engine HONDA INSIGHT 2002 1.G Repair Manual
[x] Cancel search | Manufacturer: HONDA, Model Year: 2002, Model line: INSIGHT, Model: HONDA INSIGHT 2002 1.GPages: 270, PDF Size: 3.62 MB
Page 177 of 270
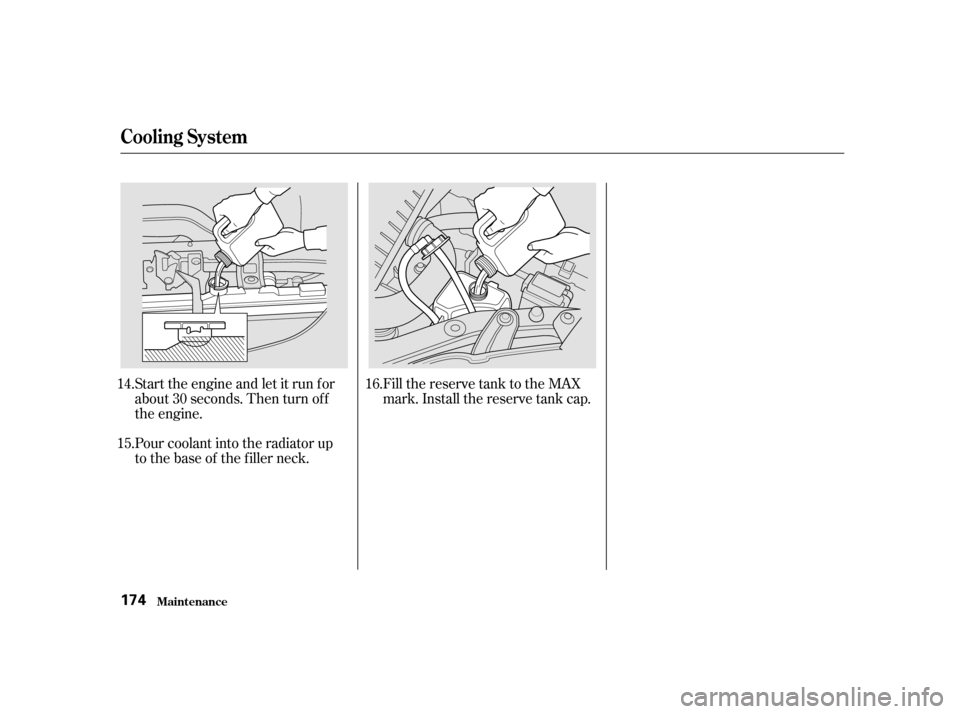
Fill the reserve tank to the MAX
mark. Install the reserve tank cap.
Start the engine and let it run f or
about 30 seconds. Then turn of f
the engine.
Pour coolant into the radiator up
to the base of the f iller neck.
14.
15.
16.
Cooling Syst em
Maint enance174
Page 178 of 270
Check the level in the windshield
washer reservoir at least monthly
during normal usage. In bad weather,
when you use the washers of ten,
check the level every time you stop
f or f uel. This reservoir supplies the
windshield and rear window washers.Fill the reservoir with a good-quality
windshield washer f luid. This
increases the cleaning capability and
prevents f reezing in cold weather.
When you ref ill the reservoir, clean
the edges of the windshield wiper
blades with windshield washer fluid
on a clean cloth. This will help to
condition the blade edges.
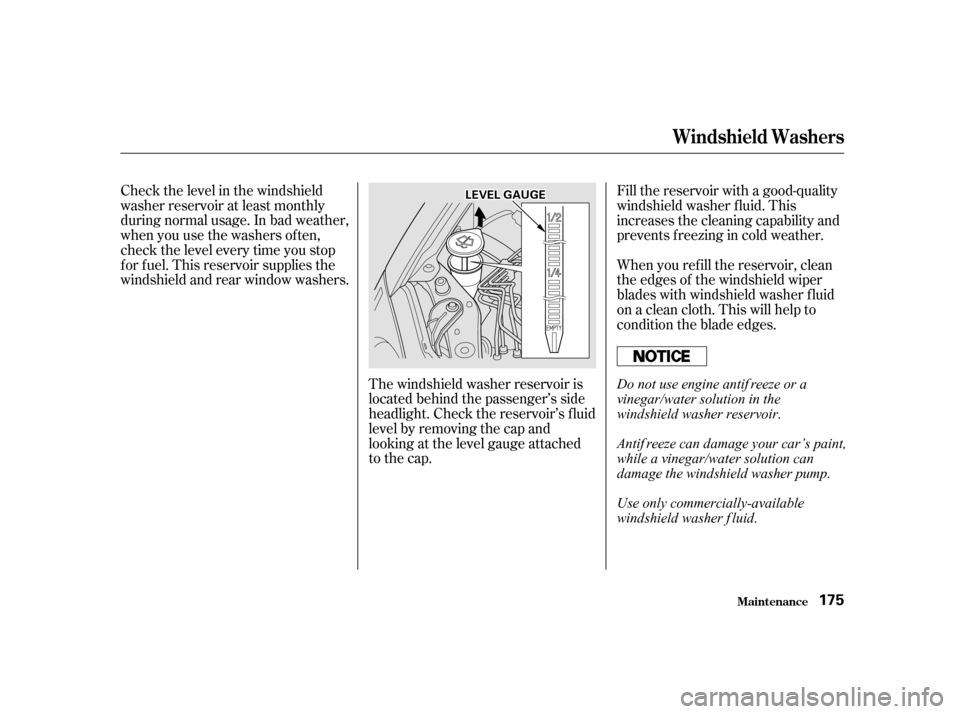
The windshield washer reservoir is
located behind the passenger’s side
headlight. Check the reservoir’s f luid
level by removing the cap and
looking at the level gauge attached
to the cap.
Windshield Washers
Maint enance175
L LE E V
V E
EL
L G
GAAU
UG GEE
Do not use engine antif reeze or a
vinegar/water solution in the
windshield washer reservoir.
Antif reeze can damage your car’s paint,
while a vinegar/water solution can
damage the windshield washer pump.
Use only commercially-available
windshield washer f luid.
Page 179 of 270
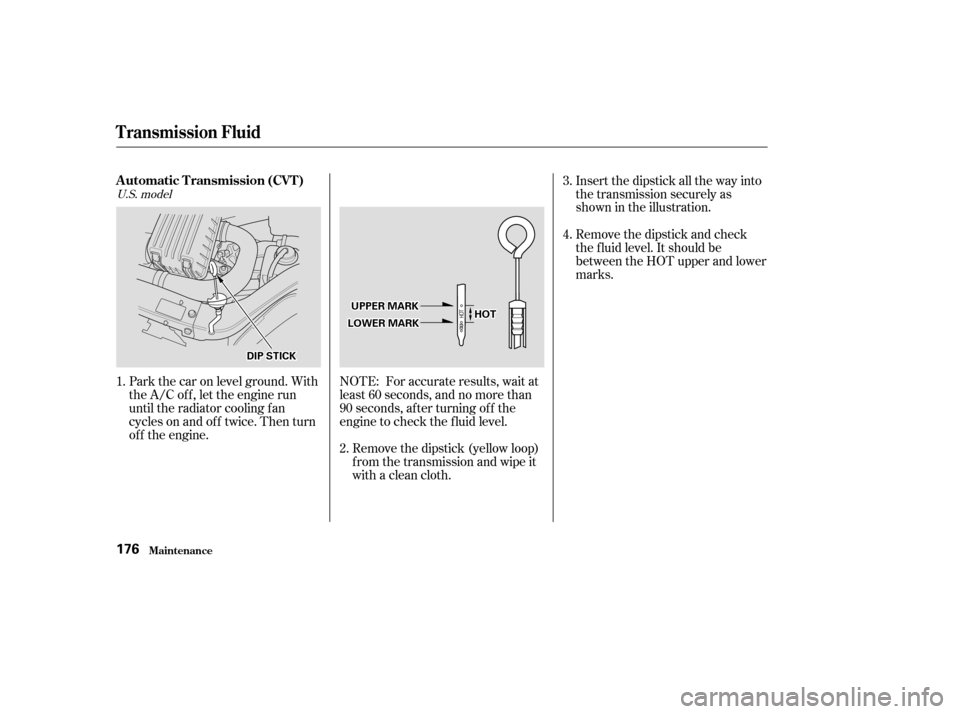
Park the car on level ground. With
the A/C of f , let the engine run
until the radiator cooling f an
cycles on and of f twice. Then turn
of f the engine.Insert the dipstick all the way into
the transmission securely as
shown in the illustration.
Remove the dipstick (yellow loop)
f rom the transmission and wipe it
with a clean cloth.
NOTE: For accurate results, wait at
least 60 seconds, and no more than
90 seconds, af ter turning of f the
engine to check the f luid level. Remove the dipstick and check
the f luid level. It should be
between the HOT upper and lower
marks.
1. 2.3.
4.
U.S. model
Maint enance
T ransmission Fluid
Automatic Transmission (CVT)
176
U UP
PP
PE
ER
R M
M A
AR
RKK
L
LO OW WE ER
R M
M A
AR
RKK
D
D I
IPP S
STTI
ICCK K H
H
O
OT T
Page 181 of 270
If Honda MTF is not available, you
may use an API service SG, SH or SJ
grade motor oil with a viscosity of
SAE 10W-30 or 10W-40 as a
temporary replacement. An SG
grade is pref erred, but an SH or SJ
grade may be used if SG is not
available. However, motor oil does
not contain the proper additives and
continued use can cause stif f er
shif ting. Replace as soon as it is
convenient.
The transmission should be drained
and ref illed with new f luid according
to the time and distance recommen-
dations in the maintenance schedule.
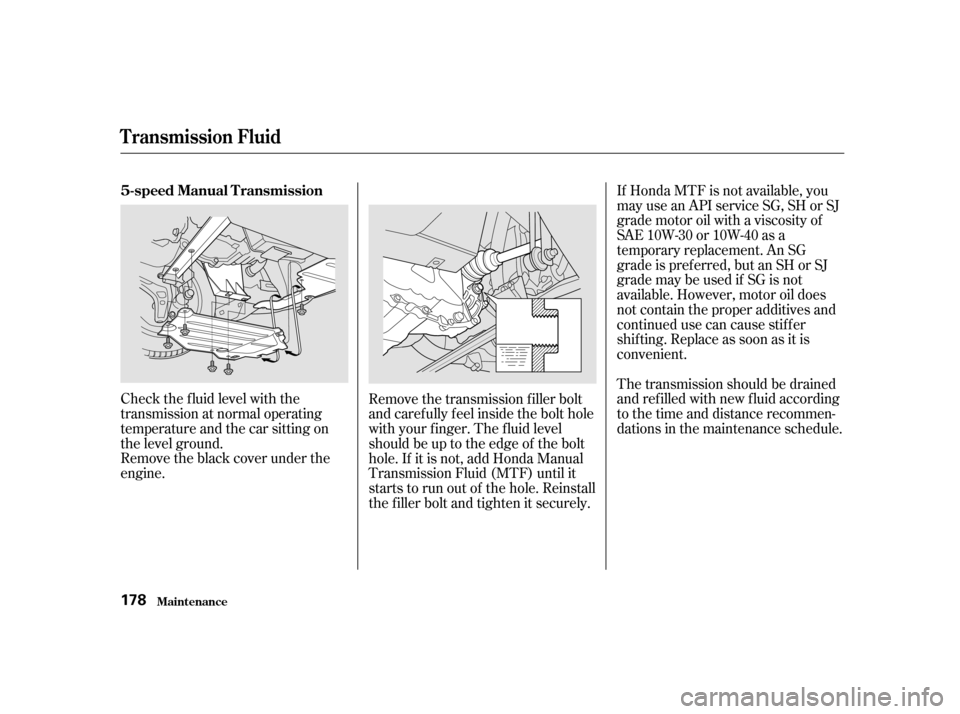
Check the f luid level with the
transmission at normal operating
temperature and the car sitting on
the level ground.
Remove the black cover under the
engine. Remove the transmission f iller bolt
and caref ully f eel inside the bolt hole
with your f inger. The f luid level
should be up to the edge of the bolt
hole. If it is not, add Honda Manual
Transmission Fluid (MTF) until it
starts to run out of the hole. Reinstall
the f iller bolt and tighten it securely.
Maint enance
T ransmission Fluid
5-speed Manual Transmission
178
Page 184 of 270
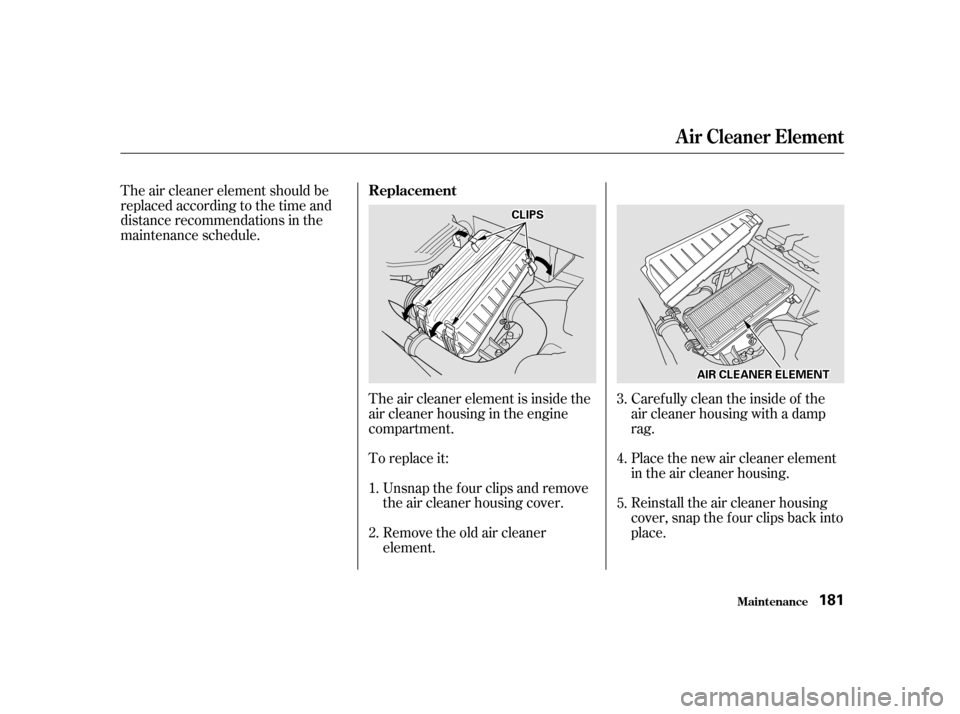
The air cleaner element should be
replaced according to the time and
distance recommendations in the
maintenance schedule.Remove the old air cleaner
element. Unsnap the four clips and remove
the air cleaner housing cover.
To replace it: The air cleaner element is inside the
air cleaner housing in the engine
compartment.
Caref ully clean the inside of the
air cleaner housing with a damp
rag.
Reinstall the air cleaner housing
cover, snap the four clips back into
place. Place the new air cleaner element
in the air cleaner housing.
1. 3.
2. 4.
5.
Replacement
A ir Cleaner Element
Maint enance181
C CL
LIIPP S
S
A
AI
IRR C
CLLEE A
A N
NE ER
R E
EL
LEE M
M E
EN
NT T
Page 191 of 270
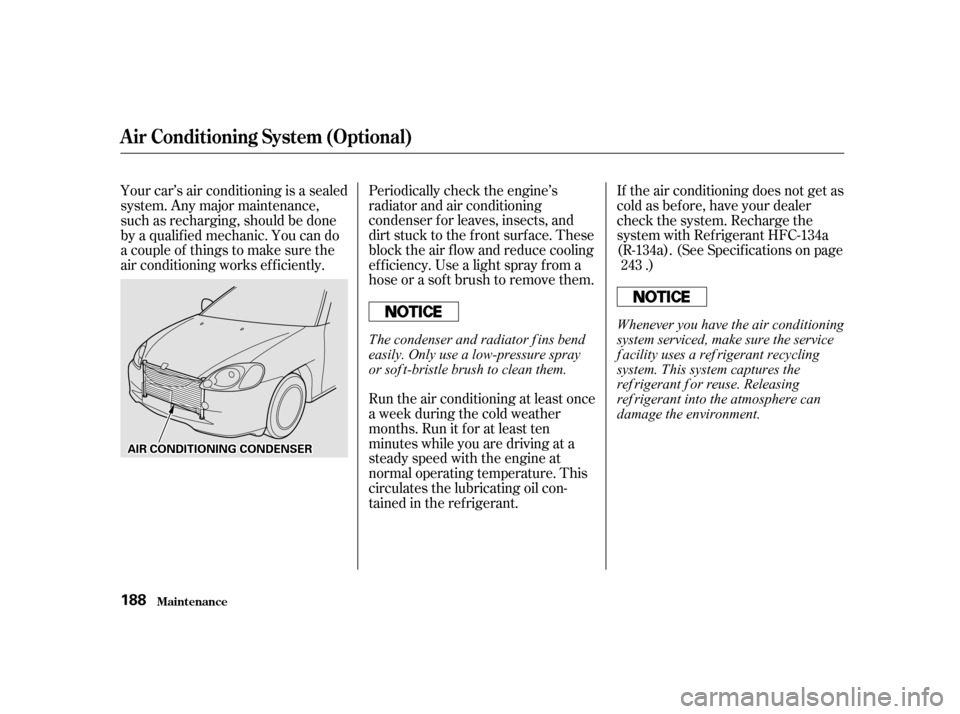
Periodically check the engine’s
radiator and air conditioning
condenser f or leaves, insects, and
dirt stuck to the f ront surf ace. These
block the air f low and reduce cooling
ef f iciency. Use a light spray f rom a
hose or a sof t brush to remove them.If the air conditioning does not get as
cold as before, have your dealer
check the system. Recharge the
system with Ref rigerant HFC-134a
(R-134a). (See Specif ications on page
.)
Run the air conditioning at least once
a week during the cold weather
months. Run it f or at least ten
minutes while you are driving at a
steady speed with the engine at
normal operating temperature. This
circulates the lubricating oil con-
tained in the ref rigerant.
Your car’s air conditioning is a sealed
system. Any major maintenance,
such as recharging, should be done
by a qualif ied mechanic. You can do
a couple of things to make sure the
air conditioning works ef f iciently.
243
Maint enance
Air Conditioning System (Optional)
188
A AI
IRR C
COON NDDI
ITT I
IOON NIINNG G C
COON NDDE
EN
NS SEER
R
Whenever you have the air conditioning
system serviced, make sure the service
f acility uses a ref rigerant recycling
system. This system captures the
ref rigerant f or reuse. Releasing
ref rigerant into the atmosphere can
damage the environment.
The condenser and radiator f ins bend
easily. Only use a low-pressure spray
or sof t-bristle brush to clean them.
Page 201 of 270
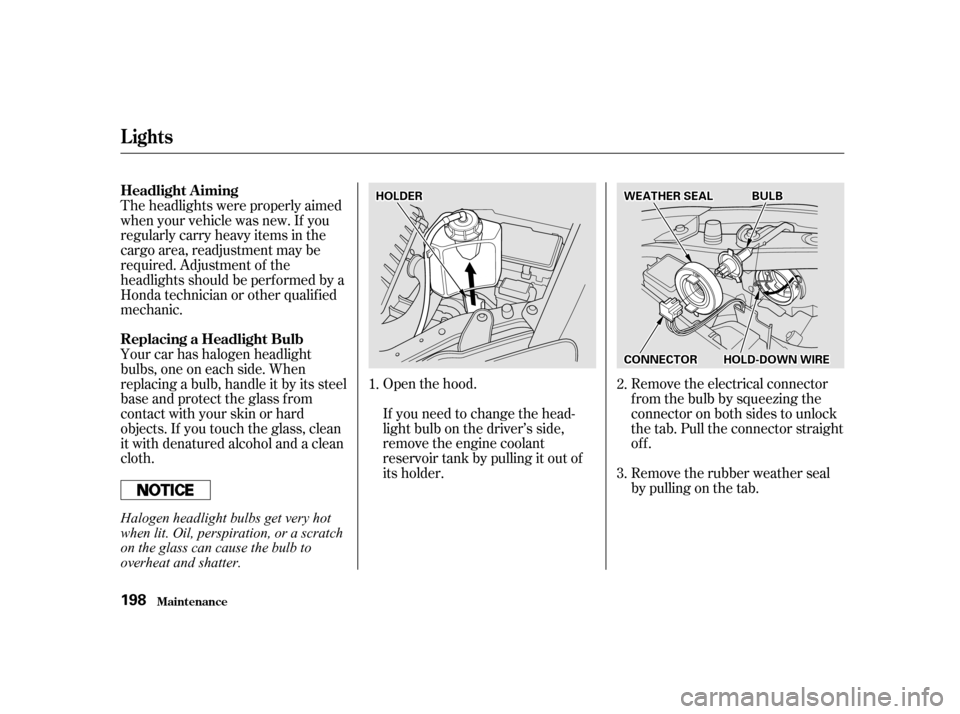
Open the hood.Remove the electrical connector
f rom the bulb by squeezing the
connector on both sides to unlock
the tab. Pull the connector straight
off.
Remove the rubber weather seal
by pulling on the tab.
If you need to change the head-
light bulb on the driver’s side,
remove the engine coolant
reservoir tank by pulling it out of
its holder.
Your car has halogen headlight
bulbs, one on each side. When
replacing a bulb, handle it by its steel
base and protect the glass from
contactwithyourskinorhard
objects. If you touch the glass, clean
it with denatured alcohol and a clean
cloth. Theheadlightswereproperlyaimed
when your vehicle was new. If you
regularly carry heavy items in the
cargo area, readjustment may be
required. Adjustment of the
headlights should be perf ormed by a
Honda technician or other qualif ied
mechanic.
1.2.
3.
Lights
Maint enance
Headlight A iming
Replacing a Headlight Bulb
198
H HO
OL LDD E
ER
R W
WEEA
A T
TH
H E
ER
R S
SEEA
A L
L B
BUUL LBB
C
CO ON NNNEEC
CT TO
OR R H
HO
OL LDD -
-D
D O
OW WN N W
WIIRRE E
Halogen headlight bulbs get very hot
when lit. Oil, perspiration, or a scratch
on the glass can cause the bulb to
overheat and shatter.
Page 202 of 270
CONT INUED
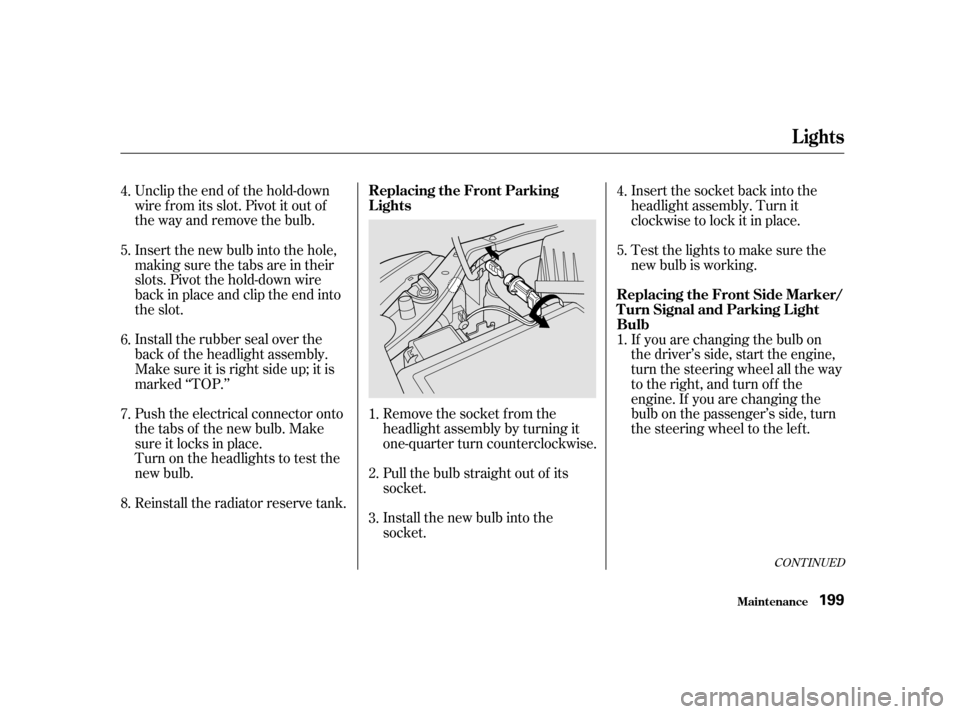
Unclip the end of the hold-down
wire f rom its slot. Pivot it out of
the way and remove the bulb.
Insert the new bulb into the hole,
making sure the tabs are in their
slots. Pivot the hold-down wire
back in place and clip the end into
the slot.
Install the rubber seal over the
back of the headlight assembly.
Make sure it is right side up; it is
marked ‘‘TOP.’’
Push the electrical connector onto
the tabs of the new bulb. Make
sure it locks in place.
Turn on the headlights to test the
new bulb.
Reinstall the radiator reserve tank.Remove the socket from the
headlight assembly by turning it
one-quarter turn counterclockwise.
Pull the bulb straight out of its
socket.
Install the new bulb into the
socket.Insert the socket back into the
headlight assembly. Turn it
clockwise to lock it in place.
Testthelightstomakesurethe
new bulb is working.
If you are changing the bulb on
the driver’s side, start the engine,
turn the steering wheel all the way
to the right, and turn off the
engine. If you are changing the
bulb on the passenger’s side, turn
the steering wheel to the left.
4.
5.
6.
7.
8.
1.
1.
2.
3. 4.
5.
Lights
Maint enance
Replacing the Front Parking
Lights
Replacing the Front Side Marker/
Turn Signal and Parking L ight
Bulb
199
Page 207 of 270

Block the rear wheels.
Fill the f uel tank.
Change the engine oil and f ilter
(see page ).
Wash and dry the exterior
completely.
Cleantheinterior.Makesurethe
carpeting, floor mats, etc. are
completely dry.
If you need to park your car f or an
extended period (more than one
month), there are several things you
should do to prepare it f or storage.
Proper preparation helps prevent
deterioration and makes it easier to
get your car back on the road. If
possible, store your car indoors.
If the car is to be stored for a
longer period, it should be
supported on jackstands so the
tires are of f the ground.
Leave one window open slightly (if
the car is being stored indoors).Coverthecarwitha‘‘breathable’’
cover, one made f rom a porous
material such as cotton.
Nonporous materials, such as
plastic sheeting, trap moisture,
which can damage the paint.
Disconnect the battery.
Support the f ront and rear wiper
blade arms with a f olded towel or
ragsotheydonottouchthe
windshield.
To minimize sticking, apply a
silicone spray lubricant to all door
and hatch seals. Also, apply a body
wax to the painted surf aces that
mate with the door and hatch seals. Drive your car every month f or
about 30 minutes. This will keep
the IMA battery charged and in
good condition.
If you store your car f or 12 months
or longer, have your Honda dealer
perf orm the inspections called f or in
the 24 months/30,000 miles (48,000
km) maintenance schedule (Normal
Conditions) as soon as you take it
out of storage (see page ). The
replacements called f or in the
maintenance schedule are not
needed unless the car has actually
reached that time or mileage.
Leave the parking brake off. Put
the transmission in Reverse (5-
speed manual) or Park (CVT). 167
156
Maint enance
St oring Your Car
204
Page 216 of 270

This section covers the more-
common problems that motorists
experience with their vehicles. It
gives you inf ormation about how to
safely evaluate the problem and what
to do to correct it. If the problem has
stranded you on the side of the road,
you may be able to get going again.
If not, you will also f ind instructions
on getting your car towed.......................
Compact Spare Tire .214
....................
Changing a Flat Tire .215
..........
If Your Engine Won’t Start . 221
Nothing Happens or the Starter Motor Operates ............................
Very Slowly .221
The Starter Operates ................................
Normally .222
................................
Jump Starting .222
............
If Your Engine Overheats . 224
.........
Low Oil Pressure Indicator . 226
..........
Charging System Indicator . 227
.......
Malf unction Indicator Lamp . 228
...............
Brake System Indicator . 230
..............................................
Fuses .231
..........
Checking and Replacing . 232
......................
Emergency Towing .237
Taking Care of the Unexpected
T aking Care of t he Unexpect ed213