HONDA INSIGHT 2021 Owner's Manual (in English)
Manufacturer: HONDA, Model Year: 2021, Model line: INSIGHT, Model: HONDA INSIGHT 2021Pages: 687, PDF Size: 37.14 MB
Page 651 of 687
649
uuIndicator, Coming On/BlinkinguIf the Low Tire Pressure/TPMS Indicator Comes On or Blinks
Handling the Unexpected
If the Low Tire Pressure/TPMS Indicator Comes On or
Blinks
■Reasons for the indicator to come on or blink
A tire pressure is signif icantly low, or the TPMS has not been calibrated.
If there is a problem with the TPMS, the indicator blinks for about one
minute, and then stays on.
If the compact spare tire
* is installed, the indicator will either come on or
it will first blink for about one minute, then stay on.
■What to do when th e indicator comes on
Drive carefully and avoid abrupt cornering and hard braking.
Stop your vehicle in a safe place. Ch eck the tire pressure and adjust the
pressure to the specified level. The spec ified tire pressure is on a label on
the driver side doorjamb. u Calibrate the TPMS after the tire pressure is adjusted.
2 TPMS Calibration P. 478
If the compact spare tire* causes the indicator to come on, change the
tire to a full-size tire. The indicato r goes off after calibrating the TPMS.
■What to do when the indicator blinks, then remains on
Have the tire inspected by a dealer as soon as possible. If the compact
spare tire
* causes the indicator to first b link, and then stay on, change
the tire to a full-size tire. The indi cator goes off after calibrating the
TPMS.
1 If the Low Tire Pressure/TPMS Indicator Comes On or Blinks
NOTICE
Driving on an extremely unde rinflated tire can cause
it to overheat. An overheated tire can fail. Always
inflate your tires to the prescribed level.
* Not available on all models
21 INSIGHT-31TXM6200.book 649 ページ 2020年2月5日 水曜日 午前10時0分
Page 652 of 687
650
uuIndicator, Coming On/Blinking uIf the Transmission System Indicator Blinks along with the Warning Message
Handling the Unexpected
If the Transmission System Indicator Blinks along
with the Warning Message
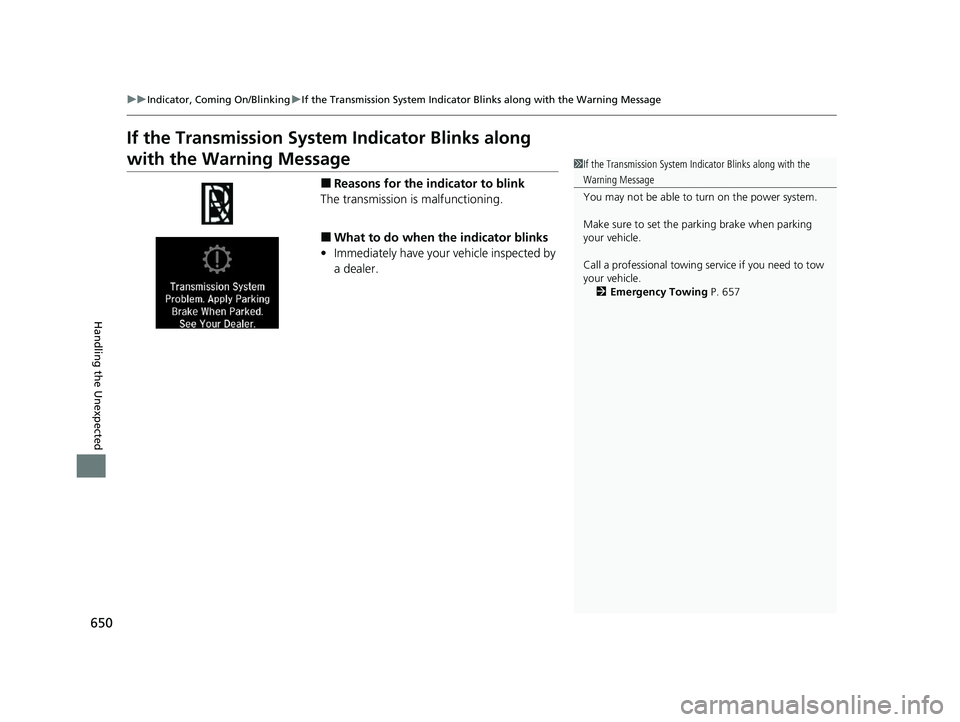
■Reasons for the in dicator to blink
The transmission is malfunctioning.
■What to do when the indicator blinks
• Immediately have your vehicle inspected by
a dealer.
1If the Transmission System In dicator Blinks along with the
Warning Message
You may not be able to turn on the power system.
Make sure to set the parking brake when parking
your vehicle.
Call a professional towing service if you need to tow
your vehicle. 2 Emergency Towing P. 657
21 INSIGHT-31TXM6200.book 650 ページ 2020年2月5日 水曜日 午前10時0分
Page 653 of 687
651Continued
Handling the Unexpected
Fuses
Fuse Locations
If any electrical devices are not working, set the power mode to VEHICLE OFF and
check to see if any applicable fuse is blown.
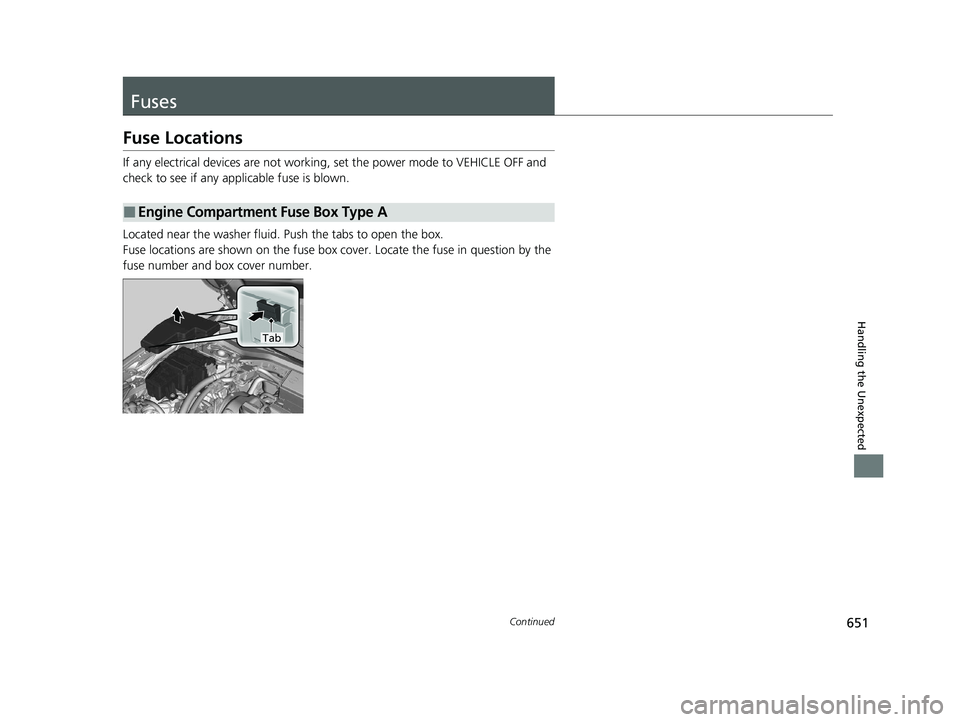
Located near the washer fluid. Push the tabs to open the box.
Fuse locations are shown on the fuse box cove r. Locate the fuse in question by the
fuse number and box cover number.
■Engine Compartment Fuse Box Type A
Tab
21 INSIGHT-31TXM6200.book 651 ページ 2020年2月5日 水曜日 午前10時0分
Page 654 of 687
652
uuFuses uFuse Locations
Handling the Unexpected
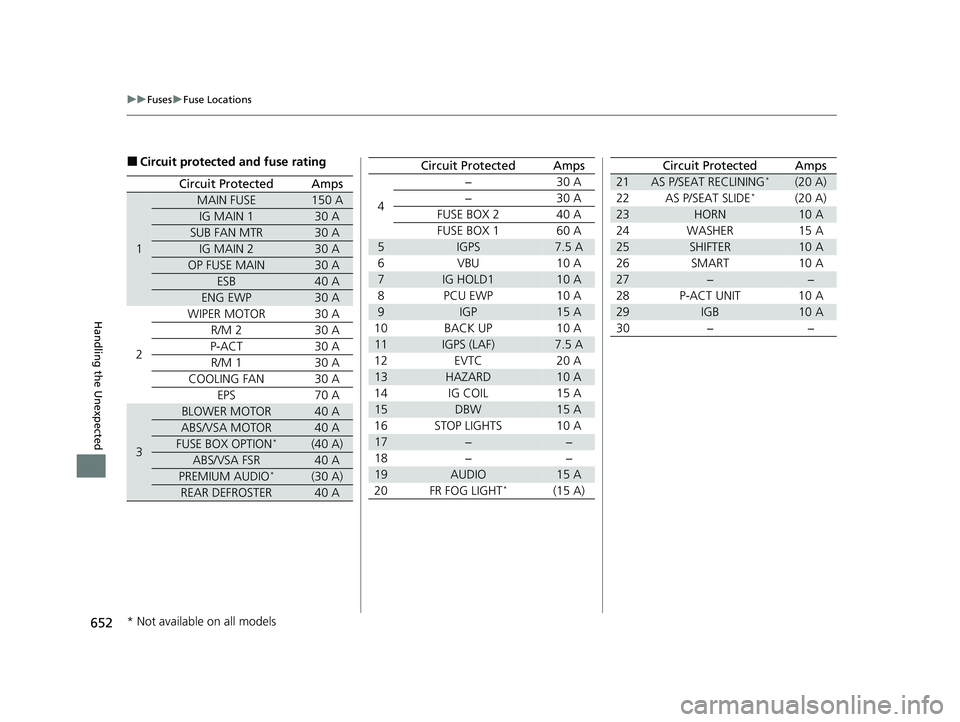
■Circuit protected and fuse rating
Circuit ProtectedAmps
1
MAIN FUSE150 A
IG MAIN 130 A
SUB FAN MTR30 A
IG MAIN 230 A
OP FUSE MAIN30 A
ESB40 A
ENG EWP30 A
2
WIPER MOTOR30 A
R/M 230 A
P-ACT 30 A R/M 1 30 A
COOLING FAN 30 A EPS 70 A
3
BLOWER MOTOR40 A
ABS/VSA MOTOR40 A
FUSE BOX OPTION*(40 A)
ABS/VSA FSR40 A
PREMIUM AUDIO*(30 A)
REAR DEFROSTER40 A
4−30 A
−30 A
FUSE BOX 2 40 A
FUSE BOX 1 60 A
5IGPS7.5 A
6VBU 10 A
7IG HOLD110 A
8 PCU EWP 10 A
9IGP15 A
10 BACK UP 10 A
11IGPS (LAF)7.5 A
12 EVTC 20 A
13HAZARD10 A
14 IG COIL 15 A
15DBW15 A
16 STOP LIGHTS 10 A
17−−
18 − −
19AUDIO15 A
20 FR FOG LIGHT*(15 A)
Circuit ProtectedAmps
21AS P/SEAT RECLINING*(20 A)
22 AS P/SEAT SLIDE*(20 A)
23HORN10 A
24 WASHER 15 A
25SHIFTER10 A
26 SMART 10 A
27−−
28 P-ACT UNIT 10 A
29IGB10 A
30 − −
Circuit ProtectedAmps
* Not available on all models
21 INSIGHT-31TXM6200.book 652 ページ 2020年2月5日 水曜日 午前10時0分
Page 655 of 687
653
uuFuses uFuse Locations
Continued
Handling the Unexpected
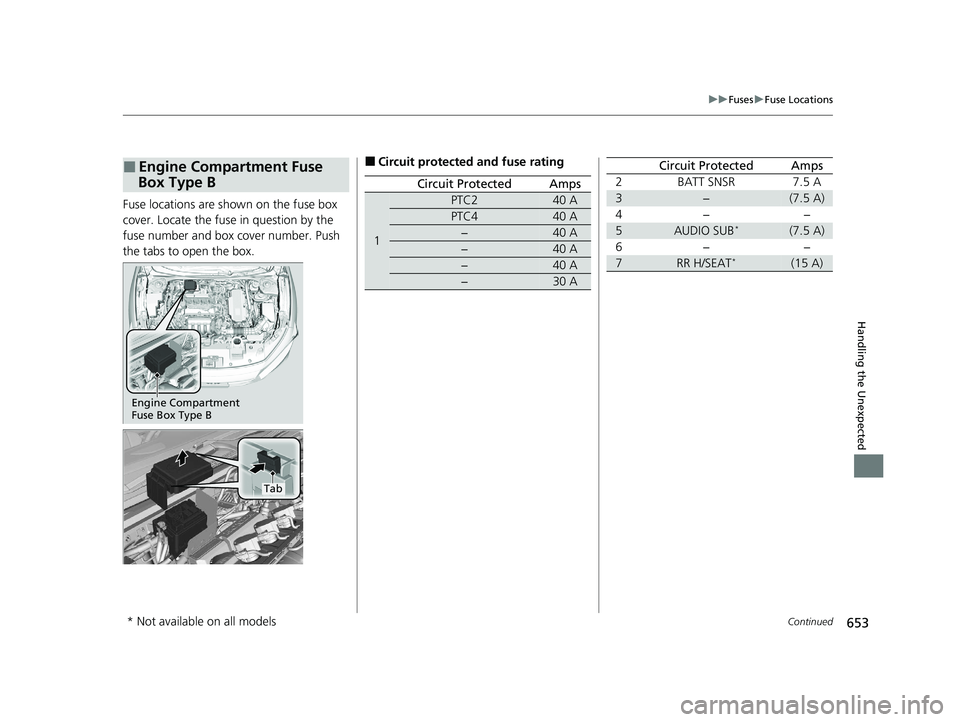
Fuse locations are shown on the fuse box
cover. Locate the fuse in question by the
fuse number and box cover number. Push
the tabs to open the box.
■Engine Compartment Fuse
Box Type B
Engine Compartment
Fuse Box Type B
Tab
■Circuit protected and fuse rating
Circuit ProtectedAmps
1
PTC240 A
PTC440 A
−40 A
−40 A
−40 A
−30 A
2 BATT SNSR 7.5 A
3−(7.5 A)
4− −
5AUDIO SUB*(7.5 A)
6− −
7RR H/SEAT*(15 A)
Circuit ProtectedAmps
* Not available on all models
21 INSIGHT-31TXM6200.book 653 ページ 2020年2月5日 水曜日 午前10時0分
Page 656 of 687
654
uuFuses uFuse Locations
Handling the Unexpected
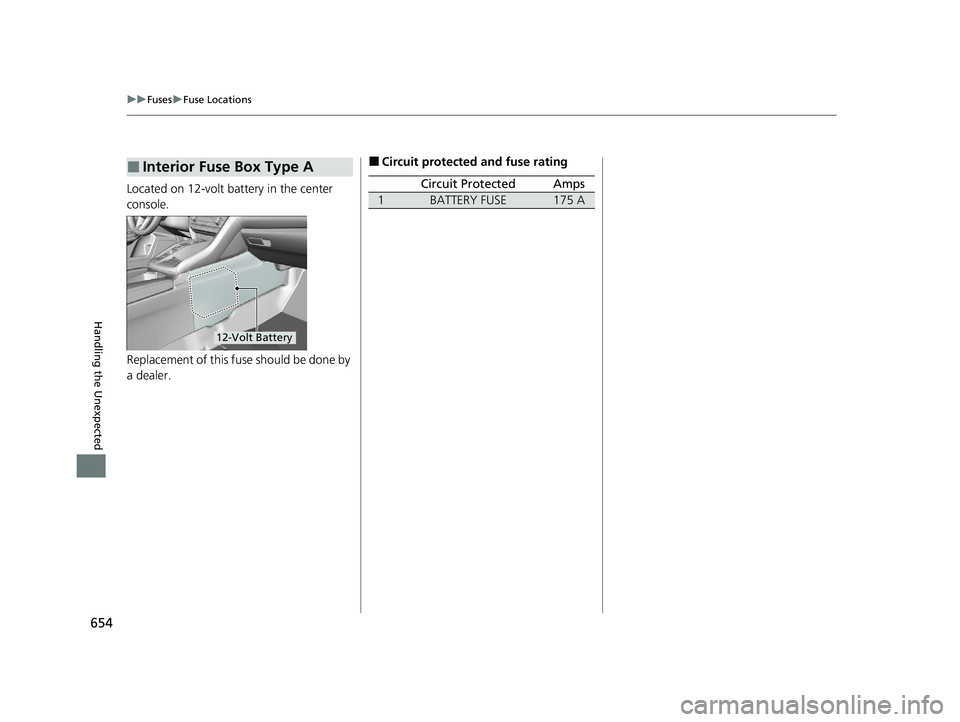
Located on 12-volt battery in the center
console.
Replacement of this fuse should be done by
a dealer.
■Interior Fuse Box Type A
12-Volt Battery
■Circuit protected and fuse rating
Circuit ProtectedAmps
1BATTERY FUSE175 A
21 INSIGHT-31TXM6200.book 654 ページ 2020年2月5日 水曜日 午前10時0分
Page 657 of 687
655
uuFuses uFuse Locations
Handling the Unexpected
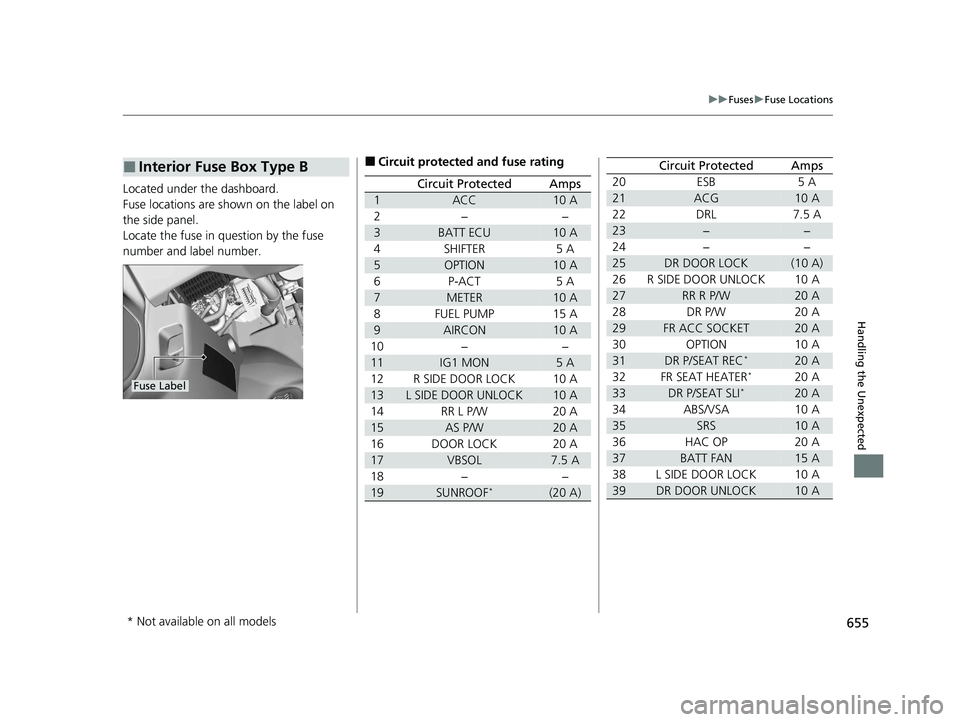
Located under the dashboard.
Fuse locations are shown on the label on
the side panel.
Locate the fuse in question by the fuse
number and label number.
■Interior Fuse Box Type B
Fuse Label
■Circuit protected and fuse rating
Circuit ProtectedAmps
1ACC10 A
2−−
3BATT ECU10 A
4SHIFTER5 A
5OPTION10 A
6P-ACT5 A
7METER10 A
8FUEL PUMP15 A
9AIRCON10 A
10−−
11IG1 MON5 A
12R SIDE DOOR LOCK10 A
13L SIDE DOOR UNLOCK10 A
14RR L P/W20 A
15AS P/W20 A
16DOOR LOCK20 A
17VBSOL7.5 A
18−−
19SUNROOF*(20 A)
20ESB5 A
21ACG10 A
22DRL7.5 A
23−−
24−−
25DR DOOR LOCK(10 A)
26R SIDE DOOR UNLOCK10 A
27RR R P/W20 A
28DR P/W20 A
29FR ACC SOCKET20 A
30OPTION10 A
31DR P/SEAT REC*20 A
32FR SEAT HEATER*20 A
33DR P/SEAT SLI*20 A
34ABS/VSA10 A
35SRS10 A
36HAC OP20 A
37BATT FAN15 A
38L SIDE DOOR LOCK10 A
39DR DOOR UNLOCK10 A
Circuit ProtectedAmps
* Not available on all models
21 INSIGHT-31TXM6200.book 655 ページ 2020年2月5日 水曜日 午前10時0分
Page 658 of 687
656
uuFuses uInspecting and Changing Fuses
Handling the Unexpected
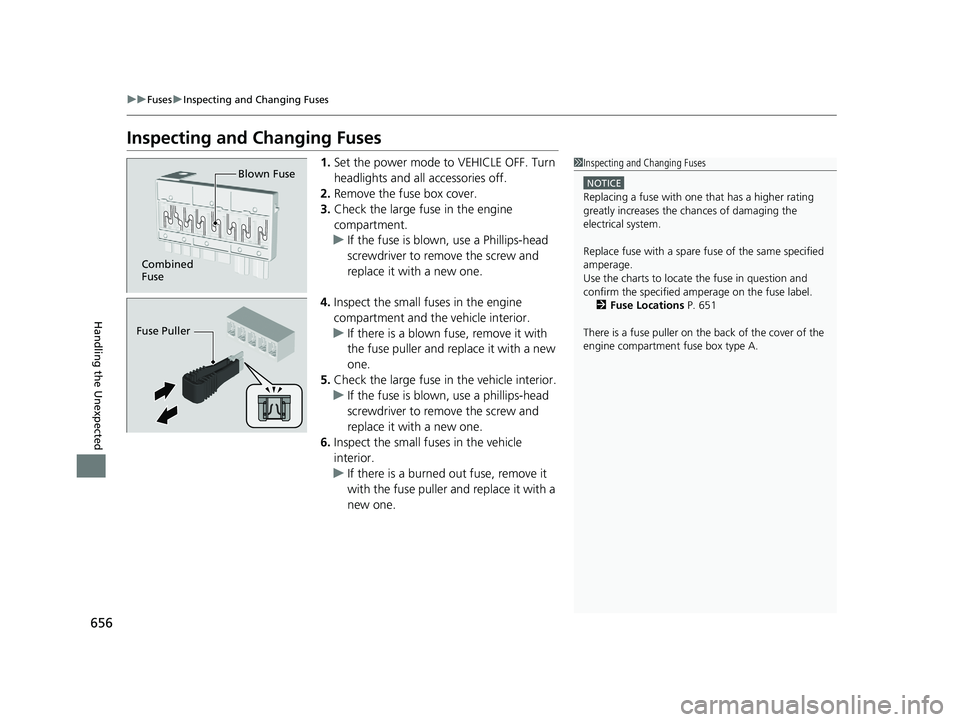
Inspecting and Changing Fuses
1. Set the power mode to VEHICLE OFF. Turn
headlights and all accessories off.
2. Remove the fuse box cover.
3. Check the large fuse in the engine
compartment.
u If the fuse is blown, use a Phillips-head
screwdriver to remo ve the screw and
replace it with a new one.
4. Inspect the small fuses in the engine
compartment and the vehicle interior.
u If there is a blown fuse, remove it with
the fuse puller and replace it with a new
one.
5. Check the large fuse in the vehicle interior.
u If the fuse is blown, use a phillips-head
screwdriver to remo ve the screw and
replace it with a new one.
6. Inspect the small fuses in the vehicle
interior.
u If there is a burned out fuse, remove it
with the fuse puller and replace it with a
new one.1Inspecting and Changing Fuses
NOTICE
Replacing a fuse with on e that has a higher rating
greatly increases the chances of damaging the
electrical system.
Replace fuse with a spare fuse of the same specified
amperage.
Use the charts to locate the fuse in question and
confirm the specified amperage on the fuse label. 2 Fuse Locations P. 651
There is a fuse puller on the back of the cover of the
engine compartment fuse box type A.
Combined
Fuse Blown Fuse
Fuse Puller
21 INSIGHT-31TXM6200.book 656 ページ 2020年2月5日 水曜日 午前10時0分
Page 659 of 687

657
Handling the Unexpected
Emergency Towing
Call a professional towing service if you need to tow your vehicle.
■Flat bed equipment
The operator loads your vehicle on the back of a truck.
This is the best way to transport your vehicle.
■Wheel lift equipment
The tow truck uses two pivoti ng arms that go under the front tires and lift them off
the ground. The rear tires remain on the ground. This is an acceptable way to
tow your vehicle.
1 Emergency Towing
NOTICE
Trying to lift or tow your vehicle by the bumpers will
cause serious damage. The bumpers are not designed
to support the vehicle’s weight.
Make sure the parking brake is released. If you
cannot release the parking brake, your vehicle must
be transported by the flat bed equipment. 2 Parking Brake P. 539
NOTICE
Improper towing such as towing behind a
motorhome or other motor vehicle can damage the
transmission.
Never tow your vehicle with just a rope or chain.
It is very dangerous since ropes or chains may shift
from side to side or break.
21 INSIGHT-31TXM6200.book 657 ページ 2020年2月5日 水曜日 午前10時0分
Page 660 of 687
658
Handling the Unexpected
When You Cannot Unlock the Fuel Fill Door
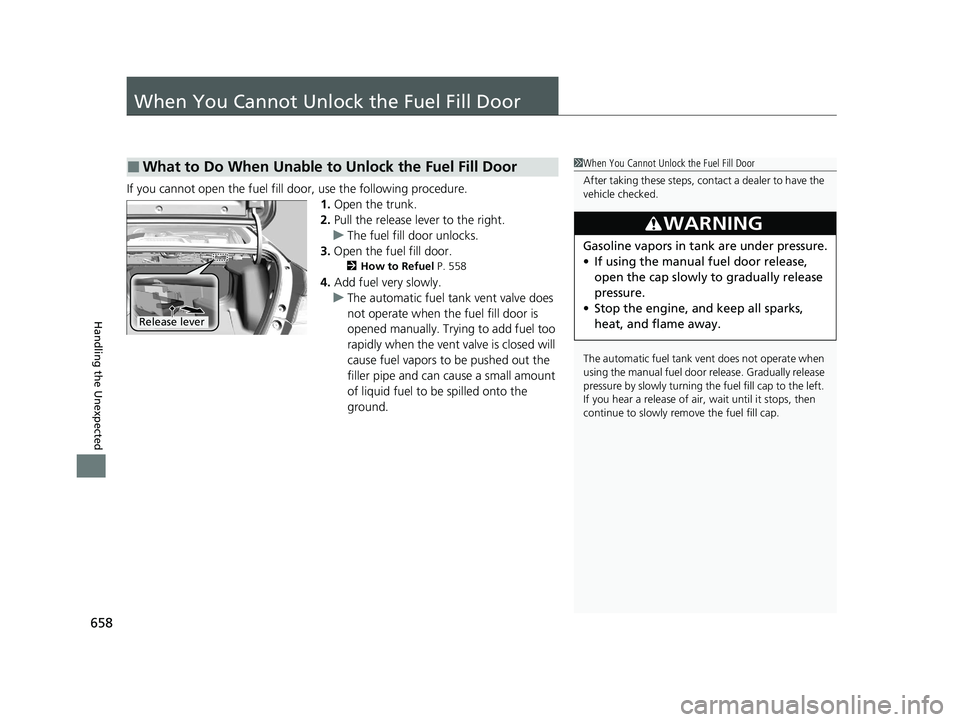
If you cannot open the fuel fill door, use the following procedure.1.Open the trunk.
2. Pull the release lever to the right.
u The fuel fill door unlocks.
3. Open the fuel fill door.
2 How to Refuel P. 558
4.Add fuel very slowly.
u The automatic fuel tank vent valve does
not operate when the fuel fill door is
opened manually. Trying to add fuel too
rapidly when the vent valve is closed will
cause fuel vapors to be pushed out the
filler pipe and can cause a small amount
of liquid fuel to be spilled onto the
ground.
■What to Do When Unable to Unlock the Fuel Fill Door1 When You Cannot Unlo ck the Fuel Fill Door
After taking these steps, cont act a dealer to have the
vehicle checked.
The automatic fuel tank ve nt does not operate when
using the manual fuel door release. Gradually release
pressure by slowly turning th e fuel fill cap to the left.
If you hear a release of air, wait until it stops, then
continue to slowly remove the fuel fill cap.
3WARNING
Gasoline vapors in tank are under pressure.
• If using the manual fuel door release,
open the cap slowly to gradually release
pressure.
• Stop the engine, and keep all sparks,
heat, and flame away.
Release lever
21 INSIGHT-31TXM6200.book 658 ページ 2020年2月5日 水曜日 午前10時0分