reset HONDA INTEGRA 1994 4.G User Guide
[x] Cancel search | Manufacturer: HONDA, Model Year: 1994, Model line: INTEGRA, Model: HONDA INTEGRA 1994 4.GPages: 1413, PDF Size: 37.94 MB
Page 256 of 1413
PGM-FI System
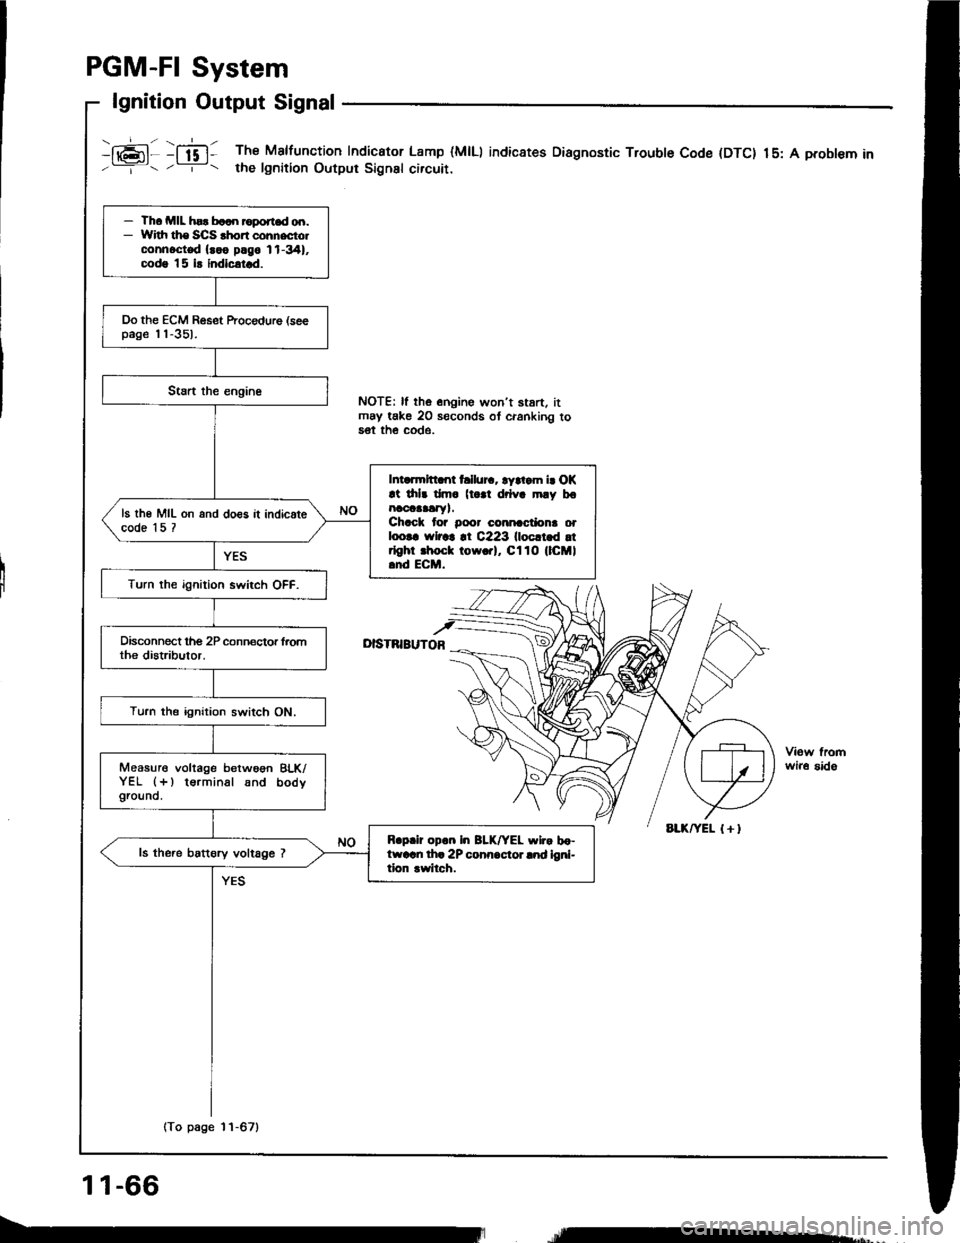
lgnition Output Signal
i16;11 :ffi1 The Malfunction Indicator Lamp (MlLl indic8tes Diagnostic Trouble Code (DTC) 15: A probl€m in'--=-- . -r- t the lgnition Output Signsl circuir.
I
NOTE| ll the onoine won't stan. itmay take 20 seconds ot cranking to5€t th€ COde.
D|STNIBUTOB
wir6 sido
- Th. MIL hsr b..n roport.d od.- Widr ths SCS .hon cohnecto.connoct€d {..o plgo 11-341,codg |5 i! indicatrd.
Do the ECM Reset ftocedure (seepage 'l'l-351.
Intarmltt nt hllur.. ryltam i. OK!t drlr dm. (t |l drlva mly bonaoaaalry).Chack tor Door cmnactiona orloo|. rYlrar !t C223 llocltld !trlghr .hoct tow.rl, Cl10 (lCMl.nd ECM.
ls th€ MIL on and do€s it indicatecode 15 ?
Turn the ignition swirch OFF.
Turn the ignition switch ON.
Measure voltage betwoon BLK/YEL (+) terminal snd bodygrouno.
R.p.ir op.n In BLK/YEL wlr. bo-ftvarn th. 2P conn.cior lnd ioni-tion rwitch.
ls the.e battory voltage ?
(To page 11-67)
11-66
re*,
Page 263 of 1413
PGM-FI System
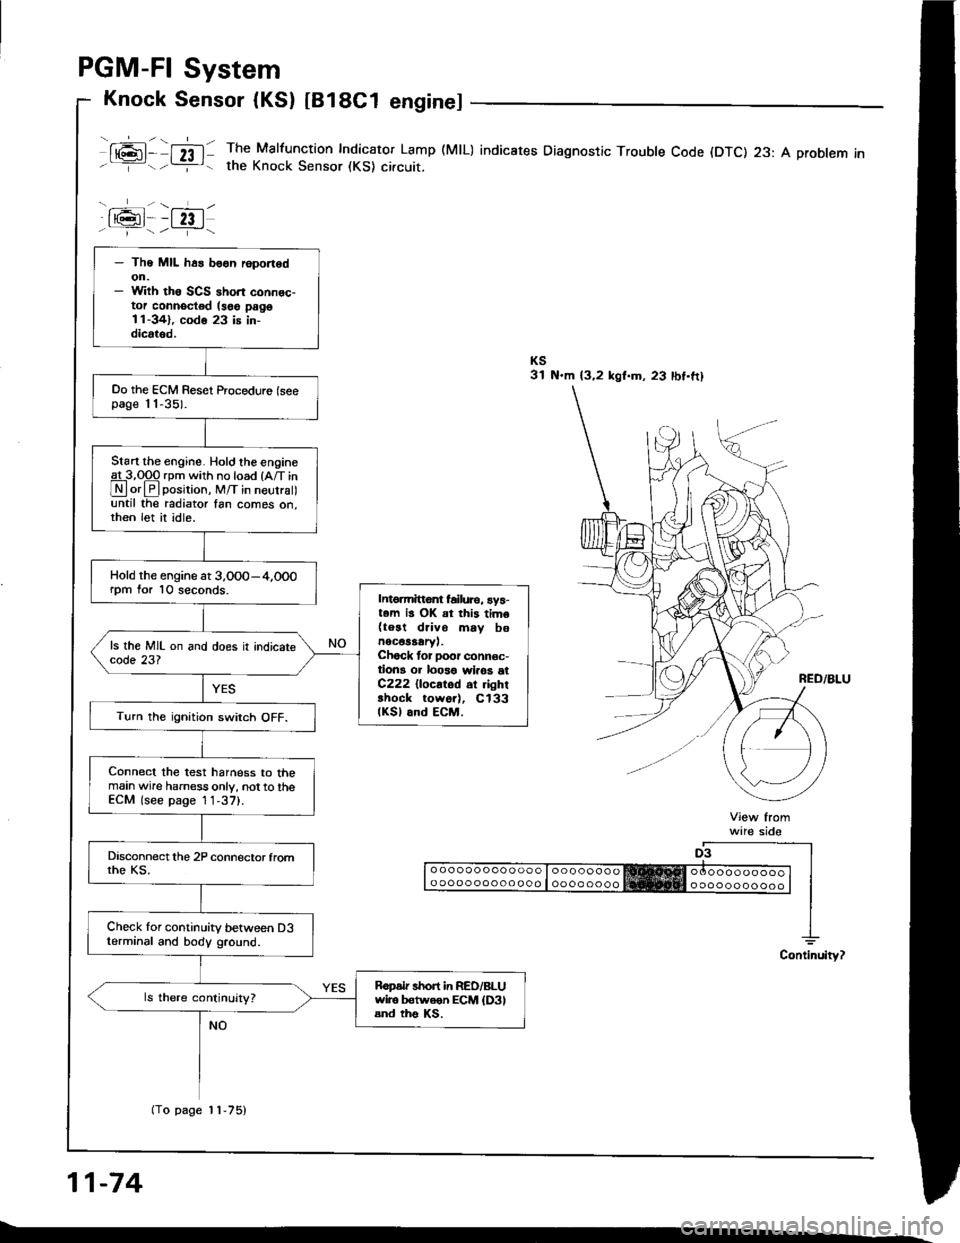
Knock Sensor (KS) tB18C1 enginel
ml- nl: The Malfunction Indicator Lamp (MlL) indicates Diagnostic Troubte Code (DTC) 23: A probtem inthe Knock Sensor (KS) circuit.
a6l--fzt.i--1/.---r+\
ware sido
o ooooo ooo ooo o looooooooo oooo ooo oo ooo I oooo oooo
11-74
- The MIL h6s boon r6port6don.- With th6 SCS ahort connec-tor connoctod (soe pago11-341, codo 23 is in-dicrtod.
Oo the ECM Reset Proceduro (seepage 11-35).
Start the engine. Hold the engineg!-3,Opq rpm with no load {A/T in
Lryl orlPlposirion, M/T in neurra until the radiator fan comes on,then let it idle.
Hold the engine at 3,0O0-4,000rpm for 10 seconds.Intomittor failure, ay5-t.m is OK at this tim6(teat drivo mav bonec€saary,.Chock tor Door connec-tion3 or loo3o wlaos etC222 {locatod 6r ghrshock tow6r), Cl33(KSl and ECM.Turn the ignition swirch OFF.
Connect the test harness to themain wire harness only, not to theECM (see page 1 1-37).
Check for continuity between D3terminal and body ground.
Ropdr short in RED/BLUwiro b€tweon ECM {D3land ths Ks.
(To page 11-75)
Page 271 of 1413
ldle Control System
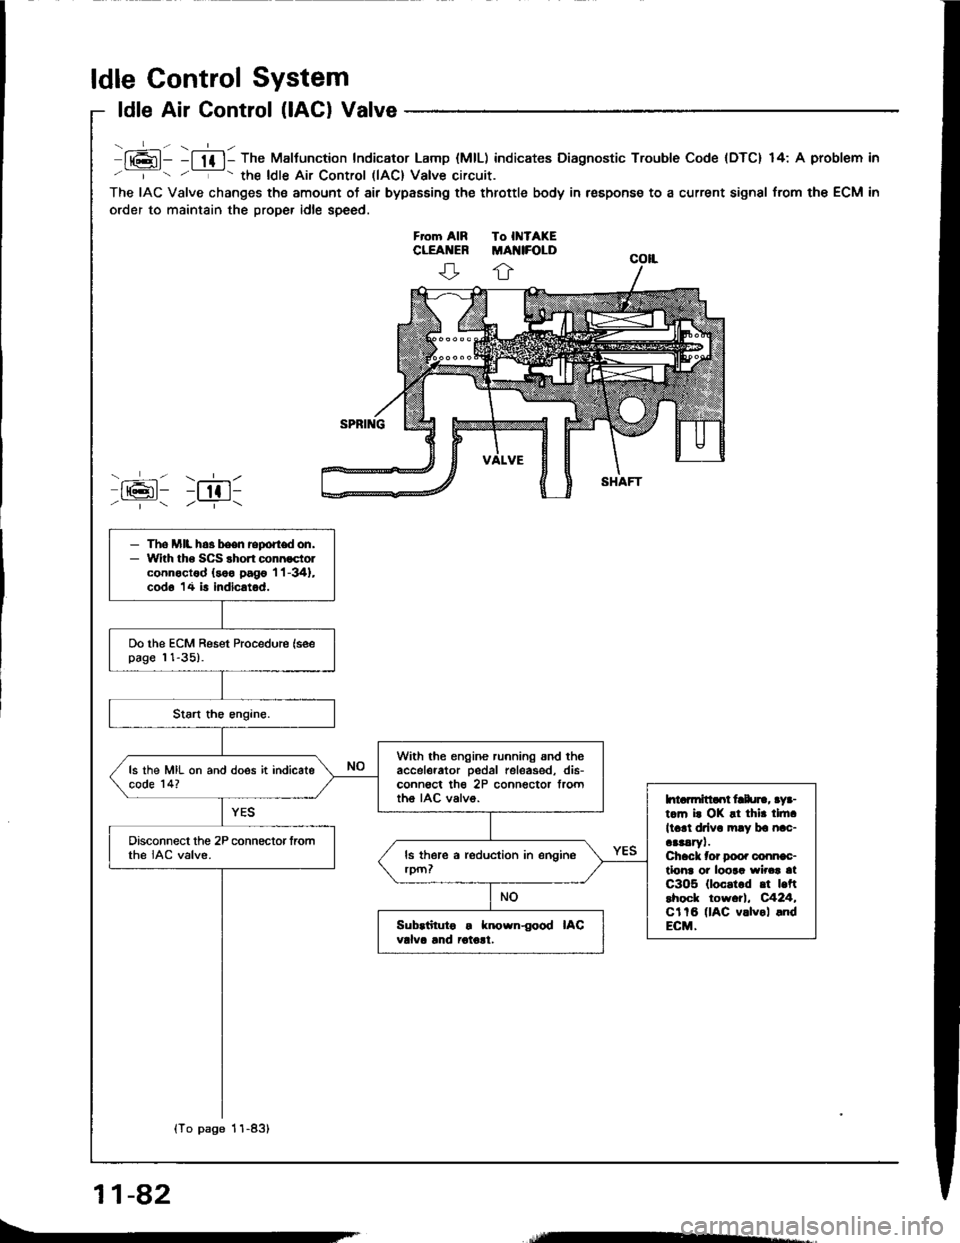
ldle Air Control (lACl Valve
lt6l- -l lf l- The Maltunction Indicator Lamp (MlL) indicates Diagnostic Trouble Code {DTC} 14: A problem in
' '- the ldle Air Control llAC) Valve circuit.
The IAC Valve changes the amount of air bypasEing the throttle body in respons€ to a current signal from the ECM in
order to maintain the proper idle speed.
ffi: r;611/ | /--T-\
- The MIL h.3 been report don,- With tho SCS shon connoctolconnoctod (soo pago 'l 'l -341,
cod6 14 is indicatod.
Do the ECM Reset Procedure (seepage 11-35).
With the engine running snd theaccelerator pedal releas€d, dis-conn€ct th€ 2P connector frorttho IAC valvo.
ls the MIL on and does it indicatecode 14?
htarmitlaot frlu]., aya-t.m i. OK !t thir tlft.
ll.rl drlv. mly ba nac-aaaaryl.Chack tor Doo. conn€c-tlonr oi loora wirca atC3O5 (loc.t.d .t |.ftlhock tow.tl, C424,Cl tB (lAC v.lvol .ndECM.
Disconnect the 2P connector fromthe IAC valve.
Sub.iituto . known{ood IACvdva lnd iotolt.
{To page 11-83}
11-82
Page 284 of 1413
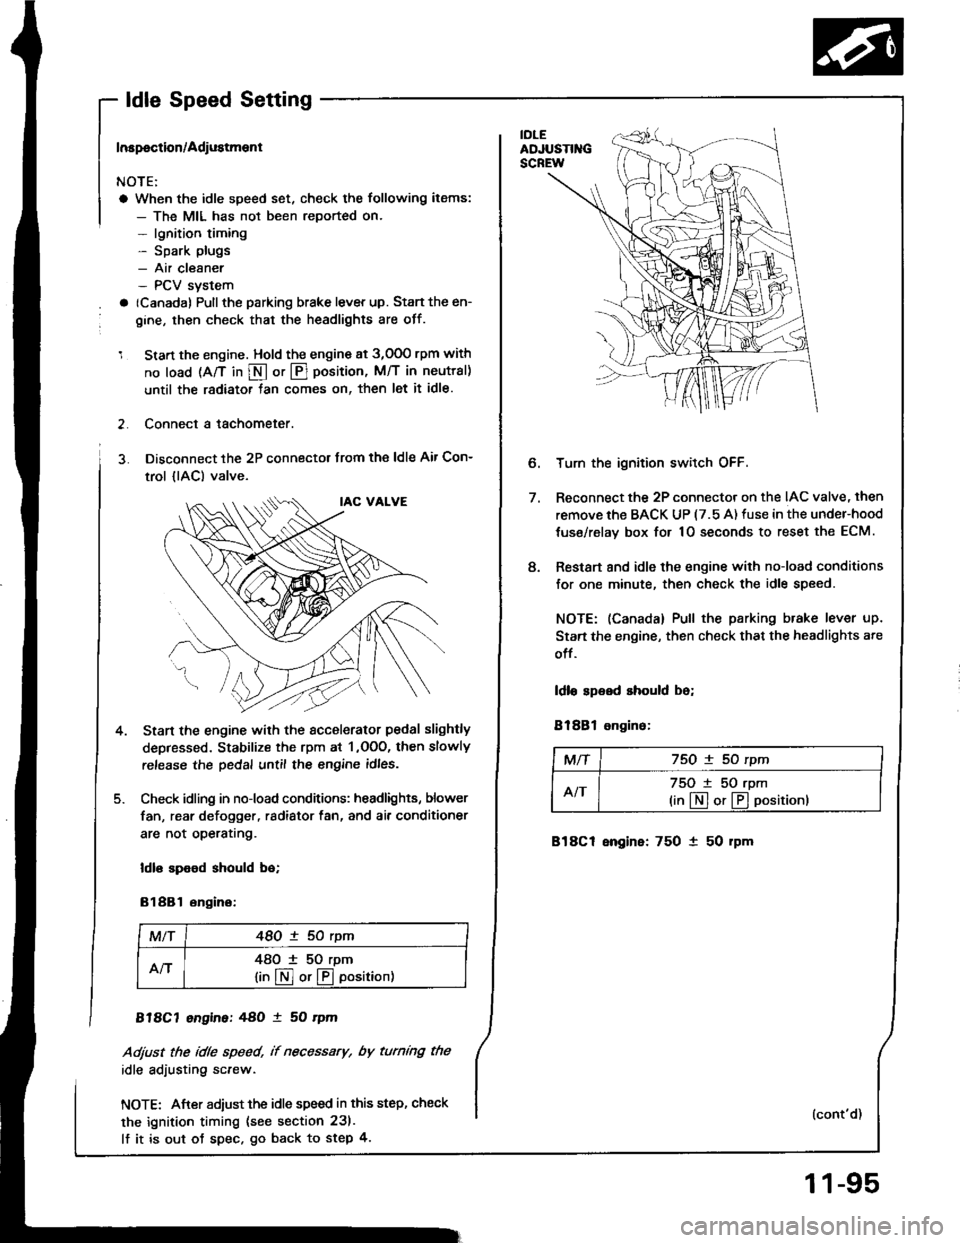
- ldle Speed Setting
Inspoction/Adiustment
NOTE:
a When the idle speed set, check the following items:
- The MIL has not been reported on.- lgnition timing- Spark plugs- Air cleaner- PCV svstem
a (Canada) Pullthe parking brake lever up. Stan the en-
gine, then check that the headlights are off.
1 Start the engine. Hold the engine at 3,000 rpm with
no load (A/T in S or @ position, M/T in neutral)
until the radiator tan comes on, then let it idle.
2. Connect a tachometer.
3. Disconnect the 2P connectot trom the ldle Air Con-
trol {lAC) valve.
Start the engine with the sccelerator pedal slightly
depressed. Stabilize the rpm at 1 ,OOO, then slowly
release the pedal until the engine idles.
Check idling in no-load conditions: headlights, blower
fan, rear defogger, radiator fan, and ai. conditioner
are not operatrng.
ldl€ spood should bo;
81881 ongino:
MlT48O ! 50 rym
An48O I 50 rpm
lin@or@oosition)
818C7 engine:48O ! 50 rym
Adjust the idle speed, if necessary, by turnmg the
idle adiusting screw.
NOTE: After adiust the idle speed in this step, check
the ignition timing (see section 231.
lf it is out ot spec. go back to step 4.
4.
e
Turn the ignition switch OFF.
Reconnect the 2P connector on the IAC valve, then
remove the BACK UP (7.5 A) fuse in the under-hood
tuse/relav box for 1O seconds to reset the ECM.
Restart 8nd idle the engine with no-load conditions
for one minute, then check the idle speed.
NOTE: (Canada) Pull the parking brake lever up.
Start the engine, then check that the headlights ate
off.
ldlo speed should be;
81881 ongino:
MTf75O ! 50 rpm
AIT75O t 50 rpm
(in[]or@positionl
818C1 engine: 750 1 50 rpm
(cont'd)
11-95
Page 309 of 1413
lntake Air System
Throttle Body
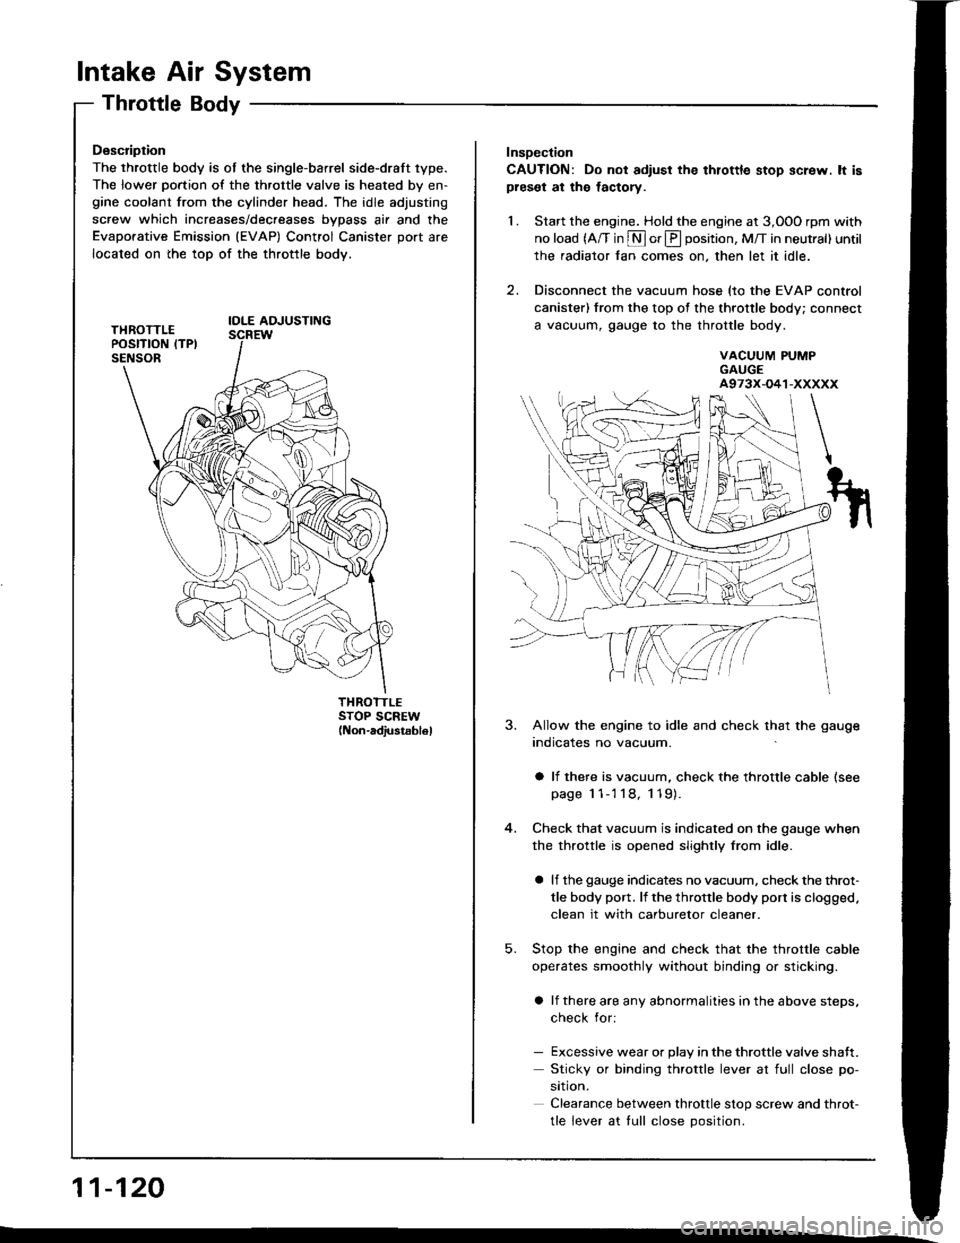
Description
The throttle body is ot the single-barrel side-draft 1ype.
The lower portion of the throttle valve is heated by en-gine coolant from the cylinder head. The idle adjusting
screw which increases/dec.eases bvDass air and the
Evaporative Emission (EVAP) Control Canister port are
located on the top of the throttle body.
IOLE AOJUSTING
THROTTLESTOP SCREW(Non-adiustsb16l
11-120
Insoection
CAUTION: Do not adiust the thlottle stop screw. lt ispreset at the lactory.
1. Start the engine. Hold the engine at 3,OOO rpm with
no load (A/T in S or E position, M/T in neutral) until
the radiator fan comes on, then let it idle.
2. Disconnect the vacuum hose (to the EVAP control
canister) from the top of the throttle body; connect
a vacuum, gauge to the throttle body.
VACUUM PUMPGAUGEA973X-O41-XXXXX
5.
3. Allow the engine to idle and check that the gauge
indicates no vacuum.
a li there is vacuum, check the throttle cable (see
page 1 1-'l 18, 119).
Check that vacuum is indicated on the gauge when
the throttle is opened slightly from idle.
a lf the gauge indicates no vacuum, check the throt-
tle body port. lf the throttle body port is clogged.
clean it with carburetor cleaner.
Stop the engine and check that the throttle cable
operates smoothly without binding or sticking.
a lf there are any abnormalities in the above steps,
check for:
- Excessive wear or Dlav in the throttle valve shaft.
Sticky or binding throttle lever at full close po-
srtron.
Clearance between throttle stop screw and throt-
tle lever at tull close Dosition.
Page 440 of 1413
![HONDA INTEGRA 1994 4.G User Guide Troubleshooting Procedures
when the TcM senses an abnormality in the input or output systems. the E]indicator light in the gaugo assembly willblink.
when the service check Connector {located under the HONDA INTEGRA 1994 4.G User Guide Troubleshooting Procedures
when the TcM senses an abnormality in the input or output systems. the E]indicator light in the gaugo assembly willblink.
when the service check Connector {located under the](/img/13/6067/w960_6067-439.png)
Troubleshooting Procedures
when the TcM senses an abnormality in the input or output systems. the E]indicator light in the gaugo assembly willblink.
when the service check Connector {located under the dash on the passenger side} is connected with the specaat toolas shown, the E] indicator light will blink the Diagnostic Trouble iode {DTCI when the ignition switch is turned on.
When the lDil indicator light has been reported on, connect the service check connector with the special tool.Then turn on the ignition switch and observe the @ indicator light.
GAUGE ASSEMSLY
)'t
DAI'A LI]TKcor{r{EcToR (3P)NOTE:Do not atlachjumpe. wire.
Sc. DTCI
So. DTC2
S.. DTC14
scs sHoRT CO[{]{ECTORoTPAZ-OOl0too
codes 1 through I are indicated by individual short blinks, codes 1o through 1 5 are indicated by a series of tong andshon blinks. one long blink equals l0 short blinks. Add the long and short blinks together to dete;mins the cod€. Aft6rdetermining the code, refer to the erectricar system symptom-to-component chart on pages 14-5o and 51.
ahon
f"l
some PGM-FI problems will also make the @ indicator light come on. After repairing the pGM-Fr system, disconnectthe BACK UP tuse (7.5 Al in the under-hood fuse/relay box tor more than 1o seconds to reset the TcM memorv.
NOTE:
a PGM-FI svstem
The PGM-FI system on this model is a sequential multipon fuel iniection svstem.' Disconnecting the BACK UP tuse also cancels the radio anti-theft code, preset stations and the clock setting. G6tthe customer's code numbe. and make note of the radio presets befote temoving the fuse so you can reset them.
14-48
Page 441 of 1413
CAUTIOI{:
a All SRS eloctdcal wiring harna$os are covcred whh
yollow lnaulation.
a Sofora disconnecting any pan ot tho SRS wirc har'
n6ss, connoct the short connoctots (s€6 pago 23-701.
a Roplacs tho entiro aff.ct d SRS ham6t. rssombly it
ii has an opon circuil or damagcd wlrlng.
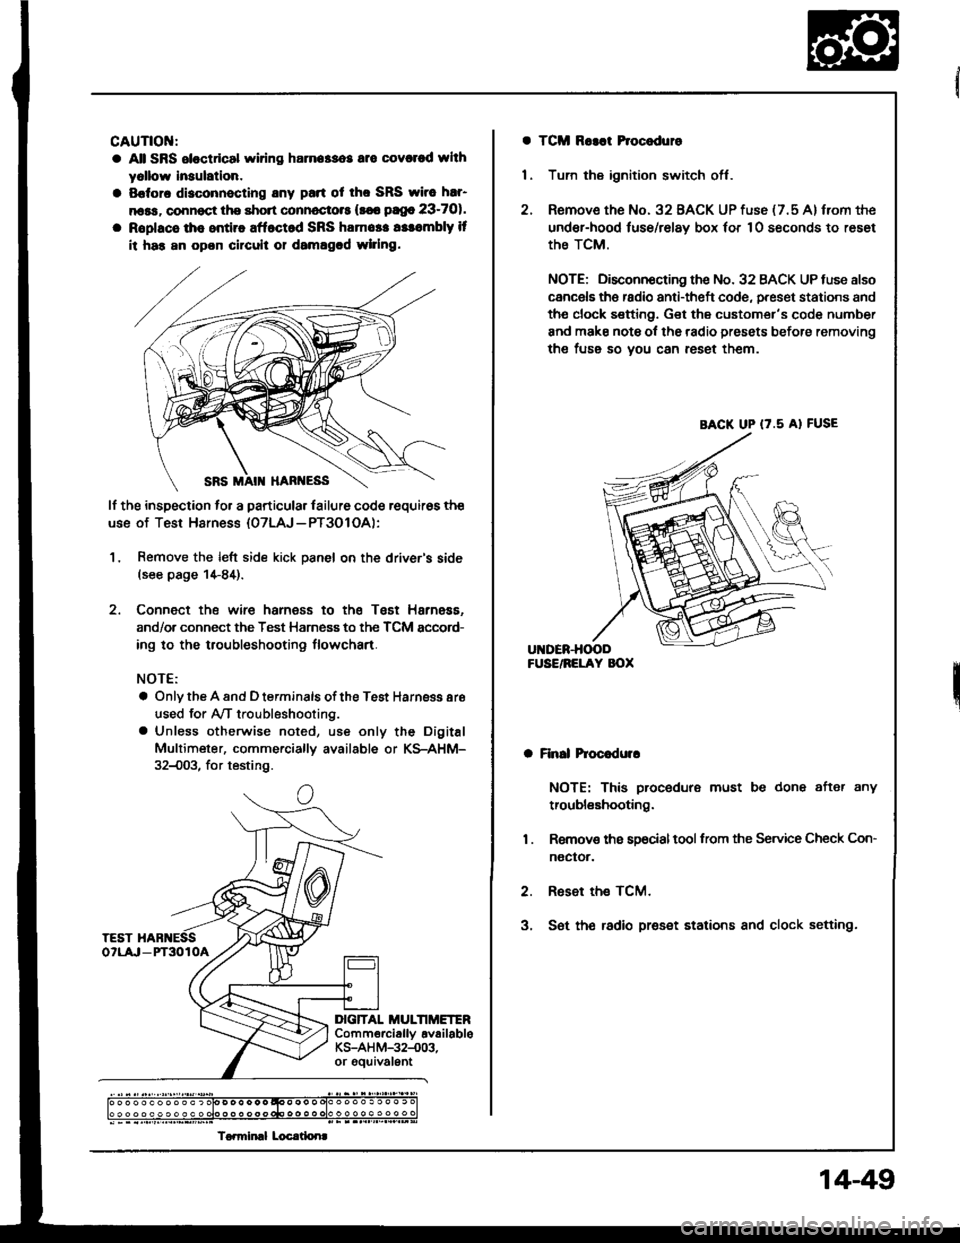
lf the inspection to. a particular lailure code requir6s the
use of Test Harness {07LAJ - PT3O1 OA):
1, Remove the left side kick panel on the driver's side(see page 1+84).
2. Connect the wire harness to the Tsst Harness.
and/or connect the Test Harness to the TCM sccord-
ing to the troubleshooting flowchart.
NOTE:
a Only the A and D terminals of the Test Harnsss aro
used for Ay'T troubleshooting.
a Unless otherwise noted, use only the Digital
Multimeter, commerciallv available or KS-AHM-
32{)03, for testing.
c
DIG]TAL MULTIMETERComm€rciallv availableKS-AH M-32-.003,or gouivalEnt
) o o o o o o o o o o ) olo D o o o o o qoo o o o olo o o o o . o o o . c
To.miml Locrtlonr
a TCM Ro3at Procoduro
1 . Tum the ignition switch off.
2. Remove the No. 32 BACK UP fuse {7.5 A} from the
under-hood luse/relay box 'or 10 seconds to reset
the TCM.
NOTE; Disconnocting the No. 32 BACK UP tuse also
cancels ths radio anti-theft code, preset stations and
tho clock sefting. Get the customer's code number
and make note ol the radio presets before removing
the fuss so you can reset them.
a Finll hoc.dulr
NOTE: This procedure must be done after any
troubleshooting.
1 . Removs ths s9ocialtool from the Service Check Con-
noctor.
2. Reset the TCM.
3, S6t th€ radio preset stations and clock setting.
BACK UP (7.5 A} FUSE
14-49
Page 443 of 1413
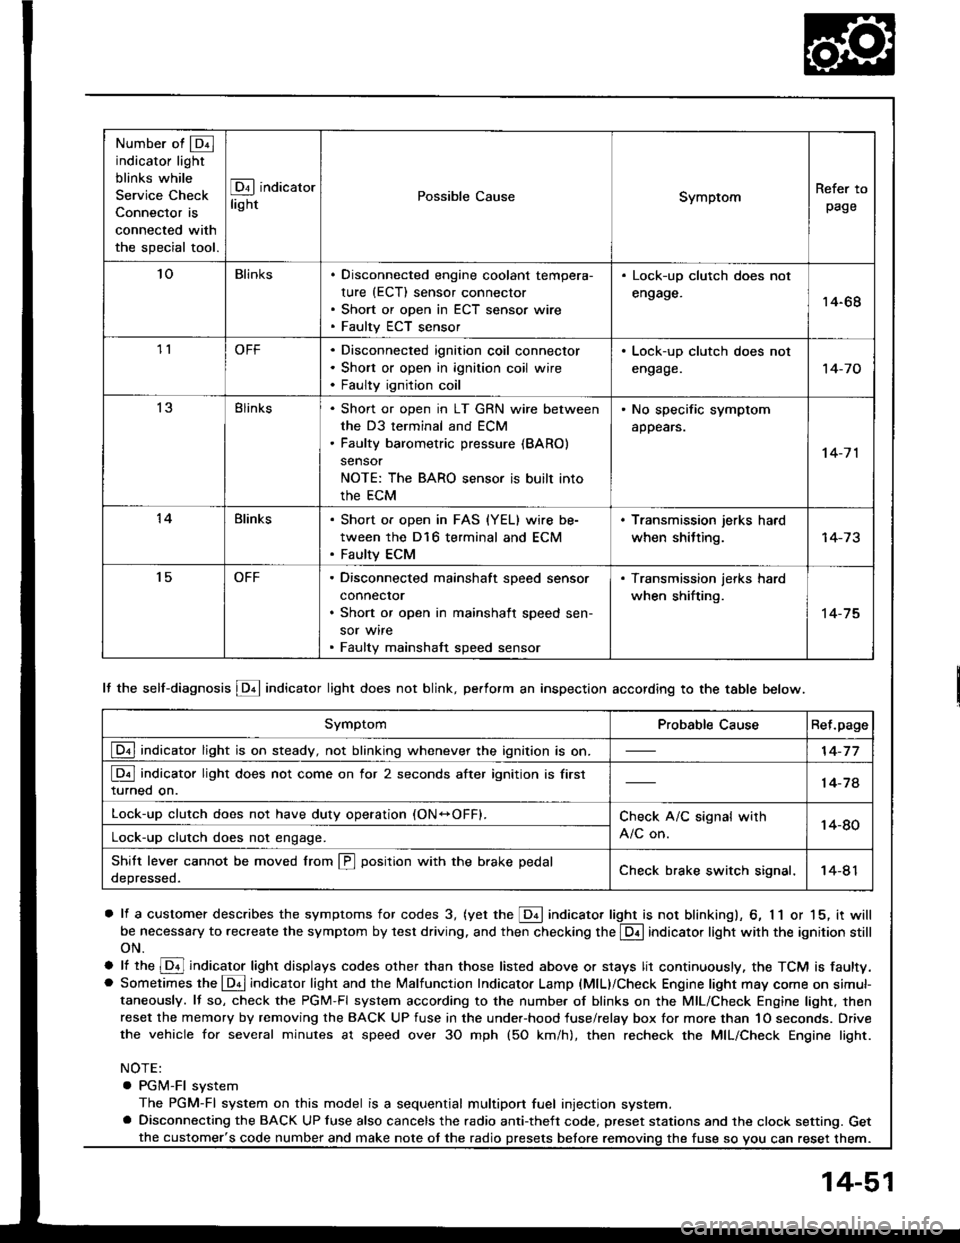
Number of @indicator light
blinks while
Service Check
Connector is
connected with
the special tool.
@ indicator
lightPossible CauseSymptomRefer to
page
'loBlinksDisconnected engine coolant tempera-
rure (ECT) sensor connector
Short or open in ECT sensor wire
Faulty ECT sensor
Lock-up clutch does not
engage.14-68
1lOFFDisconnected ignition coil connector
Short or open in ignition coil wire
Faulty ignition coil
. Lock-up clutch does not
engage.'t 4-7 0
13Blinks. Shon or open in LT GRN wire between
the D3 terminal and ECM. Faulty barometric pressure {BARO)
sensor
NOTE: The BARO sensor is built into
the ECM
. No specific symptom
appears.
14-7 1
14Blinks. Short of open in FAS {YEL} wire be-
tween the D16 terminal and ECM. Faulty ECM
. Transmission jerks hard
when shitting.
't5OFFDisconnected mainshaft speed sensor
connecror
Short or open in mainshaft speed sen-
sor wire
Faulty mainshaft speed sensor
. Transmission jerks hard
when shifting.
14-75
SymptomProbable CauseRet.page
LQ! indicator light is on steady, not blinking whenever the ignition is on.14-77
[Q3] indicator light does not come on for 2 seconds after ignition is first
turned on.14-78
Lock-up clutch does not have duty operation (ON-OFFI.Check A/C signal with
A/C on.14-80Lock-up clutch does not engage.
Shitt leve. cannot be moved lrom @ position with the brake pedal
depressed.Check brake switch signal,14-41
It the self-diagnosis LQ4 indicator light does not blink, perform an inspection according to the table below.
a lf a customer describes the symptoms for codes 3, (yet the LQ! indicator light is not blinkingl, 6, 1 1 or 15, it will
be necessa.y to recreate the symptom by test driving. and then checking the @ indicator light with the ignition still
oN.
e lt ttre @ indicator light displays codes olher than those listed above or stays lit continuously, the TCM is faulty.. Sometimes the Lqd indicator light and the Malfunction Indicator Lamp (MlL)/Check Engine light may come on simul-taneously. lf so, check the PGM-Fl system according to the numbe. of blinks on the MIL/Check Engine light. thenreset the memory by removing the BACK UP fuse in the unde.-hood fuse/relay box for more than 1O seconds. Drive
the vehicle for several minutes at speed over 30 mph (5O km/h), then recheck the MIL/Check Engine light.
NOTE:
. PGM-FI system
The PGM-Fl system on this model is a sequential multiport fuel injection system.a Disconnecting the BACK UP luse also cancels the radio anti-theft code. preset stations and the clock setting. Get
the fuse so vou can reset them.the customer's code number and make note ot the radio
14-51
Page 1182 of 1413
Starting System
Startel Test
NOTE: The air temDerature must be between 59 8nd
10OoF (15 and 38oC) before testing.
Recommendsd Procodure:
a Use a staner svstem tester.
a Connect and operate the equipment in accordance
with the manutacturer's instructions.
a Test and troubleshoot as described.
Altohato Procedure:
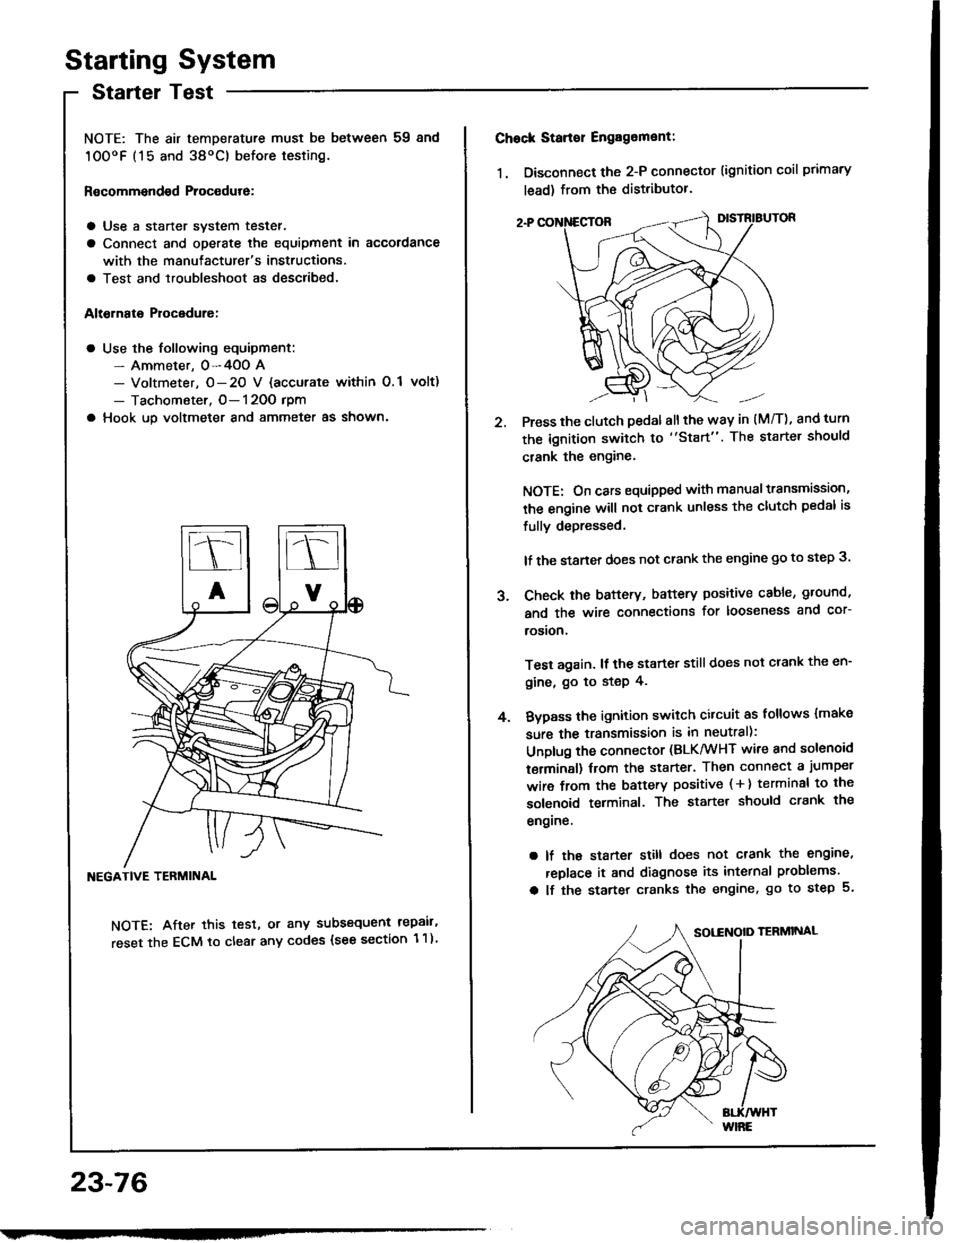
a Use the following equipment:- Ammeter. 0-4OO A- Voltmeter, O- 20 V {accurate within 0.1 volt)
- Tachometer, O- 120O rpm
a Hook up voltmeter and ammeter as shown'
NEGATIVE TERMINAL
NOTE: After this test, or any subsequent repair,
reset the ECM to clear any codes (see section 1 1)
23-76
2.
Chock Stan€r Engag6ment:
1. Disconnect the 2-P connector (ignition coil primary
lead) from the distributor.
Press the clutch pedal allthe way in (M/T), and turn
the ignition switch to "Start". The starter should
crank the engine.
NOTE: On cars equipped with manual transmission,
the engine will not crank unless the clutch pedal is
fully depressed.
lf the staner does not crank the engine go to step 3.
Check the baftery, battery positive cable, ground,
and the wire connections for looseness and cor-
rosion,
Test again. lf the starter still does not crank the en-
gine, go to step 4.
Bvpass the ignition switch citcuit as follows {make
sure the transmission is in neutral):
Unplug the connector (BLK/WHT wire and solenoid
terminsl) trom the starter. Then connect a jumper
wire from the battery positive ( + ) terminal to the
solenoid terminal. The starter should crank the
engrne.
a lf the starter still does not crank the engine,
replace it and diagnose its internal problems.
a lf the starter cranks the engine, go to step 5.
J.
4.
Page 1235 of 1413
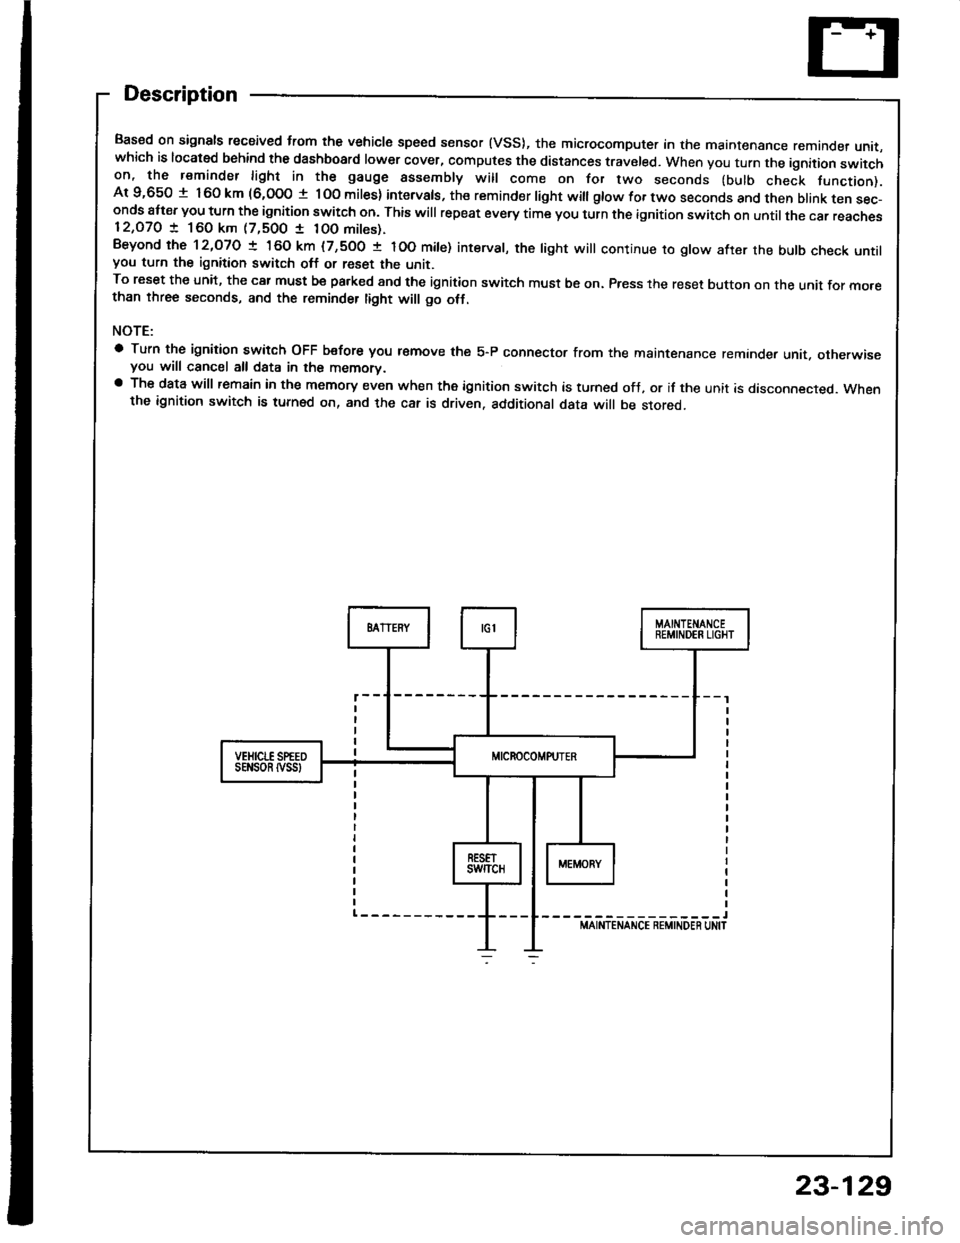
Description
Based on signals recaived trom the vehicle speed sensor (VSS), the microcomputer in the maintenance remande, unit,which is located behind the dashboard lower cover, computes the distances traveled. When you turn the ignition switchon, the reminder light in the gauge assembly will come on for two seconds (bulb check tunction).Ar 9,650 t 160 km (6,000 t lOo miles) intervals, the reminder light witl gtow for two seconds and then btank ten sec-onds att€r you turn the ignition switch on. This will repeat every time you turn the ignition switch on until the car reaches12,O7O ! 160 km (7,500 1 10O mites).Beyond the 12,O7O ! 160 km (7,500 t IOO mite) interval, the tight will continue ro gtow after the butb check untilyou turn the ignition switch off or reset the unit.To reset the unit, the car must be pa.ked and the ignition switch must be on. Press the reset button on the unit for mo.ethan three seconds, and the reminder tight will go otf.
NOTE:
a Turn the ignition switch OFF b€fore you r€move the 5-P connector from the maintenance reminder unit. otherwiseyou will cancel all data in the memorv.a The data will remain in the memory even when the ignition switch is turned ofJ, or if the unit is disconnected. Whenthe ignition switch is turned on, and the car is driven. additional data will be stored.
-----------------lMAINTENANCE REMINDEN UN|T
sEt{son tvss
23-129