Automatic shift selector HONDA INTEGRA 1994 4.G Workshop Manual
[x] Cancel search | Manufacturer: HONDA, Model Year: 1994, Model line: INTEGRA, Model: HONDA INTEGRA 1994 4.GPages: 1413, PDF Size: 37.94 MB
Page 26 of 1413
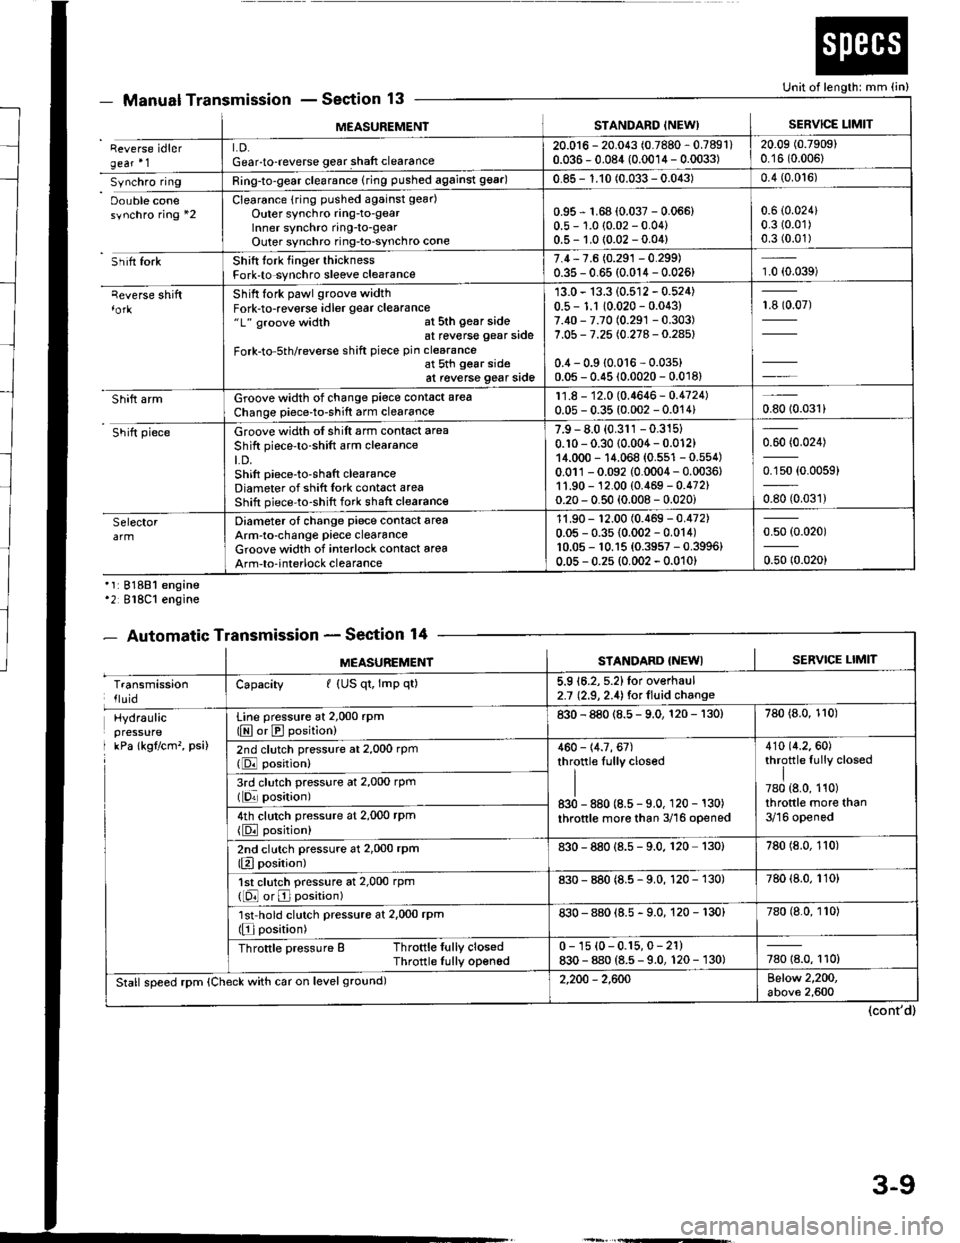
MEASUREMENISTANDARD INEW)SERVICE LIMIT
Reverse idlergear'1LD.Gear-to-reverse gear shaft clearance20.016 - 20.043 (0.7880 - 0.7891)0.036 - 0.084 (0.0014 - 0.0033)20.09 (0.7909)
0.16 (0.006)
Synchro ringRing-to-gear clearance (ring pushed against 99ar)0.85 - 1.10 (0.033 - 0.043)0.4 (0.0't6)
Oouble conesynchro ring *2Clearance {rin9 pushed against gear)
Outer synchro ring-to-gearlnner synchro ring-to-gearOuter synchro ring-to-synchro cone
0.95 r 1.68 (0.037 - 0.066)0.5 - 1.0 (0.02 - 0.04)0.5- 1.0 {0.02 -0.04)
0.6 (0.024)
0.3 (0.01)
0.3 (0.01)
Sh itt forkShift tork finger thicknessFork-to synchro sleeve clearance7.4,7.6 (0.291 - 0.299)0.35 - 0.65 (0.014 - 0.026)1.0 (0.039)
qeverse shiftShift fork pawl groove widthFork-to-reverse idler gear clearance"1" groove width at sth gear sideat reverse gear side
Fork-to-5th/reverse shift piece pin clearanceat 5th gear sideat reverse gear side
13.0 - 13.3 (0.512 - 0.524)0.5 - 1.1 10.020 - 0.043)7.40 - 7.70 (0.291 -0.303)
7.05 - 7.25 (0.278 - 0.28s)
0.4 - 0.9 {0.016 - 0.03s)0.05 - 0.45 (0.0020 - 0.018)
13907)
Shift armGroove width of change piece contact area
Change piece-to-shift arm clearance11.8 - 12.0 (0.4646- 0.4724)0.05 - 0.35 (0.002 - 0.014)0.8010.031)
Shift pieceGroove width of shift arm contact area
Shift piece'to-shift arm clearanceLD.Shift piece-to-shaft clearanceDiameter of shift Iork cont6ct areaShift piece-to-shift fork shaft clearance
7.9 - 8.0 (0.311 -0.315)
0.10 - 0.30 (0.004 - 0.012)14.000 - 14.068 {0.551 - 0.554)0.011-0.092 (0.0004 - 0.0036,1'1.90 - 12.00 (0.469 - 0.472)0.20 - 0.50 (0.008 - 0.020i
0.60 (0.024)
0.150 (0.0059)
oso to.oart
SelectorDiameter of change piece contact areaArm-to-change piece clearanceGroove widlh of interlock contact area
Arm-to-interlock clearance
11.90 - '�t2.00 (0.469 - 0.472)0.05 - 0.35 {0.002 - 0.014)10.05 - 10.15 {0.3957 - 0.3996}0.05 - 0.2s (0.002 - 0.010)
0.50 (0.020)
0.50 (0.020)
Manual TransmissionSection 13
'1:81881 engine'2 818C1 engine
- Automatic TransmissionSection 14
Unit of length: mm (in)
(cont'd)
- oEutrlrrl rr
MEASUREMENTSTANDARD {NEWISERVICE LIMIT
TransmissionlluidCapacity I (US qt, lmp qt)5.9 16.2, 5.2)for overhaul2.7 (2.9, 2.4) for lluid change
Hydraulicpressure
I kPa lkgflcm'�, psi)
Line pressure at 2,000 rpm(E or E position)830 - 880 (8.5 - 9.0, 120 - 130)780 {8.0, 110)
2nd clutch pressure at 2,000 rpm(DJ position)460 - 14.7, 67)throttle Iully closed
II830 - 880 (8.5 - 9.0, 120 - 130)
throttle more than 3/16 opened
410 {4.2.60)throttle fully closed
I780 {8.0, 110)throttle more than3/16 opened
3rd clutch pressure at 2,000 rpm(lqr posirion)
4th clutch pressure at 2,000 rPm
{E position)
2nd clutch pressure at 2,000 rPm(Elposition)830 - 880 {8.s - 9.0. 120 130)780 (8.0, 110)
1st clutch pressure at 2,000 rpm([O or E position)830 - 880 (8.5 - 9.0, 120 - 130)780 (8.0, 110)
'lst'hold clutch pressure at 2,000 rpm(Elposition)830 - 880 {8.5 - 9.0, 120 - 130}780 (8.0, 110)
Throttle pressure B Throttle fully closedThrotlle Iully opened0 - 1s {0-0.15,0- 21)830 - 880 (8.5 - 9.0, 120 - 130)780 18.0, 110)
Stall speed rpm (Check with car on level ground)2,200 - 2,600Below 2,200,above 2,600
3-9
Page 393 of 1413
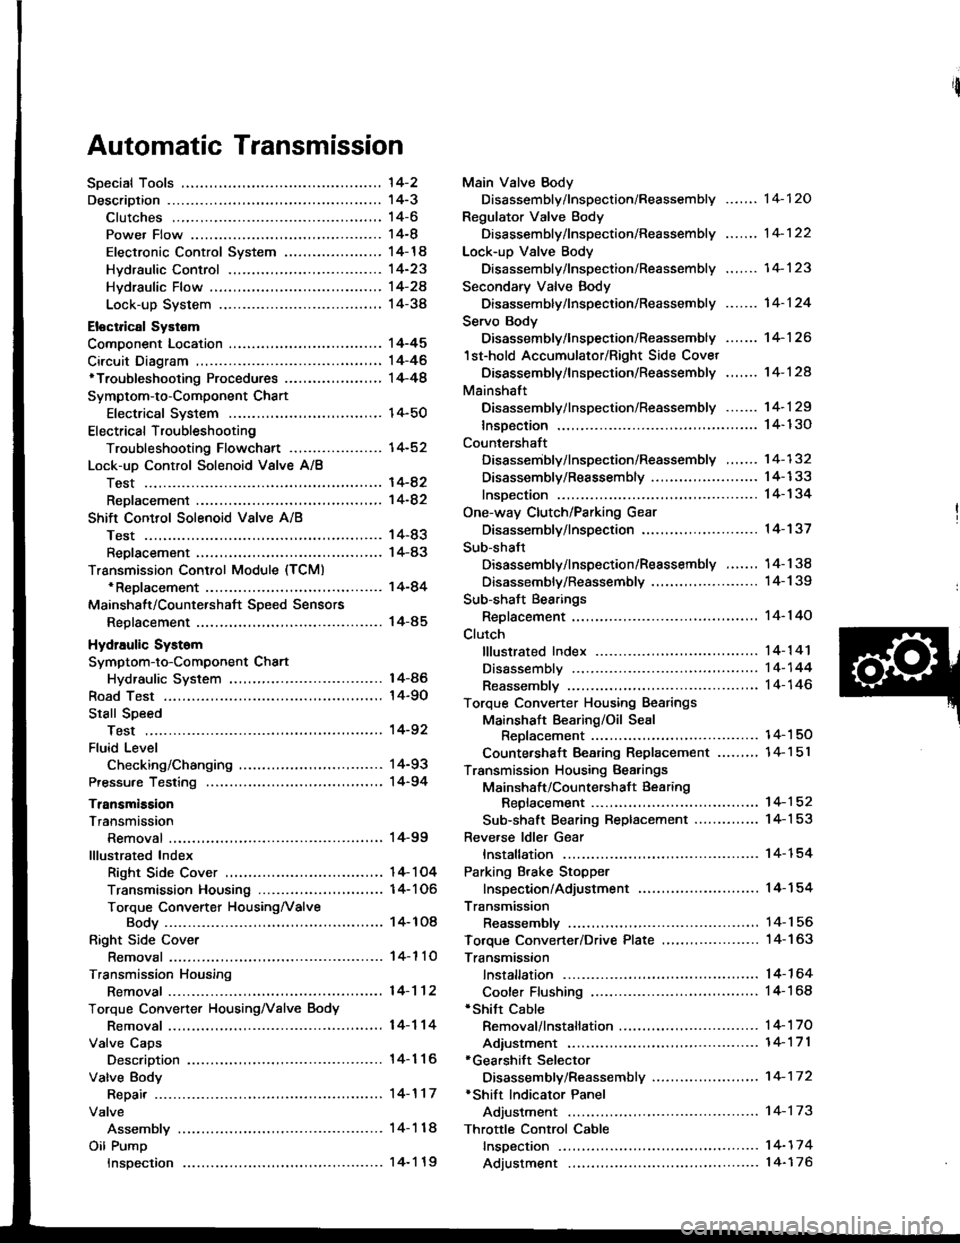
Automatic Transmission
'l4-2
14-3't 4-6
14-8
14-14
14-23
Hvdraulic Flow ...--...... 14-24
Lock-up System ........ 14-38
Eloctrical Systom
Component Location ............,...,................ I 4-45
Circuit Diagram ............. 14-46'Troubleshooting Procedures ........,..........., l4-48
Symptom-to-Component Chart
Electrical System ...... 14-50
Electrical Troubleshooting
Troubleshooting Flowchart .................... 14-52
Lock-uo Control Solenoid Valve A/8
Test .................. --.... \4-82
ReDlacement ,...,...,..,. 14-82
Shift Control Solenoid Vslve A/B
Test .................. ...... 14-83
Reolacement .............. 14-83
Transmission Control Module (TCM)*ReDlacement ........... 14-84
Mainshalt/CountershaJt SDeed Sensors
Reolacement ............. 14-85
Hydraulic Systom
Symptom-to-Component Chart
Hydraulic System
Road Test
Slall Speed
Test ..................
Fluid Level
Checking/Changing
Pressu.e Testing
Transmission
Transmission
Removal ............. ...... 14-99
lllustrated Index
Right Side Cover .................................. 1 4- 1 04
Transmission Housin9 ..................,,....... I 4-1 06
Torque Converter HousingNalve
Body .................. ... 14- 1O8
Right Side Cover
Removal ............. ...... 14-110
Transmission Housing
Removal ............. .-..-. 14-112
Torque Convener HousingNalve Body
Removal ............. ...... 14-114
Valve Caps
Description ................ 14-116
Valve Body
Repair ................ ...-.. 14-117
Valve
Assembly ...........
Oil Pump
Main Valve Body
Disassembly/lnspection/Reassembly
Regulator Valve Body
Disassembly/lnspection/Reassembly
Lock-up Valve Body
Disassembly/lnspection/Reassembly .......
Secondary Valve Body
Disassembly/lnspection/Reassembly .......
Servo Body
Disassembly/lnspection/Reassembly .......
1st-hold Accumulator/Right Side Covet
Oisassembly/lnspection/Reassembly .,..,..
Mainshaft
Disassembly/lnspection/Reassembly -.. -... 1 4- 1 29
lnsDection ................. 14- 130
Countershaft
Disassembly/lnspection/Reassembly ....... 14-132
Disassembly/Reassembly ....................... 1 4-1 33
lnsDection ................. 14-134
One-way Clutch/Parking Gear
Disassembly/lnspection .................... -.. -. 1 4-137
Sub-shaft
Disassembly/lnspection/Reassembly ....... 14-138
Disassemblv/Reassemblv ....................... 1 4-1 39
Sub-shaft Bearings
Replacement ............. l4-140
Clutch
fllustrated lndex ................. -..-...-.......... 14-1 41
Disassembly ,,,.,,........ 14-144
Reassembly .............. 14-146
Torque Converter Housing Bearings
Mainshaft Bearing/Oil Seal
Reolacement ......... 14-1 50
Countershaft Bearing Replacement .......,, 14-1 5l
Transmission Housing Bearings
Mainshsft/Countershaft Bearing
Repfacement ...-..-..14-152
Sub-shaft Bearing Replacement .............. 1 4-1 53
Reve.se ldler Gear
lnstallation ................ 14-154
Parking Brake Stopper
lnspection/Adjustment ..........................'14-'154
Transmission
Reassemblv .............,. .14_156
Toroue Converter/Drive Plate ..,..,............... 1 4- 1 63
Transmission
14-120
14-122
14-123
14-124
14-126
14-124
14-86
14-90
't4-92
14-93
14-94
lnstallation
Cooler Flushing'Shitt Cable
Removal/lnstallation ..............................
Adiustment ...-..-......-. 14-'171*Gearshift Selector
Disassembly/Reassembly .....................,. 1 4-17 2*Shift Indicator Panel
Adjustment -..........-...14-173
Throttle Control Cable
fnspection .......,..,...... 14-17 4
Adjustment .............. 14-176
14-164
14-168
14-'t 7 0
Inspection
Page 395 of 1413
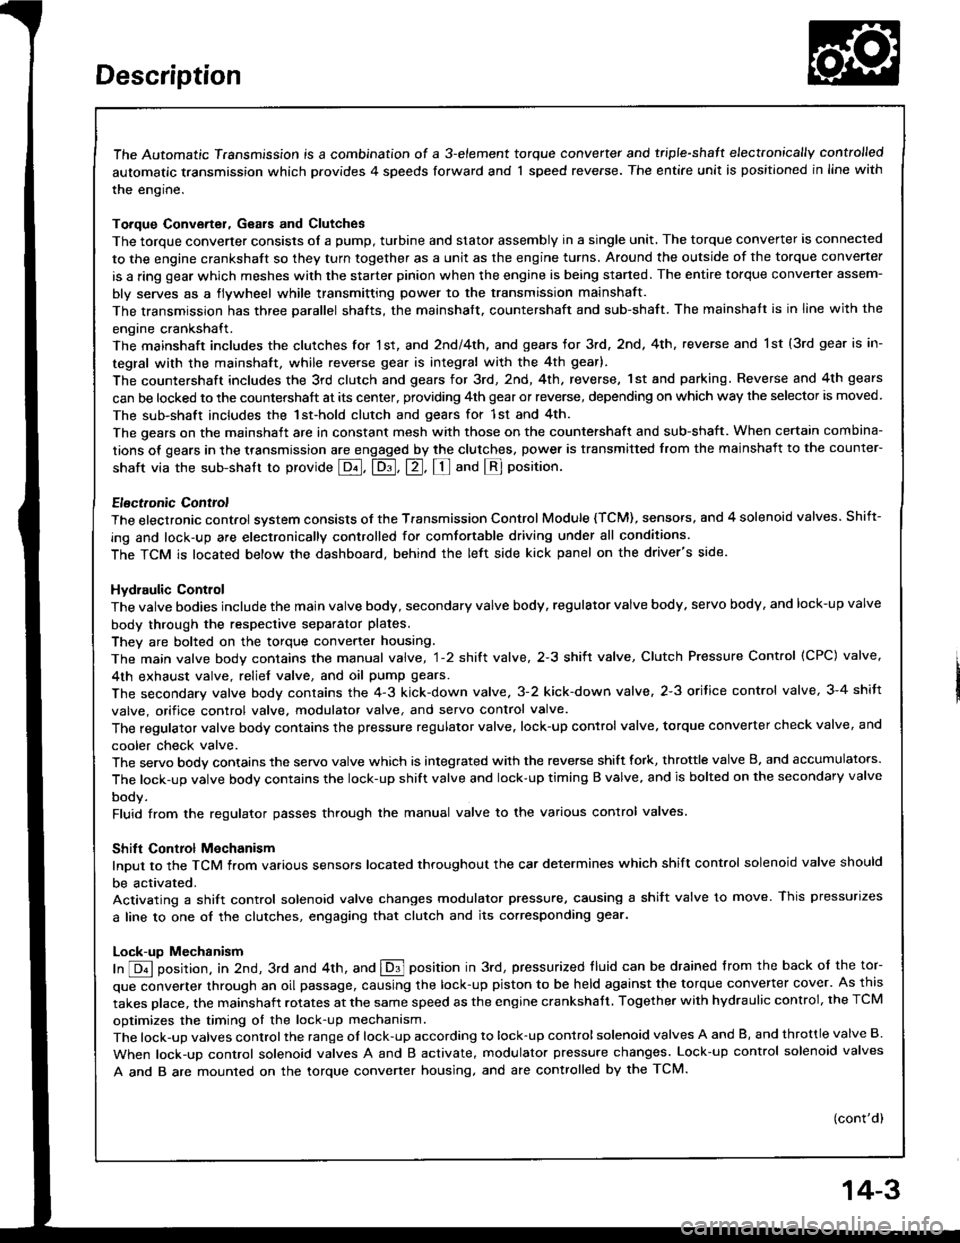
The Automatic Transmission is a combination of a 3-e,ement torque convefter and triple-shaft electfonically controlled
automatic transmission which provides 4 speeds forward and 1 speed reverse. The entire unit is positioned in line with
the engine.
Torque Converter, Gears and Clutches
The torque converter consists of a pump, turbine and stator assembly in a single unit, The torque converter is connected
to the engine crankshaft so they turn together as a unit as the engine turns. Around the outside of the torque converter
is a ring gear which meshes with the starter pinion when the engine is being staned. The entire torque converter assem-
bly serves as a flywheel while transmitting power to the transmission mainshaft.
The transmission has three parallel shafts, the mainshaft. countershaft and sub-shaft. The mainshatt is in line with the
engine crankshaft.
The mainshaft includes the clutches for 1 st, and 2ndl4th, and gears for 3rd. 2nd, 4th, reverse and l st (3rd gear is in-
tegral with the mainshaft, while reverse gear is integral with the 4th gear).
The countershaft includes the 3rd clutch and gears Ior 3rd, 2nd,4th, reverse, lst and parking. Reverse and 4th gears
can be locked to the countershaft at its center, providing 4th gear or reverse, depending on which way the selector is moved.
The sub-shaft includes the lst-hold clutch and gears for 1st and 4th
The gears on the mainshait are in constant mesh with those on the countershaft and sub-shaft. When certain combina-
tions of gears in the transmission are engaged by the clutches, power is transmitted from the mainshaft to the counter-
shaft via the sub-shatt to provide @, E, tr. tr and @ position.
Electronic Control
The electronic control system consists of the Transmission Control Module {TCM), sensors, and 4 solenoid valves. Shift-
ing and lock-up are electronically controlled for comfortable driving under all conditions.
The TCM is located below the dashboard, behind the left side kick panel on the driver's side.
Hydraulic Control
The valve bodies include the main valve body, secondary valve body, regulator valve body. servo body, and lock-up valve
body throuqh the respective separator plates.
They are bolted on the torque converter housing.
The main valve body contains the manual valve, 1-2 shift valve, 2-3 shift valve, Clutch Pressure Cont.ol (CPC) valve,
4th exhaust valve, relief valve, and oil pump gears.
The secondary valve body contains the 4-3 kick-down valve,3-2 kick-down valve,2-3 orifice cont.ol valve, 3-4 shitt
valve, orifice control valve. modulator valve, and servo control valve
The regulator valve body contains the pressure regulator valve. lock-up control valve, torque converter check valve, and
cooler check valve.
The servo bodv contains the servo valve which is integrated with the reverse shift fork, throttle valve B, and accumulators.
The lock-ug valve bodv contains the lock-up shift valve and lock-up timing B valve. and is bolted on the secondary valve
body.
Fluid from the regulator passes through the manual valve to the various control valves.
Shitt Control Mochanism
Input to the TCM i.om various sensors located throughout the car determines which shift control solenoid valve should
be activated.
Activating a shift control solenoid valve changes modulator pressure, causing a shift valve to move. This pressurizes
a line to one of the clutches. engaging that clutch and its corresponding gear.
Lock-up Mechanism
In @ position. in 2nd, 3rd and 4th, and E position in 3rd, pressurized tluid can be drained from the back of the tor-
que converter through an oil passage, causing the lock-up piston to be held against the torque converter cover. As this
takes Dlace, the mainshaft rotates at the same speed as the engine crankshatt. Together with hydraulic control, the TCM
optimizes the timing ol the lock-up mechanism.
The lock-up valves control the range of lock-up according to lock-up control solenoid valves A and B, and throttle valve B
When lock-up control solenoid valves A and B activate, modulator pressure changes. Lock-up control solenoid valves
A and B are mounted on the torque converter housing, and are controlled by the TCM.
(cont'd)
14-3
Page 396 of 1413
![HONDA INTEGRA 1994 4.G Workshop Manual Description
(contd)
Gear Selection
The selector lever has seven posirions; E PARK, E REVERSE, N NEUTRAL, @ 1st through 4th positions. E 1st
through 3rd positions, Ql2nd gear and [] 1st gear.
Starting HONDA INTEGRA 1994 4.G Workshop Manual Description
(contd)
Gear Selection
The selector lever has seven posirions; E PARK, E REVERSE, N NEUTRAL, @ 1st through 4th positions. E 1st
through 3rd positions, Ql2nd gear and [] 1st gear.
Starting](/img/13/6067/w960_6067-395.png)
Description
(cont'd)
Gear Selection
The selector lever has seven posirions; E PARK, E REVERSE, N NEUTRAL, @ 1st through 4th positions. E 1st
through 3rd positions, Ql2nd gear and [] 1st gear.
Starting is possible only in @ and I Oosition through use ot a slide-type, neutral-safety switch.
Automatic Tlansaxle {A/T) Gear Position Indicatol
A/T gear pos;tion indicator in the instrumenl panel shows what gear has been selected without having look down at
the console.
Position Description
l3?]] PARK Front wheels locked; parking pawl engaged with parking gear on countershatt. All clutches
reteaseo,
[R] REVERSE Reverse; reverse selector engaged with countershalt reverse gear and 4th clutch locked.
N NEUTRAL All clurches released.
D+l DRIVE General driving; starts off in 'lst, shifts automatically to 2nd, 3rd, then 4th, depending on vehicle
('lst through 4th) speed and throttle position. Do'vnshifts through 3rd, 2nd and 1st on deceleration to stop.
The lock-up mechanism comes into operation in 2nd, 3rd and 4th when the transmission in lDtposrtron.
Dgi DRIVE For rapid acceleration at highway speeds and general driving; starts off in 1st. shifts automatical-(1st through 3rd) ly to 2nd then 3rd, depending on vehicle speed and throttle position. Downshifts through lower
gears on deceleration to stop. The lock-up mechanism comes into operation in 3rd.
El SECOND Driving in 2nd geari stays in 2nd gear, does not shift up and down.
For engine braking or better traction starting off on loose or slippery surfece.
L]l FIRST Driving in 1st gear; stays in lst gear, does not shilt up.
For engine braking.
14-4
Page 561 of 1413
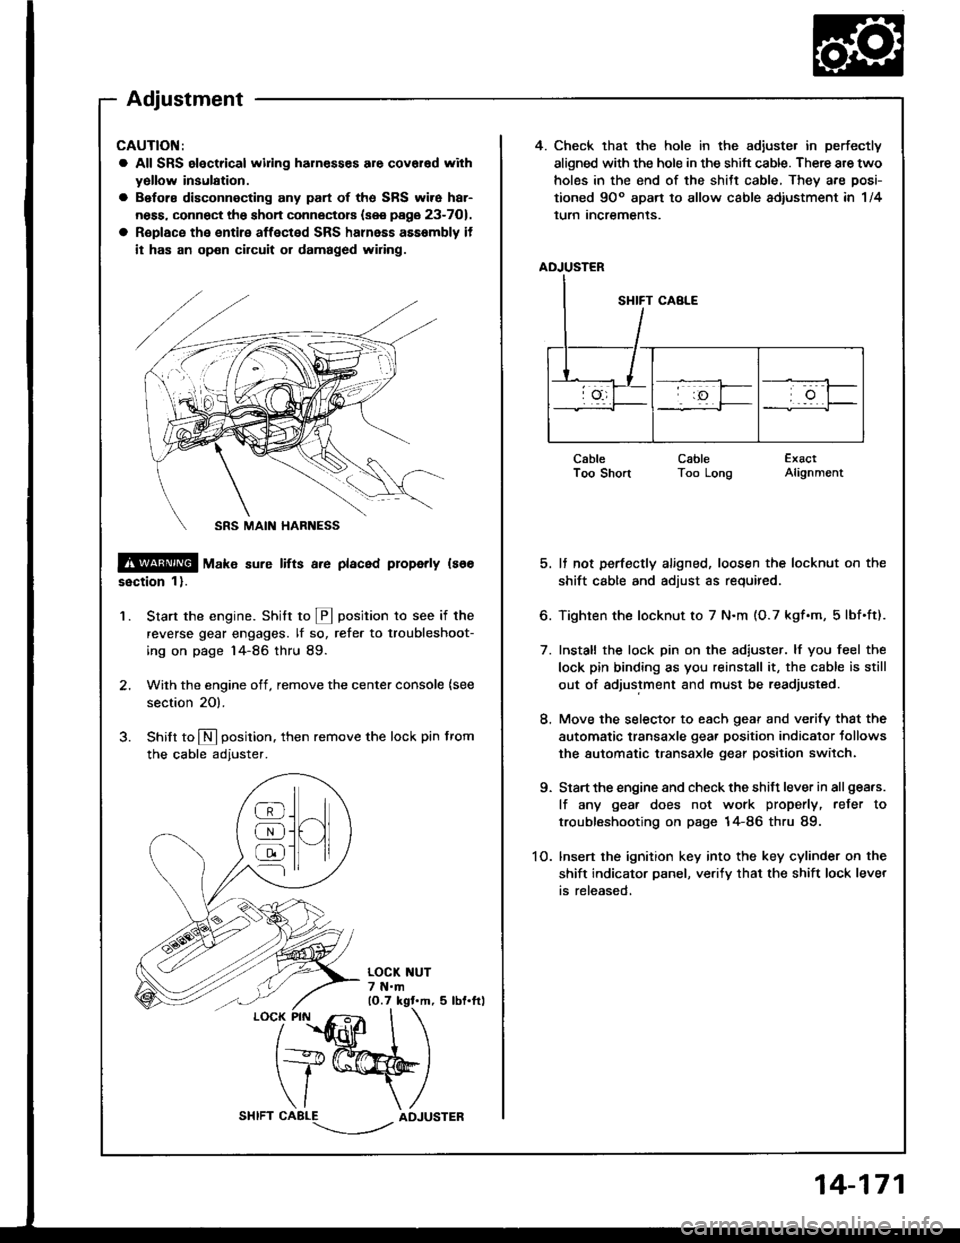
4. Check that the hole in the adiuste. in perfectly
aligned with the hole in the shift cable. There are two
holes in the end of the shitt cable, They are posi-
tioned 9Oo apart to allow cable adiustment in 1/4
lurn Incremenls.
ADJUSTER
CableI oo snonCableToo LongExactAlignment
5. It not perfectly aligned, loosen the locknut on the
shift cable and adjust as required.
6. Tighten the locknut to 7 N.m (O.7 kgf.m, 5lbf.ft).
7. Install the lock pin on the adiuster. lf you feel the
lock pin binding as you reinstall it, the cable is still
out of adjustment and must be readjusted.
8. Move the selector to each gear and verify that the
automatic transaxle gear position indicator tollows
the automatic transaxle gear position switch.
9. Start the engine and check the shift lever in all gea.s.
lf any gea. does not work properly, refer to
troubleshooting on page 14-86 thru 89.
1O. lnsert the ignition key into the key cylinder on the
shift indicator panel, ve.ify that the shift lock lever
is released,
CAUTION:
a All SRS electrical widng harn€sses are covar€d with
yollow insulation.
a Before disconnecting any part of ths SRS wire har-
ness, connect the shon connectors (see page 23-701.
a R€place the entire affected SRS halnass asssmbly it
it has an op€n circuit or damaged wiring.
@ tu"t" sure lifts a.e placed properly ls66
ssction 1).
Start the engine. Stritt to @ position to see if the
reverse gear engages. lf so, refer to troubleshoot-
ing on page 14-86 thru 89.
Wilh the engine off, remove the center console {see
section 20).
Shilt to N position. then remove the lock pin from
the cable adjuster.
'1.
/
''fidlfr
I
t+@
\/ \
CABLE-.'.-_--l../ADJUSTER
]H
@
@
@
Adjustment
14-171
Page 562 of 1413
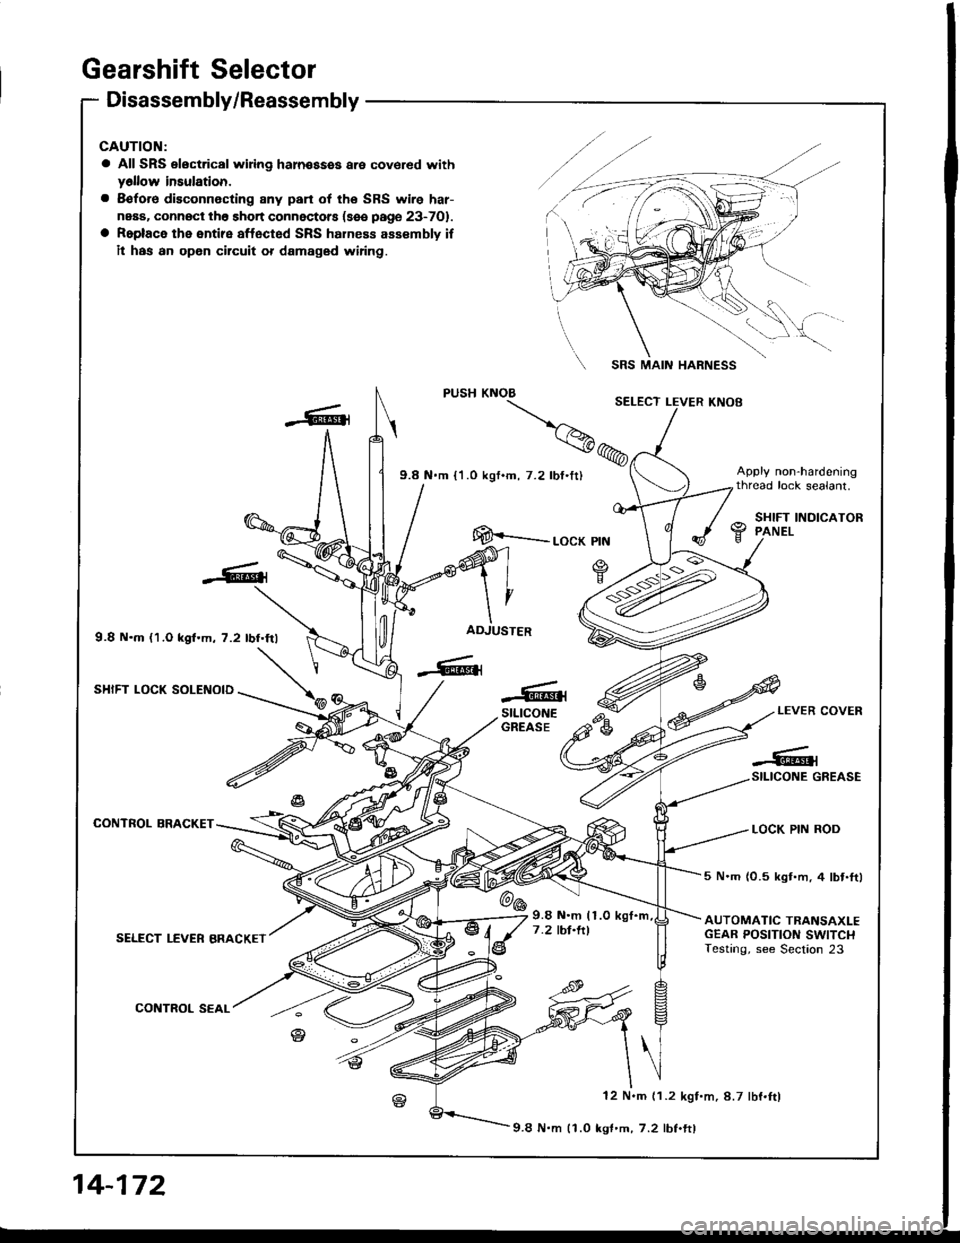
Gearshift Selector
Disassembly/Reassembly
CAUTION:
a All SRS electrical wiing haln€ssss are covered withy6llow insulation.
a 8€fore disconnecting 8ny pan of the SRS wire har-
neaa. connOct th6 short connectors (sse page 23-701.
a Roplace the entire affected SRS hahess assembly if
il has an opon circuit or damaged wiring.
9.8 N.m {1.O kgf.m, 7.2 lbf.frl
SHIFT LOCK SOLENOID
CONTROL BRACKET
SELECT LEVER BRACKET
CONTROL SEAL
SRS MAIN HARNESS
[E--__ rocK ptN
ADJUSTER
-6{stLtcoNEGREASEe-LEVER COVER
LOCK PIN ROD
-#qSILICONE GREASE
@6
5 N.m (0.5 kgt.m, 4 lbt.ftl
AUTOMATIC TRANSAXLEGEAR POSITION SWITCHTesting, see Section 23
9.8 N.m (1.0
7 .2 tbt.ltl
12 N.m (1.2 kgf.m, 8.7 lbf.ftl
9.8 N.m 11.0 kgf'm,7.2 lbf.ftl
14-172