key HONDA INTEGRA 1994 4.G Workshop Manual
[x] Cancel search | Manufacturer: HONDA, Model Year: 1994, Model line: INTEGRA, Model: HONDA INTEGRA 1994 4.GPages: 1413, PDF Size: 37.94 MB
Page 75 of 1413
Timing Belt
Installation
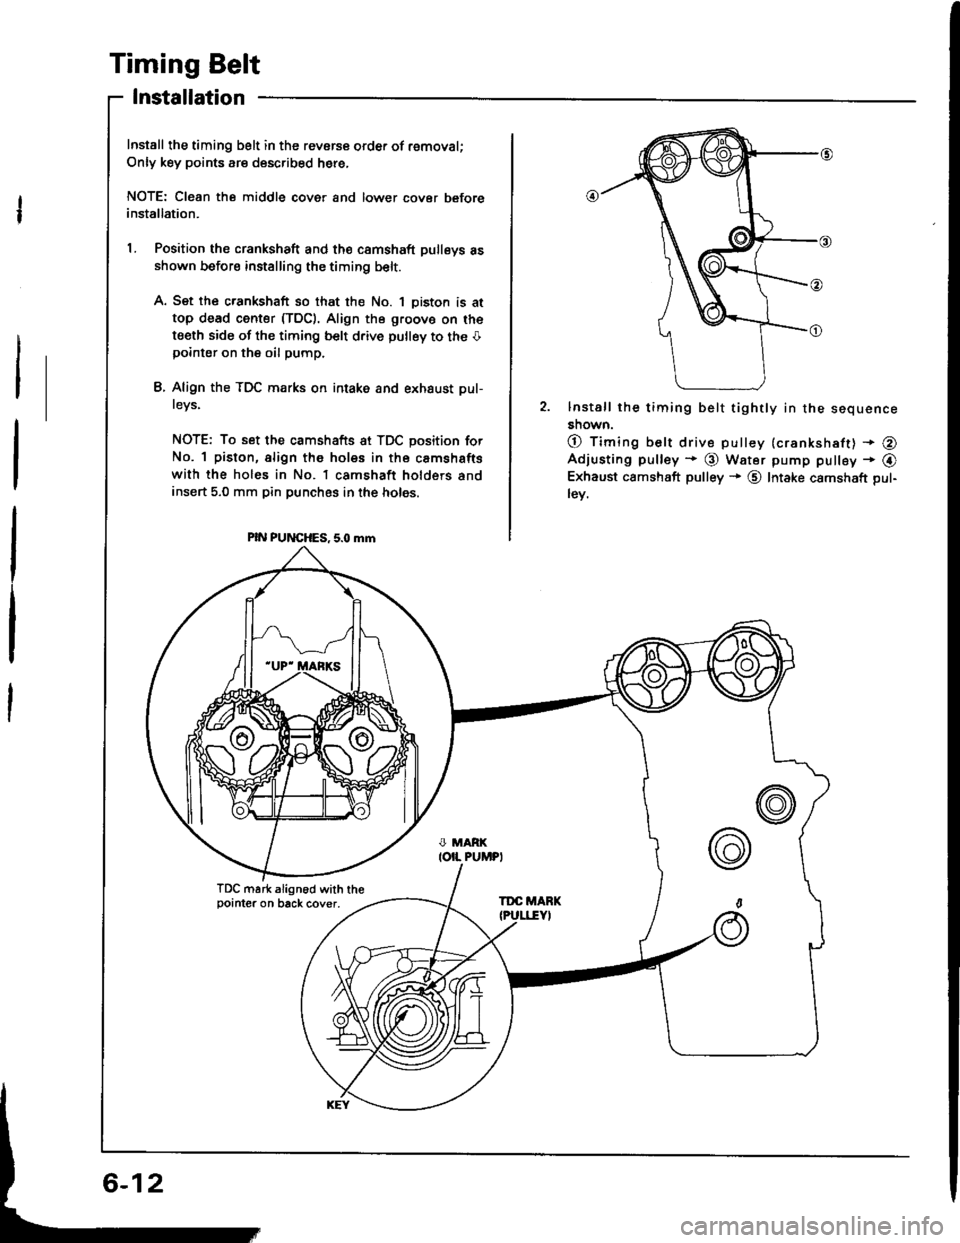
Install the timing belt in the revorce order of removal;
Only key points are described here,
NOTE: Cl€an the middle cover and lower cover beforeinstallation.
L Position the crankshaft and th€ camshaft pulleys asshown before installing the timing belt.
A. Set the crankshaft so that the No. 1 oiston is at
top dead center (TDC). Align the g.oovo on the
t€eth side of the timing belt d.ive pulley to the Opointer on the oil pump.
L Align the TDC marks on intake and exhaust pul-
tevs,
NOTE: To set the camshafts at TDC position for
No. 1 piston, align the holes in the camshafts
with the holes in No. l camshaft holders andinsert 5,0 mm pin punches in the holes.
PIN PUNCHES, 5.0 mm
2. lnstall the timing belt tightly in the sequence
snown.
O timing belt drive pulley {crankshaft) + @Adjusting pulley * @ Water pump pulley - @Exhaust camshaft pulley + @ Intake camshaft pul-
lev.
TDC mark align6d with thepointer on back cover,TDC MARK
6-12
Page 76 of 1413
Cylinder Head
I x 1.25 mm22 N.m 12.2 kgt.m,16 rbf.ft)
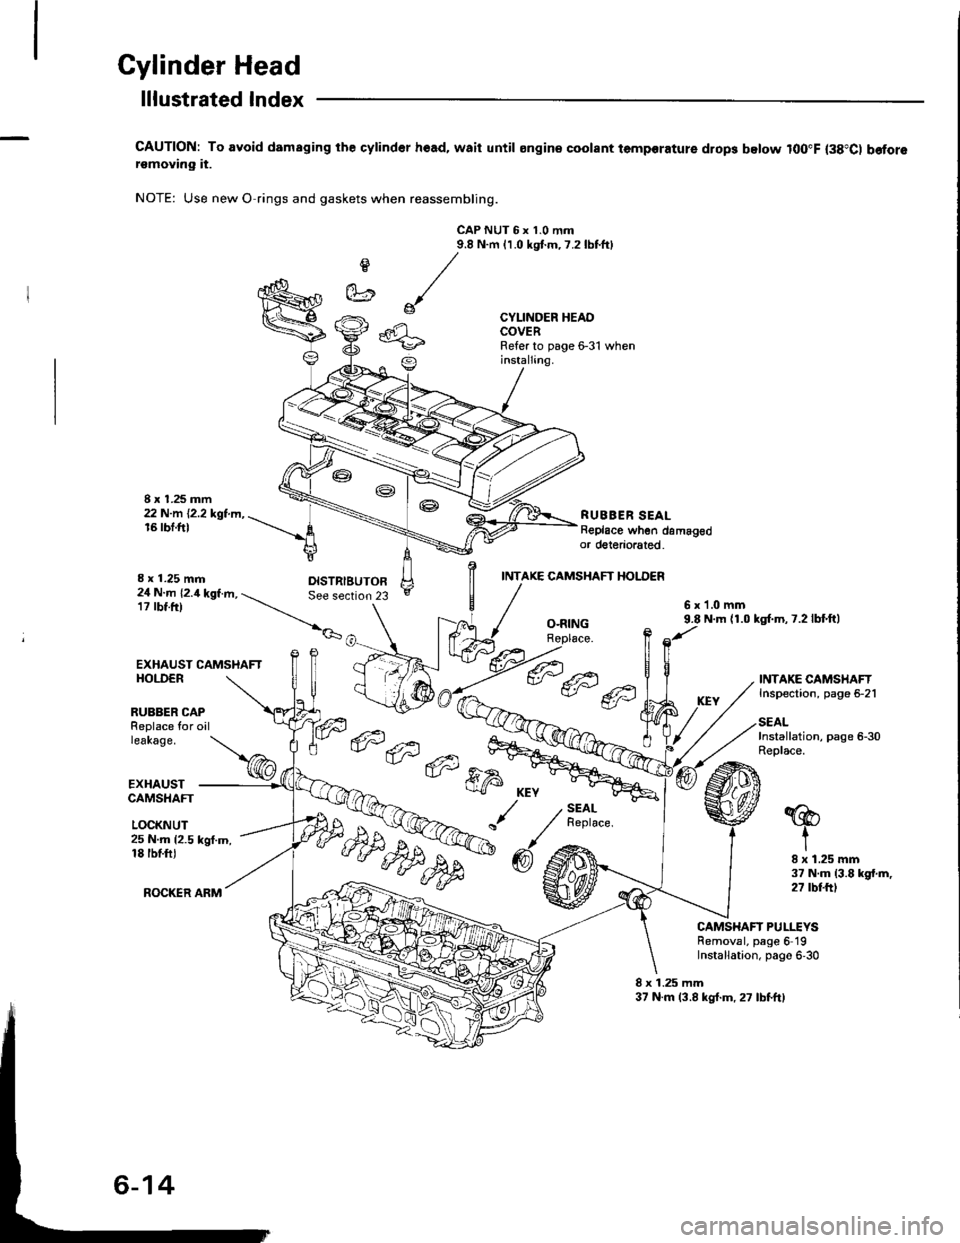
lllustrated lndex
CAUTION: To avoid damaging the cylind6r hoad, waii until ongin€ coolant temporature drop3 below lOO"F (38"C) b€forersmoving it.
NOTE: Use new O rings and gaskets when reassembling.
CAP NUT 6 x 1.0 mtn9.8 N.m 11.0 kgtm,7.2lbtftl
e
et
CYLINDER HEADCOVERRefer to page 6-31 wheninstallang.
RUBBER SEALReplace when damagedor doteriorated.
I x 1.25 mm
EXHAUST CAMSHAFTHOI.DER
INTAKE CAMSHAFT HOI.DER
24 N.m 12.4 kgf.m, -. See section17 rbt.tr) --_r,_
__.|._6x1.0mm9.8 N.m {1.0 kgl.m,7.2lbf.ft)O-RINGRoplace.
RUBBER CAPReplace for oilleakage.
EXHAUSTCAMSHAFT
LOCKNUT
INTAKE CAMSHAFTInspection, page 5-21
SEALInstallation, page 6-30Replace.- 6tal --,
ffi;r
KEY
/./
"
@6
SEALReplace.'@
t25 N.m {2.5 kgf.m,18 tbtfiJ
ROCKER ARM
I x 1.25 mm37 N.m (3.8 kgt.m,27 rbtftt
CAMSHAFT PULLEYSRemoval, page 6 19Installation, page 6,30
8 x 1.25 mm37 N.m 13.8 kg{.m,27 lbfftl
Page 92 of 1413
Cylinder Head
Installation (cont'dl
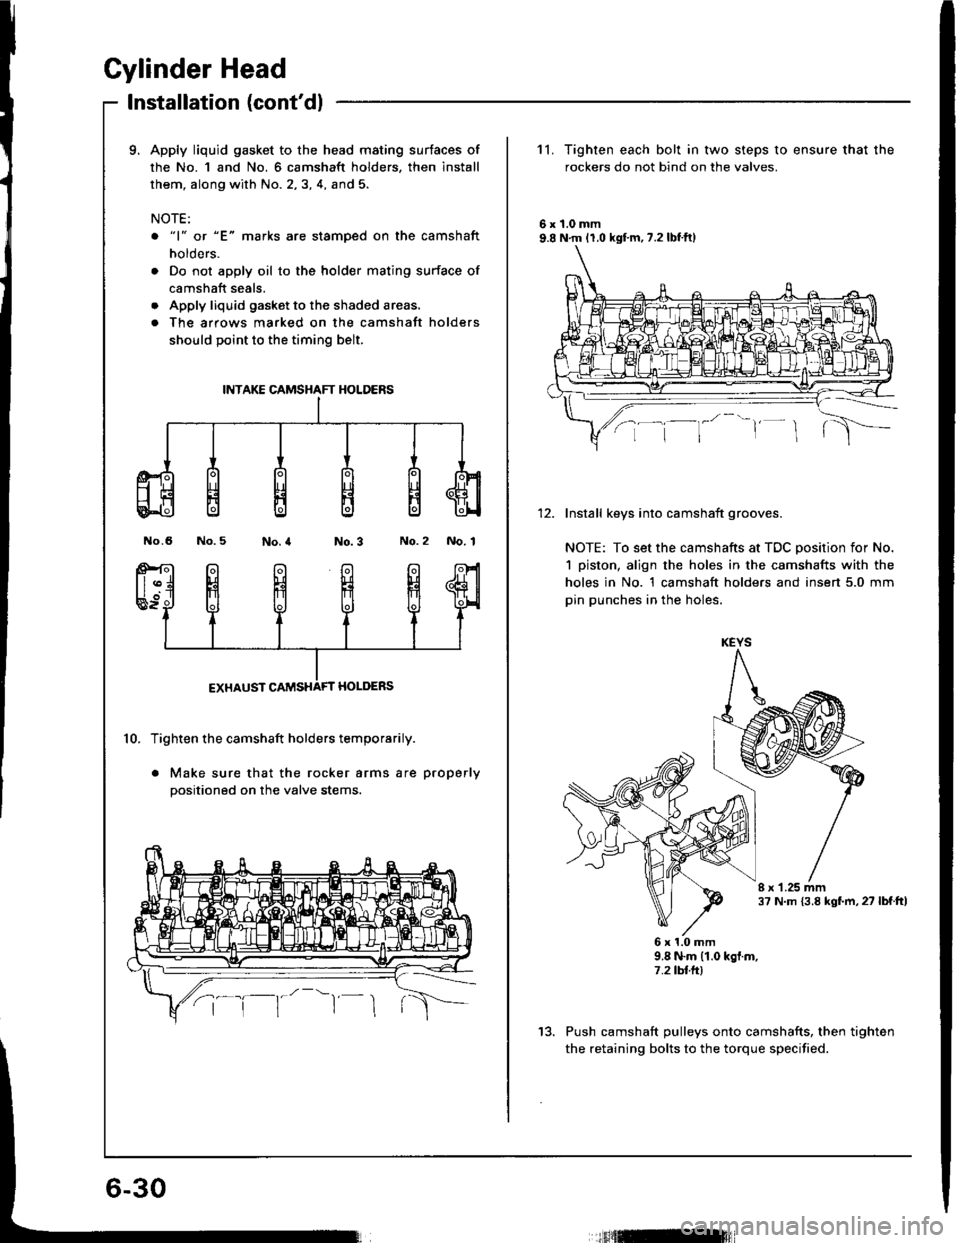
9. Apply liquid gasket to the head mating surtaces of
the No. 1 and No. 6 camshaft holders, then install
them, along with No. 2,3, 4, and 5.
NOTE:
o "1" or "E" marks are stamoed on the camshaft
holders.
. Do not apply oil to the holder mating surface of
camshaft seals.
. Apply liquid gasket to the shaded areas.
. The arrows marked on the camshatt holders
should point to the timing belt.
No.6 No.5No.2 No. 1
10. Tighten the camshaft holders temporarily.
. Make sure that the rocker arms are properly
positioned on the valve stems.
INTAKE CAMSHAFT HOLDERS
11. Tighten each bolt in two steps to ensure that the
rockers do not bind on the valves.
6r1.0mm9.8 N.m 11.0 kgf.m,7.2lbtft)
Install keys into camshaft grooves.
NOTE: To set the camshafts at TDC position for No.
1 piston, align the holes in the camshafts with the
holes in No. 1 camshaft holders and insert 5.0 mm
pin punches in the holes.
I r 1.25 mm37 N.m {3.8 kgf.m, 27 lbf.ttl
6x1.0mm9.8 N.m (1.0 kgf.m,7.2 tbtft)
Push camshaft pulleys onto camshafts, then tighten
the retaining bolts to the torque specified.
KEYS
13.
tfitml
Page 112 of 1413
Timing Belt
lnstallation
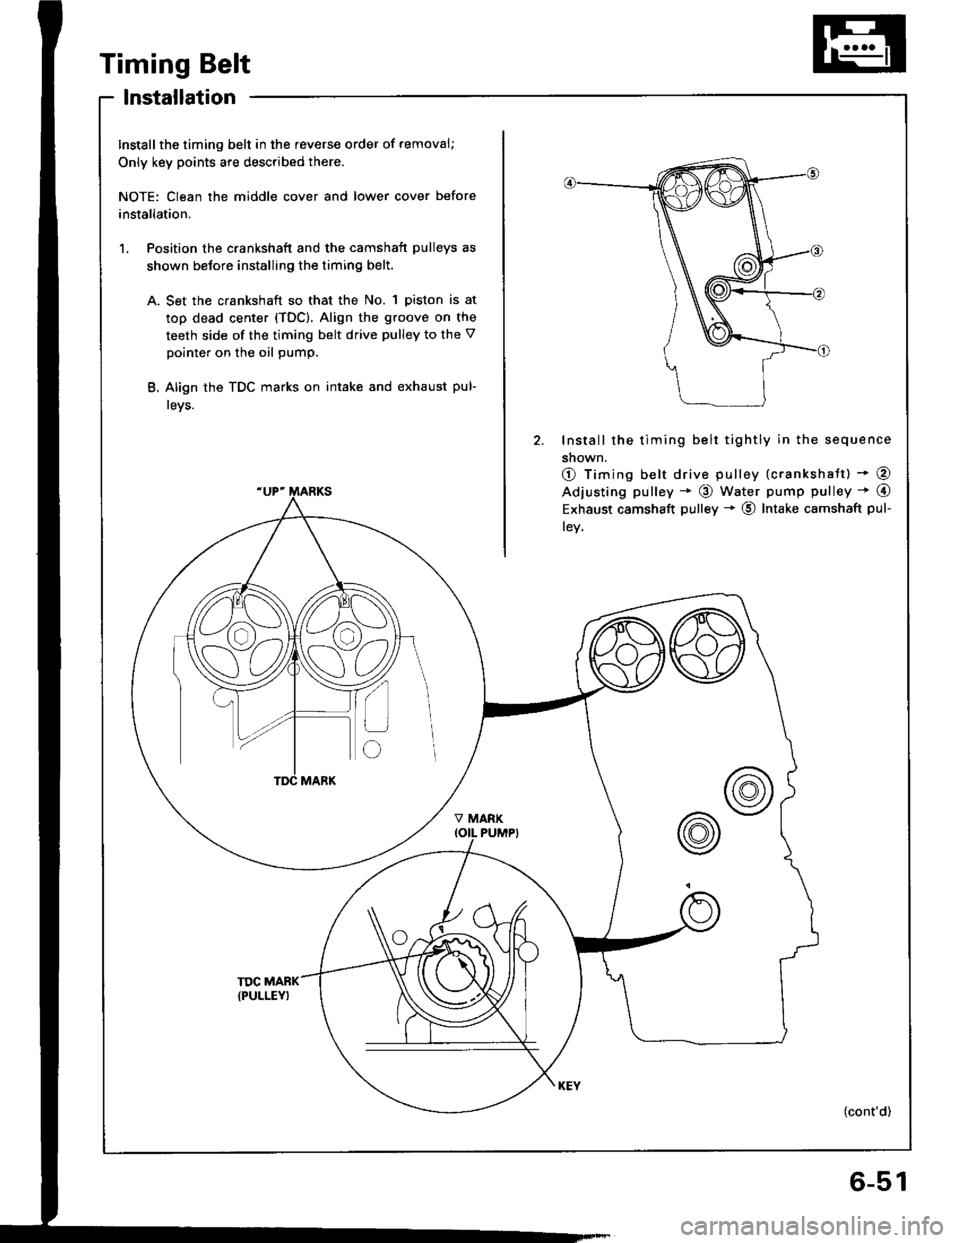
Install the timing belt in the feverse order of removal;
Only key points are described there.
NOTE: Clean the middle cover and lower cover before
installation.
1. Position the crankshaft and the camshaft pulleys as
shown betore installing the timing belt.
A. Set the crankshaft so that the No. 1 piston is at
top dead center {TDC). Align the groove on the
teeth side of the timing belt drive pulley to the V
pointer on the oil pump.
B. Align the TDC marks on intake and exhaust pul-
leys.
2. Install the timing belt tightly in the sequence
shown.
O Timing belt drive pulley (crankshatt) * @
Adjusting pulley * @ water pump pulley * @
Exhaust camshaft pulley * @ Intake camshaft pul-
lev,
(cont'd)
6-51
Page 137 of 1413
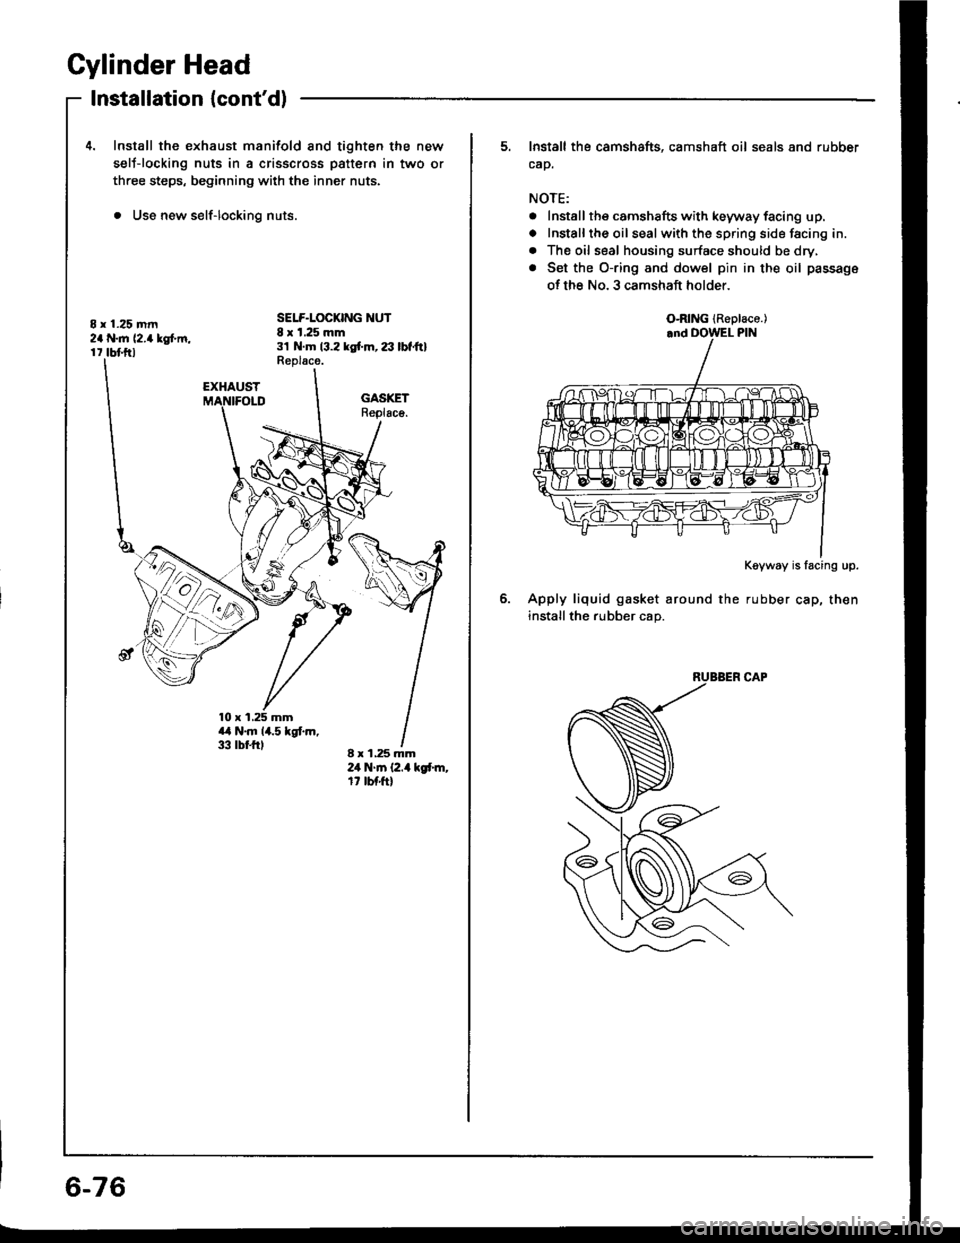
Cylinder Head
8 r 1.25 mm2a N..n 12.4lgtm,r 7 tbf.ftl
Installation {cont'd)
4. Install the exhaust manifold and tighten the new
selJ-locking nuts in a crisscross pattern in two or
three steps, beginning with the inner nuts.
. Use new self-locking nuts.
SELF.LOCKING NUT8 x 1.25 mm31 N.m 13.2 kgf'm, 23 lbtltlReplace.
EXHAUST
a.l N.m 14.5 kgt m,33 tbr.trl
GASKETReplsco.
8 x 1.25 mm24 N.m (2.4 kgt m,rt tbfft)
&,x
6-76
5. Install the camshafts, camshaft oil seals and rubber
cap.
NOTE:
. Install the camshafts with keyway facing up.
o Installthe oil sealwith the spring side facing in.
. The oil seal housing surface should be dry,
. Set the O-ring and dowel pin in the oil passage
of th€ No. 3 camshaft holder
Kgyway is lacing up.
Apply liquid gasket around the rubber cap, then
install the rubber cap.
O-RING {ReDlace.)
Page 152 of 1413
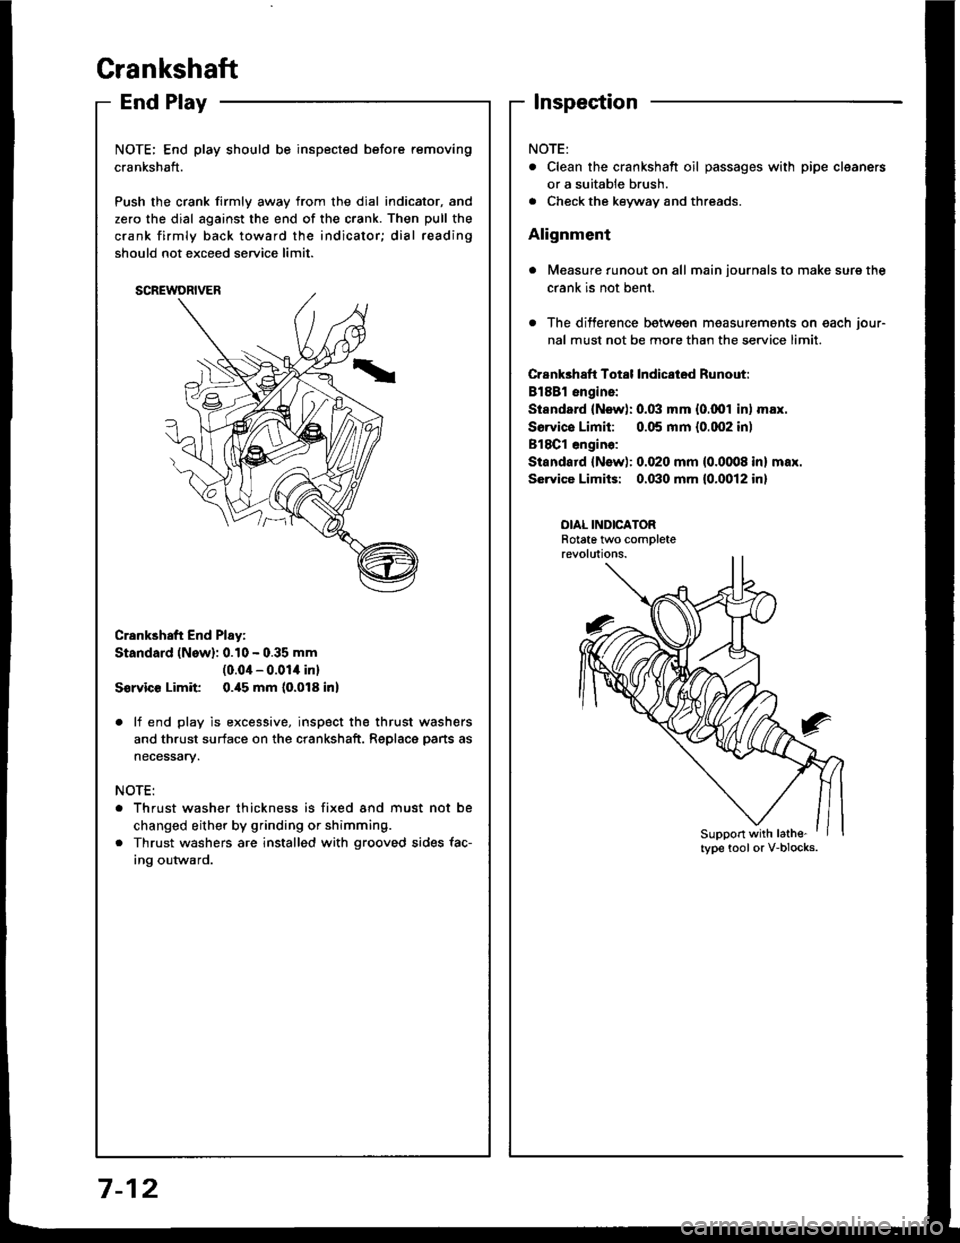
EndPlay
NOTE; End play should be inspected before removing
crankshaft.
Push the crank firmly awav from the dial indicator, and
zero the dial against the end of the crank. Then pull the
crank firmly back toward the indicator; dial reading
should not exceed service limit.
Crankshaft End Play:
Standard (New): 0.10 - 0.35 mm
(0.04 - 0.01i| inl
S€rvic€ Limit 0.i15 mm (0.018 inl
. lf end play is excessive, inspect the thrust wash€rs
and thrust surface on the crankshaft. Replace pans as
necessary.
NOTE:
Thrust washer thickness is fixed and must not be
changed either by grinding or shimming.
Thrust washers are installed with grooved sides fac-
ing outward.
Crankshaft
lnspection
. Clean the crankshatt oil passages with pipe cleaners
or a suitable brush.
. Check the keyway and threads.
Alignment
Measure runout on all main journals to make sure the
crank is not bent.
The differ€nce between measurements on each jour-
nal must not be more than the service limit.
Crank3haft Total lndicatod Runout:
Bl8Bl engins:
Sisndod {Nsw): 0.03 mm {0.001 in) max.
Sorvice Limit: 0.05 mm {0.002 inl
818C1 engin€:
Standard {Nsw): 0.020 mm (0.0008 in} mar.
SGrvice Limits: 0.030 mm 10.0012 in)
OIAL INDICATORRotate tlvo completerevolutions.
Support with lathe-
7-12
Page 561 of 1413
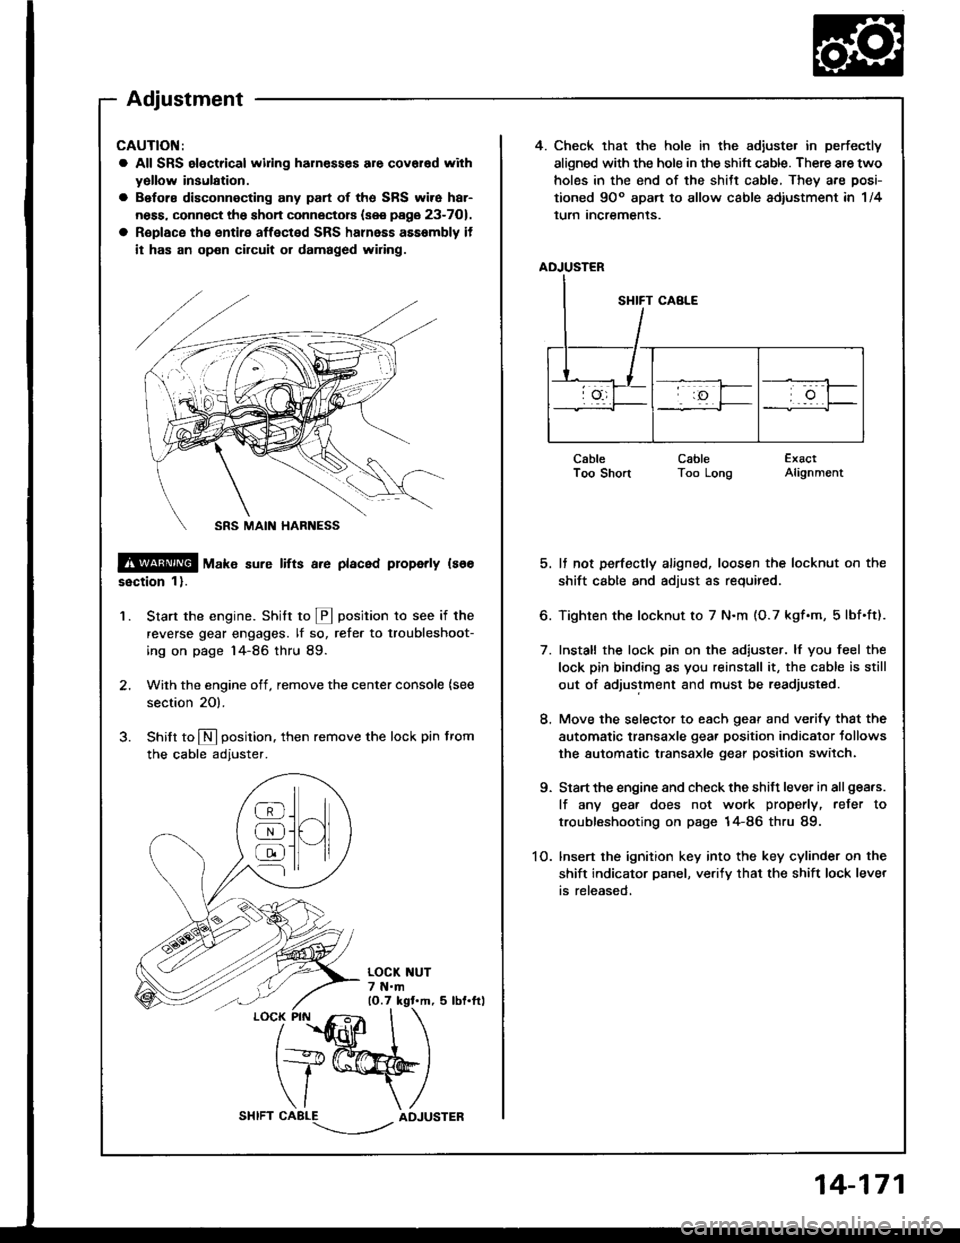
4. Check that the hole in the adiuste. in perfectly
aligned with the hole in the shift cable. There are two
holes in the end of the shitt cable, They are posi-
tioned 9Oo apart to allow cable adiustment in 1/4
lurn Incremenls.
ADJUSTER
CableI oo snonCableToo LongExactAlignment
5. It not perfectly aligned, loosen the locknut on the
shift cable and adjust as required.
6. Tighten the locknut to 7 N.m (O.7 kgf.m, 5lbf.ft).
7. Install the lock pin on the adiuster. lf you feel the
lock pin binding as you reinstall it, the cable is still
out of adjustment and must be readjusted.
8. Move the selector to each gear and verify that the
automatic transaxle gear position indicator tollows
the automatic transaxle gear position switch.
9. Start the engine and check the shift lever in all gea.s.
lf any gea. does not work properly, refer to
troubleshooting on page 14-86 thru 89.
1O. lnsert the ignition key into the key cylinder on the
shift indicator panel, ve.ify that the shift lock lever
is released,
CAUTION:
a All SRS electrical widng harn€sses are covar€d with
yollow insulation.
a Before disconnecting any part of ths SRS wire har-
ness, connect the shon connectors (see page 23-701.
a R€place the entire affected SRS halnass asssmbly it
it has an op€n circuit or damaged wiring.
@ tu"t" sure lifts a.e placed properly ls66
ssction 1).
Start the engine. Stritt to @ position to see if the
reverse gear engages. lf so, refer to troubleshoot-
ing on page 14-86 thru 89.
Wilh the engine off, remove the center console {see
section 20).
Shilt to N position. then remove the lock pin from
the cable adjuster.
'1.
/
''fidlfr
I
t+@
\/ \
CABLE-.'.-_--l../ADJUSTER
]H
@
@
@
Adjustment
14-171
Page 610 of 1413
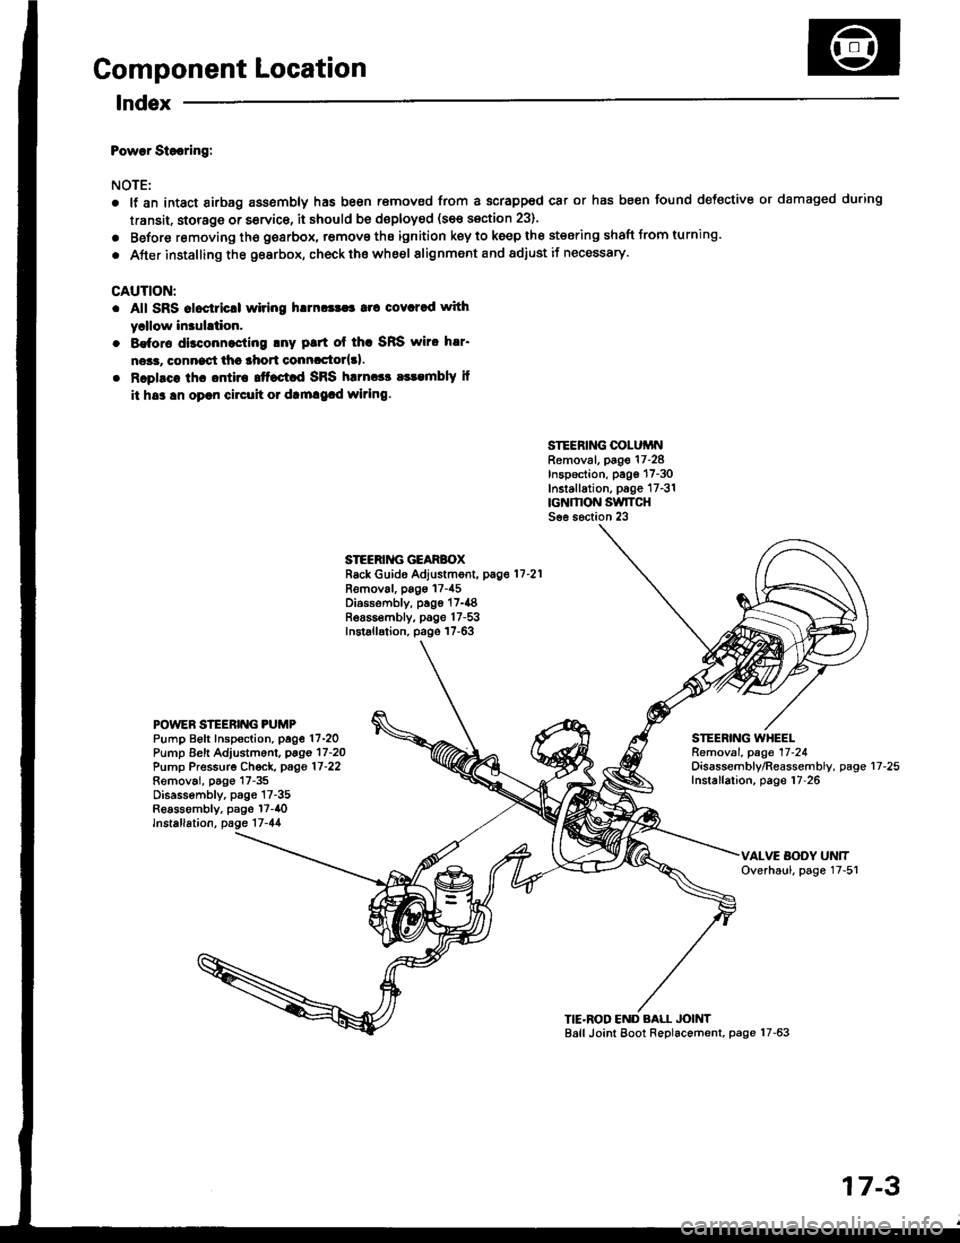
Component Location
lndex
Powar Siooring:
NOTE:
a
a
It an intact airbag ass€mbly has been r€moved from a scrapped car or has been found defective or damaged during
transit. storage or service, it should be doploy€d (see section 23).
Before removing tho gearbox, remove ths ignition key to keep the steering shaft Jrom turning.
After installing the gearbox, check ths whe€l alignment and adiust if necessary.
CAUTION:
. All SRS aloctricll wiring h!m!|$a rrc covcred with
yrllow in3uhtion.
. 8€for€ disconnocling lny ptrt ol thc SRS wiro h!r'
ne*r, connect thc lhort conncctor{3l.
. Rcplsce lhc ontira ttfact d SRS harnccc a$embly il
it hs3 !n oprn circuh 01 dtm!9.d wiring.
SIEERING COLUiINRemoval, page 17-28Inspection, pago 17-30Installation, p6ge 17-31rcNMON SwlTCHSee s6ction 23
STEERII{G GEARBOXRack Guide Adjustment, pag.11-21
Removal, pags 17-45Diossombly, page 17-{8Bea65€mbly, page 17-53Installation, page 17-63
POWEN STEERING PUMPPump Beft Inspoction. page 17-2OPump Eeft Adjustm6nl, pago 17-2OPump Pressurg Ch€ck, page 17-22Removai, p6go 17-35Disassembly, p3gs 17-35Reassombly, psge l7-40lnstallation, page 17-44
STEERING WHEELRemoval. page 17-24Oisassembly/Reassembly, pageInstallation, page 17-2617-25
TIE'ROD END BALL JOINTBall Joint Eoot Replacement, page 17-63
17-3
Page 652 of 1413
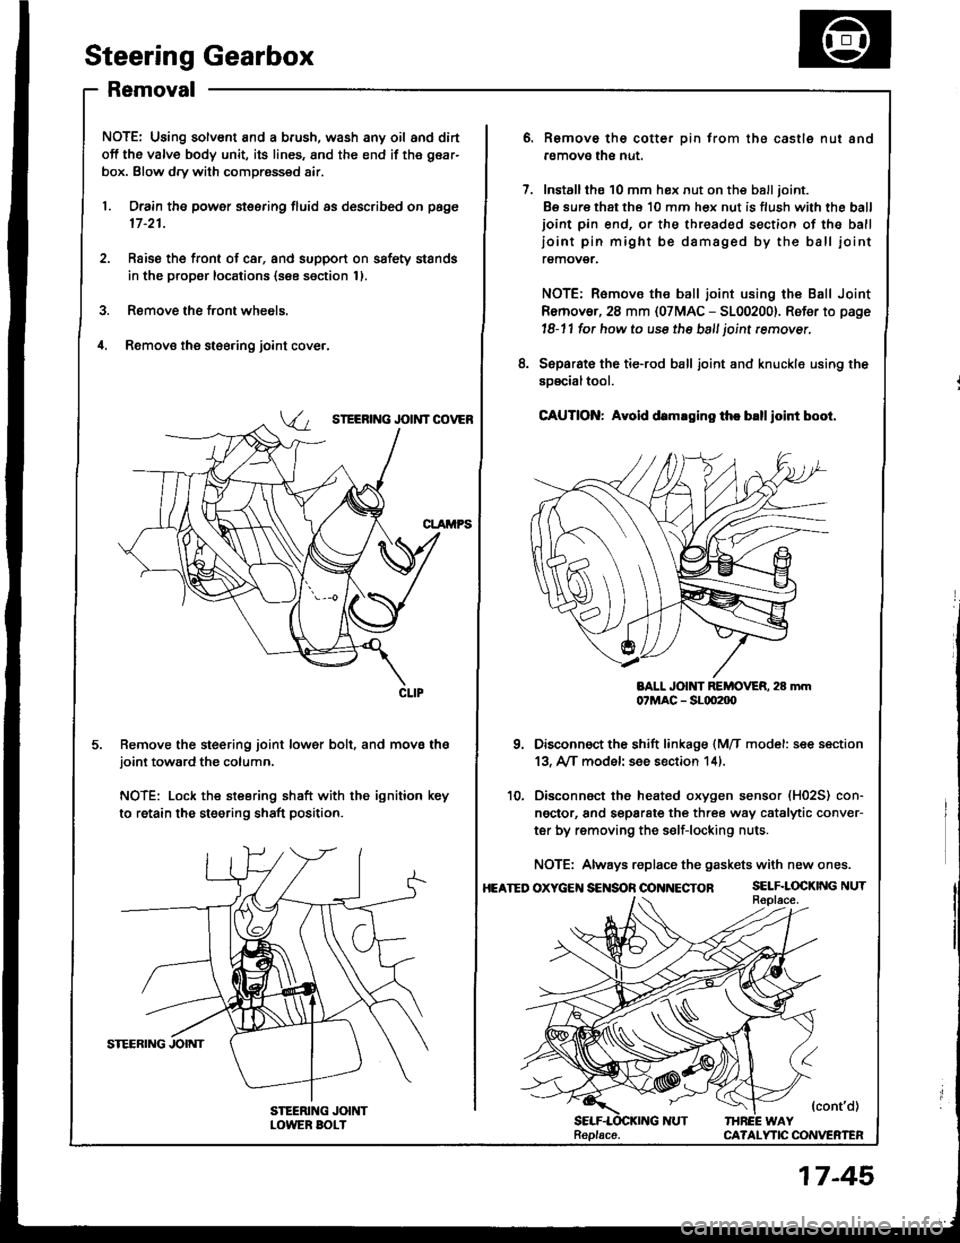
Steering Gearbox
Removal
NOTE: Using solvent and a brush, wash any oil and dirt
off the valve body unit, its lines, and the end if the gear-
box. Blow dry with compressed air.
1. Drain the power steering fluid as described on page
17 -21.
2. Rsise the front of car, and support on safety stands
in the propsr locations (see section 1).
3. Remove the front wheels.
il. Removs the st€ering joint cove.,
SIEERING JOIi{T COVEB
Remove the steering joint lower bolt, and move thejoint toward the column.
NOTE: Lock the steering shaft with the ignition key
to retain the steering shaft position.
Remove the cotter pin trom the castle nut and
removo the nut.
Installthe 10 mm hex nut on the balljoint.
Be sure that ths 10 mm hex nut is flush with the ball
ioint pin end, or the threaded section of the ball
ioint pin might be damaged by the ball iointremover.
NOTE: Remove the ball joint using the Ball Joint
Remover, 28 mm {07MAC - 5100200}. Refer to page
l8-11 fot how to use the ball joint rcmover,
Separat€ the tie-rod ball joint and knuckle using the
soscialtool.
CAUTION: Avold d.maging th. blllloint boot.
BALL JOlt{T REMOVER. 28 mm07MAC - SLqt2|X)
Disconnect the shift linkage {MfI model: see section
13, A/[ model see section 14).
Disconnect the heated oxygen sensor (H02S) con-
ngctor, and separate the three way catalytic conver-
ter by removing the s€lf-locking nuts.
NOTE: Always replace the gaskets with new ones.
OXycEt{S€NSOnOONNECTOR SELF.LOCKINGNUT
{cont'd)IHREE WAYCA?ALYTIC CONVERTEN
8.
10.
HEATED
Replacs.
17-45
Page 1107 of 1413
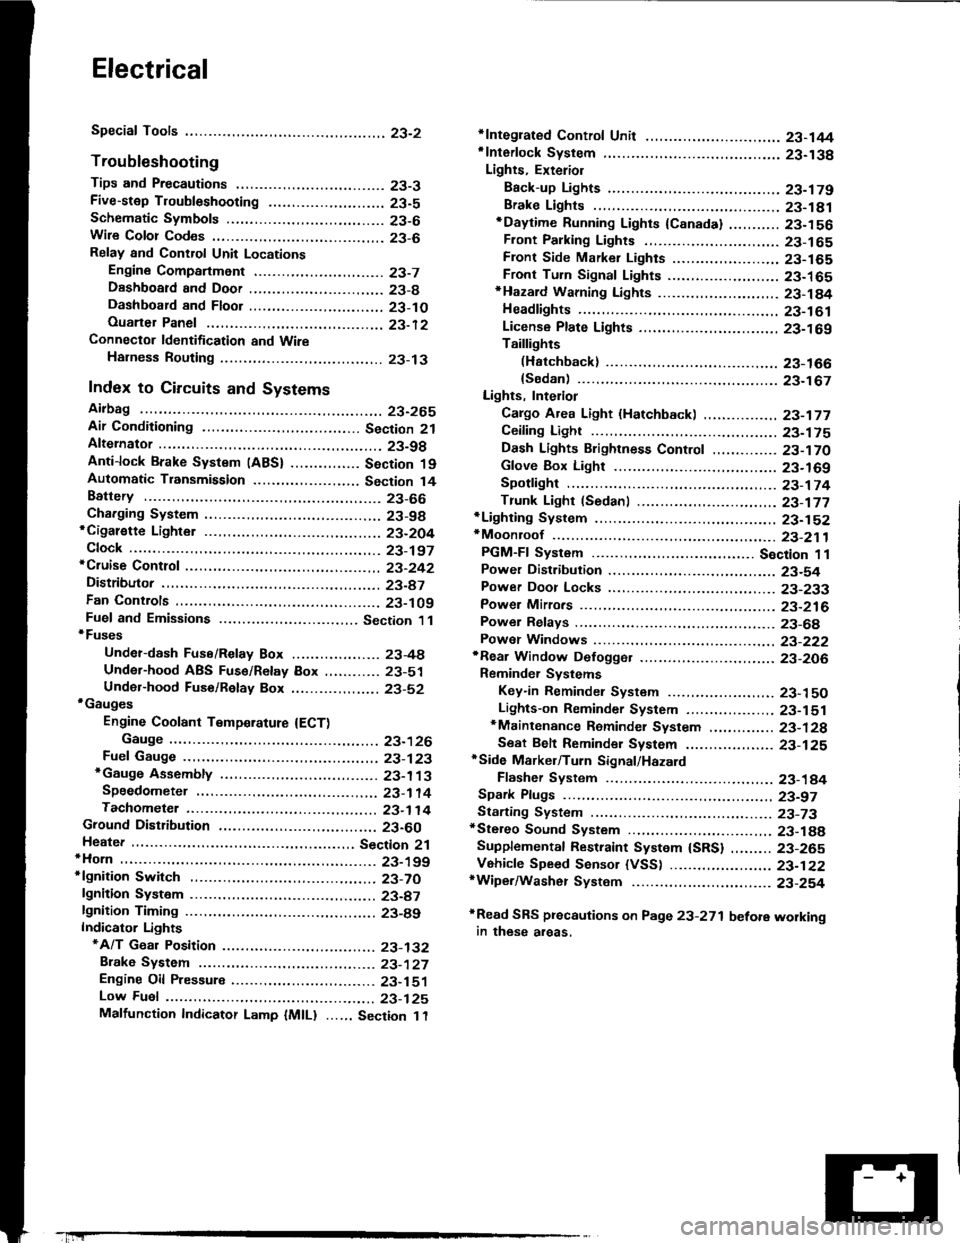
Electrical
Special Tools
Troubleshooting
Tips and Precautions ................................ 23-3Five-stop Tloubleshooting ..............,...-..-... Z3-sSchematic Symbols ................................_. 23-6wire Color Cod€s ..................................... 23-6Relay and Control Unit Locations
Engine Compartment .........,............ ... --. 23-7Dsshboard and Door ..,,......................... 23-gDashboard and Floor ............................. 23-t OOuaner Panel .....-.....23-12Connector ldentification and WireHarness Routing ........ 23-i 3
Index to Circuits and Systems
Airbag ............... ...-..-... 2g-26sAir Conditioning ....,.. Section 2lAltelnator ......_.............. 23-99Anti-lock Brake Systsm (ABS) Section 19Automatic Transmission Section 14Battery .............. .......... 23-66Chafging System ........... 23-98rCigalstte Lighter .....................-...-......-..-.. Z3-2O4Cfock ................. ..........23-197rcruise Controf .......--..-... 23-242Distributor .................... 23-87Fan Controls ................. 23-1ogFuel and Emissions ... Section 1i*Fuses
Under-dash Fuse/Relay Box ................... 23-48Undor-hood ABS Fuse/Retay Box ............ 23-51Under-hood Fuse/Relay Box,.................. 23-52rGauges
Engine Coolant Temperature {ECT)Gauge ................ ..23-126Fuef cauge ............... 2g-123'Gauge Assembly ....--.23-113Speedometer .....-...,,. 23-114Tachometer .....,.....-.. 23-114Ground Distribution ........ 23-60Heater ,,,........,.... ..... Section 2lrHorn ................. ........... 23-199*fgnition Switch ............. 23-70fgnition Syst6m .......-..-.. 23-A7lgnition Timing .............. 23-89Indicator Lights"A/T Gear Position .............. ................... 23-1 32B1ak6 System ...,..,..-.23-127Engine Oil Pressura .............................. _ 23-1 51Low Fuel ............ ......23-125Malfunction Indicator Lamp {MlL} ...,,. Section I l
tfnteglated Control Unit ...29-144*lnterlock System ...................................... 23-1 3gLights, Exteriol
Back-up Lights ........... 23-179Brake Lights .............. 23-t8ltDaytime Running Lights {Csnada} ........... 23-156Front Palking Lights ............................. 23-1 65Flont Side Marker Lights ....................... 23-165Front Turn Signal Lights ........................ 23-1 65*Hazard Warning Lights .........................- 2g-1A4Headlights ................. 23-t6tLicense Plate Lights .............................. 23-1 69Taillights(Harchback) .......... 23-166
{Sedan) .............. .. 23-167Lights. Inteliol
Cargo Area Light {Hatchback) ...... -.. -.. -... 23-177Ceifing Light ........-..-.23-175
Dash Lights Blightness Controt .............. 23-t70Glove Box Lighr ................................... 23-1 69Spotfighr ............ ....-.23-174Trunk Light (Sedanl ............... .............. - 23.-177*Lighting Sysrem .......-.-... 23-152:Moonroof ,,.,.......,..,,,,,.-.23-211PGM-FI Systom ........ S€crion 11Power Distribution .,.-..--..23-54Power Door Locks .............,,..................... 23-233Power Mirors ..,..,....-...- 23-216Power Relays ...........,..... 23-68Power Windows ............ 29-222*Rear Window Defogger ........,... ..........,..... - 23-20,6Reminder Systems
Key-in Remindel System ....,.............,.... 23-1 50Lights-on Reminder System ................... 23-l 5f*Maintenance Reminder system ..,,.... -.. - -. 23-.1 2gSeat Belt Reminder System ..................- 23-125*Side Markel/Turn Signal/Hazard
Ffasher System .,..,..-.23.-1A4Spark Pfugs .........-...-..... 23-97Starting System ....,,.....-. 23-73*Stereo Sound System ...,.......................,,.. 23-l gg
Supplemental Restraint System {SRS} ......... 23-265Vehicfe Speed Sensor {VSS) .............--..-.... 23-122*Wiper/Washer Systom ...............--.........-..- Zg-254
rRead SRS pi€cautions on Page 23-271 betore workingin these areas.
-+