rear trim HONDA INTEGRA 1994 4.G Workshop Manual
[x] Cancel search | Manufacturer: HONDA, Model Year: 1994, Model line: INTEGRA, Model: HONDA INTEGRA 1994 4.GPages: 1413, PDF Size: 37.94 MB
Page 930 of 1413
Rear Window
Removal
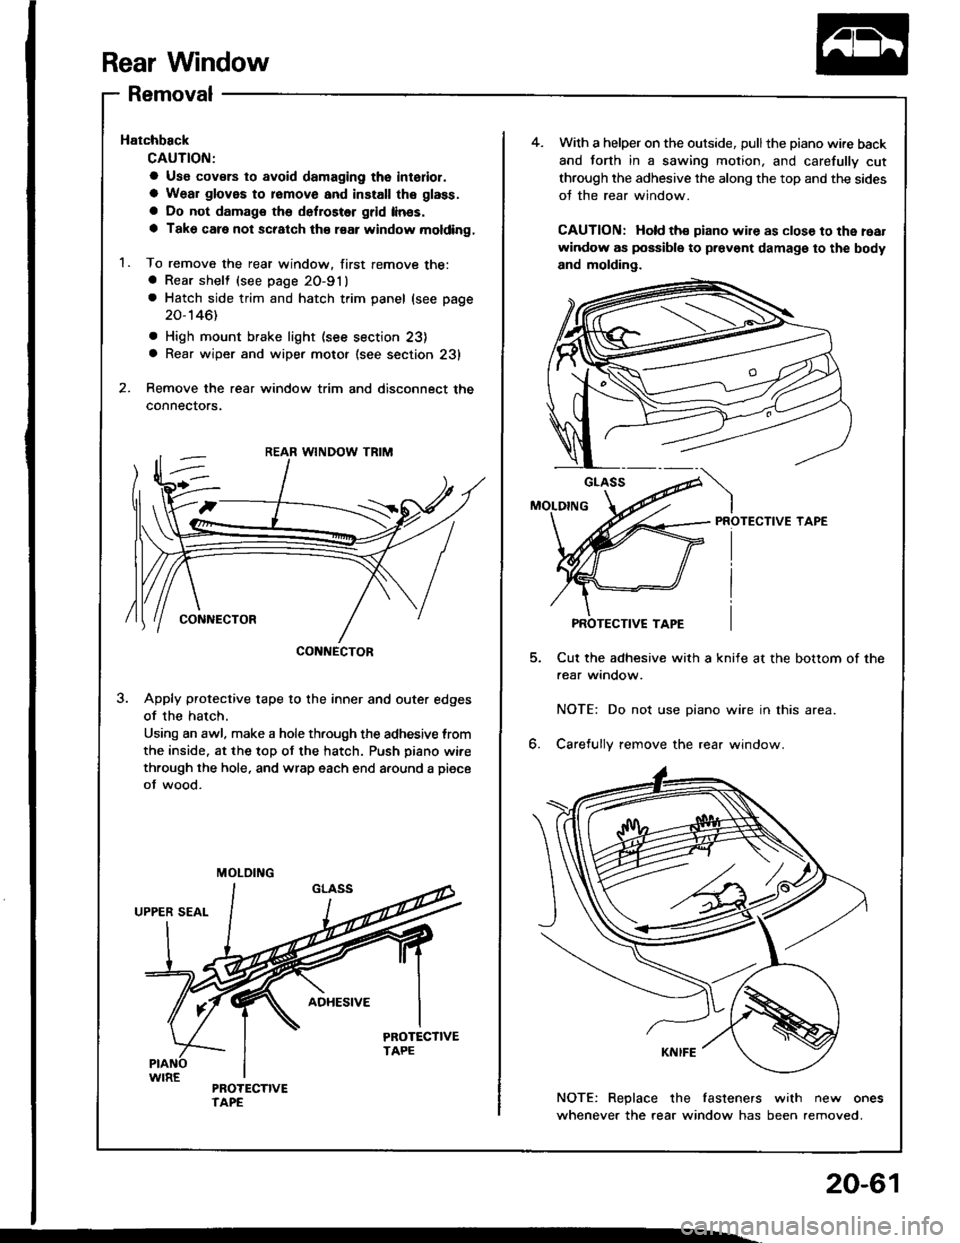
Hatchback
CAUTION;
a Use covsrs to avoid damaging tho interior.
a Wear gloves to romove and install the glass.
a Do not damags the defroster grid linss.
a Tako care not scratch th€ raar window molding,
1. To remove the rear window. first remove the:a Rear shelt (see page 20-91)
a Hatch side trim and hatch trim panel (see page
20-146)
. High mount brake light (see section 23)a Rear wiper and wiper motor (see section 231
2. Remove the rear window trim and disconnect the
connectors.
3. Apply protective tape to the inner and outer edges
of the hatch.
Using an awl. make a hole th.ough the adhesive trom
the inside. at the top ot the hatch. Push piano wire
through the hole, and wrap each end a.ound a piece
of wood.
CONNECTOR
MOLOING
4.With a helper on the outside, pullthe piano wire back
and forth in a sawing motion, and carefully cut
through the adhesive the along the top and the sides
oJ the rear window.
CAUTION: Hold ths piano wire as clos€ to the roat
window as possible to prevont damage to the body
and molding.
PROTECTIVE TAPE
Cut the adhesive with a knife at the bottom of the
aear window.
NOTE: Do not use piano wire in this area.
6. Carefully remove the rear window.
NOTE: Replace the fasteners with new ones
whenever the rear window has been removed.
PROTECTIVE TAPE
20-61
Page 932 of 1413
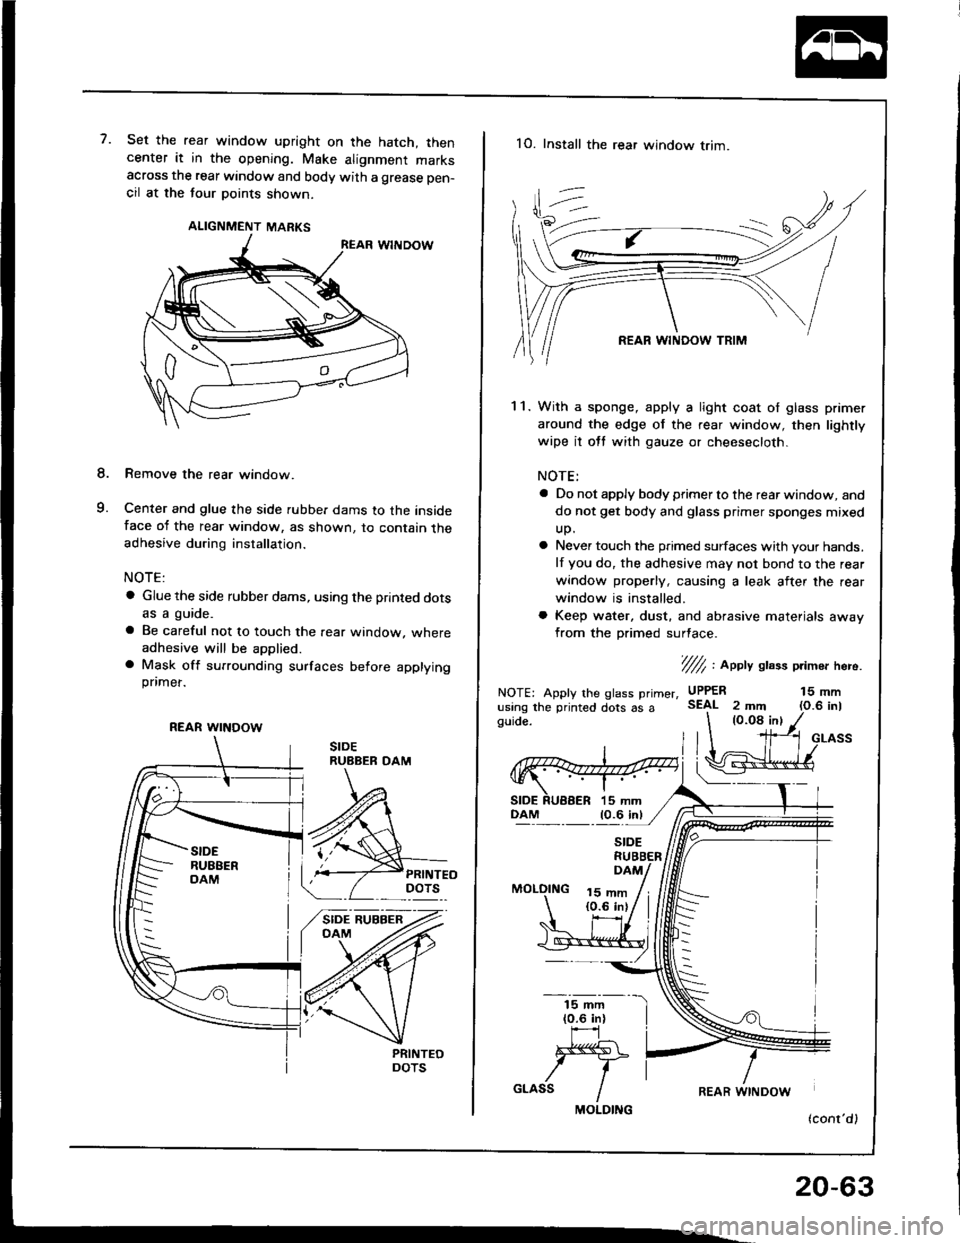
7.Set the rear window upright on the hatch, thencenter it in the opening. Make alignment marksacross the rear window and body with a grease pen-
cil at the tour points shown.
ALIGNMENT MARKS
Remove the rear window.
Center and glue the side rubbe. dams to the insideface of the rear window, as shown, to contain theadhesive during installation.
NOTE:
a Glue the side rubber dams, using the printed dotsas a guide-
a Be careful not to touch the rear window, whereadhesive will be applied.a Mask off surrounding surfaces before applyingpnmeI.
8.
cl
REAR WINDOW
1O. Install the rear window trim.
1 1. With a sponge, apply a light coat of glass primer
around the edge of the rear window, then lightly
wipe it ott with gauze or cheesecloth.
NOTE:
a Do not apply body primer to the rear window, and
do not get body and glass primer sponges mixed
up.
a Never touch the primed surfaces with your hands.
lf you do, the adhesive mav not bond to the rear
window properly, causing a leak after the rear
window is installed.
a Keep water, dust. and abrasive materials awav
from the primed surlace.
//// , appV glass primor hero.
NOTE: Apply the glass primer,using the printed dots as aguroe.
MOLOING
UPPER 15 mm
(0.0a inl
15 mm{0.6 in}
(cont'd)
10.6 inl
MOLDING
REAR WINDOW
20-63
Page 937 of 1413
Rear Window
Removal
Sadan
CAUTION:
a Wear gloves to remove and install the leal window.
a Do not damage the delloster grid lines.
1. To remove the rear window, f irst remove:
. Trunk lid {see page 20-149)
a Rear seat-back side bolsters (see page 20-11 1)
. Rear shelf (see page 2O-95)
a Rear pillar trim panel {see page 20 95)
2. Disconnect the defroster leads, and remove their
holders.
NOTE: Avoid scratching the rear window with the
cutter blade.
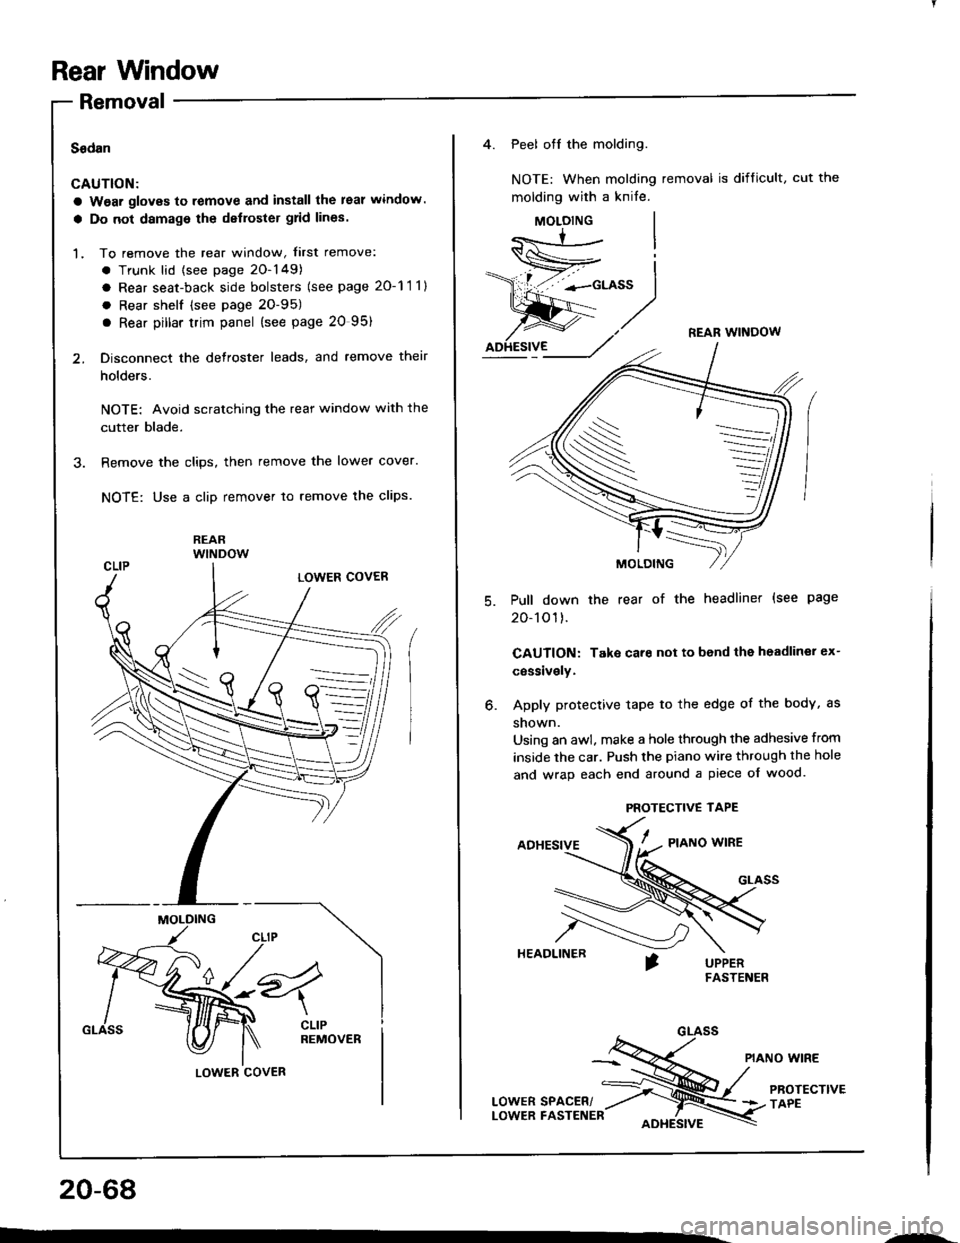
3. Remove the clips, then remove the lower cover.
NOTE: Use a clip remover to remove lhe clips.
REARwlNDow
MOLDING
LOWER COVER
20-68
---
4. Peel off the molding.
NOTE: When molding removal is difficult, cut the
molding with a knife.
MOLOING
REAR WINOOW
Pull down the rear of the headliner (see page
20-101).
CAUTION: Take care not to bend the headliner ex-
cessively.
Apply protective tape to the edge of the body, as
shown.
Using an awl. make a hole through the adhesive from
inside the car. Push the piano wire through the hole
and wrap each end around a piece of wood.
ADHESIVE/ - a,o*o *'*a
HEADLINER
PIANO WIRE
LowERsPAcER/ ;ru/
PRorEcrtvE
LowER FASTENER oore,srvr \3 rlee
o.
S
PROTECTIVE TAPE
Page 949 of 1413
Moonroof
Motor, Drain Tube and Frame Replacement
CAUTION: B€ caretul not to damag€ lhe seats, dash-
board and other interior trim.
1. Remove the glass (see page 2O-79) and headliner
(see page 20-98).
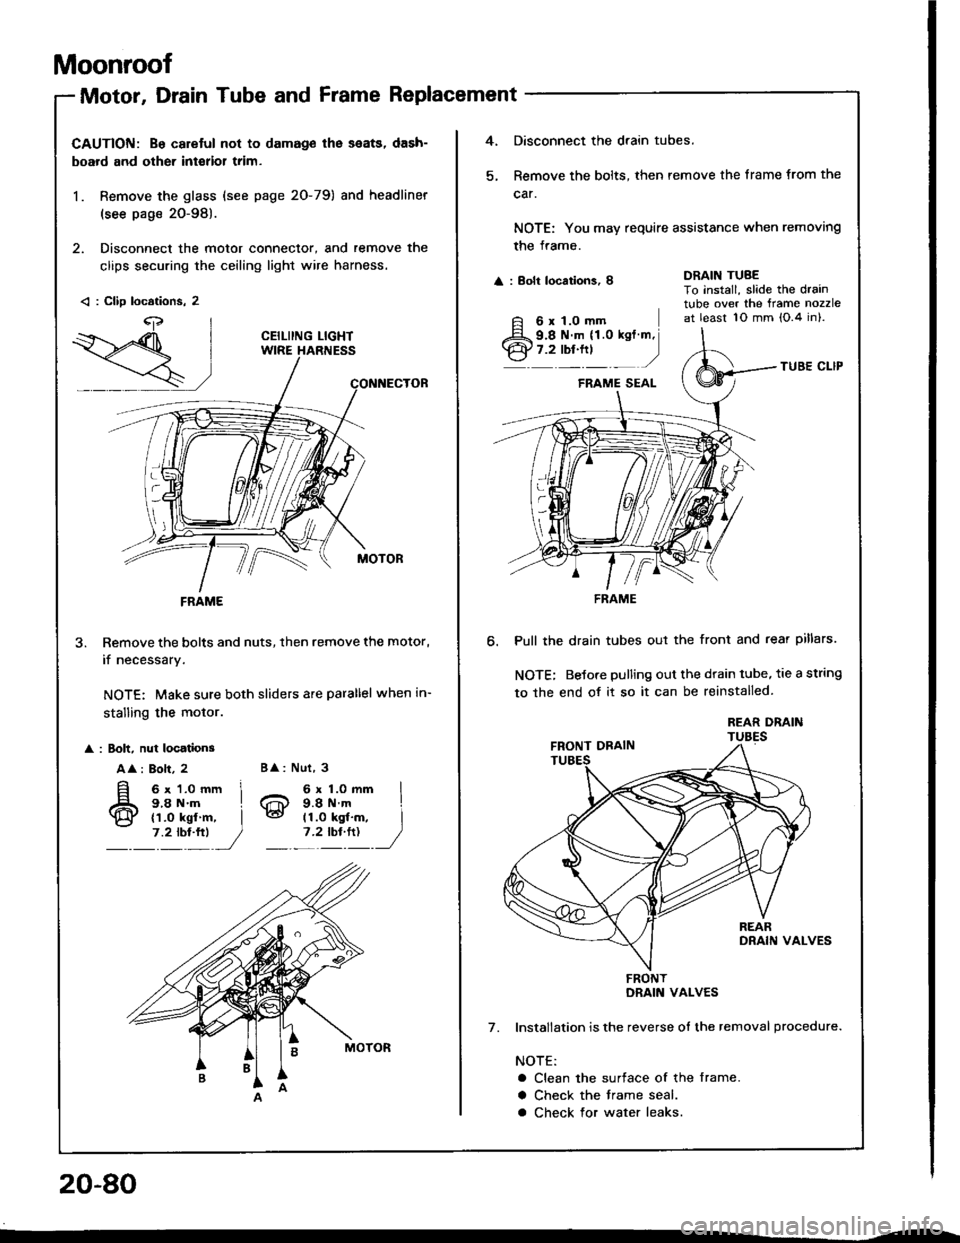
2. Disconnect the motor connector, and remove the
clips securing the ceiling light wire harness.
3. Remove the bolts and nuts, then remove the motor,
if necessarv,
NOTE: Make sure both sliders are parallel when in-
stalling the motor.
: 8olt, nut locationg
A
: Bolt, 2
6x1.Omm I9.8 N.m ILd tt.o kgf.-, I,.?- ", _,/
< : CliD locations. 2
CEILIING LIGHT
FRAME
B : Nut, 3
20-80
4.Disconnect the drain tubes.
Remove the bolts, then remove the trame from the
car.
NOTE: You may require assistance when removing
the frame.
: Eolt locations, I
6 x 1.0 mm
DRAIN TUBETo install, slide the draintube over the ftame nozzleat least 10 mm {O.4 in}.
6.
TUBE CI-IP
Pull the drain tubes out the front and rear pillars.
NOTE; Betore pulling out the drain tube, tie a string
to the end of it so it can be reinstalled.
Installation is the reverse ol the removal procedure.
NOTE:
a Clean the surtace of the frame.
a Check the trame seal.
a Check for water leaks.
7.
9.8 N.m (1.0 kgt m,7.2 rbr.ttl )
FRAME
FRONT
Page 956 of 1413
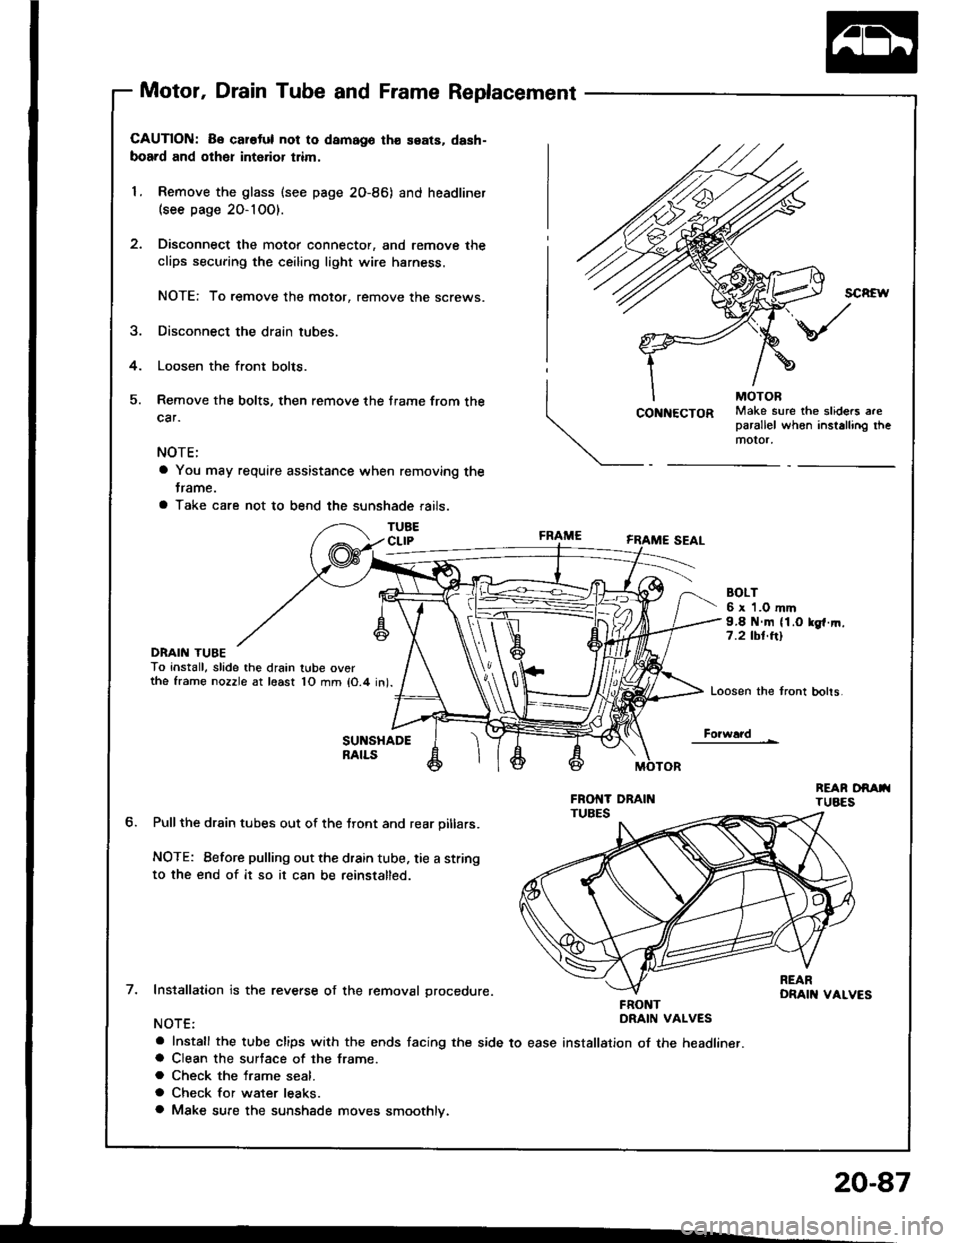
Motor, Drain Tube and Frame Replacement
CAUTION: Be carotul not to damago th€ seats, dash-
board and other int6rior trim,
1. Remove the glass (see page 2O-86) and headliner(see page 20-10O).
Disconnect the motor connector, and remove the
clips securing the ceiling light wire harness.
NOTE: To remove the motor, remove the screws.
Disconnect the drain tubes.
Loosen the front bolts.
Remove the bolts, then remove the trame from the
car.
NOTE:
a You may require assistance when removing the
trame.
a Take care not to bend the sunshade rails.
TUBECLIP
DRAIN TUBETo install, slade the drain tube ov6rthe frame nozzle at least 10 mm lO.4 in).
SUNSHADERAILS
Pullthe drain tubes out of the tront and rear oillars.
NOTE: Before pulling out the drain tube, tie a string
to the end of it so it can be reinstalled.
Installation is the reverse of the removal grocedure.
NOTE:
a Install the tube clips with the ends facing the side to easea Clean the surtace of the frame.
a Check the frame seal.
a Check for water leaks.
a Make sure the sunshade moves smoothlv.
SCREW
4.
\/
Make sure the sliders areparallel when installing themotor,
CONNECTOR
FRAME
BOLT6 x 1.0 mm9.8 N.m (1.O lg{.rn.7.2 tbt.ttl
Loosen the tront bohs
Fo?w!?d
tt.
FRONTDRAIN VALVES
installation of the headliner.
20-87
Page 960 of 1413
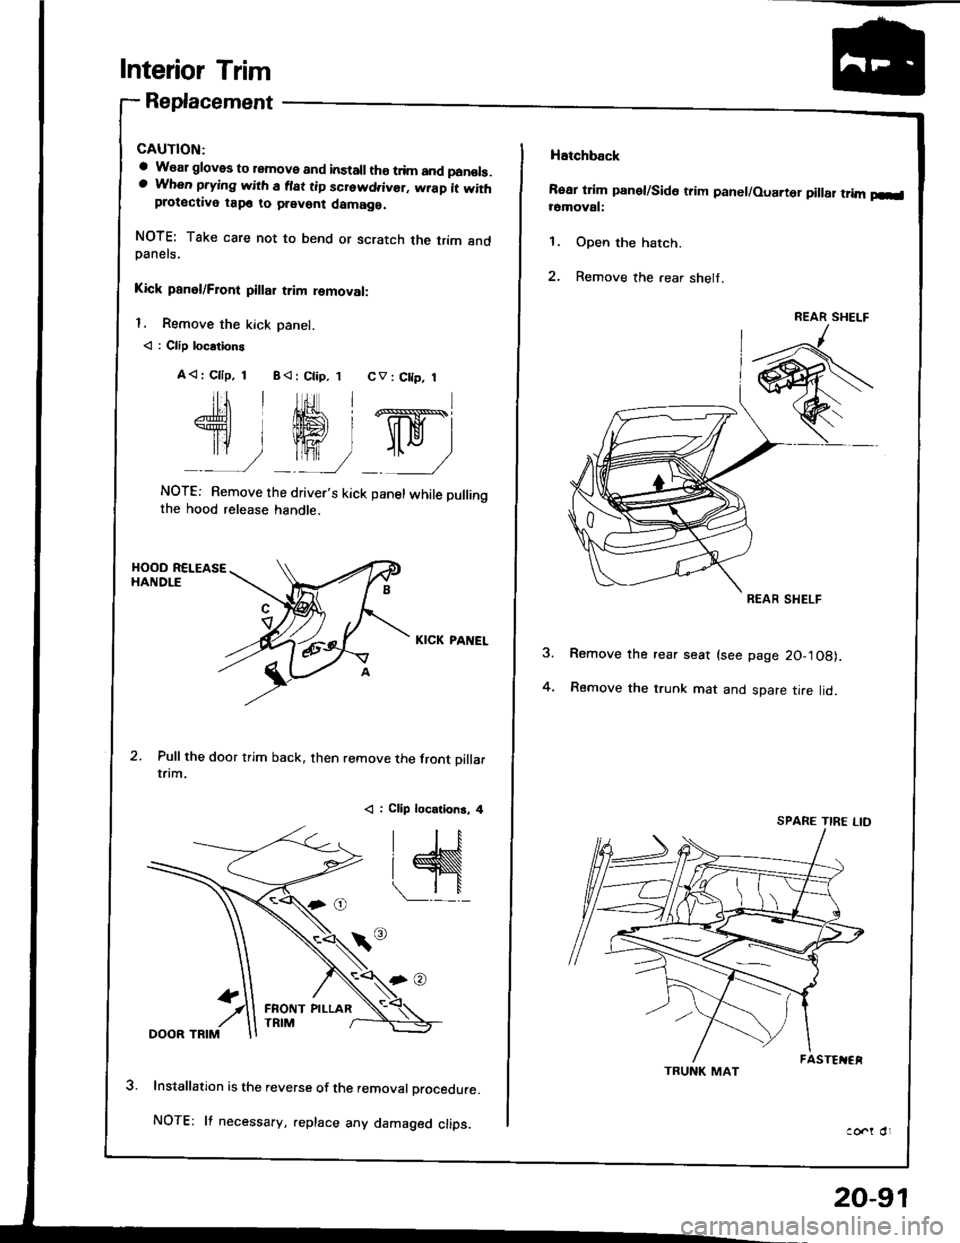
Interior Trim
Replacement
a W€al gloves to remove and installth€ trim and panols.a When prying with a flat tip screwd.ivor. wrap it withprotective tap€ to prevent damaga.
NOTE: Take care not to bend or scratch the trim andDanels.
Kick panel/Front pillar trim removal:
l. Remove the kick Danel.
< : Clip locations
A< | Cllp, 1 B< : Ctip, 1 CV : C[p, 1
Jtl,Ml*
U ry-ry
NOTE: Remove the driver's kick panel while pullingthe hood release handle.
KICK PANEL
Pull the door trim back, then remove the front oillarrflm.
< : Clip locations, 4
lnstallation is the reverse of the removal procedure.
NOTE: lf necessary, .eplace any damaged clips.
FRONT PILLAR
20-91
Hatchback
Rear trim panet/Side trim panel/Ouarter pillar trim p-l16moval:
1. Open the hatch.
2. Remove the .ear shelt.
Remove the rear seat (see page 20-'l08).
Remove the trunk mat and spare tire lid.4.
ao..t dr
REAR SHELF
REAR SHELF
TRUNK MAT
SPARE TIRE LID
Page 961 of 1413
lnterior Trim
Replacement (cont'd)
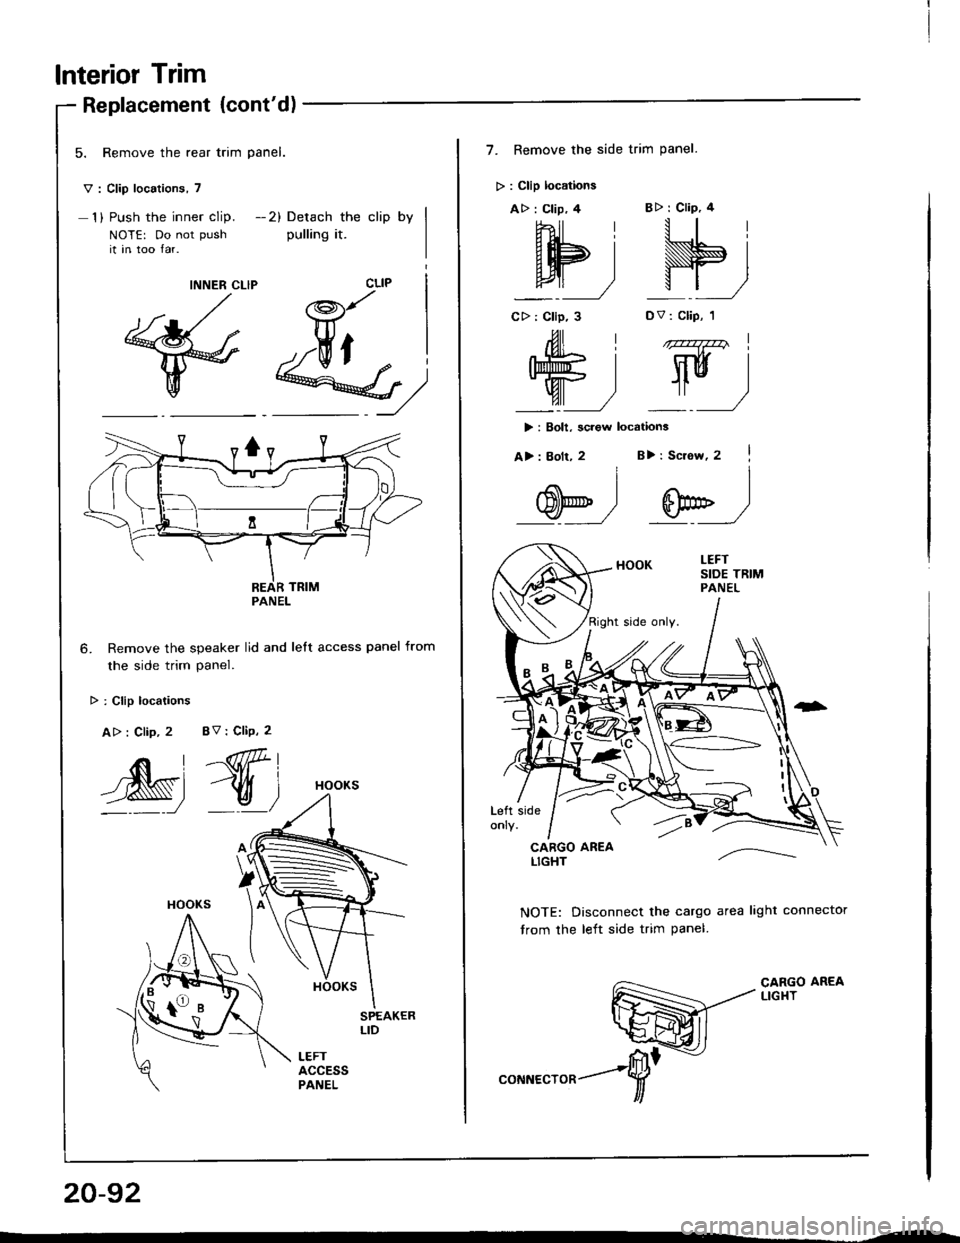
5. Remove the rear trim panel.
v : Clip locations, 7
1) Push the inner clip. -2) Detach the clip by
NOTE: Do not push pulling it.it in too lar.
M)
Remove the speaker lid and left access panel from
the side trim panel.
SPEAKERLID
LEFTaccEssPANEL
INNER CLIP
@
PANEL
> : Clip locaiions
A> : Clip, 2 8V : CliP, 2
,e-, ff)
ffi
,Kl^\
B
\fo
7. Remove the side trim Panel.
> : Clip locations
A> : Clip. 4
W-t Nj
BD : Clip, 4
DV : Clip, 1CD : Clip, 3
> : Boll, screw locations
,Ull | ,,zqzz4 |
w) !)
A> : Bolt, 2B>: Sciow, 2
@-,
i,Gffi'^*^
NOTE: Disconnect the cargo area light connector
trom the left side trim Panel.
CARGO AREALIG}IT
Page 962 of 1413
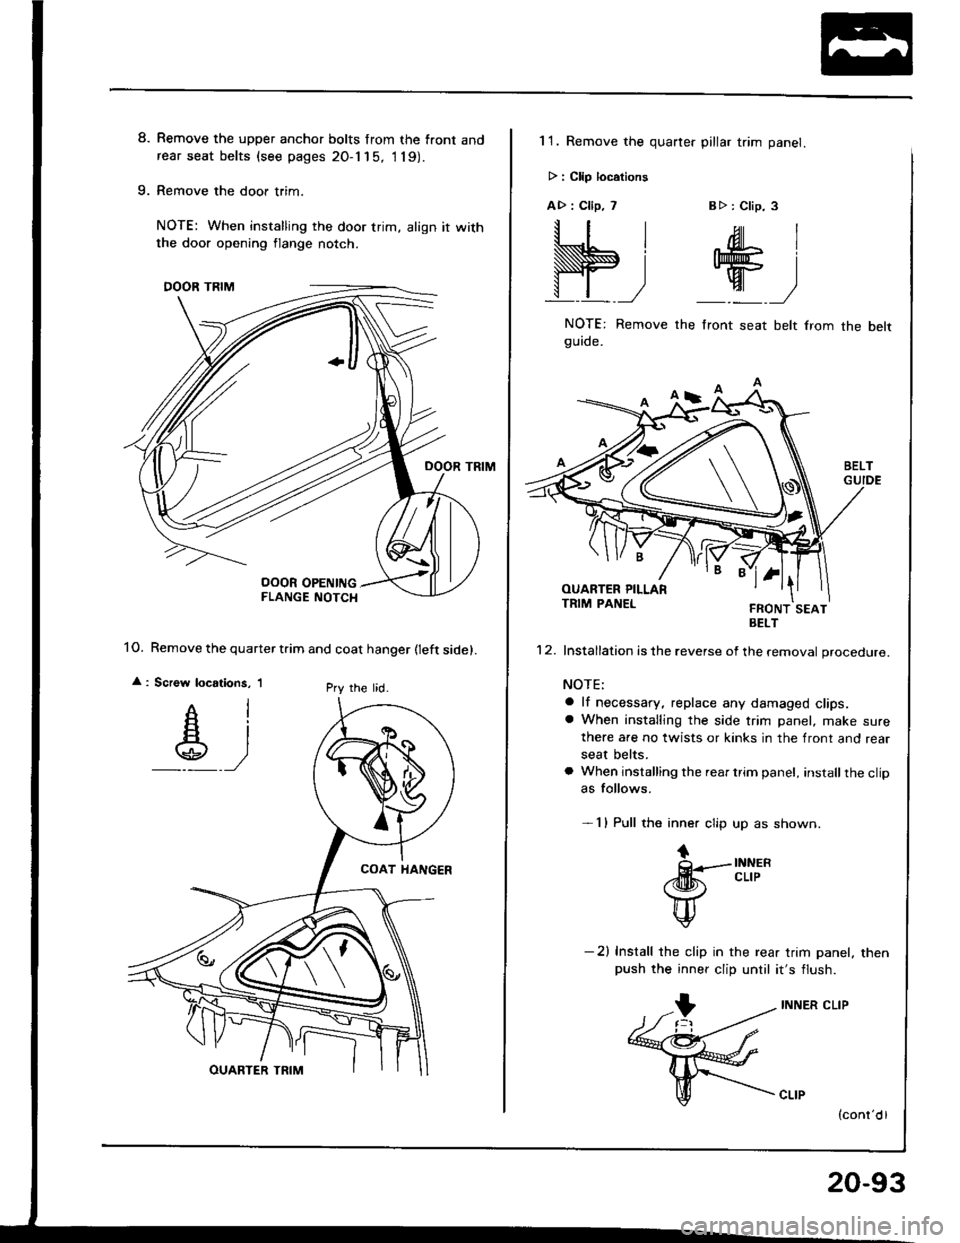
8. Remove the upper anchor bolts from the front andrear seat belts (see pages 20-1 15, 1 19).
9. Remove the door trim.
NOTE: When installing the door trim, align it with
1O. Remove the quarter tiim and coat hanger fleft sidel.
: Screw locstions, 'lPry lhe lid.
the door opening flange notch.
11. Remove the quarter pillar trim panel.
> : Clip locations
A>: Clip, 7 Btr: Clip. 3
S;+)
NOTE: Remove the front seat belt lrom
9UrOe.
the belt
BELT
'12. Installation is the reverse of the removal procedure.
NOTE:
a lf necessary, .eplace any damaged clips.a When installing the side trim panel, make sure
there are no twists or kinks in the front and rear
seat belts.
a When installing the rear trim panel, installthe clipas follows.
- 1 I Pull the inner clip up as shown.
tQ-.-INNER./ilk cLrP( \c4z )\/
tl\#
-2) Install the clip in the rear trim panel. thenpush the inner clip until it's flush.
INNER CLIP
20-93
Page 963 of 1413
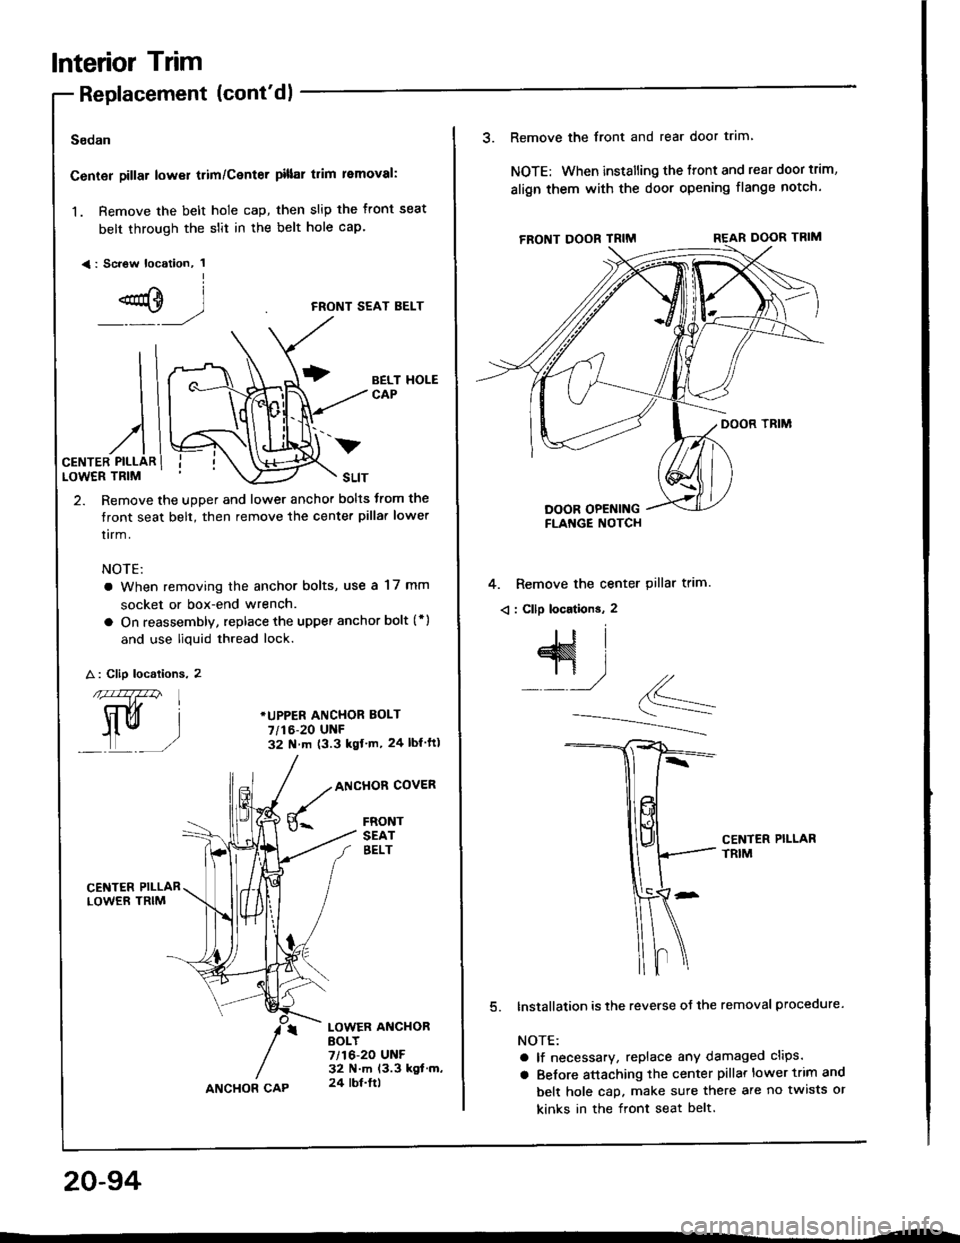
lnterior Trim
Replacement lcont'dl
Sodan
Center pillar lower trim/Center pillal trim removal:
1. Remove the belt hole cap, then slip the front seat
belt through the slit in the belt hole cap.
<: Sc.ew location, 1I
e)
)
2. Remove the upper and lower anchor bolts trom the
tront seat belt, then remove the center pilla. lower
tirm.
NOTE:
a When removing the anchor bolts, use a 17 mm
socket or box-end wrench.
a On reassembly, replace the upper anchor bolt (* )
and use liquid thread lock.
CENTER PILLARLOWER TRIM
FRONT SEAT BELT
BELT HOLECAP
*UPPER ANCHOR EOLT
7/t6-20 UNF32 N m (3.3 kgf'm, 24 lbl ft)
A : Clip localions. 2
nfa147zzn
trui
L_,)
ANCHOR COVER
FRONTSEATEELT
CENTER PILLARLOWER TRIM
LOWER ANCHORBOLY7/16-20 UNF32 N.m 13.3 kgt.m,24 lbt.ltlANCHOR CAP
20-94
v
3. Remove the front and rear door trim
NOTE: When installing the ffont and rear door trim,
align them with the door opening flange notch.
4. Remove the center pillar trim.
< : Cllp locations. 2
CENTER PILLARTRIM
lnstallation is the reverse oJ the removal procedure.
NOTE:
a lf necessary, replace any damaged clips.
a Belore attaching the center pillar lower trim and
belt hole cap. make sure there are no twists or
kinks in the front seat belt.
Page 964 of 1413
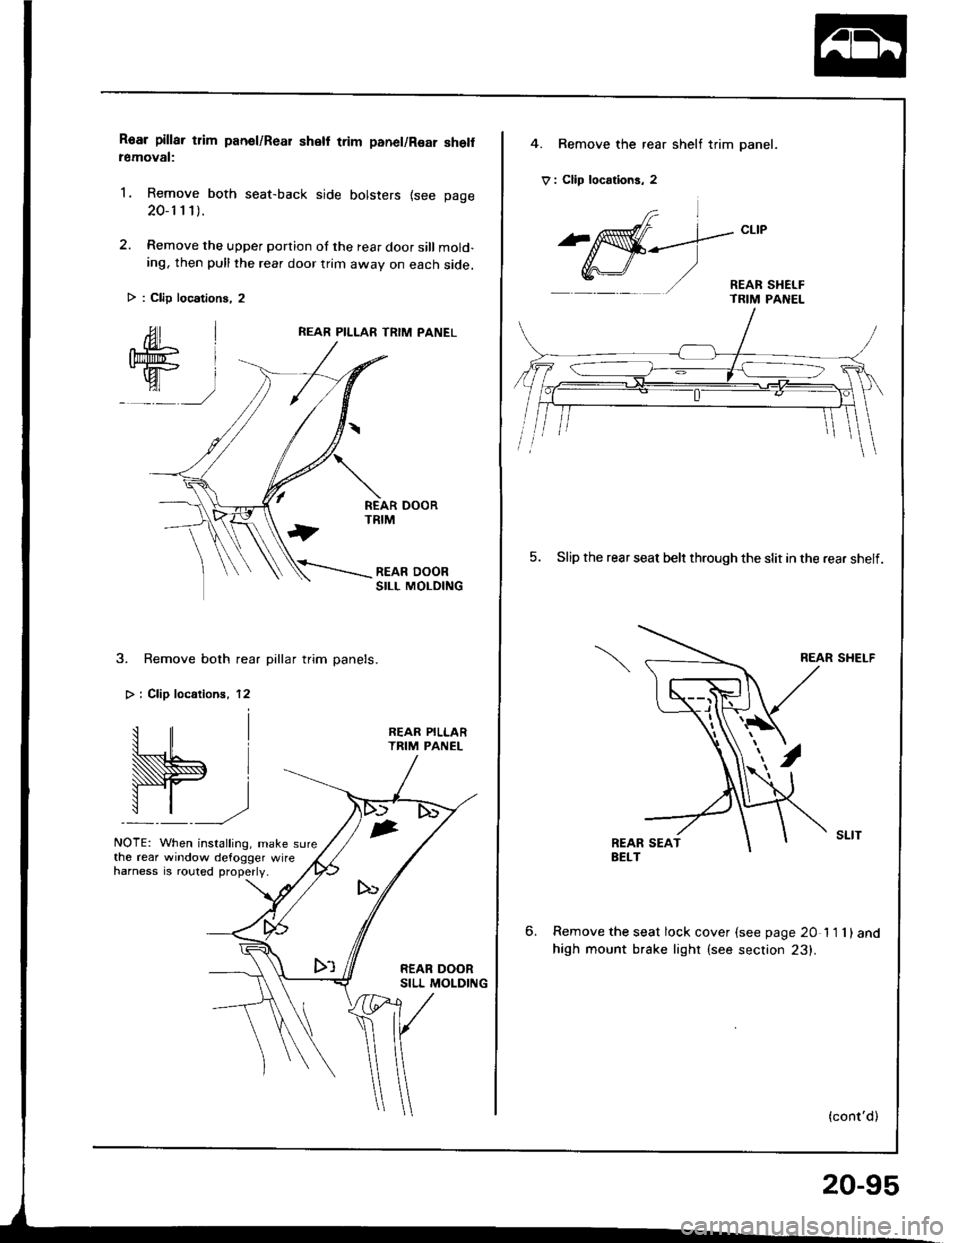
Roar pillar tlim panel/Rear shell trim panel/Rsar she removal:
1. Remove both seat-back side bolsters {see page
20-1 1 1).
2. Remove the upper portion of the rear door sill mold-ing, then pull the rear door trim awav on each side.
REAR PILLAR TRIM PANEL
3. Remove both rear pillar trim panels.
> i Clip localionr, 12
W.,
NOTE: When installing, make sure
REAR PILLARTRIM PANEL
the rear window defogger wireharness is .outed properly.
> : Clip locations, 2
4. Bemove the rear shelf trim panel.
V : Clip locrtions, 2
frl
^affi-_--.]-"t't
Y,r\-J/ '/ - REAR sHEr-F- TRIM PANEL
5. Slip the rear seat belr through the slit in the rear shelf.
REAR SHELF
6.Remove the seat lock cover {see page 20 11 1)and
high mount brake lighr (see section 23).
(cont'd)
20-95