rear trim HONDA INTEGRA 1994 4.G User Guide
[x] Cancel search | Manufacturer: HONDA, Model Year: 1994, Model line: INTEGRA, Model: HONDA INTEGRA 1994 4.GPages: 1413, PDF Size: 37.94 MB
Page 965 of 1413
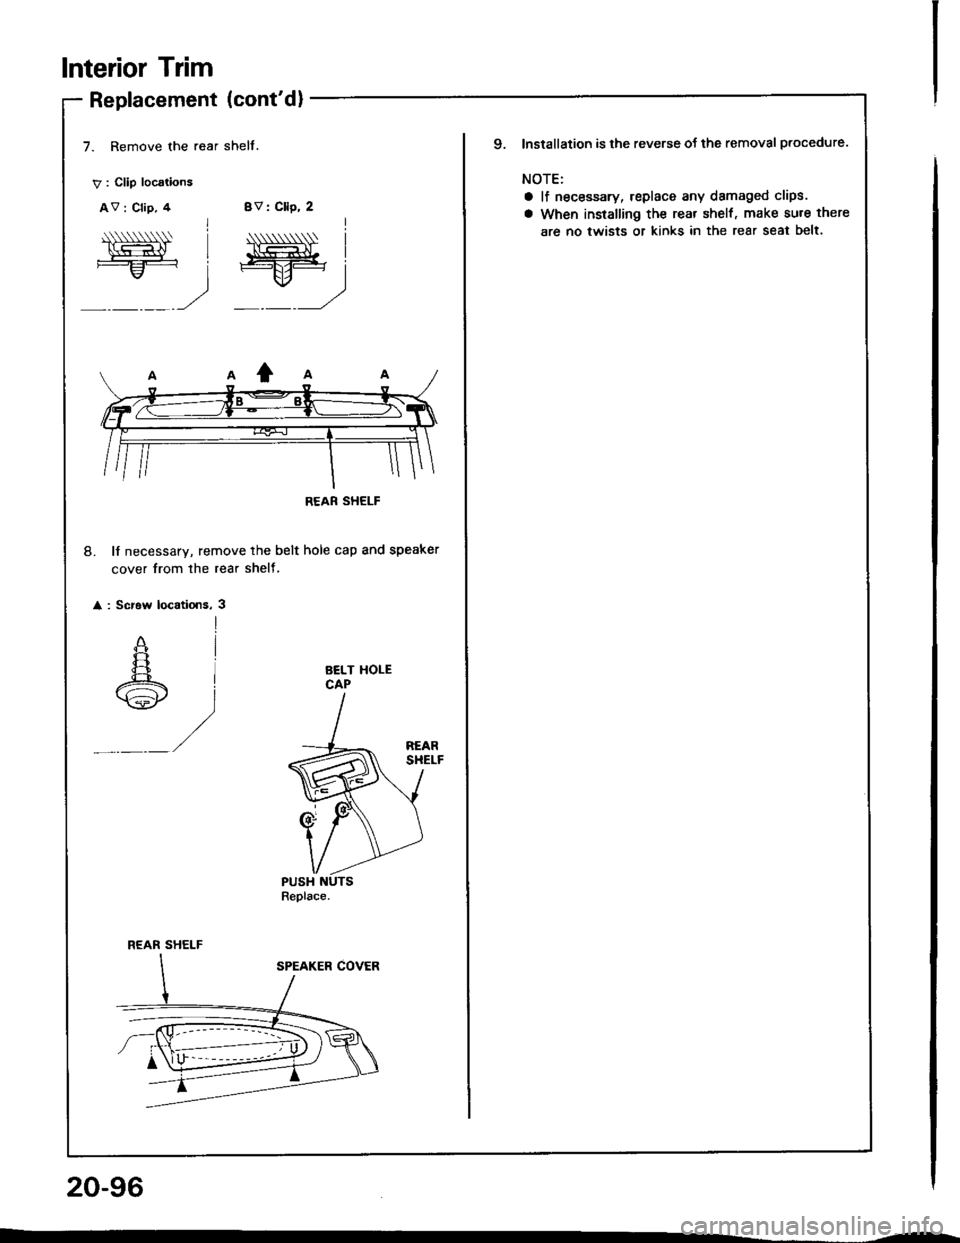
Replacement (cont'd)
7. Remove the rear shelf.
V : Clip locations
AV : Clip, 4BV: Cllp, 2
20-96
lnterior Trim
Niwt==:
;
"ff=
_) =)
8. lf necessary, remove the belt hole cap and speaker
cover from the rear shelf,
: Screw locatlons, 3
AELT HOLECAP
REAR SHELF
lnstallation is lhe reverse of the removal plocedure.
NOTE:
a lf necessary, replace any damaged clips.
a When installing the rear shelf, make sure there
are no twists or kinks in the rear seat belt'
q
Page 966 of 1413
Trunk Trim
Replacement
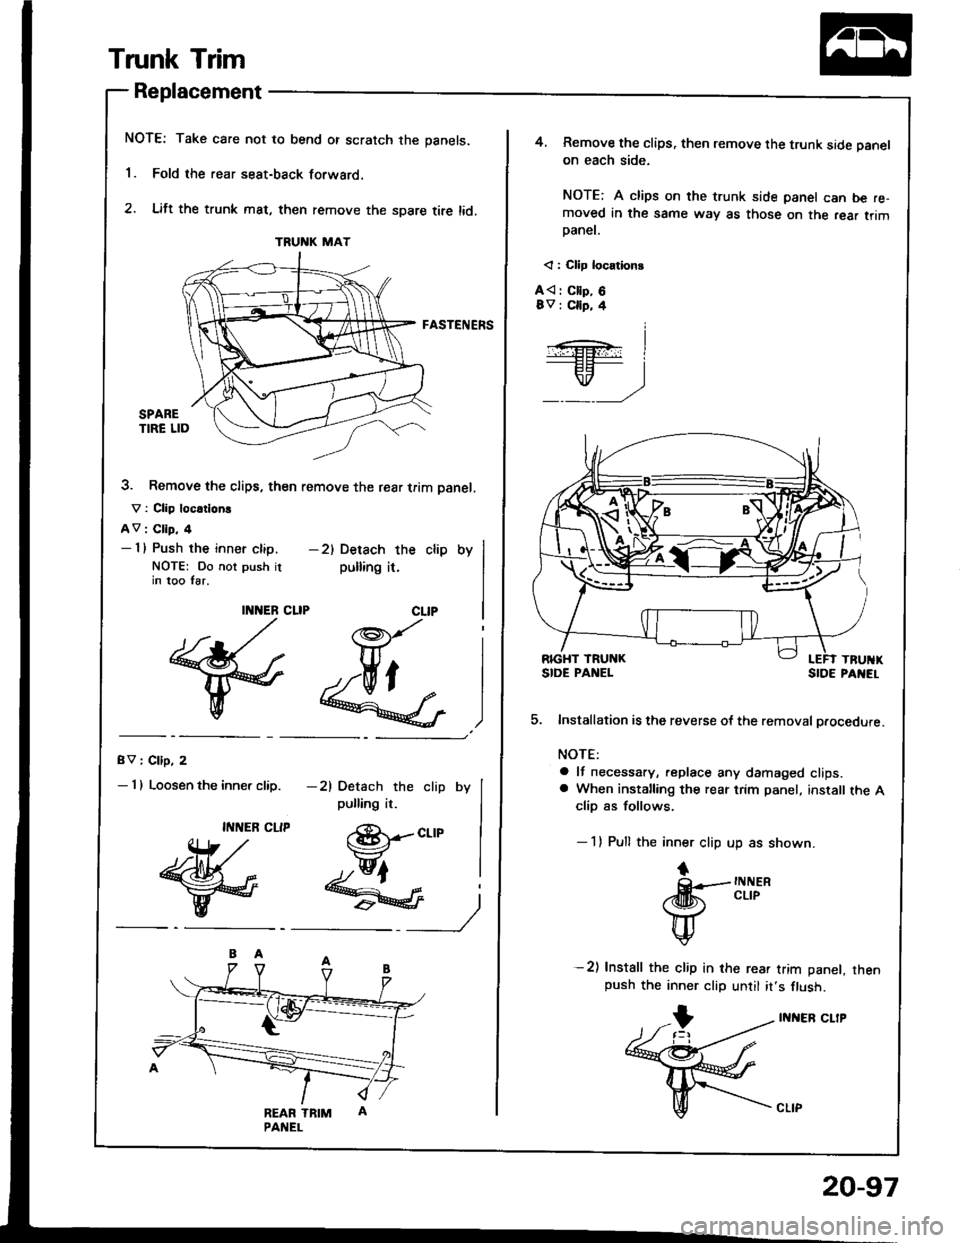
NOTE: Take care not to bend or scratch the panels.
'1. Fold the rear seat-back forwaro.
2. Lift the trunk mat, then remove the spare tire lid.
FASTENERS
3. Remove the clips, then remove the rear trim Danel.
V : Clip loc.tlorE
AV : Clip, 4- I l Push the inner clip.
NOTE: Do not push itin too Iar.
gV I Cllp, 2
- I I Loosen the inner clip.
TRUNK MAT
-2) Detach the clip by
pulling it.
Y_)
(8r-ct-tp
hfr
)J"'J..&G 4
eEdf,
II{NER
{* ,/
w
II{NEB CLIP
ffi
-21 Detach the clip by
pulling it.
@lqFl
-- t"
4. Remove the clips, then remove the trunk side panel
on each side.
NOTE: A clips on the trunk side panel can be re-moved in the same way as those on the rea. trimpaner.
< : Cllp locationt
A{ : Cllp, 68v : Cllp, 4
Installation is the reverse ot the removal procedure.
NOTE:
a lf necessary, replace any damaged clips.a When installing the rear trim panel, install the Aclip as follows.
- 1) Pull the inner clip up as shown.
tF tNt{ER
rd[h cLrP
H
v
-2) Install the clip in rhe rear trim panel, rhenpush the inner clip until it,s flush.
INI{ER CLIP
5.
20-97
Page 967 of 1413
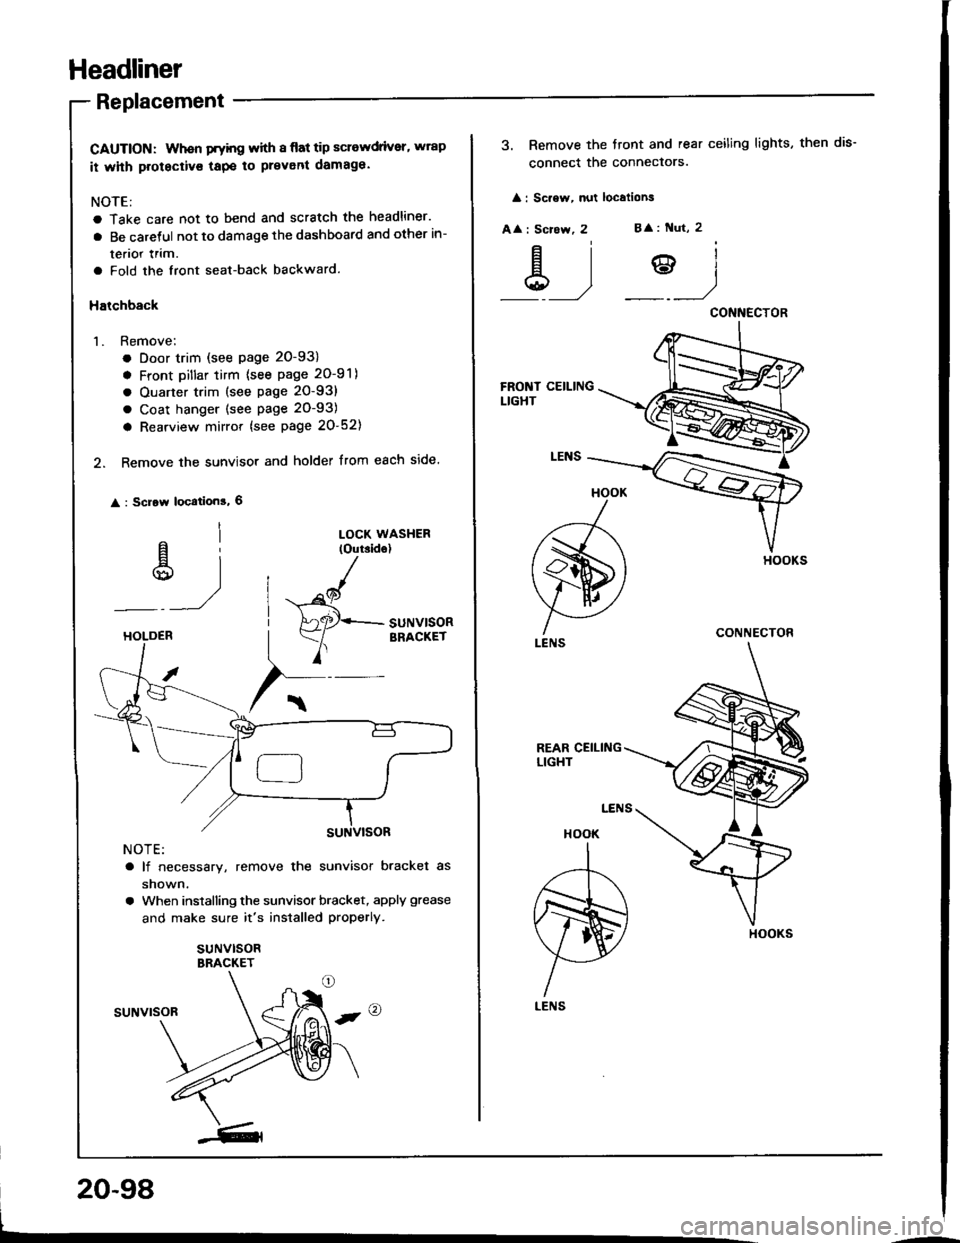
Headliner
Replacement
CAUTION: Whon Fyhg with I flat tip sclewdrivsr, wrap
it whh protectivs tapo to prevent damaga.
NOTE:
a Take care not to bend and scratch the headliner.
a Be caretul not to damage the dashboard and other in-
terior lrim.
a Fold the front seat-back backward.
Halchback
1. Remove;
. Door trim (see page 20-93)
a Front Dillar tirm {see page 20-91)
a Ouarter trim (see page 20-93)
a Coat hanger (see page 20-93)
a Rearview mirror {see page 20-52)
2. Remove the sunvisor and holder from each side.
: Scrow location!, 6
al
u)
LOCK WASHER(Outside)
"^/
HAaqr+- SUNV|SOR
Y
BRACKETHOLDEB
NOTE:
a lf necessary, remove the sunvisor bracket as
shown.
a When installing the sunvisor bracket, apply grease
and make sure it's installed properly.
suNvlsoRBRACKET
suNvrsoR
20-98
3. Remove the tront and rear ceiling lights, then dis-
connect the conneclors.
: Sc.ew, nut localions
A
: Scrcw, 2B
: Nut, 2
&)?)
HOOK
A
ffi)
LENS
HOOK
I
,r--T-\
m)
H
LENS
CONNECTOR
CONNECTOR
HOOKS
Page 968 of 1413
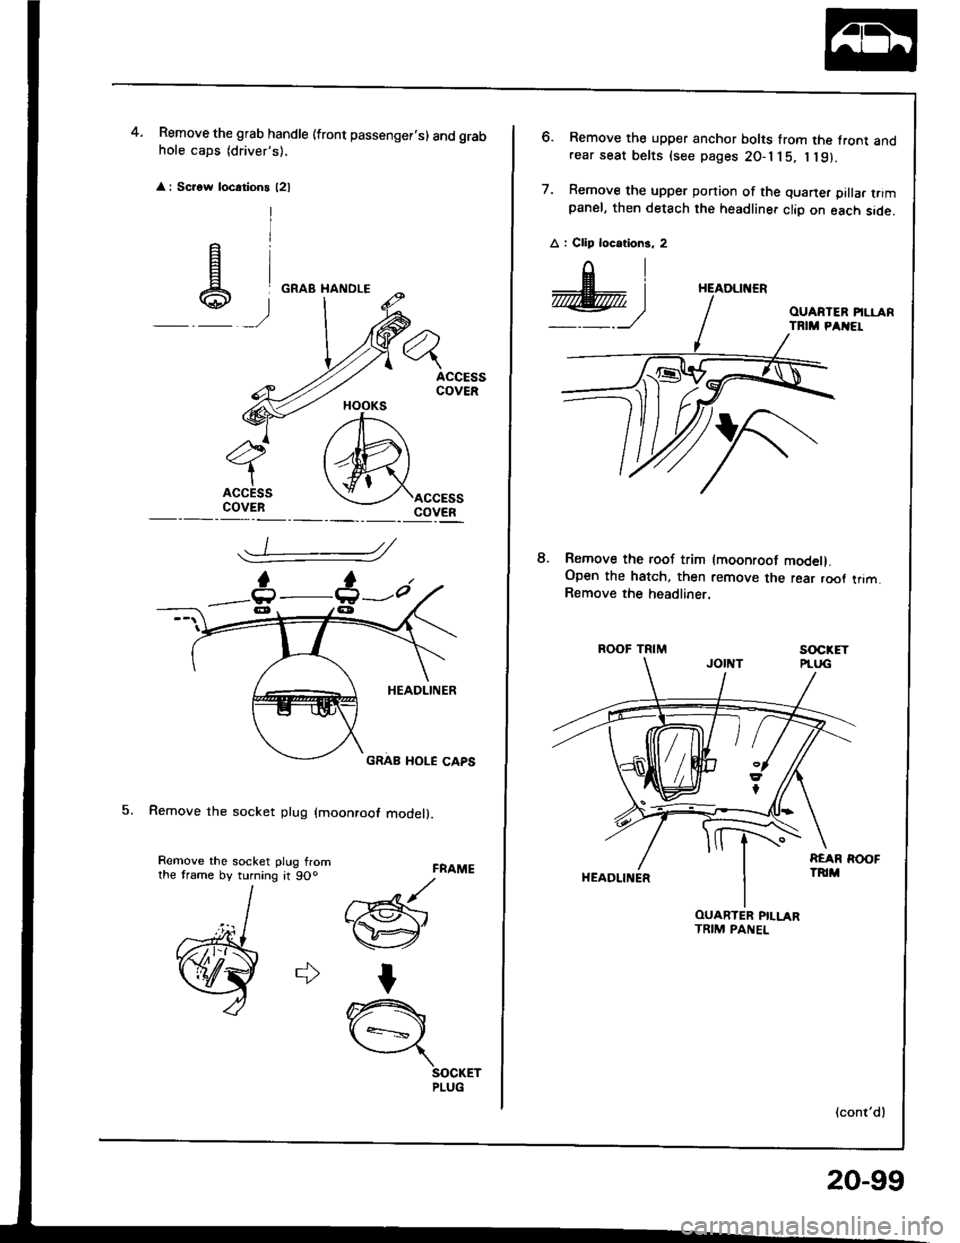
Remove the grab handle (front passenger.s) and grabhole caps (driver's),
: Scrow locations l2l
5. Remove the socket plug (moonroof model).
4.
FRAME
//Gr-@'
I
n{ +=s ,
SOCKETPLUG
HOOKS
_t :
e)
Remove the roof trim (moonroot model).Open the hatch, then remove the rear root trim.Remove the headliner.
ROOF TRIMsocxET
HEADLII{ER
(cont'dl
6. Remove the upper anchor bolts from the front andrear seat belts (see pages 2O-l j 5, I l9).
7. Remove the upper ponion of the quaner pilla. trimpanel, then detach the headliner clio on each side.
A : Clip locotions, 2
8.
HEADLINER
OUARTER PILLARTRIM PANEL
20-99
Page 969 of 1413
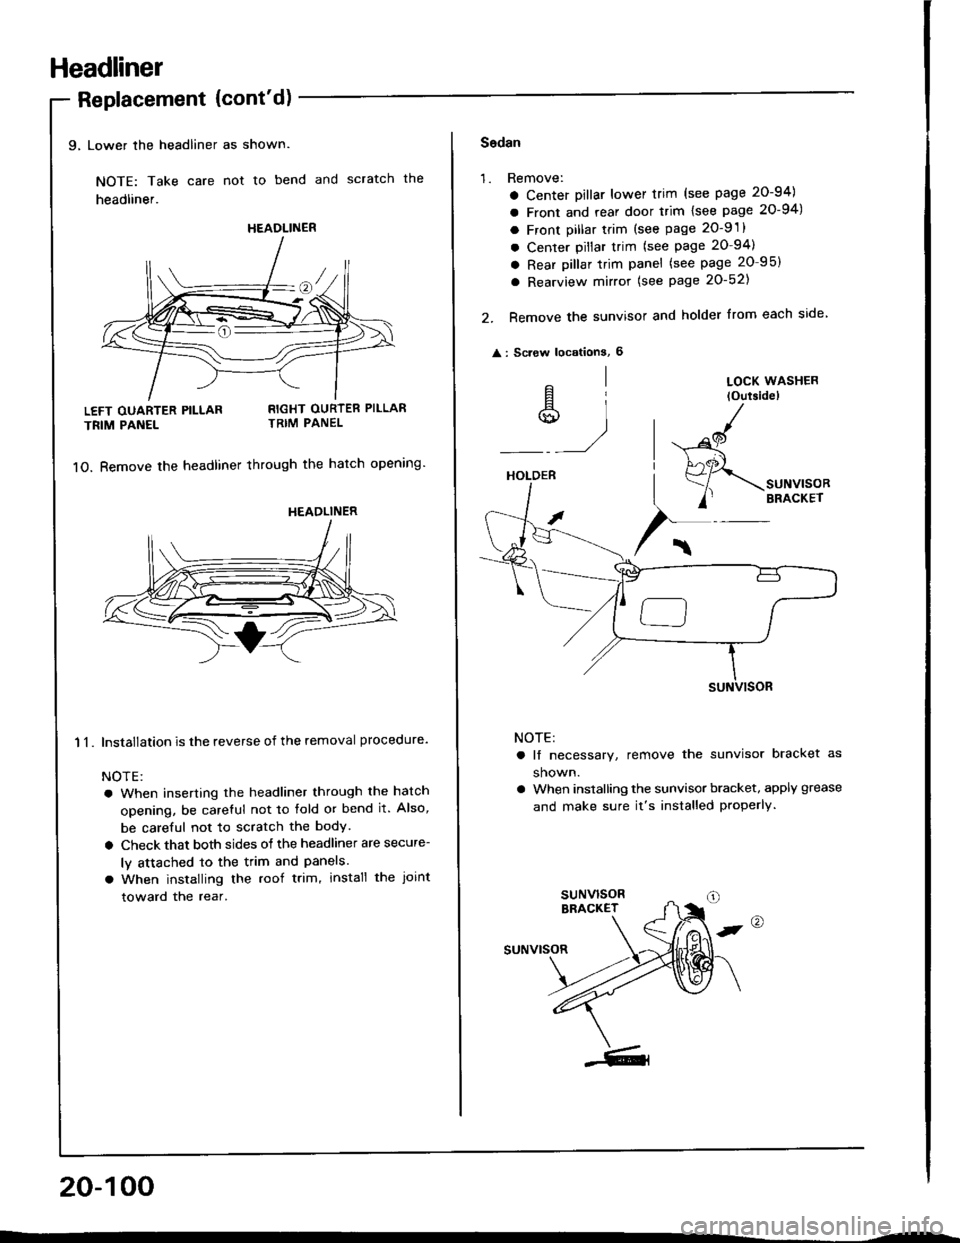
Headliner
9, Lower the headliner as shown.
NOTE: Take care not to bend and scratch the
headliner.
Replacement {cont'd)
LEFT OUARTER PILLAR
TRIM PANEL
11.
RIGHT OURTER PILLARTRIM PANEL
1O. Bemove the headliner through the hatch opening'
Installation is the reverse of the removal procedure.
NOTE:
a When inserting the headliner through the hatch
opening, be careful not to fold or bend it. Also,
be careful not to scratch the bodY.
a Check that both sides of the headliner are secure-
ly attached to the trim and Panels.
a When installing the roof trim, install the Joint
toward the rear.
20-100
HEADLINER
HEADLINER
Sodan
'1.Remove:
a Center Dillar lower trim (see page 20-94)
a Front and rear door trim lsee page 20-94)
a Front pillar trim (see page 2O-9 .
a Center pillar trim (see page 20-94)
a Rear pillar trim panel (see page 20 95)
a Rearview mirror (see Page 20-521
Remove the sunvisor and holder from each side
: Screw locationS, 6
2.
^l
s,1
LOCK WASHER
loutsidel
HOLDER
/
$-.unu,"o"
/' BRACKET
NOTE:
a lf necessary, remove the sunvisor bracket as
shown.
a When installing the sunvisor bracket, apply grease
and make sure it's installed properly.
,@
suNvrsoR
Page 971 of 1413
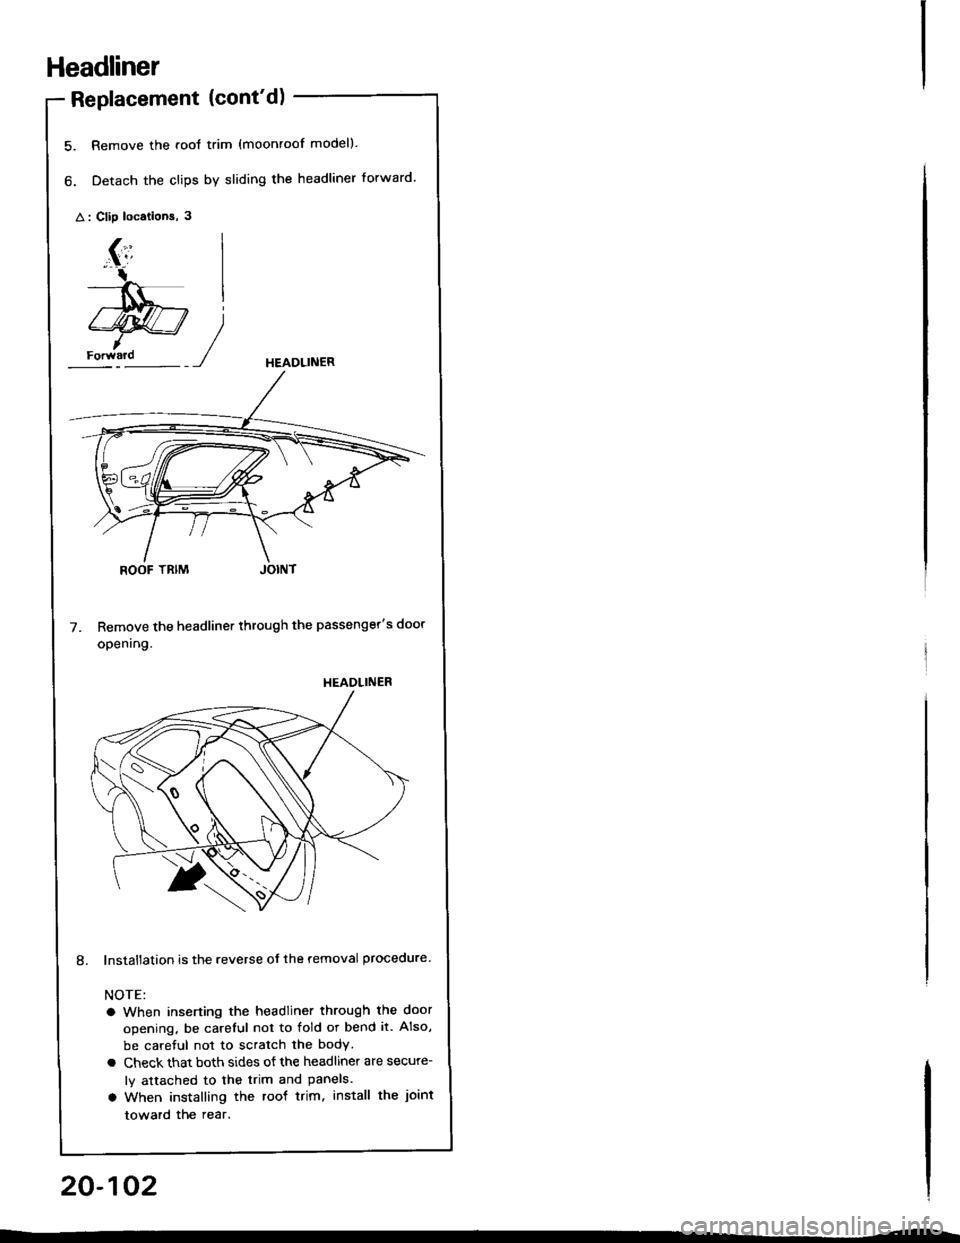
Headliner
Replacement {cont'd)
5. Remove the .ool trim (moonroof modell.
6. Detach the clips by sliding the headliner forward.
A : Clip locations, 3
HEADLINER
Remove the headliner through the passenger's door
opening.
lnstallation is the reverse ot the removal procedure
NOTE:
a When inserting the headliner through the door
opening. be careful not to fold or bend it. Also,
be careful not to scratch the body
a Check that both sides ot the headliner are secure-
ly attached to the trim and Panels.
a When installing the roof trim, install the joint
toward the rear.
)
HEADLINER
20-102
Page 980 of 1413
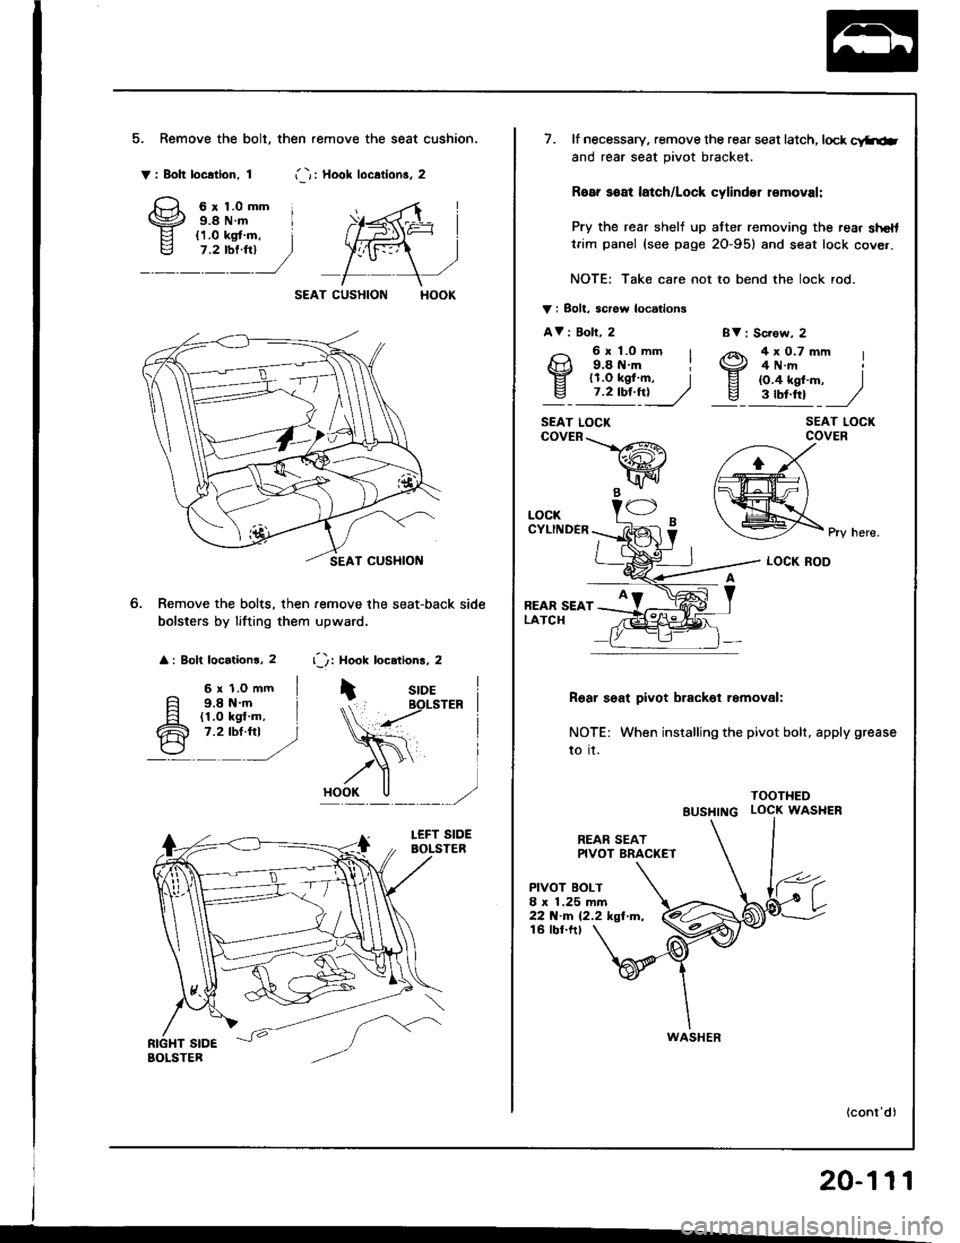
5. Remove the bolt, then .emove the seat cushion.
Y: Bolt location. 1i -r i Hool loc.lion3. 2
6r1.0mm i9.8 N.m I
SEAT CUSHION
Remove the bolts, then remove the seat-back side
bolsters by lifting them upward.
: Bolt locationr, 2 r'): Hook locetions, 2
6 r 1.o mm I9.8 N.m i(1.0 kgl'm, I7.2 tbt.fti )
BV : Sc?ow, 2
SEAT LOCKCOVER
Pry here.
LOCK ROD
R6ar seat pivot brackol removal:
NOTE: When installing the pivot bolt, apply grease
to it.
TOOTHED
BUSHTNG LOCK WASHER
REAR SEATPIVOT BRAC(ET
PIVOT BOLT8 x 1.25 mm22 N.m (2.2 kgf m,16 tbf.ftt
20-111
7. lf necessary, remove the rear seat latch, lock c!ftiab
and rear seat pivot bracket.
Roar soat latch/Lock cylinder r€moval:
Pry the rear shelj up after removing the rear shelttrim panel (see page 2O-95) and seat lock cover.
NOTE: Take care not to bend the lock rod.
V i Bolt. scrow locations
AV i Boll, 2
9: l;o--' I4x0.7mm I4 N.rrt
EI lr.o tgf .m, Iv_ 7.2 tbf.ft!____//
9.8 tt.m il1.O kgf.m, I{O.4 kgf'm, )3tbt.ttt J
SEAT LOCKcovER\-_L/-R\
wB -"1/ -
LOCKCYLINDER
REAR SEATLATCH
WASHER
Page 984 of 1413
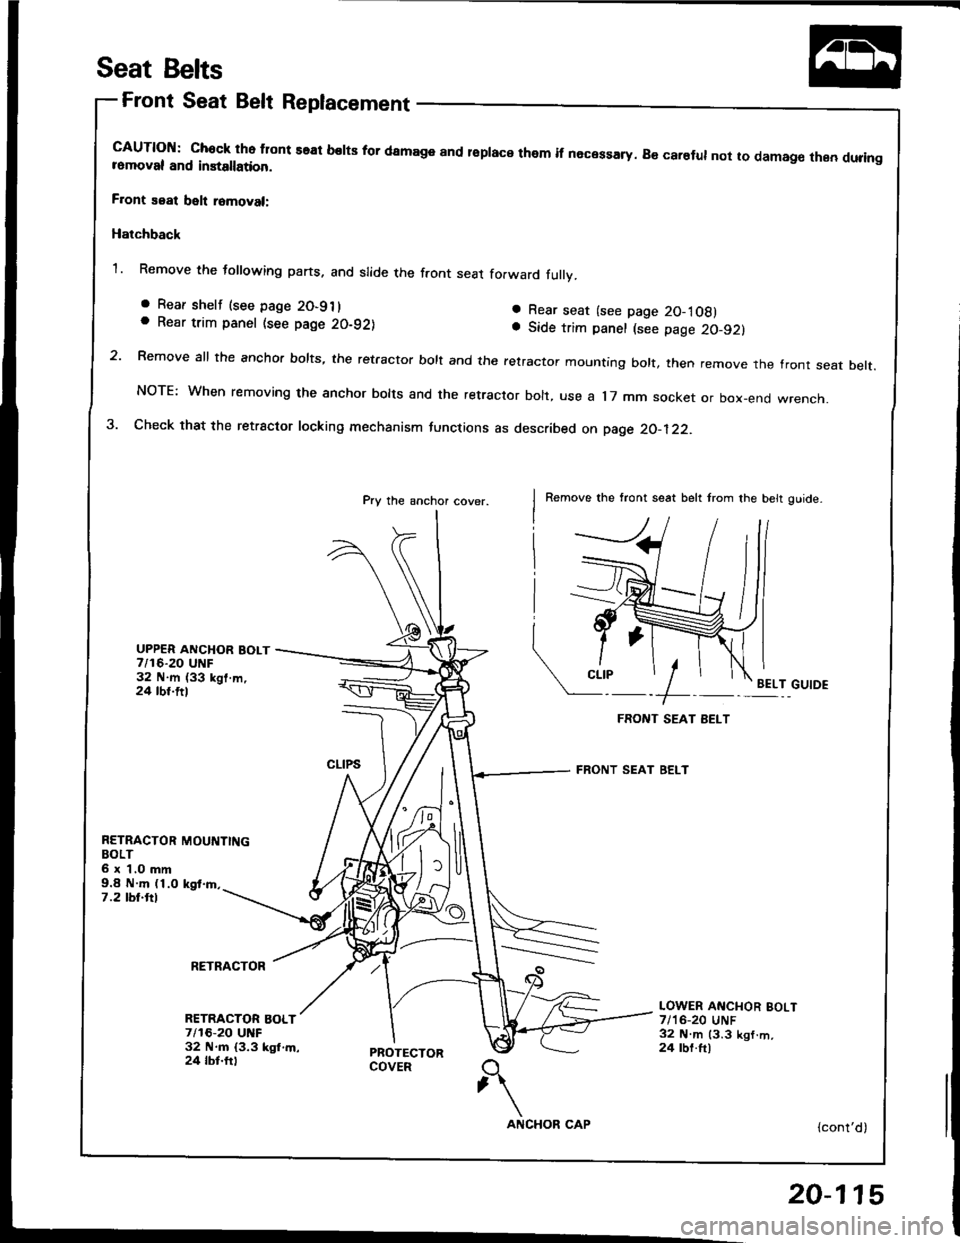
Seat Belts
Front Seat Belt Replacement
cAUTloN: chock tho tlont seal belts for damage and lsplace them if necessary. B€ carelul not to damag€ then duringromoval and installation.
F.ont seat belt romoval:
Hatchback
1. Remove the following parts, and slide the front seat fo.ward fullv.
a Rear seat (see page 20-1Og)a Side trim panel (see page 2c,-92}
2 Remove all the anchor bolts, the retractor bolt and the retractor mountrng bott, then remove the front seat belt.
NOTE: When removing the anchor bolts and the retractor bolt, use a l7 mm socket or box-end wrench.
3. Check that the retractor locking mechanism functions as described on page 20_122-
Pry the anchor cover.Remove the tront seat belt trom the belt ouide-
UPPER ANCHOR BOLT7/16-20 UNF32 N.m (33 kgl.m,24 tbt.ttlEELT GUIDE
RETRACTOR MOUNTINGBOLT6 x 1.O mm9.8 N.m (1.0 kgt.rn.7.2 tbl.ftl
RETRACTOR
. Rear shelf (see page 20-911. Rear trim panel (see page 20-921
RETRACTOR BOLT7/16-20 UNF32 ltl.m {3.3 kgl,m,24 tbt.ftl
LOWER ANCHOR BOLT7/'16-20 UNF32 N.m 13.3 kgl.m,24 rbf.ft)
{cont'd)
20-115
Page 988 of 1413
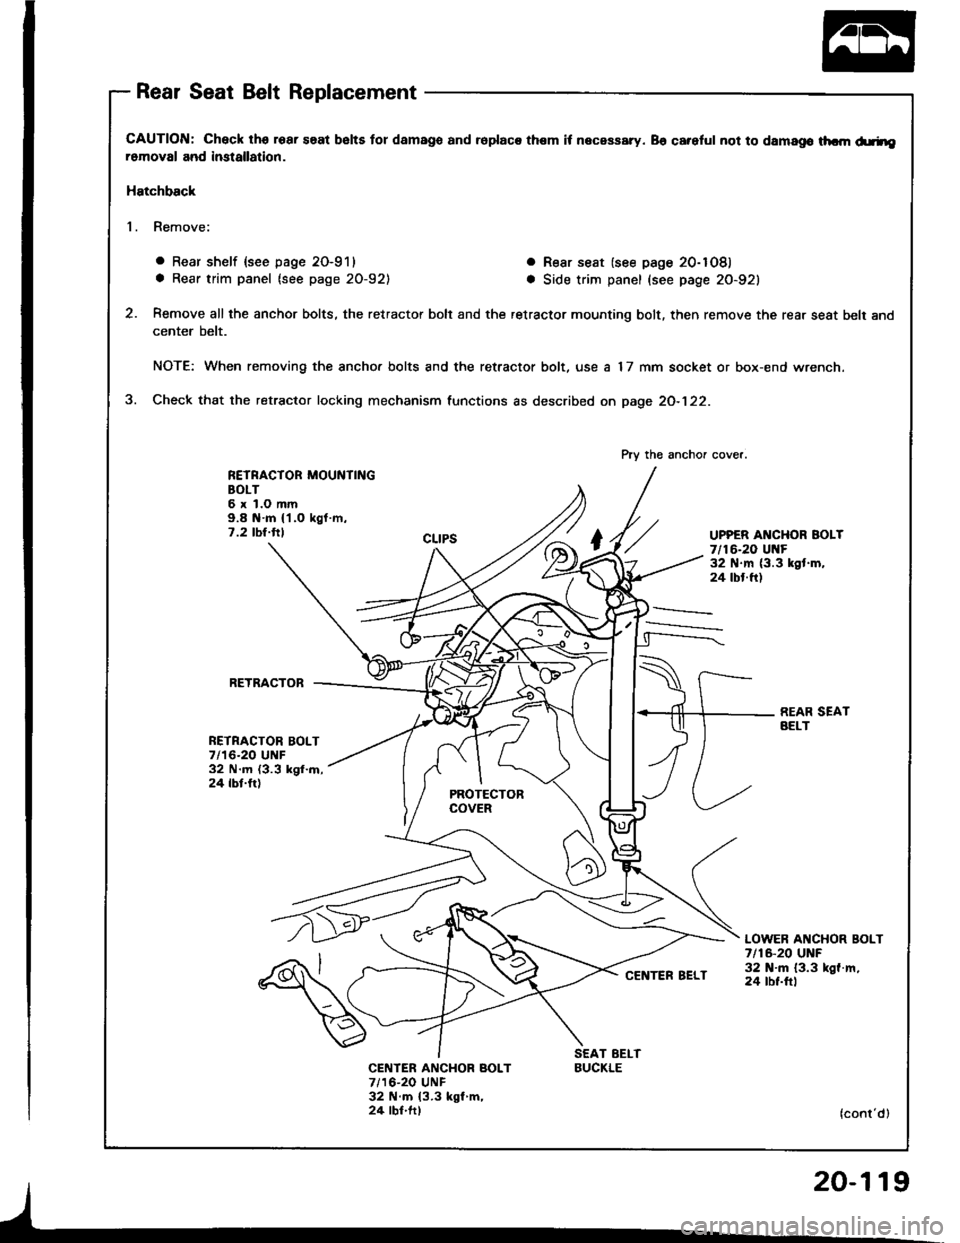
Rear Seat Belt Replacement
CAUTION: Check lhs roar saat bslts tor damago and ioplaca them it necassary. 86 careful not to damago thcm d.rheromoval and imtallation.
Hatchback
1. Remove:
o Rear shelf {see page 20-911
a Rear trim panel (see page 20-921
. R€ar seat (see page 20-1081
a Side trim panel (see page 20-921
Remove all the anchor bolts, the retractor bolt and the retractor mounting bolt, then remove the rear seat belt and
center belt.
NOTE: When removing the ancho. bolts and the retractor bolt, use a 17 mm socket or box-end wrench.
Check that the retractor locking mechanism functions as described on page 2O-122.
RETRACTOR MOUNTINGBOLT6xl.Omm9.8 N.m {'l.O kgf.m,7 .2 tbt.ttlUPPER ANCHOR BOLT7/16-20 Ul{F32 N.m (3.3 kgt.m,24 tbt.ft)
RETRACTOB
NETRACTOR BOLT7/16-20 UNF32 N.m (3.3 kgl.m,24 tbt.fr)
REAR SEATAELT
LOWER ANCHOR BOLT7 t16-20 UNF32 N'm 13.3 kgf.m,24 tbt.ftl
CENTER ANCHOR BOLT7/16-20 UNF32 N.m {3.3 kgl m,24 lbf.ft)
Pry the anchor cover.
BUCKLE
(cont'd)
Page 989 of 1413
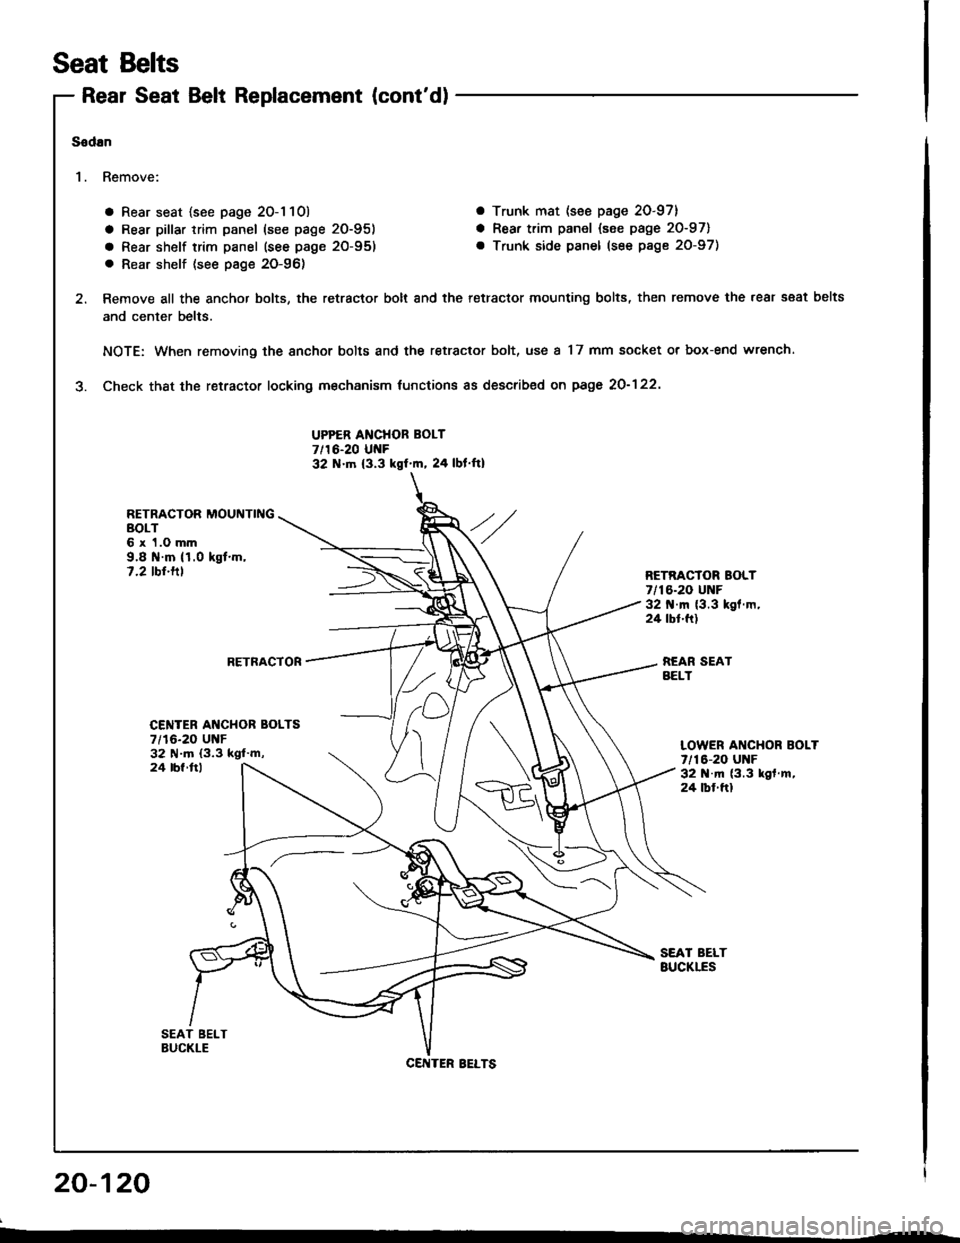
Rear Seat Belt Replacement (cont'd)
a Rear seat {see page 20-1 10) a Trunk mat (see page 20-97}
a Rear pillar trim panel (see page 20-951 a Rear trim panel {see page 20-971
a Rear shelf trim panel (see page 20-95) . Trunk side panel (see page 20-97)
. Rear shelf (see pag€ 20-96)
Remove all the anchor bolts, the retractor bolt and the retractor mounting bolts, then remove the rear s€at belts
and center belts.
NOTE: When removing the anchor bolts and the retractor bolt, use a 17 mm socket or box-end wrench.
Check thst the retractor locking m€chanism tunctions as described on page 2O-122'
UPPER ANCHOR BOLT7/16-20 UNF32 N.tn (3.3 kgf'm, 24 lbl ft)
RETRACTOR MOUNTINGBOLT6 x 1.0 mm9.8 il.m (1.0 kgt.m,7.2 tbt.tllRETRACTOR BOLT7/16-20 UNF32 .m (3.3 kgl.m,24 tbt.ft)
RETRACTORREAR SEATBELT
Seat Belts
Sodan
'I . Remove:
20-120
CENTER AI{CHOR BOLTS7/16-20 UNF32 N.m (3.3 ksl'm,LOWER ANCHOR BOLT7/16-20 UNF32 N.m (3.3 kgf .m,
24 tbf.ftl
24 lbl ftl
CENTER BELTS