CD player HONDA ODYSSEY 1995 Owners Manual
[x] Cancel search | Manufacturer: HONDA, Model Year: 1995, Model line: ODYSSEY, Model: HONDA ODYSSEY 1995Pages: 240, PDF Size: 2.44 MB
Page 75 of 240
Comfort and Convenience Features
The heating and air conditioning
system in your car provides a com-
fortable driving environment in all
weather conditions.
The audio sound system is very
versatile. To get the most from this system, take the time to learn what
the controls do.
Some models have an anti-theft
audio system that requires a code
number to enable it. Heating and Cooling........................ 76
What Each Control Does............ 78
How to Use the System............... 79
Controlling Air Flow
Direction............................... 79
Ventilation................................ 79
To Cool with A/C.................... 80
To Heat..................................... 80
To Heat and Dehumidify with Air Conditioning.......... 81
To Defog and Defrost............. 82
To Turn Everything Off ............. 82
Rear A/C Unit.............................. 83
Audio System (US EX and
Canadian EX).......................... 84
AM/FM/Cassette Stereo Audio System...................................... 84
Operating the Radio.................... 85
Finding the Radio Station........... 85
Presetting..................................... 86
Adjusting the Sound.................... 87
Radio Frequencies....................... 88Operating the Cassette Player... 89
Cassette Search Functions......... 90
Caring for Cassettes.................... 91 Audio System (US EX).................... 92
AM/FM/Cassette Stereo Audio
System....................................... 92
Operating the Radio.................... 93
Finding the Radio Station........... 93
Presetting..................................... 94
Adjusting the Sound.................... 96 Radio Frequencies....................... 97Operating the Cassette Player... 98
Cassette Search Functions......... 99
Caring for Cassettes.................. 100
Operating the CD Player.......... 101
CD Error Indications................. 104
Caring for the Cassette Player..... 105
Theft Protection............................. 106
Comfort and Convenience FeaturesProCarManuals.comMain Menu s t
Page 89 of 240
Audio System
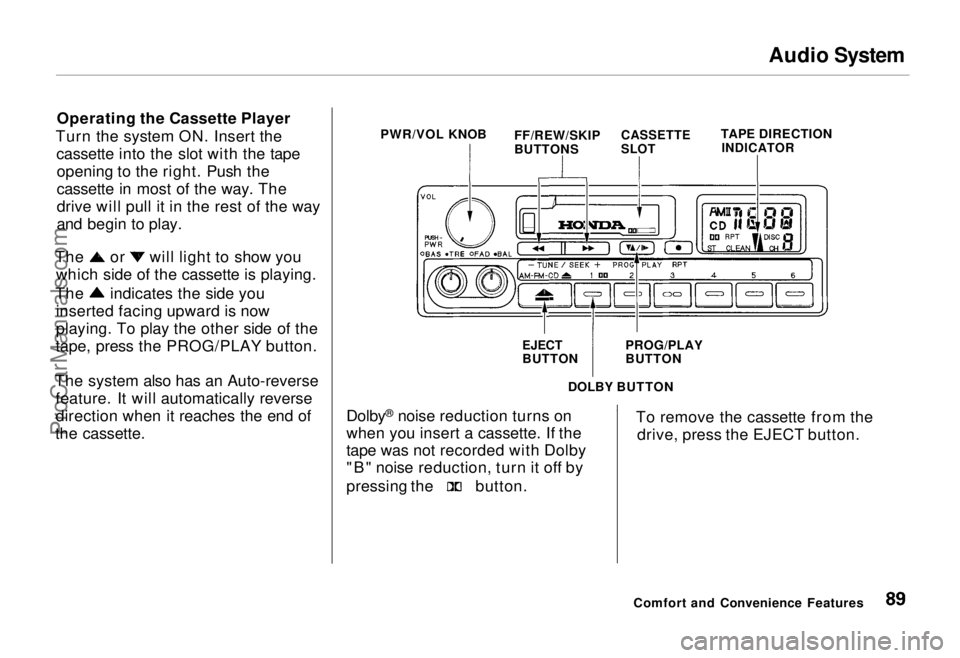
Operating the Cassette Player
Turn the system ON. Insert the cassette into the slot with the tapeopening to the right. Push the
cassette in most of the way. The
drive will pull it in the rest of the way
and begin to play. The or will light to show you
which side of the cassette is playing. The indicates the side you
inserted facing upward is now
playing. To play the other side of the
tape, press the PROG/PLAY button.
The system also has an Auto-reverse feature. It will automatically reverse
direction when it reaches the end of
the cassette. PWR/VOL KNOB
TAPE DIRECTION
INDICATOR
DOLBY BUTTON
Dolby ®
noise reduction turns on
when you insert a cassette. If the
tape was not recorded with Dolby
"B" noise reduction, turn it off by pressing the button.
To remove the cassette from the
drive, press the EJECT button.
Comfort and Convenience Features
FF/REW/SKIP
BUTTONS
CASSETTE
SLOT
EJECT
BUTTON PROG/PLAY
BUTTONProCarManuals.comMain Menu Table of Contents s t
Page 98 of 240
Audio System
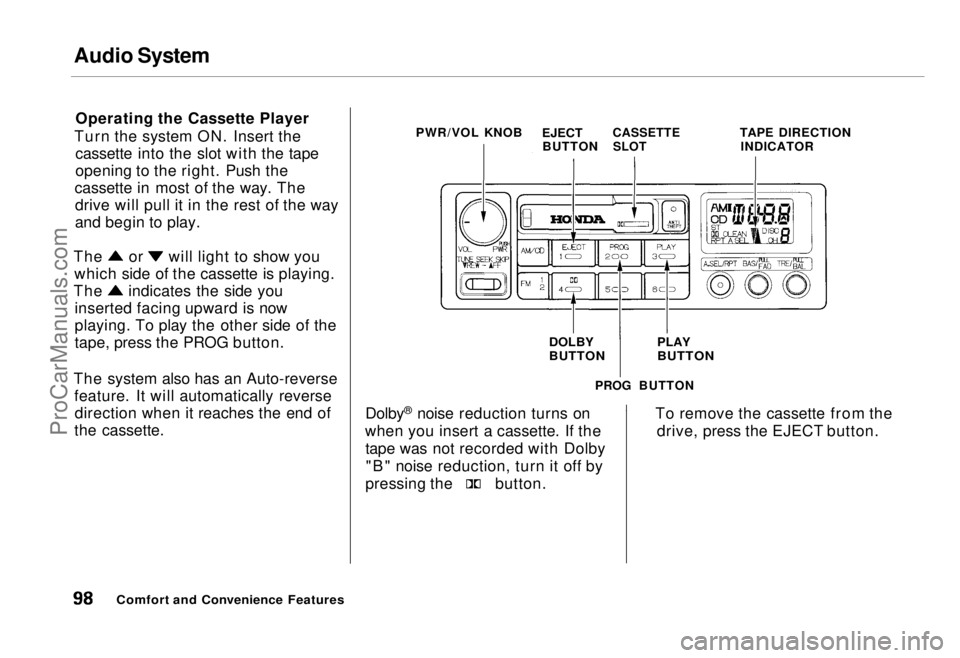
Operating the Cassette Player
Turn the system ON. Insert the cassette into the slot with the tape
opening to the right. Push the
cassette in most of the way. The drive will pull it in the rest of the way
and begin to play. The or will light to show you
which side of the cassette is playing. The indicates the side you
inserted facing upward is now
playing. To play the other side of the
tape, press the PROG button.
The system also has an Auto-reverse feature. It will automatically reversedirection when it reaches the end of
the cassette.
PWR/VOL KNOB
EJECT
BUTTON
CASSETTE
SLOT
TAPE DIRECTION
INDICATOR
PROG BUTTON
Dolby ®
noise reduction turns on
when you insert a cassette. If the tape was not recorded with Dolby"B" noise reduction, turn it off by pressing the button.
To remove the cassette from the
drive, press the EJECT button.
Comfort and Convenience Features
PLAY
BUTTON
DOLBY
BUTTONProCarManuals.comMain Menu Table of Contents s t
Page 101 of 240
Audio System
Operating the CD Player
(Optional)
A Compact Disc changer is available for your car. It holds up to six discs,
providing several hours of continu-ous programming. You operate the
CD changer with the same controls
used for the radio and cassette
player.
Load the desired CD's in the
magazine and load the magazine in
the changer according to the
instructions that came with the unit.
Your dealer has Genuine Honda accessory in-dash CD players
available that are operated by the
radio controls. If you have one of
these units, use the directions in this section (except for multi-disc
selection) to operate it. To operate the CD changer, the
ignition key must be in ACCESSORY (I) or ON (II). If you are listening to
a cassette tape, eject it before
playing a CD.
Press the CD button until "CD" appears on the display. Once in the
CD mode, the system will start to
play the first track of the first disc in the magazine.
When that disc ends, the next disc in the magazine is loaded and played.
After disc 6 has completed, the system will return to disc 1. To make
your own disc selection, push one of the six preset buttons. Your selection
will appear in the display and start
playing.
U.S. EX model
You can use the TUNE/SEEK switch while a disc is playing to
select passages and change tracks.
To move rapidly forward within a track, push up and hold the TUNE/SEEK switch. Push down and hold
the switch to move rapidly backward
within a track. You will hear a beep a
half second after you push the switch up or down. Keep pushing the
switch until you think the track has
advanced or returned to the desired
position. The disc will start playing
when you release the switch.
If you push the TUNE/SEEK switch
up and release it before you hear a
beep, the system will skip forward to the beginning of the next track on
that CD.
It will skip backward to the begin-
ning of the current track if you push
the switch down and release it.
Comfort and Convenience Features
CONTINUEDProCarManuals.comMain Menu Table of Contents s t
Page 103 of 240
Audio System
U.S. LX and Canadian EX models
You can use the TUNE/SEEK buttons while a disc is playing to select passages and change tracks.
To move rapidly forward within a track, push and hold the button.
Push and hold the button to
move rapidly backward within a
track. You will hear a beep a half second after you push the button.
Keep pushing the button until you
think the track has advanced or
returned to the desired position. The disc will start playing when you
release the button. If you push the button and
release it before you hear a beep, the system will skip forward to the
beginning of the next track on that
CD.
It will skip backward to the begin-
ning of the current track if you push the button and release it. If you push the RPT button on the
U.S. LX and Canadian EX models or
the A. SELECT/RPT button on the
U.S. EX model, the system will
continuously play the track you are
listening to. You will see RPT in the display. Push the switch again to
turn off the RPT (REPEAT) mode.
On U.S. EX model
You can get the CD player to randomly select tracks by pressing
A. SELECT/RPT until you see "A. SEL" in the display.
With this active, the system selects and plays the tracks randomly,
rather than sequentially, on each disc. When the system has played all
the tracks on that disc, it loads the
next disc and starts to play randomly.
The system continues to select and play tracks randomly on each of thesix discs until you press the
A. SELECT/RPT button again. To turn on random play mode while
the system is in the REPEAT mode,
turn off REPEAT mode first by
pressing the A. SELECT/RPT
button. Then, press the button againas explained above.
If you change modes to radio or
tape while a CD is playing, thenchange back to CD mode, thesame disc and track will play.
If you turn off the system while a CD is playing, either with the
PWR/VOL knob or by turning off
the ignition, the system will begin at the same disc and track when
you turn it back on.
If you try to select an empty slot in
the magazine, the system willselect and play the first track of
the next disc in the magazine.
To return to the radio function, press the CD button.
Comfort and Convenience FeaturesProCarManuals.comMain Menu Table of Contents s t
Page 105 of 240
Caring for the Cassette Player
The cassette drive picks up dirt and oxides whenever you play a tape.
This builds up over time and causes the sound quality to degrade. To
prevent this, you should clean the
cassette drive after every 30 hours of
use. Your dealer has a cleaning kit available for this purpose.
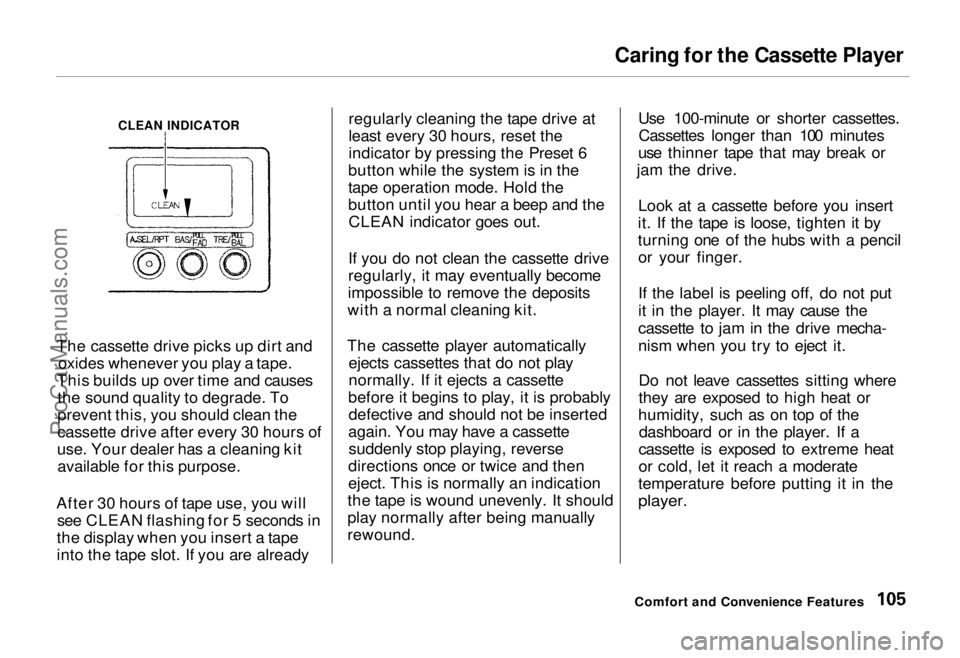
After 30 hours of tape use, you will see CLEAN flashing for 5 seconds in
the display when you insert a tape
into the tape slot. If you are already regularly cleaning the tape drive at
least every 30 hours, reset the
indicator by pressing the Preset 6
button while the system is in the
tape operation mode. Hold the
button until you hear a beep and the CLEAN indicator goes out.
If you do not clean the cassette drive
regularly, it may eventually become
impossible to remove the deposits
with a normal cleaning kit.
The cassette player automatically ejects cassettes that do not play
normally. If it ejects a cassette
before it begins to play, it is probably defective and should not be inserted
again. You may have a cassette suddenly stop playing, reverse
directions once or twice and then
eject. This is normally an indication
the tape is wound unevenly. It should
play normally after being manually
rewound. Use 100-minute or shorter cassettes.
Cassettes longer than 100 minutes
use thinner tape that may break or
jam the drive.
Look at a cassette before you insert
it. If the tape is loose, tighten it by
turning one of the hubs with a pencil or your finger.
If the label is peeling off, do not put
it in the player. It may cause the
cassette to jam in the drive mecha-
nism when you try to eject it.
Do not leave cassettes sitting where
they are exposed to high heat or
humidity, such as on top of the dashboard or in the player. If a
cassette is exposed to extreme heat
or cold, let it reach a moderate
temperature before putting it in the
player.
Comfort and Convenience Features
CLEAN INDICATORProCarManuals.comMain Menu Table of Contents s t
Page 233 of 240
Index
Break-in, New Car......................... 108
Brightness Control, Instruments... 43
Brights, Headlights......................... 42
Bulb Replacement
Back-up Lights........................... 179
Brake Lights............................... 179
Ceiling Light............................... 181
Front Parking Lights................. 178
Front Side Marker Lights......... 178
Headlights.................................. 177
License Plate Lights.................. 180
Specifications............................. 219
Turn Signal Lights..................... 178
Bulbs, Halogen............................... 177
Cables, Jump Starting With.......... 200
Capacities Chart............................. 218
Carbon Monoxide Hazard.............. 29
Cargo, Loading............................... 116
Cassette Player Care............................................. 105
Operation................................ 89, 98
CAUTION, Explanation of............... ii
CD Player........................................101 Center Pocket.................................. 71
Certification Label......................... 216
Chains............................................. 174
Change Oil
How to......................................... 148
When to....................................... 140
Changing a Flat Tire ..................... 193 Changing Engine Coolant............. 152
Charging System Indicator .... 36, 205
Check Engine Light........................ 37
Checking Automatic Transmission
Fluid........................................ 155
Battery Condition...................... 162 Brake Fluid................................. 156
Drive Belts.................................. 169
Engine Coolant........................... 150
Engine Oil................................... 146
Fuses........................................... 209
Power Steering Fluid................. 157
Checklist, Before Driving............. 118
Child Safety...................................... 20
Childproof Door Locks................... 54
Cigarette Lighter............................. 72
Cleaner, Air.................................... 158
Cleaning
Aluminum Wheels..................... 185
Carpeting.................................... 187
Exterior....................................... 184
Fabric.......................................... 187
Interior........................................ 187
Seat Belts....................................188
Vinyl............................................ 187
Window....................................... 188
CLEAN Light................................. 105
Clock, Setting the ............................ 68
Coin Box........................................... 71
CO in the Exhaust......................... 224 Cold Weather, Starting in............. 119
Compact Spare............................... 192
Consumer Information.................. 227
Controls, Instruments and.............. 33
Coolant
Adding......................................... 151
Checking..................................... 150
Proper Solution.......................... 150
Temperature Gauge.................... 40
Corrosion Protection..................... 189
Crankcase Emission Control System......................................... 224
Cruise Control Operation ............... 48ProCarManuals.comMain Menu s t Main Menu s t
Page 238 of 240
Index
Driver's Seat Power Height Adjustment.................. 57
Folding the Second Seats........... 60
Folding the Third Seats.............. 62
Head Restraints........................... 58
Passenger Seating....................... 56
Reclining the Second Seat.......... 61
Removing the Second Seats....... 59
Third Seat Access........................ 58
Serial Number................................ 216
Service Intervals............................ 140
Service Manual.............................. 233
Service Station Procedures .......... 110
Setting the Clock............................. 68
Shifting the Automatic
Transmission.............................. 120
Shift Lever Position Indicator...... 120 Side Marker Lights, Bulb
Replacement in.......................... 178
Signaling Turns................................ 43
Snow Tires...................................... 174
Solvent-type Cleaners.................... 184
Sound System................................... 84
Spare Tire
Inflating....................................... 192
Specifications............................. 219
Spark Plugs, Replacing................. 160
Specifications Charts..................... 218
Speed Control...................................
49
Speedometer......................................
39
SRS Indicator...............................
16,
37
START (Ignition
Key Position)..... 52
Starting the Engine........................ 119 In Cold Weather at HighAltitude................................... 119
With a Dead Battery ................. 200
Steam Coming from Engine......... 202 Steering Wheel Adjustment................................... 46
Anti-theft Column Lock.............. 52
Stereo Sound System...................... 84
Storing Your Car............................ 182
Sunroof.............................................. 65
Closing Manually....................... 207
Operation...................................... 65
Supplemental Restraint System Service Precautions..................... 17
Servicing....................................... 16
SRS Indicator.......................... 16, 37
System Components.................... 12 Tailgate............................................. 55
Taillights, Changing Bulbs in....... 179
Taking Care of the Unexpected .. 191 Tape Player................................. 89, 98
Technical Descriptions Anti-lock Brake System............ 220
Emission Control Systems........ 224
Three Way Catalytic
Converter................................ 226
Tire Information........................ 221
Temperature Gauge........................ 40
Tether Attachment Points.............. 26 Three Way Catalytic Converter... 226Time, Setting the............................. 68
Tire Chains..................................... 174
Tire, How to Change a Flat.......... 193
Tires................................................ 169 Air Pressure............................... 170
Checking Wear.......................... 171
Compact Spare........................... 192
DOT Tire Quality Grading....... 222
Inflation....................................... 169
CONTINUEDProCarManuals.comMain Menu s t