window HONDA ODYSSEY 1996 Owners Manual
[x] Cancel search | Manufacturer: HONDA, Model Year: 1996, Model line: ODYSSEY, Model: HONDA ODYSSEY 1996Pages: 240, PDF Size: 2.64 MB
Page 30 of 240

Carbon Monoxide Hazard
Your car's exhaust contains carbon monoxide gas. You should have no
problem with carbon monoxide
entering the car in normal driving ifyou maintain your car properly.Have the exhaust system inspected
for leaks whenever:
The car is raised for an oil change.
You notice a change in the soundof the exhaust. The car was in an accident that
may have damaged the underside. High levels of carbon monoxide can
collect rapidly in enclosed areas, such as a garage. Do not run the
engine with the garage door closed.Even with the door open, run the
engine only long enough to move the
car out of the garage.
With the tailgate open, air flow can pull exhaust gas into your car'sinterior and create a hazardous
condition. If you must drive with the
tailgate open, open all the windows and set the heating and cooling
system as follows. If you must sit in your parked car,
even in an unconfined area, with the engine running, adjust the heating
and cooling system as follows:
1. Push the
button. 2. Select the mode.
3. Turn the fan on high speed.
4. Set the temperature control to a
comfortable setting.
Driver and Passenger Safety
Carbon monoxide gas is toxic.
Breathing it can cause
unconsciousness and can even
kill you.
Avoid any enclosed areas or activities that expose you tocarbon monoxide.ProCarManuals.comMain Menu s t Table of Contents
Page 32 of 240

Instruments and Controls
This section gives information about the controls and displays thatcontribute to the daily operation of
your Honda. All the essential controls are within easy reach.
Control Locations............................ 32
Indicator Lights................................ 33
Gauges.............................................. 37
Speedometer................................ 37
Trip Meter.................................... 37
Odometer......................................
37
Temperature Gauge................... .
38
Fuel Gauge.................................. 38
Maintenanc
e Required
Indicator...................................
38
Controls Nea r
the Steering
Wheel........................................ 39
Headlights.................................... 40
Daytime Running Lights............. 40
Instrument Panel Brightness..... 41
Turn Signals................................. 41
Windshield Wipers...................... 42
Windshield Washers................... 42 Rear Window Wiper and Washer...................................... 43
Hazard Warning........................... 43
Rear Window Defogger.............. 43
Steering Wheel Adjustment....... 44
Steering Wheel Controls................ 46 Cruise Control.............................. 46
Keys and Locks................................ 49
Keys............................................... 49
Ignition Switch............................. 49
Power Door Locks....................... 50
Remote Transmitter.................... 51Childproof Door Locks............... 52
Tailgate......................................... 52
Glove Box..................................... 53
Seats.................................................. 54
Passenger Seating....................... 54
Seat Adjustments......................... 54
Driver's Seat Power Height Adjustment............................... 55
Head Restraints........................... 56 Third Seat Access........................ 56
Removing the Second Seats in the Six-Passenger Model.... 57
Folding the Second Seats in the Seven-Passenger
Model....................................
58
Reclining th e
Second Seat.......... 59
Folding the Third Seat
in All Models............................ 60
Power Windows............................... 62
Sunroof.............................................. 63
Mirrors.............................................. 64
Adjusting the Power Mirrors..... 64
Parking Brake..................................
65
Digital Clock.................................... .
66
Beverage Holder.............................. 66
Dashboard Compartment............... 68 Center Pocket.................................. 68
Vanity Mirror................................... 68 Cigarette Lighter............................. 69
Ashtrays............................................ 69 Interior Lights.................................. 70
Ceiling Lights............................... 70
Spotlights...................................... 70
Tailgate Light............................... 71 Courtesy Lights........................... 71
Instruments and ControlsProCarManuals.comMain Menu s t
Page 40 of 240

Controls Near the Steering Wheel
The two levers on the steering column contain controls for driving
features you use most often. The left lever controls the turn signals,
headlights, and high beams. The right lever controls the windshield
wipers.
The rear window defogger switch and hazard warning switch are on
the dashboard under the center air
vent.
The controls near the left air vent are for the sunroof, cruise control
and instrument panel brightness.
The lever on the underside of the steering column allows you to tilt the
steering wheel.
Instruments and Controls
HAZARD WARNING LIGHT
SHIFT LEVER
REAR WINDOW
DEFOGGER
HORN
BUTTONS
SUNROOF
SWITCH
CRUISE
CONTROL
INSTRUMENT
BRIGHTNESS
HEADLIGHTS/
TURN SIGNALS
TILT
ADJUSTMENT
WINDSHIELD
WIPERS/WASHERSProCarManuals.comMain Menu s t Table of Contents
Page 44 of 240
Controls Near the Steering Wheel
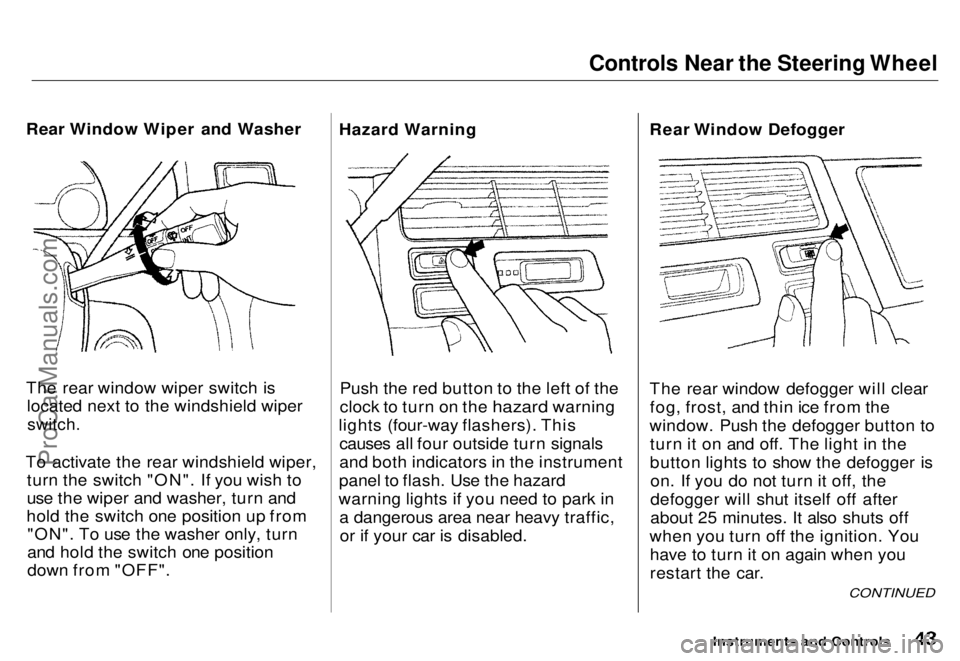
Rear Window Wiper and Washer
The rear window wiper switch is located next to the windshield wiper
switch.
To activate the rear windshield wiper, turn the switch "ON". If you wish to
use the wiper and washer, turn and
hold the switch one position up from "ON". To use the washer only, turn
and hold the switch one position
down from "OFF". Hazard Warning
Push the red button to the left of the
clock to turn on the hazard warning
lights (four-way flashers). This causes all four outside turn signals
and both indicators in the instrument
panel to flash. Use the hazard
warning lights if you need to park in a dangerous area near heavy traffic,or if your car is disabled. Rear Window Defogger
The rear window defogger will clear
fog, frost, and thin ice from the
window. Push the defogger button to turn it on and off. The light in the
button lights to show the defogger ison. If you do not turn it off, the
defogger will shut itself off after
about 25 minutes. It also shuts off
when you turn off the ignition. You have to turn it on again when you
restart the car.
Instruments and Controls
CONTINUED
ProCarManuals.comMain Menu s t Table of Contents
Page 45 of 240

Controls Near the Steering Wheel
Make sure the rear window is clear
and you have good visibility before
starting to drive.
The defogger wires on the inside of the rear window can be accidentally damaged. When cleaning the glass,
always wipe side to side. Steering Wheel Adjustment
You can adjust the steering wheel height to suit your preference. Do
this before you begin driving.
1. Adjust the seat so you are acomfortable distance from the
pedals.
2. The lever to tilt the steering wheel is under the steering column to
the left. Push this lever all the was
down.
Instruments and Controls
Adjusting the steering wheel
position while driving may
cause you to lose control of the
car and be seriously injured in a
crash.
Adjust the steering wheel only
when the car is stopped.ProCarManuals.coms t Table of Contents Main Menu
Page 63 of 240
 to raise or lower any window.
Each door has a switch that controls
its window. To open the window,
p")
Power Windows
Your car's windows are electrically- powered. Turn the ignition switch toON (II) to raise or lower any window.
Each door has a switch that controls
its window. To open the window,
push the switch down and hold it. Release the switch when you want
the window to stop. Close the
window by pulling back on the switch and holding it.
The driver's armrest has a masterpower window control panel. Toopen any of the passengers' windows,
push down on the appropriate switchand hold it down until the window
reaches the desired position. To close the window, pull back on the
window switch. Release the switch
when the window gets to the position
you want.
The master control panel also con-
tains these extra features:
AUTO — To open the driver's window fully, push the window switch firmly down and release it.
The window automatically goes all the way down. To stop the window
from going all the way down, pull back on the window switch briefly.
To open the driver's window only partially, push the window switch down lightly and hold it. The window
will stop as soon as you release the
switch.
The AUTO function only works to lower the driver's window. To raise
the window, you must pull back on
the window switch and hold it until
the window reaches the desired
position.
Instruments and Controls DRIVER'S WINDOW
SWITCH MAIN
SWITCHProCarManuals.comMain Menu s t Table of Contents
Page 64 of 240

Power Windows, Sunroof
The MAIN switch controls power to the passengers' windows. With this
switch off, the passengers' windowscannot be raised or lowered. The
MAIN switch does not affect thedriver's window. Keep the MAIN
switch off when you have children in
the car so they do not injure them- selves by operating the windows
unintentionally.
On some models
Use the switch on the dashboard to open and close the sunroof. The
ignition must be ON (II). Push and hold the switch to open the
sunroof. Release the switch when
the sunroof reaches the desired
position. To close the sunroof, press and hold the switch.
CONTINUED
Instruments and Controls
Sunroof
SUNROOF SWITCH
Closing a power window on a
child's hands or fingers can
cause serious injury.
Make sure your children are
away from the windows before
closing them.
ProCarManuals.coms t Main Menu Table of Contents
Page 74 of 240

Heating and Cooling
Proper use of the Heating and
Cooling system can make the
interior dry and comfortable, and
keep the windows clear for best
visibility.
What Each Control Does Fan Control Lever
Sliding this lever to the right
increases the fan's speed, which
increases air flow.
Temperature Control Lever
Sliding this lever to the right
increases the temperature of the air
flow.
Air Conditioning (A/C) Button This button turns the air condi- tioning ON and OFF. The indicatorin the button lights when the A/C is
on.
Fresh Air and Recirculation
Buttons
These two buttons control the source of air going into the system. In Fresh Air mode air
comes from outside the car. In
Recirculation mode the
interior air recycles through the
system.
Comfort and Convenience Features TEMPERATURE CONTROL LEVER
FAN CONTROL
LEVER AIR CONDITIONING
BUTTON
MODE BUTTONS
RECIRCULATION
BUTTONFRESH AIR BUTTONProCarManuals.comMain Menu s t Table of Contents
Page 77 of 240

Heating and Cooling
It is best to leave the system in mode under almost all
conditions. Keeping the system in mode, particularly with the
A/C off, can cause the windows to fog up. Switch to mode when
you are driving through smoky or dusty conditions, then switch back to mode when the condition
clears.
The outside air intakes for the heating and cooling system are atthe base of the windshield. Keep
these clear of leaves and other
debris.
Ventilation
The flow-through ventilation system draws in outside air, circulates it
through the interior, then exhausts it
through vents near the rear side
panels.
1. Slide the temperature control lever
all the way to the left.
Make sure the A/C is off. 2. Select and
3. Set the fan to the desired speed.
CONTINUED
Comfort and Convenience Features
MODE BUTTONS
RECIRCULATION
BUTTON
FRESH AIR BUTTON
AIR CONDITIONINGBUTTON
FAN CONTROL
LEVER
TEMPERATURE CONTROL LEVERProCarManuals.comMain Menu s t Table of Contents
Page 78 of 240

Heating and Cooling
To Cool with A/C
1. Turn on the A/C by pressing the button. The light in the button
should come on.
2. Make sure the temperature control lever is all the way to the
left.
3. Select and
4. Set the fan to the desired speed.
If the interior is very warm from
being parked in the sun, you can cool
it down more rapidly by setting up
the controls this way:
1. Start the engine.
2. Turn on the A/C by pressing the
button. Make sure the tempera-
ture control lever is all the way to
the left.
3. Set the fan to maximum speed.
4. Open the windows partially. Select
and
When the interior has cooled down
to a more comfortable temperature,
close the windows and set thecontrols as described for normal
cooling.
Air conditioning places an extra load
on the engine. Watch the engine
coolant temperature gauge (see page 38) when driving in stop-and-go
traffic or climbing a long, steep hill. If it moves near the red zone, turnoff the A/C until the gauge reads
normally.
Comfort and Convenience Features
MODE BUTTONS
RECIRCULATION
BUTTON
FRESH AIR BUTTON
AIR CONDITIONINGBUTTON
FAN CONTROL
LEVER
TEMPERATURE CONTROL LEVERProCarManuals.comMain Menu s t Table of Contents