steering wheel HONDA ODYSSEY 1996 Owners Manual
[x] Cancel search | Manufacturer: HONDA, Model Year: 1996, Model line: ODYSSEY, Model: HONDA ODYSSEY 1996Pages: 240, PDF Size: 2.64 MB
Page 13 of 240
 to
help protect the head and chest ofthe driver and front seat passenger during a severe frontal colli")
Supplemental Restraint System
Your car is equipped with a Supple- mental Restraint System (SRS) to
help protect the head and chest ofthe driver and front seat passenger during a severe frontal collision.
This system does not replace your seat
belts. It supplements, or adds to, the
protection offered by seat belts and other occupant protection features. SRS Components
Your supplemental restraint system includes: One airbag in the steering wheel
for the driver and another in the dashboard for the passenger.
Sensors that can detect a severe frontal collision.
A sophisticated electronic systemthat continually monitors thesensors, control unit, airbag
activators, and all related wiringwhen the ignition is ON (II).
An indicator light on the instru- ment panel to alert you to a possi-
ble problem with the system.
Emergency backup power in case
your car's electrical system is disconnected in a crash. What Happens In a Crash
If you ever have a severe frontal
collision, the sensors will detect rapid deceleration and signal the
control unit to instantly inflate the
airbags.
During a crash, your seat belts will
help to restrain your lower body andtorso. The airbags will provide a
cushion to absorb crash energy and
help keep the head and chest of thedriver and front passenger from
striking the interior of the car.
After inflating, the airbags will immediately deflate. The entire
process, from detection to deflation, takes a fraction of a second. This
process occurs so quickly that youmay not hear the loud noise created
by the airbag inflators, or realize
what has happened.
Driver and Passenger Safety
Not wearing seat belts
increases the chance of serious
injury or death in a crash, evenif you have airbags.
Be sure you and your
passengers always wear seat
belts and wear them properly.ProCarManuals.comMain Menu s t Table of Contents
Page 15 of 240

Supplemental Restraint System
How the Driver's Airbag Works
If you ever have a severe frontal
collision, your airbag will instantly
inflate to help protect your head and
chest.
To do its job, the airbag inflates with
considerable force. So, while it can
reduce serious injuries and even save
your life, the airbag might cause some facial abrasions or other
injuries. To reduce the possibility of
injury, you should always sit back as
far from the steering wheel as is practical while still maintaining full
vehicle control.
After the bag completely inflates, itimmediately starts deflating so it
won't interfere with your visibility, ability to steer, or ability to operate
other controls. The total time for
inflation and deflation takes a
fraction of a second. You may not even be aware that the airbag has
been fully inflated.
Driver and Passenger SafetyProCarManuals.comMain Menu s t Table of Contents
Page 16 of 240

Supplemental Restraint System
The driver's airbag is stored in the center of the steering wheel. For
your safety, do not attach any items
to the steering wheel. They could interfere with the proper operation
of the airbag. Or, if the airbaginflates, they could be propelled
inside the car and hurt someone. How the Passenger's Airbag
Works
If you ever have a severe frontal
collision, the passenger's airbag will
inflate at the same time as the driver's
airbag.
This airbag is quite large and inflates
with considerable force. It can seriously hurt a front seat passenger
who is not in the proper position and wearing the seat belt properly. Front seat passengers should move the
seat as far back as practical and sit
well back in the seat.
We strongly recommend that you do not put an infant seat in the front
passenger's seat. If the airbaginflates, it can hit the infant seat with
great force. The infant seat can be dislodged or struck with enough
force to cause very serious injury to
the infant.
If a toddler seat is used in the front
passenger's seat, the vehicle seat should be moved as far back as
possible. If the passenger's bag
inflates, it could seriously hurt a
toddler who is not in the proper
position or properly restrained.
Driver and Passenger Safety
CONTINUEDProCarManuals.comMain Menu s t Table of Contents
Page 18 of 240

Supplemental Restraint System
System Service Precautions
Do not modify your steering wheel
or any other part of the supplementalrestraint system. Modifications could
make the system ineffective.
Do not tamper with the system's
components or wiring. This could cause the airbags to inflate inadver-
tently, possibly injuring someone
very seriously.
Tell anyone who works on your car that you have a supplementalrestraint system. Failure to follow
the procedures and precautions in
the official Honda service manualcould result in personal injury ordamage to the system. Scrapping an entire car that has an
uninflated airbag can be dangerous.
Get assistance from a Honda dealer
if your car must be scrapped.
If you sell your car, please be sure to
tell the new owner that the car has asupplemental restraint system. Alert
them to the information and precau- tions in this part of the owner's
manual.
Driver and Passenger SafetyProCarManuals.comMain Menu s t Table of Contents
Page 32 of 240

Instruments and Controls
This section gives information about the controls and displays thatcontribute to the daily operation of
your Honda. All the essential controls are within easy reach.
Control Locations............................ 32
Indicator Lights................................ 33
Gauges.............................................. 37
Speedometer................................ 37
Trip Meter.................................... 37
Odometer......................................
37
Temperature Gauge................... .
38
Fuel Gauge.................................. 38
Maintenanc
e Required
Indicator...................................
38
Controls Nea r
the Steering
Wheel........................................ 39
Headlights.................................... 40
Daytime Running Lights............. 40
Instrument Panel Brightness..... 41
Turn Signals................................. 41
Windshield Wipers...................... 42
Windshield Washers................... 42 Rear Window Wiper and Washer...................................... 43
Hazard Warning........................... 43
Rear Window Defogger.............. 43
Steering Wheel Adjustment....... 44
Steering Wheel Controls................ 46 Cruise Control.............................. 46
Keys and Locks................................ 49
Keys............................................... 49
Ignition Switch............................. 49
Power Door Locks....................... 50
Remote Transmitter.................... 51Childproof Door Locks............... 52
Tailgate......................................... 52
Glove Box..................................... 53
Seats.................................................. 54
Passenger Seating....................... 54
Seat Adjustments......................... 54
Driver's Seat Power Height Adjustment............................... 55
Head Restraints........................... 56 Third Seat Access........................ 56
Removing the Second Seats in the Six-Passenger Model.... 57
Folding the Second Seats in the Seven-Passenger
Model....................................
58
Reclining th e
Second Seat.......... 59
Folding the Third Seat
in All Models............................ 60
Power Windows............................... 62
Sunroof.............................................. 63
Mirrors.............................................. 64
Adjusting the Power Mirrors..... 64
Parking Brake..................................
65
Digital Clock.................................... .
66
Beverage Holder.............................. 66
Dashboard Compartment............... 68 Center Pocket.................................. 68
Vanity Mirror................................... 68 Cigarette Lighter............................. 69
Ashtrays............................................ 69 Interior Lights.................................. 70
Ceiling Lights............................... 70
Spotlights...................................... 70
Tailgate Light............................... 71 Courtesy Lights........................... 71
Instruments and ControlsProCarManuals.comMain Menu s t
Page 40 of 240

Controls Near the Steering Wheel
The two levers on the steering column contain controls for driving
features you use most often. The left lever controls the turn signals,
headlights, and high beams. The right lever controls the windshield
wipers.
The rear window defogger switch and hazard warning switch are on
the dashboard under the center air
vent.
The controls near the left air vent are for the sunroof, cruise control
and instrument panel brightness.
The lever on the underside of the steering column allows you to tilt the
steering wheel.
Instruments and Controls
HAZARD WARNING LIGHT
SHIFT LEVER
REAR WINDOW
DEFOGGER
HORN
BUTTONS
SUNROOF
SWITCH
CRUISE
CONTROL
INSTRUMENT
BRIGHTNESS
HEADLIGHTS/
TURN SIGNALS
TILT
ADJUSTMENT
WINDSHIELD
WIPERS/WASHERSProCarManuals.comMain Menu s t Table of Contents
Page 41 of 240

Controls Near the Steering Wheel
Headlights
The rotating switch on the left lever controls the lights. Turning this switch to the first position
turns on the parking lights, taillights, instrument panel lights, side-marker
lights, and rear license plate lights.
Turning the switch to the second position turns on the
headlights. If you leave the lights on with the
ignition switch in ACCESSORY (I)
or LOCK (0), you will hear a
reminder chime when you open the
driver's door.
To change between low beams and high beams, pull back on the turnsignal lever until you hear a click,
then let go. The blue high beam indicator will light (see page 36). To flash the high beams, pull back
and hold the turn signal lever.
Release the lever and the high
beams will go off.
The high beams will stay on for as long as you hold the lever, no matter
what position the headlight switch is
in.
Daytime Running Lights (Canadian Models)
With the headlight switch off, the high beam headlights come on with
reduced brightness when you turn
the ignition switch to ON (II) and release the parking brake. They
remain on until you turn the ignition
off, even if you set the parking brake
The headlights revert to normal operation when you turn them on
with the switch.
Instruments and ControlsProCarManuals.comMain Menu s t Table of Contents
Page 42 of 240

Controls Near the Steering Wheel
Instrument Panel Brightness
The knob on the dashboard to the left of the steering column controlsthe brightness of the instrument panel lights. Push the knob to get it
to pop out. Turn the knob to adjust the brightness. Turn Signals
Signal a turn or lane change with this
lever. Push down on the lever tosignal a left turn, and up to signal aright turn. If you push it up or down
all the way, the turn signal continues
to blink even when you release the
lever. It shuts off automatically as
you complete the turn. To signal a lane change, push lightly
on the turn signal lever in the proper
direction and hold it. The lever will
return to the center position as soon as you release it.
Instruments and Controls
TURN SIGNAL LEVERProCarManuals.comMain Menu s t Table of Contents
Page 43 of 240

Controls Near the Steering Wheel
Windshield Wipers
The right lever controls the wind-
shield wipers and washers. The
rotary switch at the end of the lever
has three positions:
INT: intermittent
: low speed
: high speed
In intermittent, the wipers operate
every few seconds. In low speed and
high speed, the wipers run continu- ously. To operate the wipers in mist mode,
push the control lever down. The
wipers run at high speed until yourelease the lever. This gives you a quick way to clear the windshield. Windshield Washers
To clean the windshield, pull back ofthe wiper control lever. The washersspray until you release the lever. The
wipers run at low speed while you're pulling the lever, then complete onemore sweep of the windshield after
you release it.
Instruments and ControlsProCarManuals.comMain Menu s t Table of Contents
Page 44 of 240
Controls Near the Steering Wheel
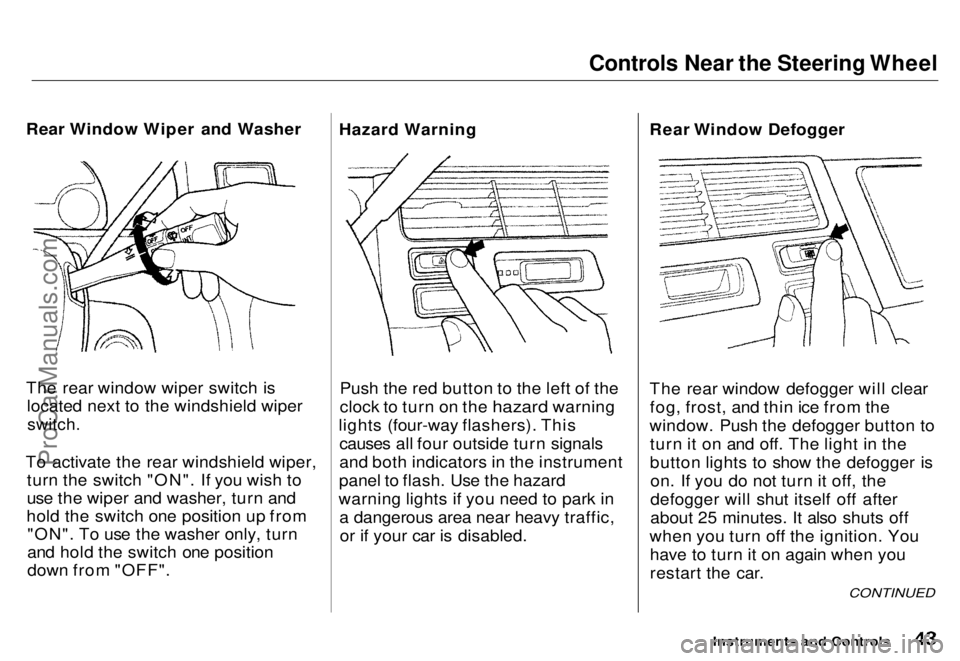
Rear Window Wiper and Washer
The rear window wiper switch is located next to the windshield wiper
switch.
To activate the rear windshield wiper, turn the switch "ON". If you wish to
use the wiper and washer, turn and
hold the switch one position up from "ON". To use the washer only, turn
and hold the switch one position
down from "OFF". Hazard Warning
Push the red button to the left of the
clock to turn on the hazard warning
lights (four-way flashers). This causes all four outside turn signals
and both indicators in the instrument
panel to flash. Use the hazard
warning lights if you need to park in a dangerous area near heavy traffic,or if your car is disabled. Rear Window Defogger
The rear window defogger will clear
fog, frost, and thin ice from the
window. Push the defogger button to turn it on and off. The light in the
button lights to show the defogger ison. If you do not turn it off, the
defogger will shut itself off after
about 25 minutes. It also shuts off
when you turn off the ignition. You have to turn it on again when you
restart the car.
Instruments and Controls
CONTINUED
ProCarManuals.comMain Menu s t Table of Contents