HONDA ODYSSEY 1998 Owners Manual
Manufacturer: HONDA, Model Year: 1998, Model line: ODYSSEY, Model: HONDA ODYSSEY 1998Pages: 272, PDF Size: 2.67 MB
Page 221 of 272
Changing a Flat Tire
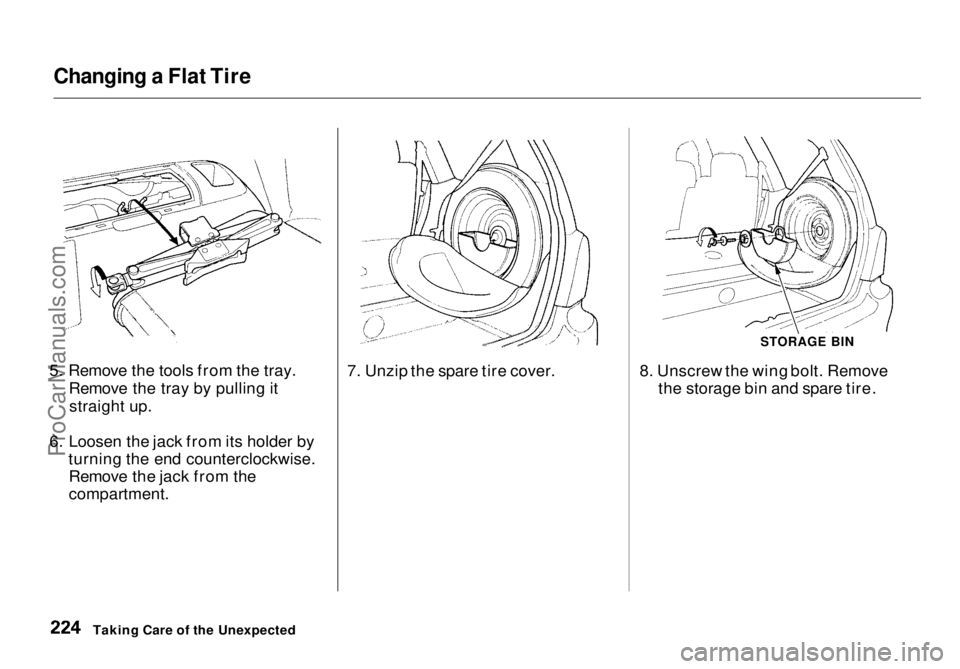
5. Remove the tools from the tray. Remove the tray by pulling itstraight up.
6. Loosen the jack from its holder by turning the end counterclockwise.Remove the jack from the
compartment. 7. Unzip the spare tire cover.
STORAGE BIN
8. Unscrew the wing bolt. Remove the storage bin and spare tire.
Taking Care of the UnexpectedProCarManuals.comMain Menu Table of Contents s t
Page 222 of 272
Changing a Flat Tire
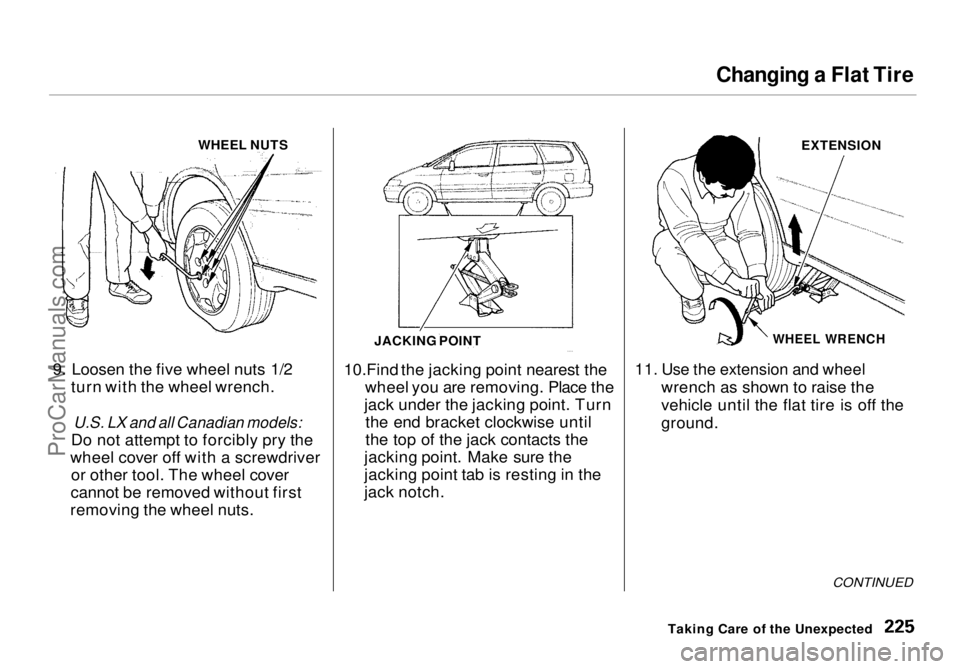
WHEEL NUTS
9. Loosen the five wheel nuts 1/2 turn with the wheel wrench.
U.S. LX and all Canadian models:
Do not attempt to forcibly pry the
wheel cover off with a screwdriver or other tool. The wheel cover
cannot be removed without first
removing the wheel nuts. 10.Find the jacking point nearest the
wheel you are removing. Place the
jack under the jacking point. Turn the end bracket clockwise until
the top of the jack contacts the
jacking point. Make sure the
jacking point tab is resting in the
jack notch. EXTENSION
WHEEL WRENCH
11. Use the extension and wheel
wrench as shown to raise the
vehicle until the flat tire is off the
ground.
CONTINUED
Taking Care of the Unexpected
JACKING POINTProCarManuals.comMain Menu Table of Contents s t
Page 223 of 272
Changing a Flat Tire
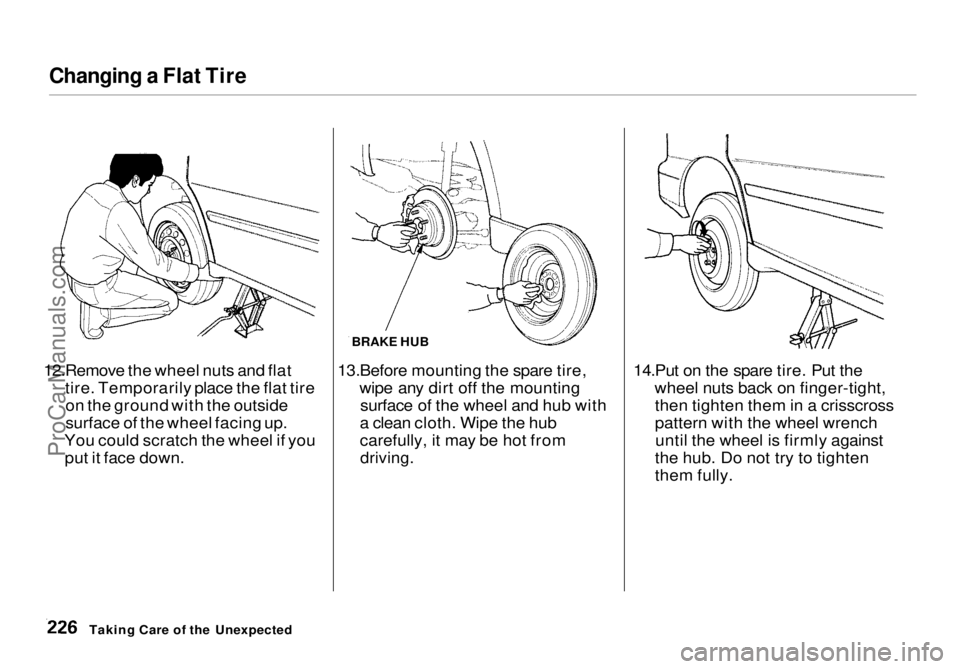
12.Remove the wheel nuts and flat tire. Temporarily place the flat tireon the ground with the outside
surface of the wheel facing up.
You could scratch the wheel if you put it face down. BRAKE HUB
13.Before mounting the spare tire, wipe any dirt off the mountingsurface of the wheel and hub with
a clean cloth. Wipe the hub
carefully, it may be hot from
driving.
14.Put on the spare tire. Put the
wheel nuts back on finger-tight,then tighten them in a crisscross
pattern with the wheel wrenchuntil the wheel is firmly against
the hub. Do not try to tighten
them fully.
Taking Care of the UnexpectedProCarManuals.comMain Menu Table of Contents s t
Page 224 of 272
Changing a Flat Tire
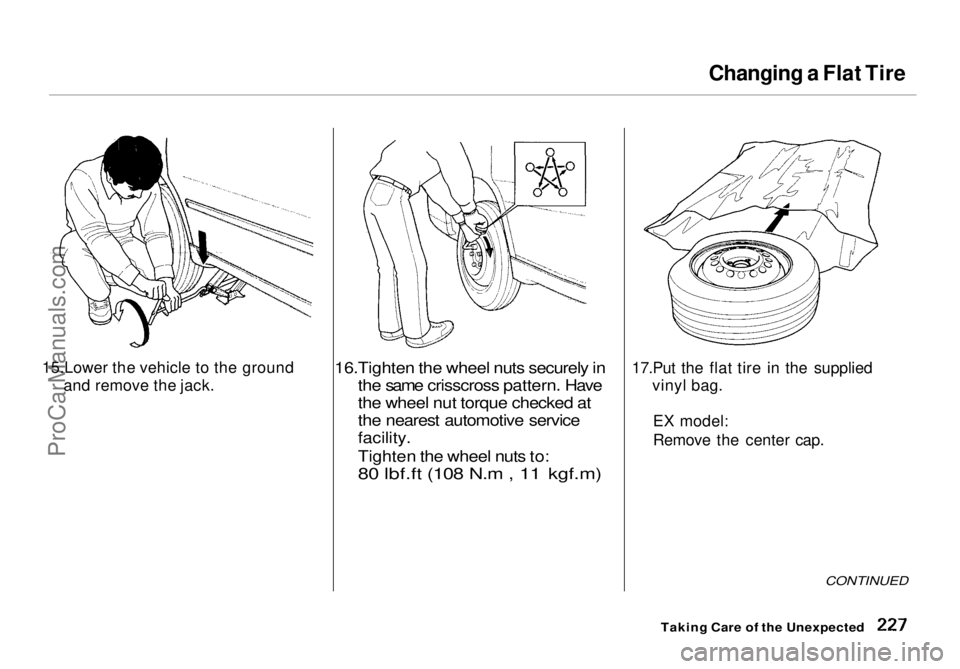
15.Lower the vehicle to the ground and remove the jack.
16.Tighten the wheel nuts securely in
the same crisscross pattern. Have
the wheel nut torque checked at
the nearest automotive service
facility.
Tighten the wheel nuts to:80 lbf.ft (108 N.m , 11 kgf.m)
17.Put the flat tire in the suppliedvinyl bag.
E
X model:
Remove the center cap.
Taking Care of the Unexpected
CONTINUEDProCarManuals.comMain Menu Table of Contents s t
Page 225 of 272
Changing a Flat Tire
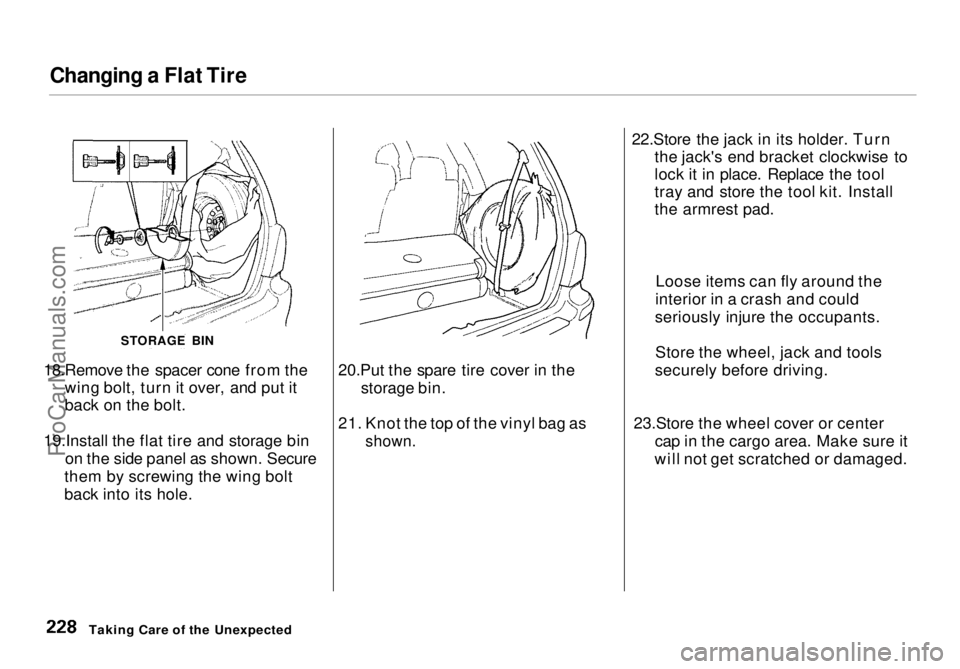
18.Remove the spacer cone from the wing bolt, turn it over, and put it
back on the bolt.
19.Install the flat tire and storage bin on the side panel as shown. Secure
them by screwing the wing bolt
back into its hole. 20.Put the spare tire cover in the
storage bin.
21. Knot the top of the vinyl bag as
shown.
22.Store the jack in its holder. Turn
the jack's end bracket clockwise to
lock it in place. Replace the tool
tray and store the tool kit. Install
the armrest pad.
23.Store the wheel cover or center cap in the cargo area. Make sure it
will not get scratched or damaged.
Taking Care of the Unexpected
STORAGE BIN
Loose items can fly around the
interior in a crash and could
seriously injure the occupants.
Store the wheel, jack and tools
securely before driving.ProCarManuals.comMain Menu Table of Contents s t
Page 226 of 272

If Your Engine Won't Start
Diagnosing why your engine won't start falls into two areas, depending
on what you hear when you turn the
key to START (III):
You hear nothing, or almostnothing. The engine's starter
motor does not operate at all, or
operates very slowly.
You can hear the starter motor operating normally, or the starter
motor sounds like it is spinning
faster than normal, but the engine does not start up and run.
Nothing Happens or the Starter
Motor Operates Very Slowly
When you turn the ignition switch to START (III), you do not hear the
normal noise of the engine trying tostart. You may hear a clicking sound
or series of clicks, or nothing at all.
Check these things: Your vehicle has the Immobilizer
System. You should use a
properly-coded master or valet key
to start the engine (see page 67).
A key that is not properly coded will cause the immobilizer systemindicator in the dash panel to blink
rapidly.
Check the transmission interlock.
The transmission must be in Park or Neutral or the starter will not
operate.
Turn the ignition switch to ON (II).
Turn on the headlights and check their brightness. If the headlightsare very dim or don't light at all,
the battery is discharged. See
Jump Starting on page 230.
Turn the ignition switch to START
(III). If the headlights do not dim,
check the condition of the fuses. If
the fuses are OK, there is proba-
bly something wrong with the electrical circuit for the ignitionswitch or starter motor. You will
need a qualified technician to determine the problem. (See
Towing on page 244.)
If the headlights dim noticeably or
go out when you try to start theengine, either the battery is dis-
charged or the connections are
corroded. Check the condition of
the battery and terminal connec-
tions (see page 189). You can
then try jump starting the vehicle
from a booster battery (see page
231).
Taking Care of the UnexpectedProCarManuals.comMain Menu Table of Contents s t
Page 227 of 272
If Your Engine Won't Start, Jump Starting
The Starter
Operates Normally
In this case, the starter motor's
speed sounds normal, or even faster
than normal, when you turn the
ignition switch to START (III), but
the engine does not run. Are you using the proper startingprocedure? Refer to Starting the
Engine on page 141.
Do you have fuel? Turn the
ignition switch to ON (II) for a
minute and watch the fuel gauge.
The low fuel level warning light may not be working, so you were
not reminded to fill the tank.
There may be an electrical problem, such as no power to the
fuel pump. Check all the fuses (see page 242).
If you find nothing wrong, you will
need a qualified technician to find
the problem. See Towing on page
244.
Jump Starting
If your vehicle's battery has rundown, you may be able to start the
engine by using a booster battery.
Although this seems like a simple procedure, you should take several
precautions.
You cannot start a Honda by pushing or pulling it. To jump start your vehicle, follow
these directions closely:
1. Open the hood and check the physical condition of the battery(see page 189 ). In very cold
weather, check the condition of the electrolyte. If it seems slushyor like ice, do not try jump starting
until it thaws.
If a battery sits in extreme cold, the electrolyte inside can freeze.
Attempting to jump start with a frozen battery can cause it to rupture.
2. Turn off all the electrical acces- sories: heater, A/C, stereo system,
lights, etc.
Put the transmission in Neutral or
Park and set the parking brake.
Taking Care of the Unexpected
A battery can explode if you do
not follow the correct procedure,
seriously injuring anyone nearby.
Keep all sparks, open flames,
and smoking materials away
from the battery.
NOTICEProCarManuals.comMain Menu Table of Contents s t
Page 228 of 272
Jump Starting
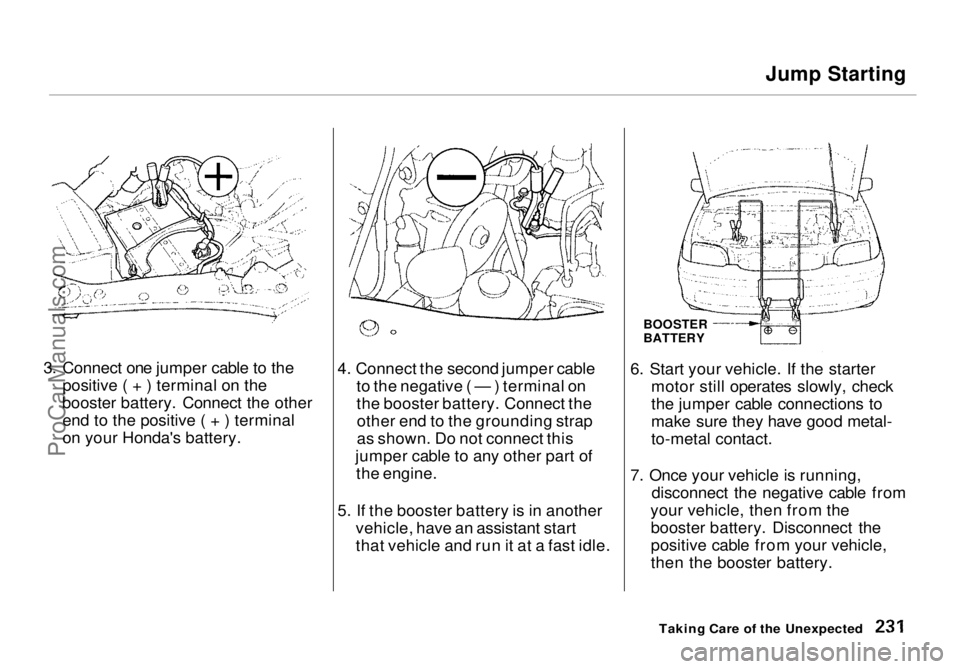
3. Connect one jumper cable to the positive ( + ) terminal on the
booster battery. Connect the other end to the positive ( + ) terminal
on your Honda's battery. 4. Connect the second jumper cable
to the negative ( — ) terminal on
the booster battery. Connect theother end to the grounding strap
as shown. Do not connect this
jumper cable to any other part of the engine.
5. If the booster battery is in another vehicle, have an assistant start
that vehicle and run it at a fast idle. 6. Start your vehicle. If the starter
motor still operates slowly, check
the jumper cable connections to
make sure they have good metal-
to-metal contact.
7. Once your vehicle is running, disconnect the negative cable from
your vehicle, then from the booster battery. Disconnect the
positive cable from your vehicle,
then the booster battery.
Taking Care of the Unexpected
BOOSTER
BATTERYProCarManuals.comMain Menu Table of Contents s t
Page 229 of 272
If Your Engine Overheats
The pointer of your vehicle's temperature gauge should stay in
the midrange under most conditions.
It may go higher if you are driving up
a long steep hill on a very hot day. If
it climbs to the red mark, you should
determine the reason.
Driving with the temperature gauge
pointer at the red mark can cause serious damage to your engine.
Your vehicle can overheat for several
reasons, such as lack of coolant or a
mechanical problem. The only
indication may be the temperature
gauge climbing to or above the red mark. Or you may see steam or
spray coming from under the hood.
In either case, you should take
immediate action.
1. Safely pull to the side of the road.
Put the transmission in Neutral or
Park and set the parking brake.
Turn off the heating and cooling system and all other accessories.
Turn on the hazard warning indicators.
2. If you see steam and/or spray coming from under the hood, turn
off the engine.
3. If you do not see steam or spray, leave the engine running and
watch the temperature gauge. If the high heat is due to overloading (climbing a long, steep hill on a
hot day with the A/C running, for example), the engine should start
to cool down almost immediately. If it does, wait until the tempera-
ture gauge comes down to the mid-
point then continue driving.
Taking Care of the Unexpected
NOTICE
Steam and spray from an
overheated engine can
seriously scald you.
Do not open the hood if steam
is coming out.ProCarManuals.comMain Menu Table of Contents s t
Page 230 of 272
If Your Engine Overheats
4. If the temperature gauge stays at the red mark, turn off the engine.
5. Wait until you see no more signs of steam or spray, then open the
hood.
6. Look for any obvious coolant leaks, such as a split radiator hose.
Everything is still extremely hot,
so use caution. If you find a leak, it
must be repaired before you
continue driving (see Towing on
page 244).
7. If you don't find an obvious leak, check the coolant level in the
radiator reserve tank (see page 132). If the level is below the
MIN mark, add coolant to halfway
between the MIN and MAX marks.
8. If there was no coolant in the reserve tank, you may also have to
add coolant to the radiator. Let the
engine cool down until the pointer reaches the middle of the tempera-
ture gauge, or lower, before check- ing the radiator.
9. Using gloves or a large heavy cloth, turn the radiator cap
counterclockwise, without pushingdown, to the first stop. This
releases any remaining pressure in
the cooling system. After the
pressure releases, push down on
the cap and turn it until it comes
off.
10.Start the engine and set the
temperature control lever tomaximum. Add coolant to the
radiator up to the base of the filler
neck. If you do not have the
proper coolant mixture available,
you can add plain water. Remember to have the cooling
system drained and refilled with
the proper mixture as soon as you
can.
11. Put the radiator cap back on tightly. Run the engine and watch
the temperature gauge. If it goes
back to the red mark, the engine
needs repair. (See Towing on
page 244.)
12.If the temperature stays normal, check the coolant level in the
radiator reserve tank. If it has
gone down, add coolant to the MAX mark. Put the cap back on
tightly.
Taking Care of the Unexpected
Removing the radiator cap
while the engine is hot can
cause the coolant to spray out,
seriously scalding you.
Always let the engine and radiator cool down before
removing the radiator cap.ProCarManuals.comMain Menu Table of Contents s t