fuses HONDA ODYSSEY 1999 Owners Manual
[x] Cancel search | Manufacturer: HONDA, Model Year: 1999, Model line: ODYSSEY, Model: HONDA ODYSSEY 1999Pages: 343, PDF Size: 3.73 MB
Page 284 of 343
Taking Care of the Unexpected
This section covers the more- common problems that motorists
experience with their vehicles. It
gives you information about how to safely evaluate the problem and what
to do to correct it. If the problem has stranded you on the side of the road,
you may be able to get going again. If not, you will also find instructions
on getting your vehicle towed. Compact Spare Tire....................... 286
Changing a Flat Tire..................... 287
If Your Engine Won't Start........... 296
Nothing Happens or the Starter Motor OperatesVery Slowly......................... 296
The Starter Operates
Normally.................................297
Jump Starting................................. 297 If Your Engine Overheats............. 299
Low Oil Pressure Indicator.......... 301
Charging System Indicator........... 302
Malfunction Indicator Lamp ........ 303
Brake System Indicator................ 304
Fuses............................................... 305
Checking and Replacing........... 306
Emergency Towing....................... 311
Taking Care of the UnexpectedProCarManuals.comMain Menu s t
Page 295 of 343
If Your Engine Won't Start
Diagnosing why your engine won't
start falls into two areas, depending
on what you hear when you turn the
key to START (III): You hear nothing, or almost
nothing. The engine's starter
motor does not operate at all, oroperates very slowly. You can hear the starter motor
operating normally, or the starter
motor sounds like it is spinning
faster than normal, but the engine does not start up and run.
Nothing Happens or the Starter
Motor Operates Very Slowly
When you turn the ignition switch to START (III), you do not hear the
normal noise of the engine trying tostart. You may hear a clicking sound
or series of clicks, or nothing at all. Check these things: Check the transmission interlock.
The transmission must be in Park or Neutral or the starter will not
operate.
Turn the ignition switch to ON (II).
Turn on the headlights and check
their brightness. If the headlightsare very dim or don't light at all,
the battery is discharged. See
Jump Starting on page 297.
Turn the ignition switch to START
(III). If the headlights do not dim,
check the condition of the fuses. If
the fuses are OK, there is proba-
bly something wrong with the electrical circuit for the ignitionswitch or starter motor. You will
need a qualified technician to determine the problem. (See
Emergency Towing on page 311.)
If the headlights dim noticeably or
go out when you try to start the
engine, either the battery is dis-
charged or the connections are
corroded. Check the condition of
the battery and terminal connec-
tions (see page 251). You can then try jump starting the vehicle
from a booster battery (see page 297).
The Starter Operates Normally In this case, the starter motor'sspeed sounds normal, or even faster
than normal, when you turn the
ignition switch to START (III), but
the engine does not run. Are you using the proper starting
procedure? Refer to Starting the
Engine on page 197.
Taking Care of the UnexpectedProCarManuals.comMain Menu Table of Contents s t
Page 296 of 343
If Your Engine Won't Start, Jump Starting
Your vehicle has the Immobilizer
System. You should use a
properly-coded master or valet key
to start the engine (see page 77).
A key that is not properly coded
will cause the immobilizer system indicator in the dash panel to blink
rapidly. Do you have fuel? Turn the
ignition switch to ON (II) for a
minute and watch the fuel gauge.
The low fuel level warning light may not be working, so you were
not reminded to fill the tank. There may be an electrical
problem, such as no power to the
fuel pump. Check all the fuses (see page 305).
If you find nothing wrong, you will
need a qualified technician to find
the problem. See Emergency
Towing on page 311. Jump Starting
If your vehicle's battery has run
down, you may be able to start the
engine by using a booster battery.
Although this seems like a simple procedure, you should take several
precautions.
You cannot start a Honda by pushing or pulling it. To jump start your vehicle, follow
these directions closely:
1. Open the hood and check the physical condition of the battery(see page 251). In very cold
weather, check the condition of the electrolyte. If it seems slushyor like ice, do not try jump starting
until it thaws.
If a battery sits in extreme cold, the
electrolyte inside can freeze.
Attempting to jump start with a frozen
battery can cause it to rupture.
2. Turn off all the electrical acces- sories: heater, A/C, climate
control, stereo system, lights, etc.
Put the transmission in Neutral or
Park and set the parking brake.
CONTINUED
Taking Care of the Unexpected
A battery can explode if you do
not follow the correct procedure,
seriously injuring anyone nearby.
Keep all sparks, open flames,
and smoking materials away
from the battery.
NOTICEProCarManuals.comMain Menu Table of Contents s t
Page 304 of 343
Fuses
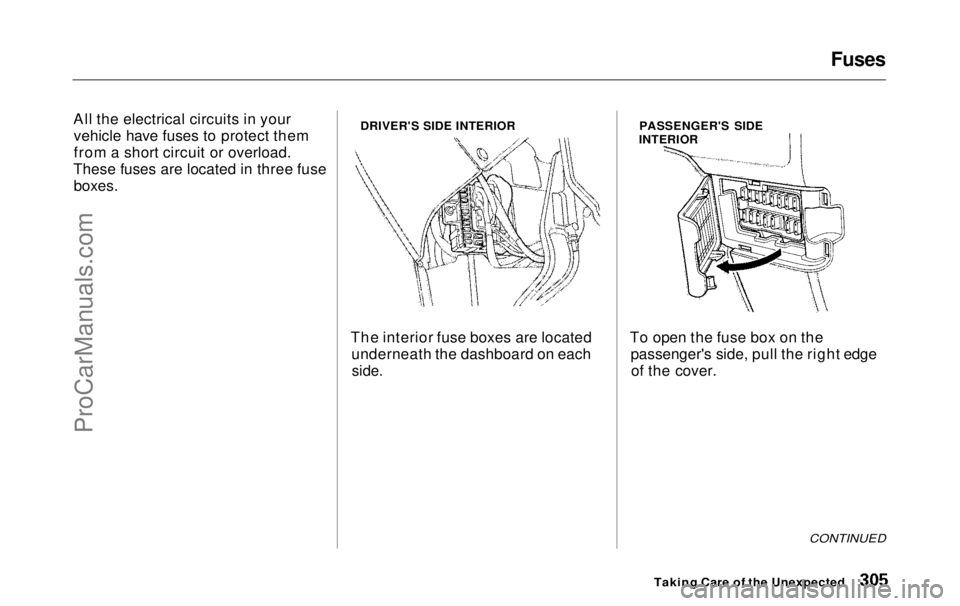
All the electrical circuits in your vehicle have fuses to protect them
from a short circuit or overload.
These fuses are located in three fuse
boxes.
DRIVER'S SIDE INTERIOR
The interior fuse boxes are located underneath the dashboard on each
side.
PASSENGER'S SIDE
INTERIOR
To open the fuse box on the passenger's side, pull the right edgeof the cover.
CONTINUED
Taking Care of the UnexpectedProCarManuals.comMain Menu Table of Contents s t
Page 305 of 343
Fuses
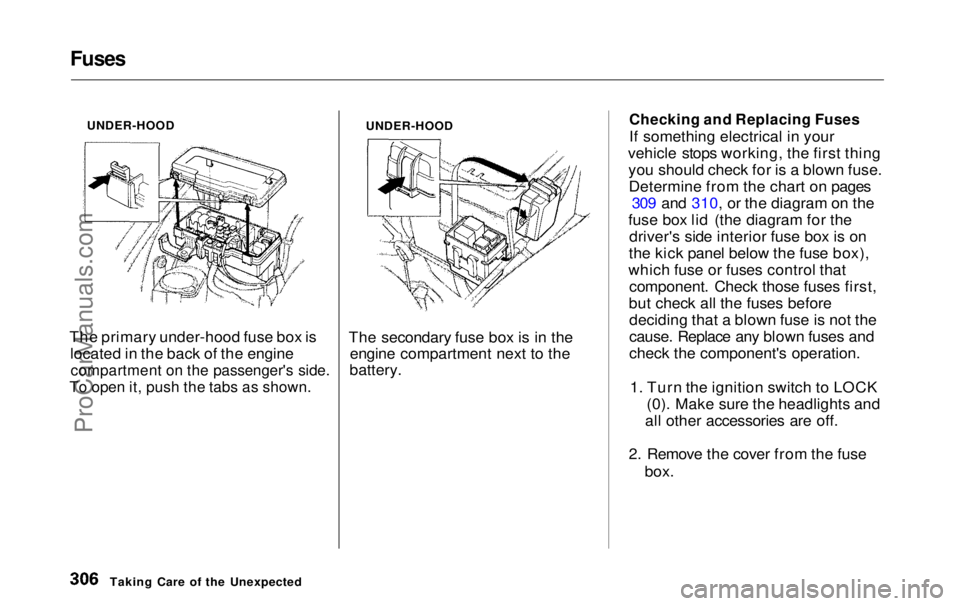
UNDER-HOOD
The primary under-hood fuse box is located in the back of the engine
compartment on the passenger's side.
To open it, push the tabs as shown.
UNDER-HOOD
The secondary fuse box is in the engine compartment next to the
battery.
Checking and Replacing Fuses
If something electrical in your
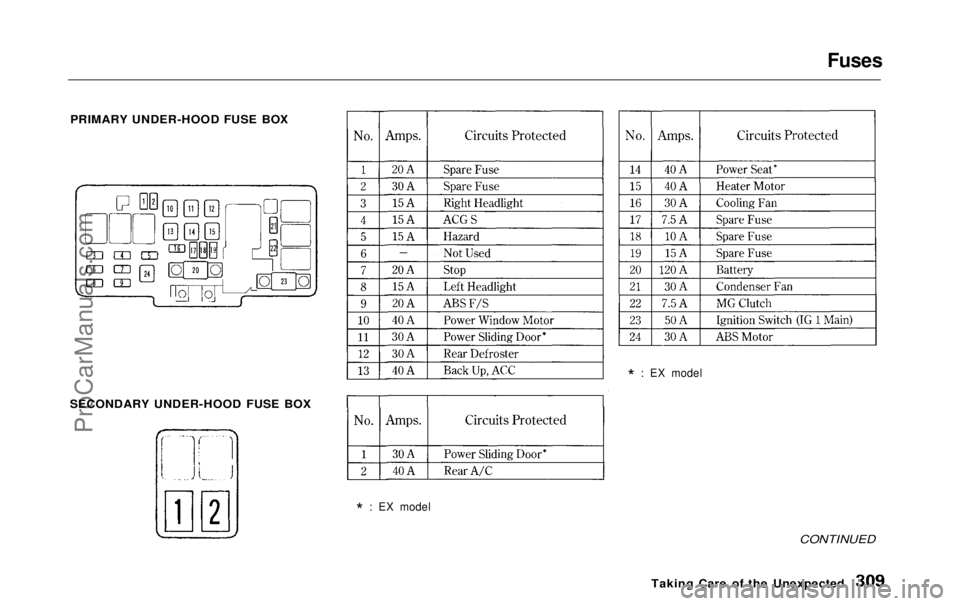
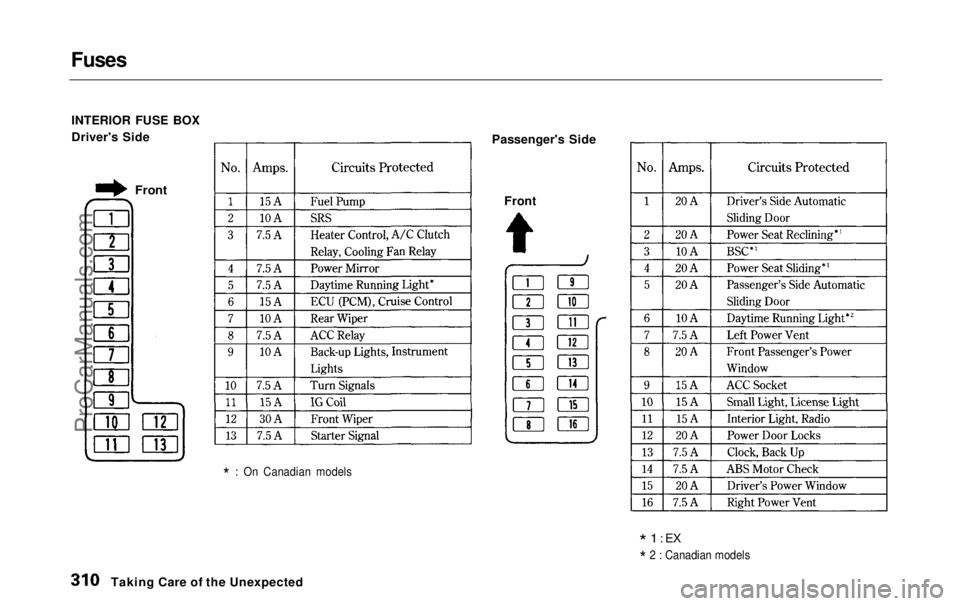
vehicle stops working, the first thing you should check for is a blown fuse.Determine from the chart on pages 309 and 310, or the diagram on the
fuse box lid (the diagram for the driver's side interior fuse box is on
the kick panel below the fuse box),
which fuse or fuses control that component. Check those fuses first,
but check all the fuses before deciding that a blown fuse is not the
cause. Replace any blown fuses and
check the component's operation.
1. Turn the ignition switch to LOCK (0). Make sure the headlights and
all other accessories are off.
2. Remove the cover from the fuse box.
Taking Care of the UnexpectedProCarManuals.comMain Menu Table of Contents s t
Page 306 of 343
Fuses
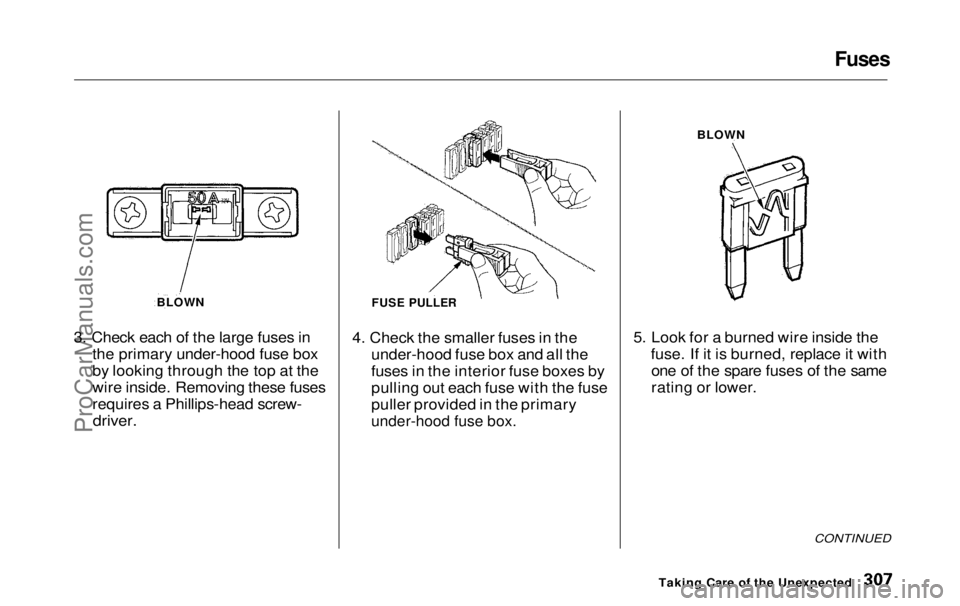
3. Check each of the large fuses in the primary under-hood fuse box
by looking through the top at the
wire inside. Removing these fuses
requires a Phillips-head screw-
driver.
4. Check the smaller fuses in the
under-hood fuse box and all the
fuses in the interior fuse boxes by
pulling out each fuse with the fuse
puller provided in the primary
under-hood fuse box.
5. Look for a burned wire inside the
fuse. If it is burned, replace it withone of the spare fuses of the same
rating or lower.
CONTINUED
Taking Care of the Unexpected
BLOWN
FUSE PULLER
BLOWNProCarManuals.comMain Menu Table of Contents s t
Page 307 of 343
Fuses
If you cannot drive the vehicle
without fixing the problem, and you do not have a spare fuse, take a fuse
of the same rating or a lower rating
from one of the other circuits. Make sure you can do without that circuit
temporarily (such as the accessory
power socket or radio).
If you replace the blown fuse with a spare fuse that has a lower rating, it
might blow out again. This does not
indicate anything wrong. Replace the
fuse with one of the correct rating as soon as you can.
Replacing a fuse with one that has a
higher rating greatly increases the
chances of damaging the electrical
system. If you do not have a replace-
ment fuse with the proper rating for the circuit, install one with a lower rating.
6. If the replacement fuse of the same rating blows in a short time,
there is probably a serious electrical problem in your vehicle.
Leave the blown fuse in that
circuit and have your vehicle
checked by a qualified mechanic.
On EX model
If the radio fuse is removed, the
audio system will disable itself. The
next time you turn on the radio you will see in the frequency
display. Use the Preset buttons to
enter the five-digit code (see page 180).
Taking Care of the Unexpected
NOTICEProCarManuals.comMain Menu Table of Contents s t
Page 308 of 343
Fuses
PRIMARY UNDER-HOOD FUSE BOX
SECONDARY UNDER-HOOD FUSE BOX
*
: EX model
*
: EX model
CONTINUED
Taking Care
of the UnexpectedProCarManuals.comMain Menu Table of Contents s t
Page 309 of 343
Fuses
INTERIOR FUSE BOX
Driver's Side
*
: On Canadian models
Passenger's Side
*
1 : EX
*
2 : Canadian models
Taking Care of the Unexpected
Front
Front
ProCarManuals.comMain Menu Table of Contents s t
Page 334 of 343
Index
Battery
Charging SystemIndicator............................ 58, 302
Jump Starting............................. 297 Maintenance............................... 251
Specifications............................. 317
Before Driving............................... 181
Belts, Seat..................................... 8, 45
Beverage Holder............................ 118
Body Repair.................................... 283
Brakes Anti-lock System (ABS)............ 205Break-in, New Linings .............. 182
Fluid............................................ 244
Light, Burned-out...................... 268
Parking........................................ 116
System Indicator.................. 58, 304
Wear Indicators......................... 204
Brakes, ABS Operation.................................... 205
System Indicator.................. 59, 206
Braking System.............................. 204
Break-in, New Vehicle .................. 182
Brightness Control, Instruments... 67 Brights, Headlights......................... 66
Bulb Replacement
Back-up Lights........................... 269
Brake Lights............................... 268Cargo Area Light....................... 272
Front Parking Lights................. 267
Front Side Marker Lights......... 267 Headlights.................................. 266
High-mount Brake Light.......... 270
Individual Map Lights............... 272 License Plate Light.................... 271
Rear Bulbs.......................... 268, 269
Specifications............................. 317
Turn Signal Lights..................... 267
Bulbs, Halogen............................... 266
Cables, Jump Starting With.......... 298
Cancel Button................................... 75
Capacities Chart............................. 316
Carbon Monoxide Hazard.............. 53
Cargo Area Light........................... 127
Cargo Net....................................... 194
Carrying Cargo.............................. 191
Cassette Player
Care............................................. 178
Operation........................... 154, 175
CAUTION, Explanation of.............. ii
CD Changer...........................157, 171 CD Player ...............................157, 169
Center Pocket................................ 122
Center Table................................... 117
Certification Label......................... 314
Chains............................................. 263 Change Oil How to.........................................235
When to....................................... 224
Changing a Flat Tire..................... 287
Changing Engine Coolant............. 239
Charging System Indicator .... 58, 302
Checking Automatic Transmission
Fluid........................................ 243
Battery Condition...................... 251
Brake Fluid................................. 244Drive Belts.................................. 256
Engine Coolant........................... 187
Engine Oil................................... 186
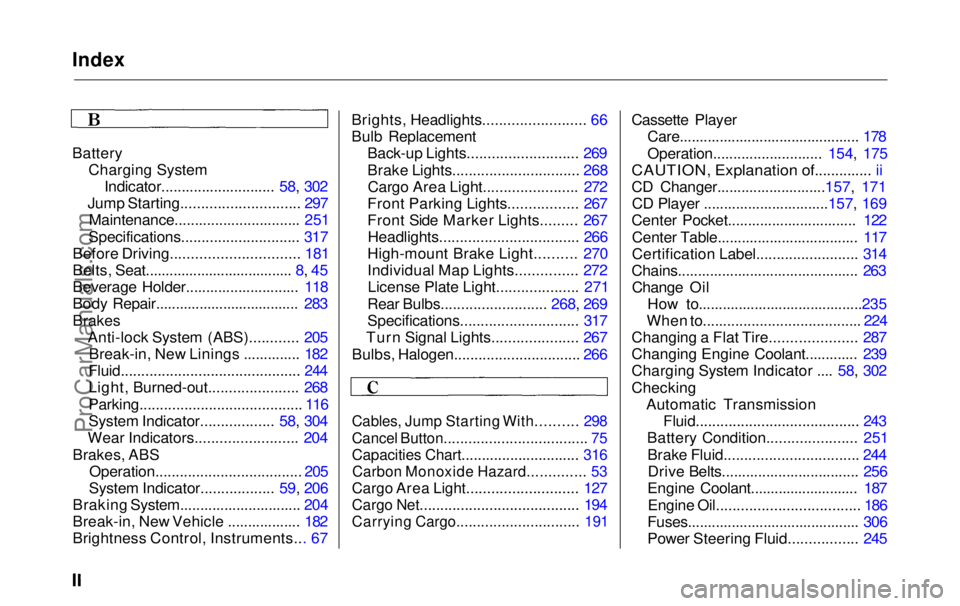
Fuses........................................... 306
Power Steering Fluid................. 245ProCarManuals.comMain Menu s t