hood open HONDA ODYSSEY 1999 Owners Manual
[x] Cancel search | Manufacturer: HONDA, Model Year: 1999, Model line: ODYSSEY, Model: HONDA ODYSSEY 1999Pages: 343, PDF Size: 3.73 MB
Page 182 of 343

Before Driving
Before you begin driving your Honda,
you should know what gasoline to use, and how to check the levels of
important fluids. You also need to
know how to properly store luggageor packages. The information in thissection will help you. If you plan to
add any accessories to your vehicle,
please read the information in this section first. Break-in Period.............................. 182
Gasoline.......................................... 182
Service Station Procedures .......... 183 Filling the Fuel Tank................. 183Opening the Hood..................... 184 Oil Check................................ 186
Engine Coolant Check.......... 187
Fuel Economy................................ 188
Vehicle Condition...................... 188Driving Habits............................ 188
Accessories and Modifications.... 189 Carrying Cargo.............................. 191
Before DrivingProCarManuals.comMain Menu s t
Page 185 of 343
Service Station Procedures
3. Remove the fuel fill cap slowly.
You may hear a hissing sound aspressure inside the tank escapes.Place the cap in the holder on the
fuel fill door.
4. Stop filling the tank after the fuel pump automatically clicks off. Donot try to "top off" the tank, leavesome room for the fuel to expand
with temperature changes.
5. Screw the fuel fill cap back on, tighten it until it clicks at least
three times. If you do not properly
tighten the cap, the MalfunctionIndicator Lamp may come on (see
page 303 ).
6. Push the fuel fill door closed until it latches.
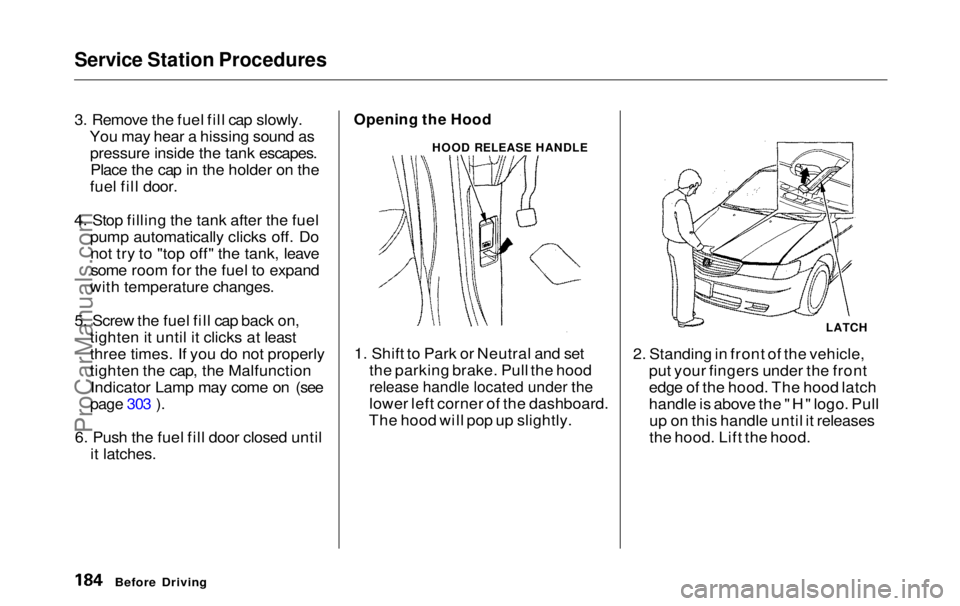
Opening the Hood
1. Shift to Park or Neutral and set the parking brake. Pull the hood
release handle located under the
lower left corner of the dashboard.
The hood will pop up slightly. 2. Standing in front of the vehicle,
put your fingers under the front
edge of the hood. The hood latch
handle is above the "H" logo. Pullup on this handle until it releases
the hood. Lift the hood.
Before Driving
HOOD RELEASE HANDLE
LATCHProCarManuals.comMain Menu Table of Contents s t
Page 186 of 343
Service Station Procedures
If you can open the hood without
lifting the hood latch handle, or the
hood latch handle moves stiffly or does not spring back as before, the
mechanism should be cleaned and
lubricated (see page 248 ).
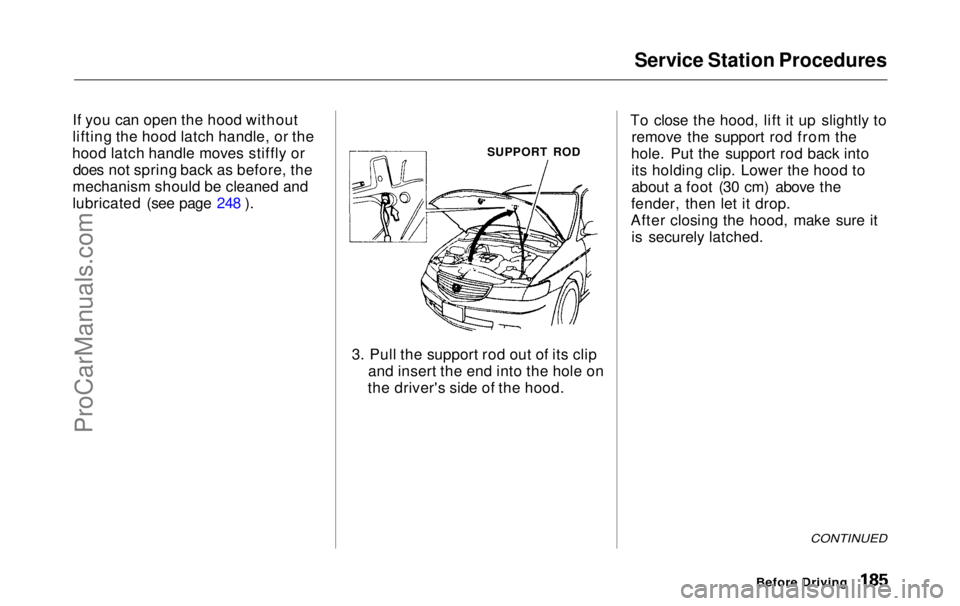
3. Pull the support rod out of its clipand insert the end into the hole on
the driver's side of the hood. To close the hood, lift it up slightly to
remove the support rod from the
hole. Put the support rod back into its holding clip. Lower the hood to
about a foot (30 cm) above the
fender, then let it drop.
After closing the hood, make sure it is securely latched.
CONTINUED
Before Driving
SUPPORT RODProCarManuals.comMain Menu Table of Contents s t
Page 236 of 343
Engine Oil
Additives Your Honda does not need any oil
additives. Purchasing additives for
the engine or transmission will not
increase your vehicle's performance
or longevity. It only increases the
cost of operating your vehicle. Changing the Oil and Filter
Always change the oil and filter according to the time and distance (miles/kilometers) recommenda-
tions in the maintenance schedule.
The oil and filter collect contami- nants that can damage your engine if
they are not removed regularly.
Changing the oil and filter requiresspecial tools and access from
underneath the vehicle. The vehicle should be raised on a service station-
type hydraulic lift for this service. Unless you have the knowledge and
proper equipment, you should have
this maintenance done by a skilled
mechanic.
1. Run the engine until it reaches normal operating temperature,
then shut it off. WASHER
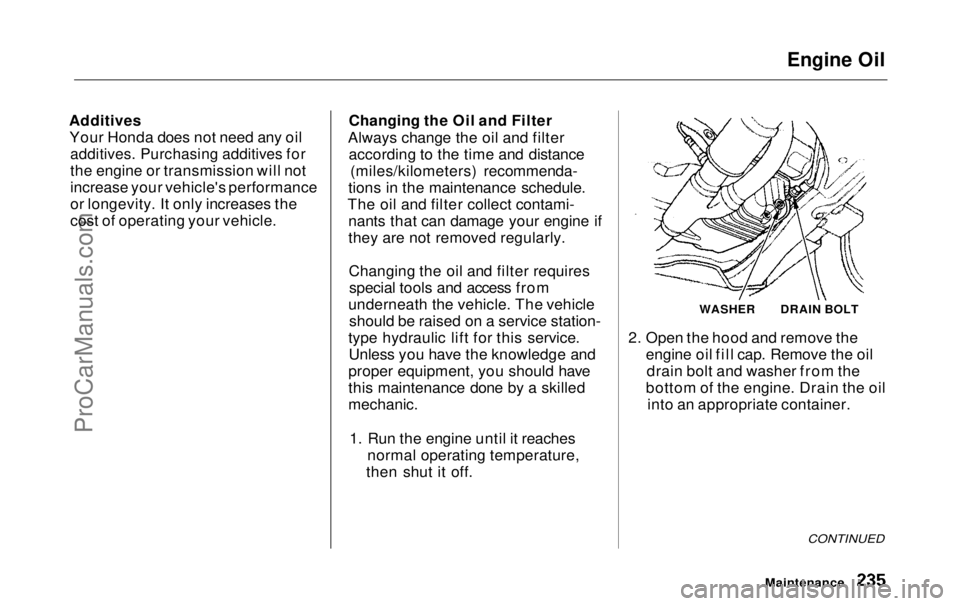
2. Open the hood and remove the engine oil fill cap. Remove the oildrain bolt and washer from the
bottom of the engine. Drain the oil into an appropriate container.
CONTINUED
Maintenance
DRAIN BOLTProCarManuals.comMain Menu Table of Contents s t
Page 240 of 343
Cooling System
Replacing Engine Coolant
The cooling system should be completely drained and refilled with
new coolant according to the timeand distance recommendations in
the maintenance schedule. Only use Genuine Honda Antifreeze/Coolant.
Draining the coolant requires access
to the underside of the vehicle. Unless you have the tools and
knowledge, you should have this maintenance done by a skilled
mechanic.
1. Turn the ignition ON (II). Turn
the heater temperature controldial fully clockwise. Turn the
ignition off.
Open the hood. Make sure the
engine and radiator are cool to the
touch.
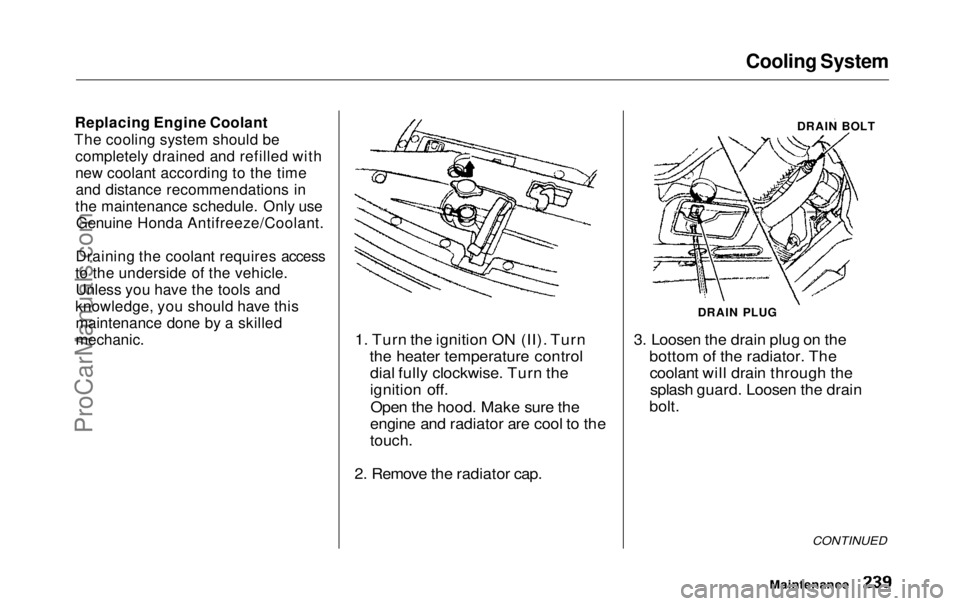
2. Remove the radiator cap. 3. Loosen the drain plug on the
bottom of the radiator. Thecoolant will drain through thesplash guard. Loosen the drain
bolt.
CONTINUED
Maintenance
DRAIN BOLT
DRAIN PLUGProCarManuals.comMain Menu Table of Contents s t
Page 267 of 343
Lights
Headlight Aiming
The headlights were properly aimed when your vehicle was new. If youregularly carry heavy items in thecargo area or pull a trailer,
readjustment may be required.
Adjustment of the headlights should be performed by a Honda technicianor other qualified mechanic. Replacing a Headlight Bulb
Your vehicle has halogen headlight bulbs, one on each side. When
replacing a bulb, handle it by its steel
base and protect the glass fromcontact with your skin or hard
objects. If you touch the glass, clean
it with denatured alcohol and a clean cloth.
Halogen headlight bulbs get very hot when lit. Oil, perspiration, or a scratch
on the glass can cause the bulb to
overheat and shatter.
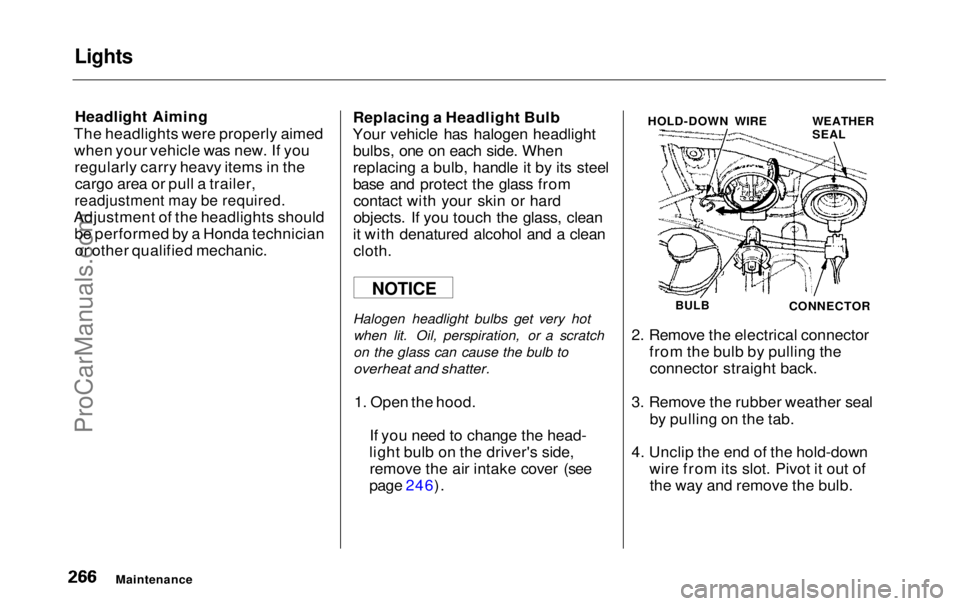
1. Open the hood. If you need to change the head-
light bulb on the driver's side, remove the air intake cover (see
page 246). HOLD-DOWN WIRE
WEATHER
SEAL
BULB
CONNECTOR
2. Remove the electrical connector from the bulb by pulling theconnector straight back.
3. Remove the rubber weather seal by pulling on the tab.
4. Unclip the end of the hold-down wire from its slot. Pivot it out ofthe way and remove the bulb.
Maintenance
NOTICEProCarManuals.comMain Menu Table of Contents s t
Page 296 of 343
If Your Engine Won't Start, Jump Starting
Your vehicle has the Immobilizer
System. You should use a
properly-coded master or valet key
to start the engine (see page 77).
A key that is not properly coded
will cause the immobilizer system indicator in the dash panel to blink
rapidly. Do you have fuel? Turn the
ignition switch to ON (II) for a
minute and watch the fuel gauge.
The low fuel level warning light may not be working, so you were
not reminded to fill the tank. There may be an electrical
problem, such as no power to the
fuel pump. Check all the fuses (see page 305).
If you find nothing wrong, you will
need a qualified technician to find
the problem. See Emergency
Towing on page 311. Jump Starting
If your vehicle's battery has run
down, you may be able to start the
engine by using a booster battery.
Although this seems like a simple procedure, you should take several
precautions.
You cannot start a Honda by pushing or pulling it. To jump start your vehicle, follow
these directions closely:
1. Open the hood and check the physical condition of the battery(see page 251). In very cold
weather, check the condition of the electrolyte. If it seems slushyor like ice, do not try jump starting
until it thaws.
If a battery sits in extreme cold, the
electrolyte inside can freeze.
Attempting to jump start with a frozen
battery can cause it to rupture.
2. Turn off all the electrical acces- sories: heater, A/C, climate
control, stereo system, lights, etc.
Put the transmission in Neutral or
Park and set the parking brake.
CONTINUED
Taking Care of the Unexpected
A battery can explode if you do
not follow the correct procedure,
seriously injuring anyone nearby.
Keep all sparks, open flames,
and smoking materials away
from the battery.
NOTICEProCarManuals.comMain Menu Table of Contents s t
Page 298 of 343
If Your Engine Overheats
The pointer of your vehicle's
temperature gauge should stay in
the midrange under most conditions.
It may go higher if you are driving up
a long steep hill on a very hot day. If
it climbs to the red mark, you should
determine the reason.
Driving with the temperature gauge
pointer at the red mark can cause serious damage to your engine.
Your vehicle can overheat for several
reasons, such as lack of coolant or a
mechanical problem. The only
indication may be the temperature
gauge climbing to or above the red
mark. Or you may see steam or
spray coming from under the hood.
In either case, you should take
immediate action.
1. Safely pull to the side of the road.
Put the transmission in Neutral or
Park and set the parking brake.
Turn off the heating and cooling/ climate control system and all
other accessories. Turn on the
hazard warning indicators.
2. If you see steam and/or spray coining from under the hood, turnoff the engine.
3. If you do not see steam or spray, leave the engine running and
watch the temperature gauge. If the high heat is due to overloading (climbing a long, steep hill on a
hot day with the A/C running, for example), the engine should start
to cool down almost immediately.
If it does, wait until the tempera-
ture gauge comes down to the mid-
point then continue driving.
CONTINUED
Taking Care of the Unexpected
NOTICE
Steam and spray from an
overheated engine can
seriously scald you.
Do not open the hood if steam
is coming out.ProCarManuals.comMain Menu Table of Contents s t
Page 299 of 343
If Your Engine Overheats
4. If the temperature gauge stays at
the red mark, turn off the engine.
5. Wait until you see no more signs of steam or spray, then open the
hood.
6. Look for any obvious coolant leaks, such as a split radiator hose.
Everything is still extremely hot, so use caution. If you find a leak, it
must be repaired before you
continue driving (see Emergency
Towing on page 311).
7. If you don't find an obvious leak, check the coolant level in the
radiator reserve tank (see page187). If the level is below the
MIN mark, add coolant to halfway
between the MIN and MAX marks.
8. If there was no coolant in the reserve tank, you may also have to
add coolant to the radiator. Let the
engine cool down until the pointer reaches the middle of the tempera-
ture gauge, or lower, before check-
ing the radiator.
9. Using gloves or a large heavy cloth, turn the radiator cap
counterclockwise, without pushing
down, to the first stop. This
releases any remaining pressure in
the cooling system. After the
pressure releases, push down on
the cap and turn it until it comes off. 10.Start the engine and set the
temperature control dial tomaximum (climate control to
FULL AUTO at 90°F/32°C). Add
coolant to the radiator up to the
base of the filler neck. If you do not have the proper coolant
mixture available, you can add
plain water. Remember to have
the cooling system drained and refilled with the proper mixture assoon as you can.
11.Put the radiator cap back on tightly. Run the engine and watch
the temperature gauge. If it goes
back to the red mark, the engineneeds repair. (See Emergency
Towing on page 311.)
12.If the temperature stays normal, check the coolant level in the
radiator reserve tank. If it has
gone down, add coolant to the MAX mark. Put the cap back on
tightly.
Taking Care of the Unexpected
Removing the radiator cap
while the engine is hot can
cause the coolant to spray out,
seriously scalding you.
Always let the engine and radiator cool down before
removing the radiator cap.ProCarManuals.comMain Menu Table of Contents s t
Page 300 of 343
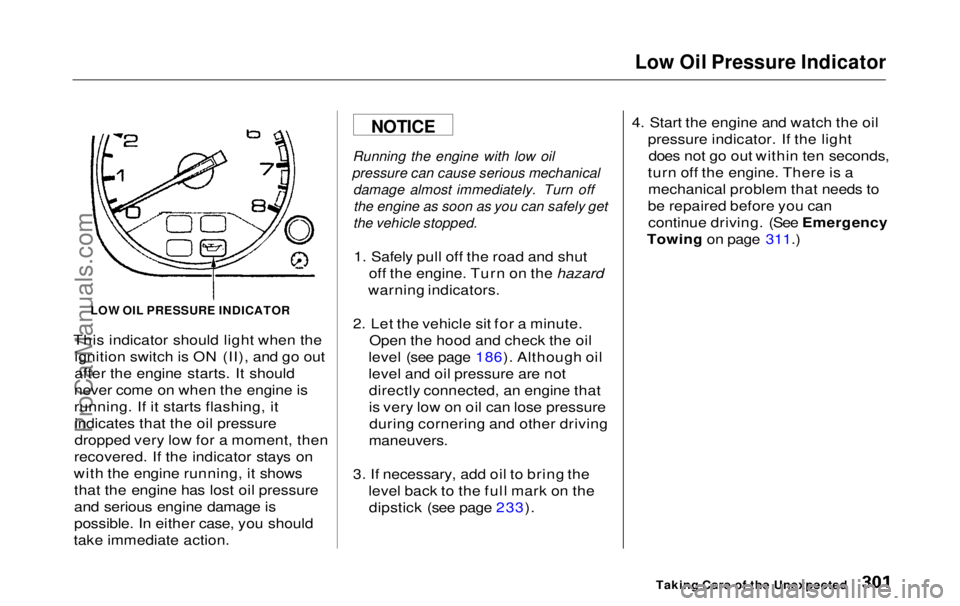
Low Oil Pressure Indicator
This indicator should light when the ignition switch is ON (II), and go out
after the engine starts. It should
never come on when the engine is
running. If it starts flashing, it indicates that the oil pressure
dropped very low for a moment, then
recovered. If the indicator stays on
with the engine running, it shows that the engine has lost oil pressure
and serious engine damage is
possible. In either case, you should
take immediate action.
Running the engine with low oil
pressure can cause serious mechanical damage almost immediately. Turn offthe engine as soon as you can safely get
the vehicle stopped.
1. Safely pull off the road and shut off the engine. Turn on the hazard
warning indicators.
2. Let the vehicle sit for a minute. Open the hood and check the oil
level (see page 186). Although oil
level and oil pressure are not directly connected, an engine that
is very low on oil can lose pressureduring cornering and other driving
maneuvers.
3. If necessary, add oil to bring the level back to the full mark on thedipstick (see page 233). 4. Start the engine and watch the oil
pressure indicator. If the lightdoes not go out within ten seconds,
turn off the engine. There is a mechanical problem that needs to
be repaired before you can continue driving. (See Emergency
Towing on page 311.)
Taking Care of the Unexpected
LOW OIL PRESSURE INDICATOR
NOTICEProCarManuals.comMain Menu Table of Contents s t