check oil HONDA ODYSSEY 2000 RA6-RA9 / 2.G Owners Manual
[x] Cancel search | Manufacturer: HONDA, Model Year: 2000, Model line: ODYSSEY, Model: HONDA ODYSSEY 2000 RA6-RA9 / 2.GPages: 352, PDF Size: 4.43 MB
Page 190 of 352
Befor
e Drivin g
Before you begin driving your Honda,
you should know what gasoline to use, and how to check the levels of
important fluids. You also need to
know how to properly store luggage or packages. The information in this
section will help you. If you plan to
add any accessories to your vehicle,
please read the information in this section first. Break-in Period.............................. 188
Gasoline.......................................... 188
Service Station Procedures .......... 189 Filling the Fuel Tank................. 189Opening the Hood..................... 190 Oil Check................................ 192
Engine Coolant Check.......... 193
Fuel Economy................................ 194 Vehicle Condition...................... 194
Driving Habits............................ 194
Accessories and Modifications.... 195 Carrying Cargo.............................. 197
Before Drivin g
Page 195 of 352
Service Statio n Procedure s
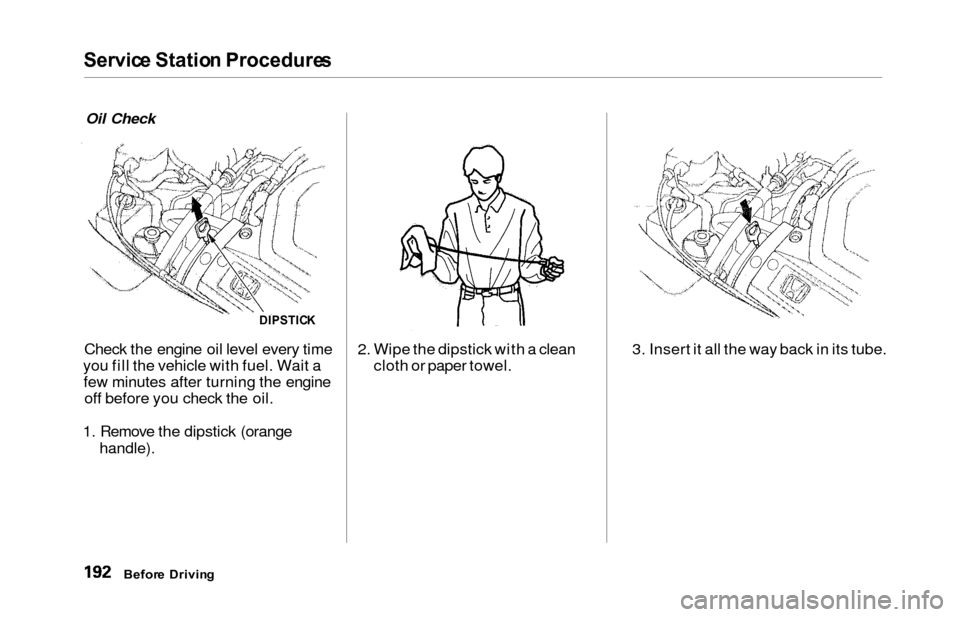
Oil Check
Check the engine oil level every time
you fill the vehicle with fuel. Wait a few minutes after turning the engine off before you check the oil.
1. Remove the dipstick (orange
handle).
2. Wipe the dipstick with a clean cloth or paper towel. 3. Insert it all the way back in its tube.
Befor
e Drivin g
DIPSTIC K
Page 228 of 352
Maintenance
This section explains why it is
important to keep your vehicle well
maintained and to follow basic
maintenance safety precautions.
This section also includes Maintenance Schedules for normal
driving and severe driving conditions,
a Maintenance Record, and instruc-
tions for simple maintenance tasks
you may want to take care of
yourself.
If you have the skills and tools to per-
form more complex maintenance tasks on your Honda, you may want
to purchase the Service Manual. See page 337 for information on how to
obtain a copy, or see your Honda
dealer.
Maintenance Safety....................... 226
Important Safety Precautions.. 227
Maintenance Schedule.................. 228
Required Maintenance Record.... 235
Owner Maintenance Checks........ 237
Fluid Locations............................... 238
Engine Oil....................................... 239 Adding Oil................................... 239Recommended Oil..................... 239
Synthetic Oil............................... 240
Additives..................................... 241
Changing the Oil and Filter...... 241
Cooling System.............................. 243
Adding Engine Coolant............. 243
Replacing Engine Coolant........ 245
Windshield Washers..................... 248
Automatic Transmission Fluid..... 249
Brake Fluid..................................... 250
Brake System............................ . 250
Power Steering............................... 251
Air Cleaner Element...................... 252
Hood Latch.................................... . 254
Spark Plugs..................................... 254
Replacement............................... 254
Specifications............................. 256
Battery............................................ 257
Wiper Blades.................................. 259
Air Conditioning System............... 261 Air Conditioning Filter.................. 262Drive Belts...................................... 262
Timing Belt.................................... . 263
Tires................................................ 263 Inflation....................................... 263
Inspection.................................. . 265
Maintenance............................... 266
Tire Rotation.............................. 266 Replacing Tires and Wheels.... 267
Wheels and Tires....................... 268
Winter Driving........................... 268
Snow Tires.............................. 269
Tire Chains............................. 269
Lights............................................. . 270
Headlight Aiming...................... 272
Replacing Bulbs......................... 272
Storing Your Vehicle..................... 281
Maintenanc e
Page 229 of 352
Maintenance Safet y
Regularly maintaining your vehicle is
the best way to protect your investment. Proper maintenance is
essential to your safety and the
safety of your passengers. It will also
reward you with more economical,
trouble-free driving and help reduce air pollution. This section includes instructions for
simple maintenance tasks, such as
checking and adding oil. Any service
items not detailed in this section
should be performed by a Honda
technician or other qualified mechanic. Some of the most important safety
precautions are given here. However,
we cannot warn you of every conceivable hazard that can arise in
performing maintenance. Only you
can decide whether or not youshould perform a given task.
Maintenanc e
Improperly maintaining this
vehicle or failing to correct a problem before driving can
cause a crash in which you can be seriously hurt or killed.
Always follow the inspection
and maintenance recommendations and
schedules in this owner's manual. Failure to properly follow
maintenance instructions and
precautions can cause you to
be seriously hurt or killed.
Always follow the procedures
and precautions in this owner's manual.
Page 234 of 352
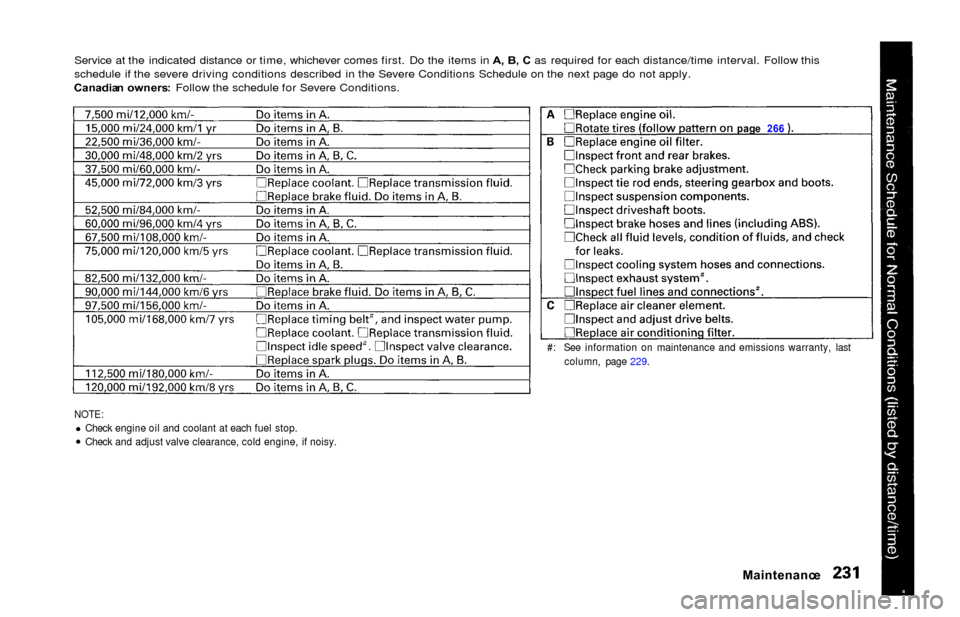
Service at the indicated distance or time, whichever comes first. Do the items in A, B , C as required for each distance/time interval. Follow this
schedule if the severe driving conditions described in the Severe Conditions Schedule on the next page do not apply.
Canadia n owners : Follow the schedule for Severe Conditions.
NOTE:Check engine oil and coolant at each fuel stop.
Check and adjust valve clearance, cold engine, if noisy.
Maintenanc e
#: See information on maintenance and emissions warranty, last
column, page 229. pag
e 26 6
Page 237 of 352
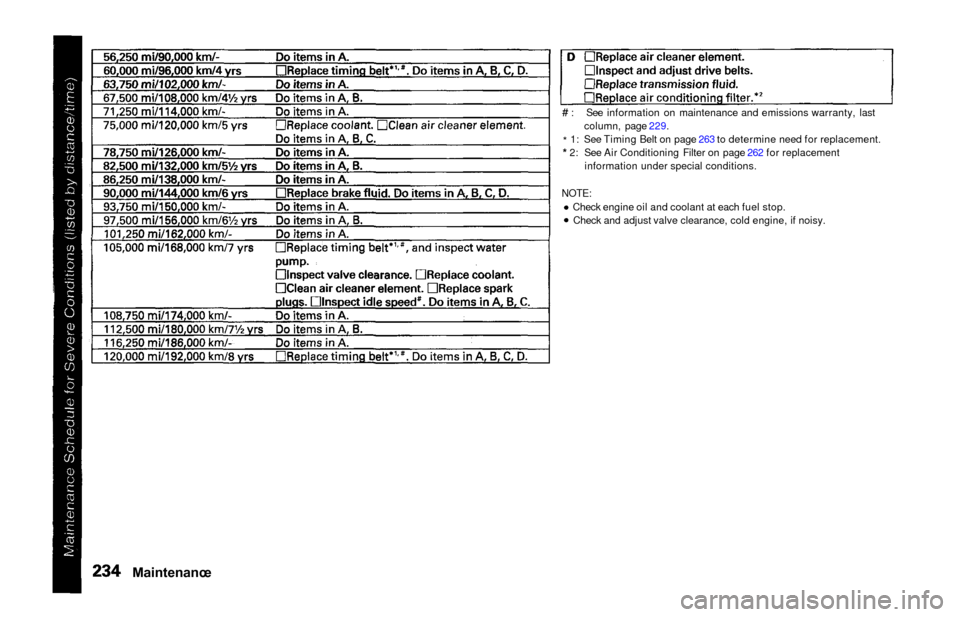
# : See information on maintenance and emissions warranty, lastcolumn, page 229.
* 1: See Timing Belt on page 263 to determine need for replacement.
* 2: See Air Conditioning Filter on page 262 for replacement
information under special conditions.
NOTE:Check engine oil and coolant at each fuel stop.Check and adjust valve clearance, cold engine, if noisy.
Maintenanc e
Page 240 of 352
Owner Maintenanc e Check s
You should check the following
items at the specified intervals. If
you are unsure of how to perform
any check, turn to the page given.
Engine oil level — Check every
time you fill the fuel tank. See
page 192.
Engine coolant level — Check the
radiator reserve tank every time
you fill the fuel tank. See page 193.
Windshield washer fluid — Check the level in the reservoir monthly.If weather conditions cause you to
use the washers frequently, check
the reservoir each time you stop
for fuel. See page 248.
Automatic transmission — Check the fluid level monthly. See page
249.
Brakes — Check the fluid level
monthly. See page 250. Tires — Check the tire pressure
monthly. Examine the tread for
wear and foreign objects. See page
263.
Lights — Check the operation of
the headlights, parking lights,
taillights, high-mount brake light,
turn signals, brake lights, and
license plate light monthly. See
page 270.
Maintenanc e
Page 242 of 352
Engine Oi l
Addin g Oi l
To add oil, unscrew and remove the engine oil fill cap on top of the valve
cover. Pour in the oil, and replace the
engine oil fill cap. Tighten it securely.
Wait a few minutes and recheck the oil level. Do not fill above the upper
mark; you could damage the engine. Recommende
d Oi l
Oil is a major contributor to your
engine's performance and longevity.
Always use a premium-grade deter- gent oil. It is highly recommendedthat you use Genuine Honda MotorOil in your vehicle for as long as you
own it.
You can determine an oil's SAE viscosity and Service Classification
from the API Service label on the oilcontainer.
A fuel-efficient oil is recommended
for your Honda. This is shown on the
API Service label by the words
"Energy Conserving." This oil is
formulated to help your engine use
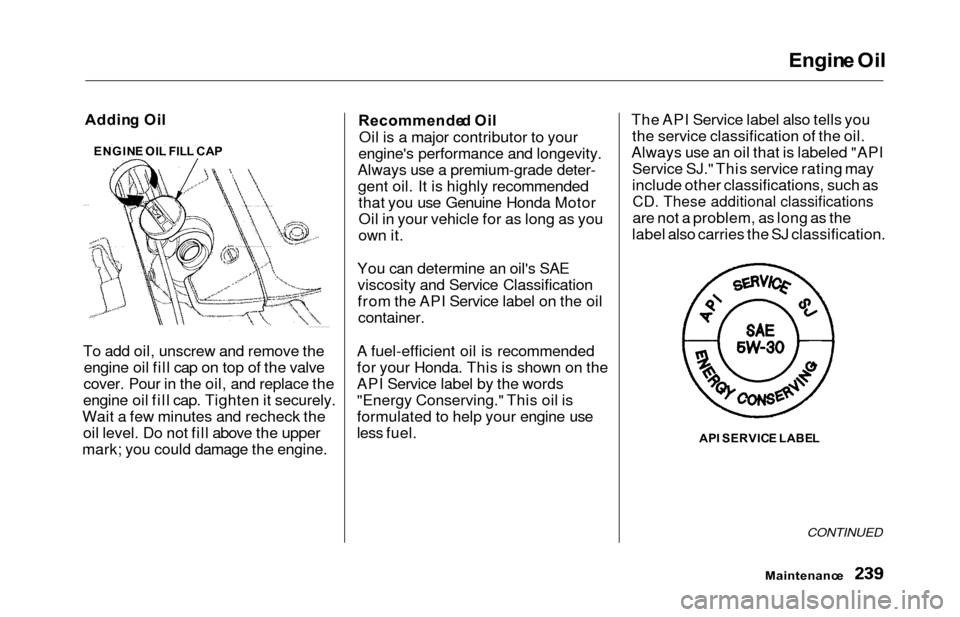
less fuel. The API Service label also tells you
the service classification of the oil.
Always use an oil that is labeled "API Service SJ." This service rating may
include other classifications, such as
CD. These additional classifications
are not a problem, as long as the
label also carries the SJ classification.
AP I SERVIC E LABE L
Maintenanc e
CONTINUED
ENGINE OI L FIL L CA P
Page 245 of 352
Engine Oi l
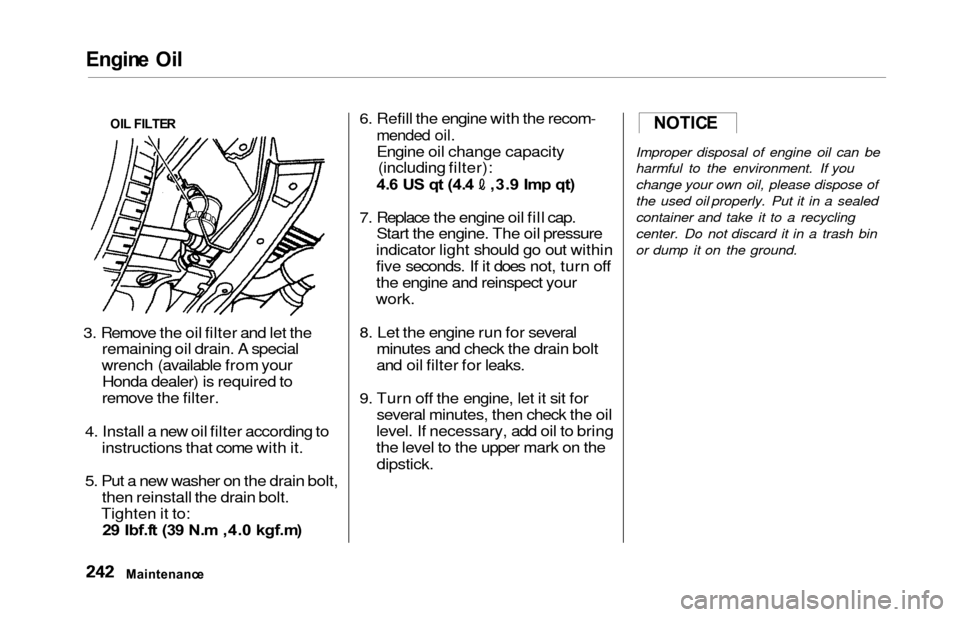
3. Remove the oil filter and let the
remaining oil drain. A special
wrench (available from your Honda dealer) is required to
remove the filter.
4. Install a new oil filter according to instructions that come with it.
5. Put a new washer on the drain bolt, then reinstall the drain bolt.
Tighten it to: 2 9 Ibf.f t (3 9 N. m ,4. 0 kgf.m ) 6. Refill the engine with the recom-
mended oil.
Engine oil change capacity
(including filter):
4. 6 U S q t (4. 4 ,3. 9 Im p qt )
7. Replace the engine oil fill cap. Start the engine. The oil pressure
indicator light should go out within
five seconds. If it does not, turn off
the engine and reinspect your
work.
8. Let the engine run for several minutes and check the drain bolt
and oil filter for leaks.
9. Turn off the engine, let it sit for several minutes, then check the oil
level. If necessary, add oil to bring
the level to the upper mark on the
dipstick.
Improper disposal of engine oil can be
harmful to the environment. If you
change your own oil, please dispose of
the used oil properly. Put it in a sealed
container and take it to a recycling
center. Do not discard it in a trash bin
or dump it on the ground.
Maintenanc e
OI
L FILTE R
NOTIC E
Page 264 of 352
Air Conditionin g Syste m
Your vehicle's air conditioning is a
sealed system. Any major mainte-
nance, such as recharging, should be done by a qualified mechanic. You
can do a couple of things to make sure the air conditioning works
efficiently.
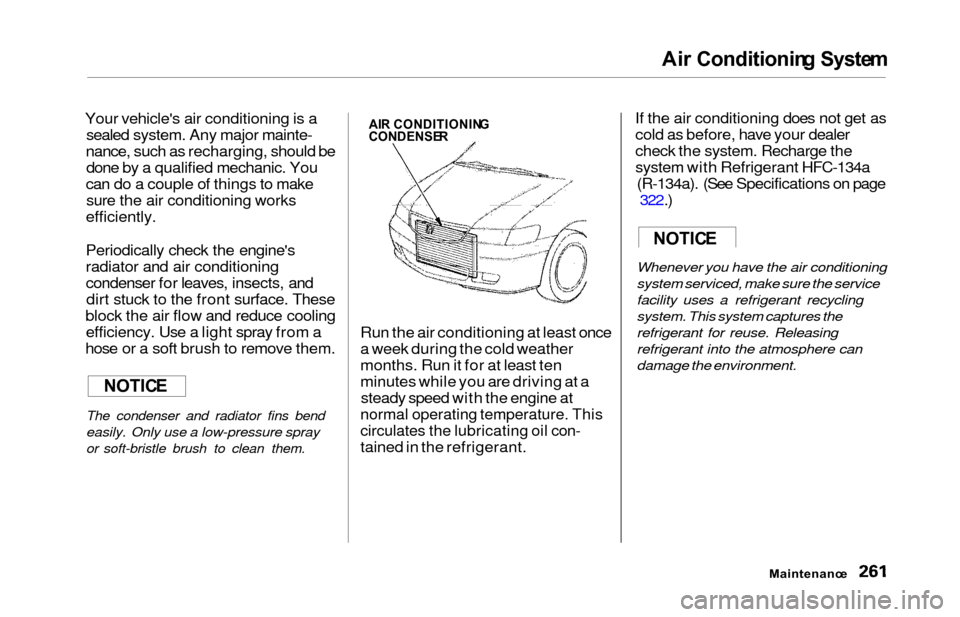
Periodically check the engine's
radiator and air conditioning
condenser for leaves, insects, and dirt stuck to the front surface. These
block the air flow and reduce cooling efficiency. Use a light spray from a
hose or a soft brush to remove them.
The condenser and radiator fins bend
easily. Only use a low-pressure spray
or soft-bristle brush to clean them.
Run the air conditioning at least once
a week during the cold weather
months. Run it for at least ten
minutes while you are driving at a steady speed with the engine at
normal operating temperature. This
circulates the lubricating oil con-
tained in the refrigerant. If the air conditioning does not get as
cold as before, have your dealer
check the system. Recharge the
system with Refrigerant HFC-134a
(R-134a). (See Specifications on page 322.)
Whenever you have the air conditioning
system serviced, make sure the service
facility uses a refrigerant recycling
system. This system captures the
refrigerant for reuse. Releasing
refrigerant into the atmosphere can
damage the environment.
Maintenanc e
NOTICE
AIR CONDITIONIN GCONDENSER
NOTICE