Transmission HONDA ODYSSEY 2000 RA6-RA9 / 2.G User Guide
[x] Cancel search | Manufacturer: HONDA, Model Year: 2000, Model line: ODYSSEY, Model: HONDA ODYSSEY 2000 RA6-RA9 / 2.GPages: 352, PDF Size: 4.43 MB
Page 223 of 352
Towing a Traile r
Towin g Equipmen t an d
Accessorie s
Towing can require a variety of equipment, depending on the size of
your trailer, how it will be used, and how much load you are towing.
Discuss your needs with your trailer
sales or rental agency, and follow the
guidelines in the rest of this section.
Also make sure that all equipment is properly installed and that it meets
federal, state, province, and local
regulations.
Hitches
Any hitch used on your vehicle mustbe properly bolted to the underbody, using the six threaded holes
provided. A hitch designed especially
for your Odyssey can be obtained
from your Honda dealer.
Weight Distributing Hitch
If the total trailer weight is more
than 2,000 Ibs (900 kg), you must
also use a weight distributing hitch.
This device transfers weight from the vehicle's rear wheels to the front
wheels, and to the trailer's wheels. Carefully follow the hitch maker's
instructions for proper installation
and adjustment.
Safety Chain
Always use a safety chain. Make sure that it is secured to both the
trailer and hitch, and that it crosses under the tongue so it can catch the
trailer if it becomes unhitched. Leave enough slack to allow the
trailer to turn corners easily, but do not let the chain drag on the ground.
Sway Control
If the total trailer weight exceeds
2,000 Ibs (900 kg), you should install
a sway control device to minimize swaying that can occur in crosswinds
and in normal and emergency
driving maneuvers. Your trailer
maker can tell you what kind of sway
control you need and how to install it.
Transmission Fluid Cooler
If the total trailer weight is more
than 2,000 Ibs (900 kg), you must also have a transmission fluid cooler
installed. This device will help
prevent transmission overheating,
which could cause serious damage.
A transmission fluid cooler designed for your Odyssey can be obtained
from your Honda dealer.
Drivin g
Page 226 of 352

Towing a Traile r
Drivin g Safel y Wit h a Traile r
The added weight, length, and height of a trailer will affect your
vehicle's handling and performance, so driving with a trailer requires
some special driving skills and
techniques.
For your safety and the safety of
others, take time to practice driving
maneuvers before heading for the
open road, and follow the guidelines
discussed below.
Towing Speeds and Gears
Driving slower than normal in all
driving situations, and obey postedspeed limits for vehicles with trailers.
Use the D
4 position when towing a
trailer on level roads. D3 is the
proper shift lever position to use
when towing a trailer in hilly terrain.
(See "Driving on Hills" in the next
column for additional gear
information.)
Making Turns and Braking
Make turns more slowly and wider
than normal. The trailer tracks a smaller arc than your vehicle, and it
can hit or run over something the
vehicle misses. Allow more time and distance for braking. Do not brake or
turn suddenly as this could cause the
trailer to jackknife or turn over.
Driving on Hills
When climbing hills, closely watch your temperature gauge. If it nearsthe red mark, turn the air
conditioning off, reduce speed and, if
necessary, pull to the side of the
road to let the engine cool.
If the automatic transmission shifts
frequently between 3rd and 4th
gears while going up a hill, shift to D
3. If you must stop when facing uphill,
use the foot brake or parking brake.
Do not try to hold the vehicle in
place by pressing on the accelerator,
as this can cause the automatic
transmission to overheat.
When driving down hills, reduce
your speed and shift down to 2nd
gear. Do not "ride" the brakes, and
remember it will take longer to slowdown and stop when towing a trailer.
Drivin g
CONTINUED
Page 227 of 352
Towing a Traile r
Handling Crosswinds and Buffeting
Crosswinds and air turbulence
caused by passing trucks can disrupt
your steering and cause trailer swaying. When being passed by a
large vehicle, keep a constant speed and steer straight ahead. Do not try
to make quick steering or braking corrections.
Backing Up
Always drive slowly and have someone guide you when backing up.
Grip the bottom of the steering
wheel; then turn the wheel to the left
to get the trailer to move to the left, and turn the wheel right to move the
trailer to the right.
Parking
Follow all normal precautions when
parking, including putting the
transmission in Park and firmly setting the parking brake. Also, place
wheel chocks at each of the trailer's
tires.
Drivin g
Page 228 of 352
Maintenance
This section explains why it is
important to keep your vehicle well
maintained and to follow basic
maintenance safety precautions.
This section also includes Maintenance Schedules for normal
driving and severe driving conditions,
a Maintenance Record, and instruc-
tions for simple maintenance tasks
you may want to take care of
yourself.
If you have the skills and tools to per-
form more complex maintenance tasks on your Honda, you may want
to purchase the Service Manual. See page 337 for information on how to
obtain a copy, or see your Honda
dealer.
Maintenance Safety....................... 226
Important Safety Precautions.. 227
Maintenance Schedule.................. 228
Required Maintenance Record.... 235
Owner Maintenance Checks........ 237
Fluid Locations............................... 238
Engine Oil....................................... 239 Adding Oil................................... 239Recommended Oil..................... 239
Synthetic Oil............................... 240
Additives..................................... 241
Changing the Oil and Filter...... 241
Cooling System.............................. 243
Adding Engine Coolant............. 243
Replacing Engine Coolant........ 245
Windshield Washers..................... 248
Automatic Transmission Fluid..... 249
Brake Fluid..................................... 250
Brake System............................ . 250
Power Steering............................... 251
Air Cleaner Element...................... 252
Hood Latch.................................... . 254
Spark Plugs..................................... 254
Replacement............................... 254
Specifications............................. 256
Battery............................................ 257
Wiper Blades.................................. 259
Air Conditioning System............... 261 Air Conditioning Filter.................. 262Drive Belts...................................... 262
Timing Belt.................................... . 263
Tires................................................ 263 Inflation....................................... 263
Inspection.................................. . 265
Maintenance............................... 266
Tire Rotation.............................. 266 Replacing Tires and Wheels.... 267
Wheels and Tires....................... 268
Winter Driving........................... 268
Snow Tires.............................. 269
Tire Chains............................. 269
Lights............................................. . 270
Headlight Aiming...................... 272
Replacing Bulbs......................... 272
Storing Your Vehicle..................... 281
Maintenanc e
Page 240 of 352
Owner Maintenanc e Check s
You should check the following
items at the specified intervals. If
you are unsure of how to perform
any check, turn to the page given.
Engine oil level — Check every
time you fill the fuel tank. See
page 192.
Engine coolant level — Check the
radiator reserve tank every time
you fill the fuel tank. See page 193.
Windshield washer fluid — Check the level in the reservoir monthly.If weather conditions cause you to
use the washers frequently, check
the reservoir each time you stop
for fuel. See page 248.
Automatic transmission — Check the fluid level monthly. See page
249.
Brakes — Check the fluid level
monthly. See page 250. Tires — Check the tire pressure
monthly. Examine the tread for
wear and foreign objects. See page
263.
Lights — Check the operation of
the headlights, parking lights,
taillights, high-mount brake light,
turn signals, brake lights, and
license plate light monthly. See
page 270.
Maintenanc e
Page 244 of 352
Engine Oi l
Additive s
Your Honda does not need any oil additives. Purchasing additives for
the engine or transmission will not increase your vehicle's performance
or longevity. It only increases the
cost of operating your vehicle. Changin
g th e Oi l an d Filte r
Always change the oil and filter according to the time and distance (miles/kilometers) recommenda-
tions in the maintenance schedule.
The oil and filter collect contami- nants that can damage your engine if
they are not removed regularly.
Changing the oil and filter requires
special tools and access from
underneath the vehicle. The vehicle should be raised on a service station-
type hydraulic lift for this service. Unless you have the knowledge and
proper equipment, you should have
this maintenance done by a skilled mechanic.
1. Run the engine until it reaches normal operating temperature,
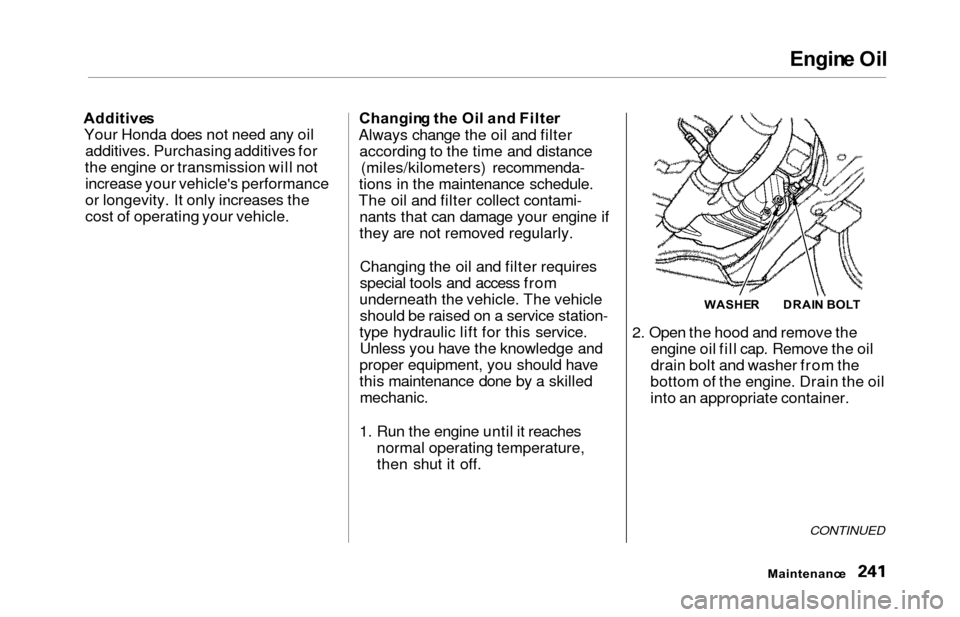
then shut it off. 2. Open the hood and remove the
engine oil fill cap. Remove the oil
drain bolt and washer from the
bottom of the engine. Drain the oil
into an appropriate container.
CONTINUED
Maintenanc e
WASHERDRAIN BOL T
Page 252 of 352
Automatic Transmissio n Flui d
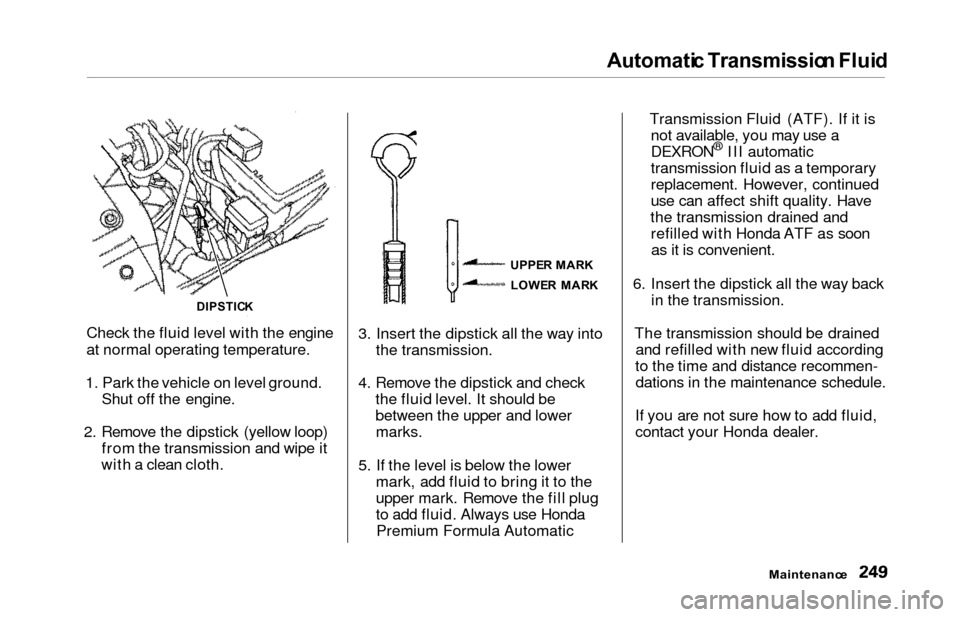
Check the fluid level with the engine
at normal operating temperature.
1. Park the vehicle on level ground. Shut off the engine.
2. Remove the dipstick (yellow loop) from the transmission and wipe it
with a clean cloth. 3. Insert the dipstick all the way into
the transmission.
4. Remove the dipstick and check the fluid level. It should be
between the upper and lowermarks.
5. If the level is below the lower mark, add fluid to bring it to the
upper mark. Remove the fill plug
to add fluid. Always use HondaPremium Formula Automatic Transmission Fluid (ATF). If it is
not available, you may use a
DEXRON
® III automatic
transmission fluid as a temporary
replacement. However, continued
use can affect shift quality. Have
the transmission drained and refilled with Honda ATF as soonas it is convenient.
6. Insert the dipstick all the way back in the transmission.
The transmission should be drained and refilled with new fluid according
to the time and distance recommen- dations in the maintenance schedule.
If you are not sure how to add fluid,
contact your Honda dealer.
Maintenanc e
DIPSTICK
UPPER MAR K
LOWE R MAR K
Page 284 of 352
Storing You r Vehicl e
If you need to park your vehicle for
an extended period (more than one
month), there are several things you
should do to prepare it for storage.
Proper preparation helps prevent
deterioration and makes it easier to
get your vehicle back on the road. If
possible, store your vehicle indoors.
Fill the fuel tank.Change the engine oil and filter
(see page 241).
Wash and dry the exterior
completely.
Clean the interior. Make sure the
carpeting, floor mats, etc. are
completely dry.
Leave the parking brake off. Put
the transmission in Park.
Block the rear wheels.
If the vehicle is to be stored for a
longer period, it should be
supported on jackstands so the
tires are off the ground. Leave one window open slightly (if
the vehicle is being stored
indoors).
Disconnect the battery.
Support the front and rear wiper
blade arms with a folded towel or rag so they do not touch the
windshield.
To minimize sticking, apply a silicone spray lubricant to all door
and tailgate seals. Also, apply a
vehicle body wax to the painted surfaces that mate with the door
and tailgate seals.
Cover the vehicle with a
"breathable" cover, one made
from a porous material such as cotton. Nonporous materials, such
as plastic sheeting, trap moisture,
which can damage the paint.
If possible, run the engine for a
while periodically (preferably once a month).
If you store your vehicle for 12
months or longer, have your Honda
dealer perform the inspections called
for in the 24 months/30,000 miles (48,000 km) maintenance schedule
(Normal Conditions) as soon as you
take it out of storage (see page 230).
The replacements called for in the maintenance schedule are not
needed unless the vehicle hasactually reached that time or mileage.
Maintenanc e
Page 296 of 352
Changing a Fla t Tir e
If you have a flat tire while driving,
stop in a safe place to change it.
Stopping in traffic or on the shoulder of a busy road is dangerous. Driveslowly along the shoulder until you
get to an exit or an area to stop that
is far away from the traffic lanes.
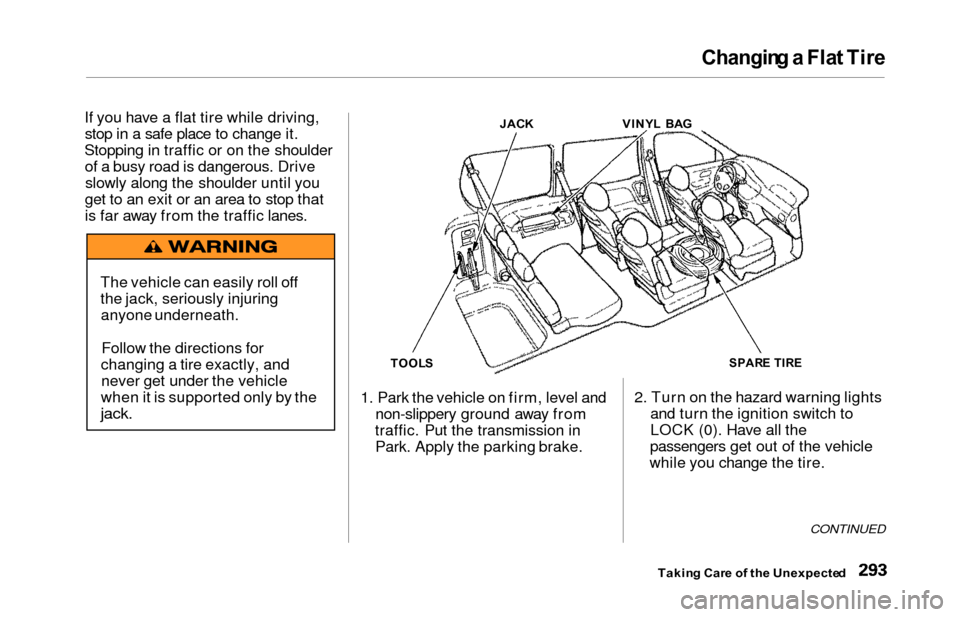
1. Park the vehicle on firm, level andnon-slippery ground away from
traffic. Put the transmission in Park. Apply the parking brake. 2. Turn on the hazard warning lights
and turn the ignition switch to
LOCK (0). Have all the
passengers get out of the vehicle
while you change the tire.
CONTINUED
Takin g Car e o f th e Unexpecte d
The vehicle can easily roll off
the jack, seriously injuring
anyone underneath.
Follow the directions for
changing a tire exactly, and never get under the vehicle
when it is supported only by the
jack.
TOOL S JAC
K VINYL BA GSPAR E TIR E
Page 305 of 352
If You r Engin e Won' t Star t
Diagnosing why your engine won't
start falls into two areas, depending
on what you hear when you turn the
key to START (III):
You hear nothing, or almostnothing. The engine's starter
motor does not operate at all, or
operates very slowly.
You can hear the starter motor operating normally, or the starter
motor sounds like it is spinning
faster than normal, but the engine does not start up and run.
Nothin g Happen s o r th e Starte r
Moto r Operate s Ver y Slowl y
When you turn the ignition switch to START (III), you do not hear the
normal noise of the engine trying to
start. You may hear a clicking sound
or series of clicks, or nothing at all.
Check these things:
Your vehicle has the ImmobilizerSystem. You should use a
properly-coded master or valet key
to start the engine (see page 77).
A key that is not properly coded will cause the immobilizer systemindicator in the dash panel to blink
rapidly.
Check the transmission interlock.
The transmission must be in Park or Neutral or the starter will not
operate.
Turn the ignition switch to ON (II).
Turn on the headlights and checktheir brightness. If the headlightsare very dim or don't light at all,the battery is discharged. See
Jum p Startin g on page 303 .
Turn the ignition switch to START
(III). If the headlights do not dim,
check the condition of the fuses. If
the fuses are OK, there is proba-
bly something wrong with the electrical circuit for the ignition
switch or starter motor. You will
need a qualified technician to determine the problem. (See
Emergency Towing on page 317.)
If the headlights dim noticeably or
go out when you try to start the
engine, either the battery is dis-
charged or the connections are
corroded. Check the condition of
the battery and terminal connec-
tions (see page 257). You can then try jump starting the vehicle
from a booster battery (see page 303).
Takin g Car e o f th e Unexpecte d