HONDA ODYSSEY 2000 RA6-RA9 / 2.G Owners Manual
Manufacturer: HONDA, Model Year: 2000, Model line: ODYSSEY, Model: HONDA ODYSSEY 2000 RA6-RA9 / 2.GPages: 352, PDF Size: 4.43 MB
Page 271 of 352
Tires
The ABS works by comparing the
speed of the wheels. When replacing
tires, use the same size originally supplied with the vehicle. Tire size
and construction can affect wheelspeed and may cause the system to
work inconsistently.
If you ever need to replace a wheel,
make sure the wheel's specifications
match those of the original wheel
that came on your vehicle. Re-
placement wheels are available at
your Honda dealer. Wheel
s an d Tire s
Wheel: 16 x 6 1/ 2 J J
Tire:
P215/65R1 6 96 T
See page 324 for information about
DOT Tire Quality Grading.
Winte r Drivin g
Tires that are marked "M + S" or
"All Season" on the sidewall have an
all-weather tread design. They
should be suitable for most winter
driving conditions. Tires without
these markings are designed for optimum traction in dry conditions.
They may not provide adequate performance in winter driving.For the best performance in snowy
or icy conditions, you should install
snow tires or tire chains. They may
be required by local laws under
certain conditions.
Maintenanc e
Page 272 of 352
Tires
Snow Tires
If you mount snow tires on your
Honda, make sure they are radial
tires of the same size and load range as the original tires. Mount snow
tires on all four wheels to balance
your vehicle's handling in all weather conditions. Keep in mind the traction
provided by snow tires on dry roads
may not be as high as your vehicle's
original equipment tires. You should
drive cautiously even when the roads
are clear. Check with the tire dealer
for maximum speed recommenda-
tions.
Tire Chains
Because your Honda has limited tire
clearance, mount only SAE Class "S"
cable-type traction devices on the
front tires. Use traction devices only
when required by driving conditions or local laws. Make sure they are the
correct size for your tires.
Metal link-type "chains" should not
be used. No matter how tight they seem to be installed, they can come
into contact with the body and suspension, causing serious damage.
When installing cables, follow the manufacturer's instructions and
mount them as tightly as you can.Drive slowly with them installed. If
you hear them coming in contact
with the body or chassis, stop and investigate. Make sure the cables are
installed tightly, and that they are
not contacting the brake lines or
suspension.
Remove them as soon as you begin driving on cleared roads.
Traction devices that are the wrong
size or improperly installed can
damage your vehicle's brake lines,
suspension, body, and wheels. Stop driving if they are hitting any part of
the vehicle.
Maintenanc e
NOTICE
Page 273 of 352
Lights
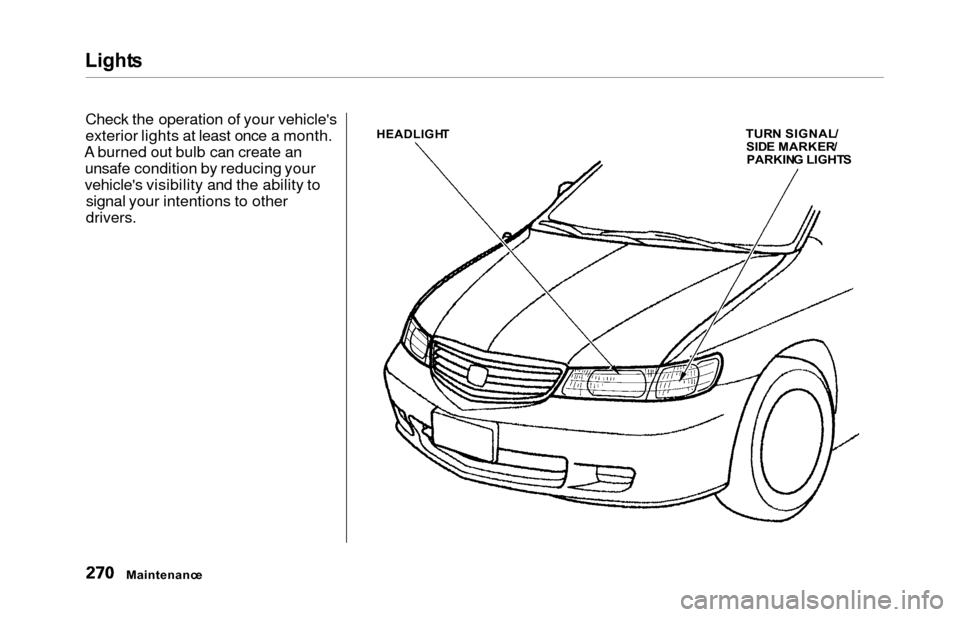
Check the operation of your vehicle's
exterior lights at least once a month.
A burned out bulb can create an unsafe condition by reducing your
vehicle's visibility and the ability to signal your intentions to other
drivers.
HEADLIGH TTURN SIGNAL /SIDE MARKER /PARKING LIGHT S
Maintenanc e
Page 274 of 352
Light
s
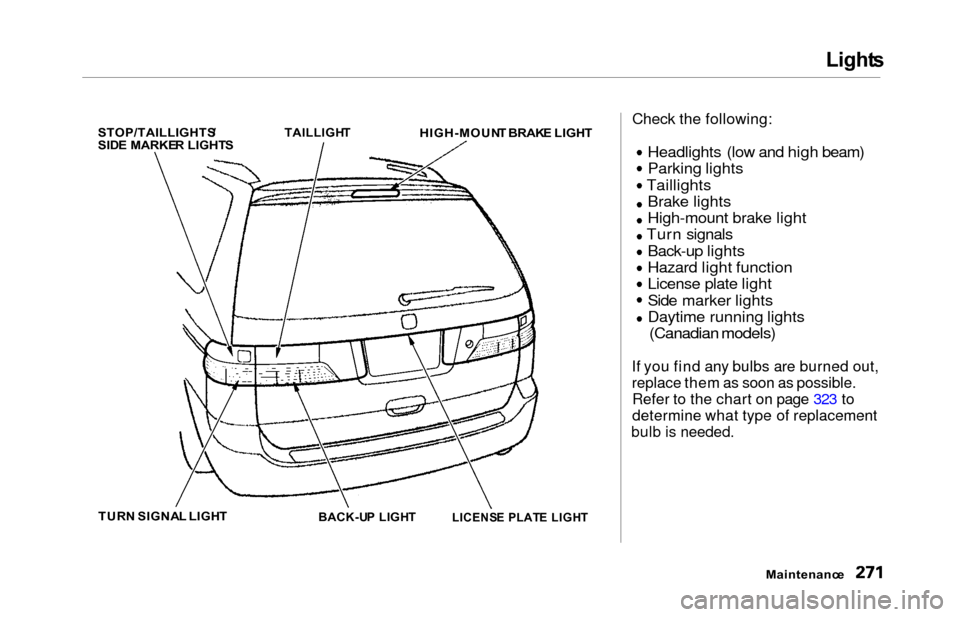
STOP/TAILLIGHTS /
SID E MARKE R LIGHT S
TAILLIGH
T
HIGH-MOUN T BRAK E LIGH T
TUR N SIGNA L LIGH T
BACK-UP LIGH T
Check the following:
Headlights (low and high beam)
Parking lights
Taillights Brake lights
High-mount brake light
Turn signals
Back-up lights
Hazard light function
License plate light
Side marker lights
Daytime running lights
(Canadian models)
If you find any bulbs are burned out,
replace them as soon as possible.
Refer to the chart on page 323 to
determine what type of replacement
bulb is needed.
Maintenance
LICENS
E PLAT E LIGH T
Page 275 of 352
Lights
Headligh t Aimin g
The headlights were properly aimed when your vehicle was new. If youregularly carry heavy items in the
cargo area or pull a trailer,
readjustment may be required.
Adjustment of the headlights should be performed by a Honda technicianor other qualified mechanic. Replacin
g a Headligh t Bul b
Your vehicle has halogen headlight bulbs, one on each side. When
replacing a bulb, handle it by its steel
base and protect the glass fromcontact with your skin or hard
objects. If you touch the glass, clean
it with denatured alcohol and a clean
cloth.
Halogen headlight bulbs get very hot
when lit. Oil, perspiration, or a scratch
on the glass can cause the bulb to
overheat and shatter.
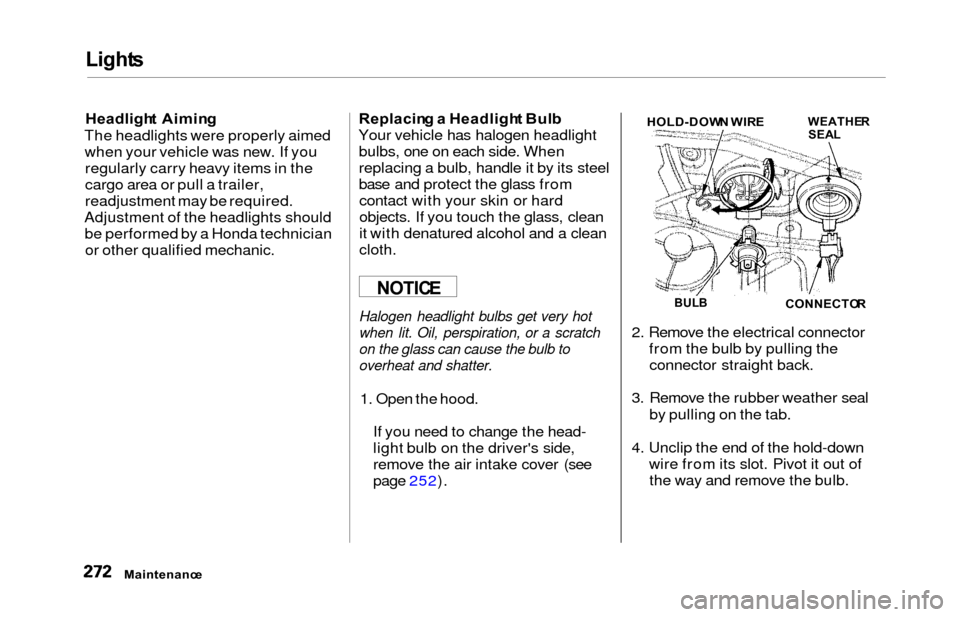
1. Open the hood.
If you need to change the head-
light bulb on the driver's side,
remove the air intake cover (see
page 252). 2. Remove the electrical connector
from the bulb by pulling theconnector straight back.
3. Remove the rubber weather seal by pulling on the tab.
4. Unclip the end of the hold-down wire from its slot. Pivot it out ofthe way and remove the bulb.
Maintenanc e
NOTICEBULBCONNECTO R
WEATHERSEALHOLD-DOW N WIR E
Page 276 of 352
Lights
5. Insert the new bulb into the hole,
making sure the tabs are in their
slots. Pivot the hold-down wire
back in place and clip the end into
the slot.
6. Install the rubber seal over the back of the headlight assembly.
Make sure it is right side up; it is
marked "TOP."
7. Push the electrical connector ontothe new bulb.
Turn on the headlights to test the
new bulb.
8. (Driver's side) Reinstall the air intake cover. Replacin
g th e Fron t Sid e Marker /
Tur n Signa l an d Parkin g Ligh t
Bul b
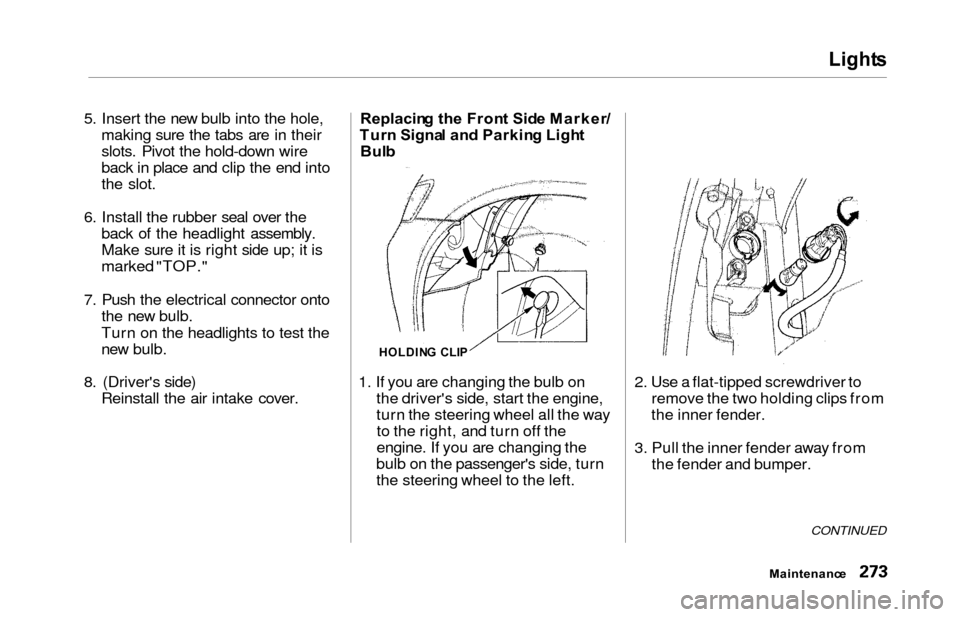
1. If you are changing the bulb on the driver's side, start the engine,
turn the steering wheel all the wayto the right, and turn off the
engine. If you are changing the
bulb on the passenger's side, turn
the steering wheel to the left. 2. Use a flat-tipped screwdriver to
remove the two holding clips from
the inner fender.
3. Pull the inner fender away from the fender and bumper.
CONTINUED
Maintenanc e
HOLDING CLI P
Page 277 of 352
Lights
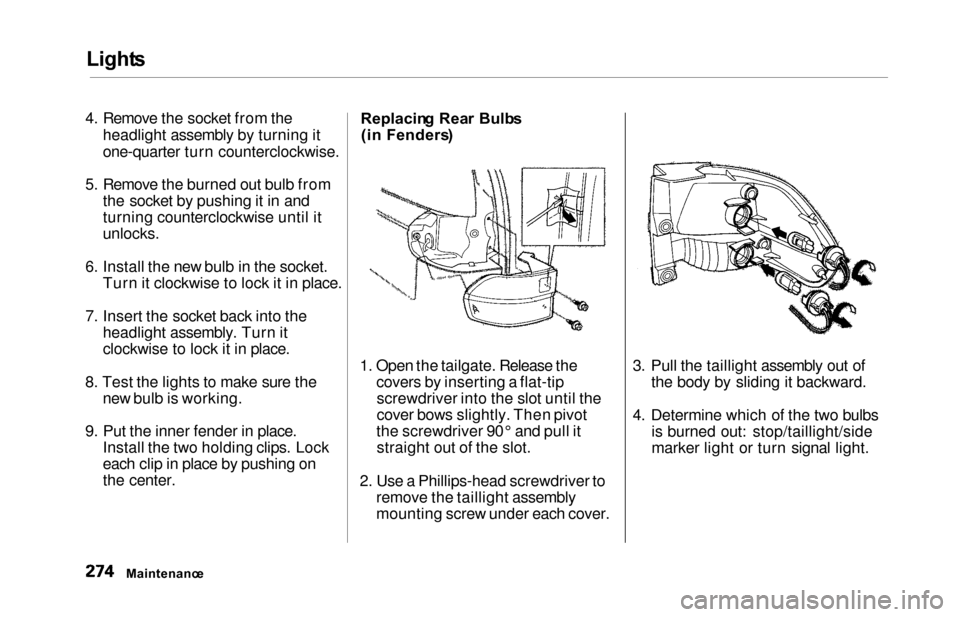
4. Remove the socket from the
headlight assembly by turning it
one-quarter turn counterclockwise.
5. Remove the burned out bulb from the socket by pushing it in and
turning counterclockwise until it
unlocks.
6. Install the new bulb in the socket. Turn it clockwise to lock it in place.
7. Insert the socket back into the headlight assembly. Turn it
clockwise to lock it in place.
8. Test the lights to make sure the new bulb is working.
9. Put the inner fender in place. Install the two holding clips. Lock
each clip in place by pushing on
the center. Replacin
g Rea r Bulb s
(i n Fenders )
1. Open the tailgate. Release the covers by inserting a flat-tipscrewdriver into the slot until the
cover bows slightly. Then pivot
the screwdriver 90° and pull it straight out of the slot.
2. Use a Phillips-head screwdriver to remove the taillight assembly
mounting screw under each cover. 3. Pull the taillight assembly out of
the body by sliding it backward.
4. Determine which of the two bulbs is burned out: stop/taillight/side
marker light or turn signal light.
Maintenanc e
Page 278 of 352
Lights
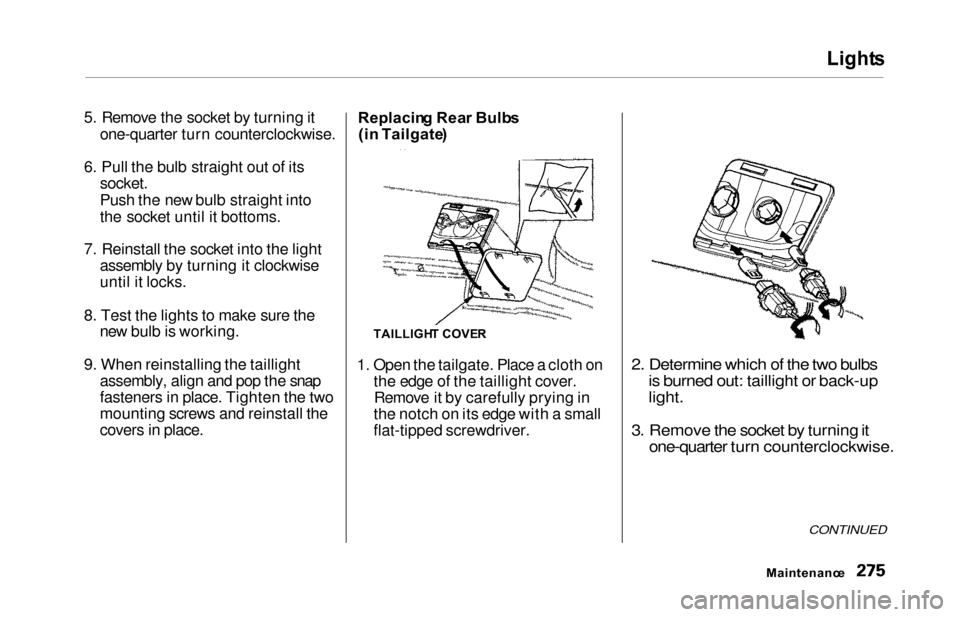
5. Remove the socket by turning it
one-quarter turn counterclockwise.
6. Pull the bulb straight out of its
socket.
Push the new bulb straight into
the socket until it bottoms.
7. Reinstall the socket into the light assembly by turning it clockwise
until it locks.
8. Test the lights to make sure the new bulb is working.
9. When reinstalling the taillight assembly, align and pop the snap
fasteners in place. Tighten the two
mounting screws and reinstall the
covers in place. Replacin
g Rea r Bulb s
(i n Tailgate )
1. Open the tailgate. Place a cloth on the edge of the taillight cover.Remove it by carefully prying in
the notch on its edge with a small
flat-tipped screwdriver.
2. Determine which of the two bulbs is burned out: taillight or back-up
light.
3. Remove the socket by turning it one-quarter turn counterclockwise.
CONTINUED
Maintenanc e
TAILLIGHT COVE R
Page 279 of 352
Lights
4. Pull the bulb straight out of its
socket.
Push the new bulb straight into
the socket until it bottoms.
5. Insert the socket back into the light assembly. Turn it clockwise
to lock it in place.
6. Test the lights to make sure the new bulb is working.
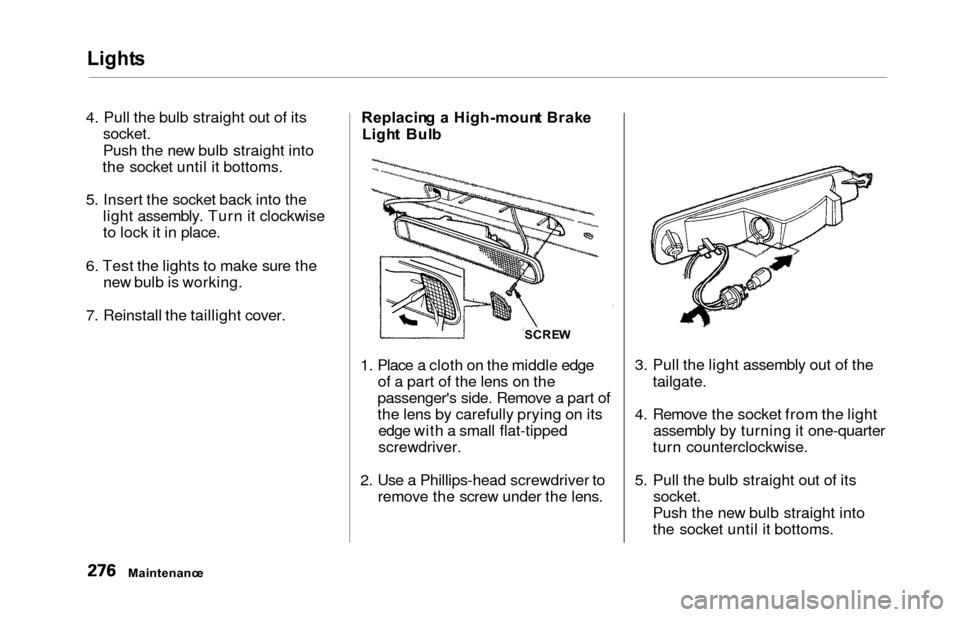
7. Reinstall the taillight cover. Replacin
g a High-moun t Brak e
Ligh t Bul b
1. Place a cloth on the middle edge of a part of the lens on the
passenger's side. Remove a part of
the lens by carefully prying on its edge with a small flat-tipped
screwdriver.
2. Use a Phillips-head screwdriver to remove the screw under the lens. 3. Pull the light assembly out of the
tailgate.
4. Remove the socket from the light assembly by turning it one-quarter
turn counterclockwise.
5. Pull the bulb straight out of its socket.
Push the new bulb straight into
the socket until it bottoms.
Maintenanc e SCRE
W
Page 280 of 352
Lights
6. Put the socket back into the light
assembly and turn it clockwise to
lock it in place.
7. Test the light to make sure the new bulb is working.
8. Put the light assembly back into the tailgate. Install the screw and
tighten it securely. Reinstall the
lens piece.
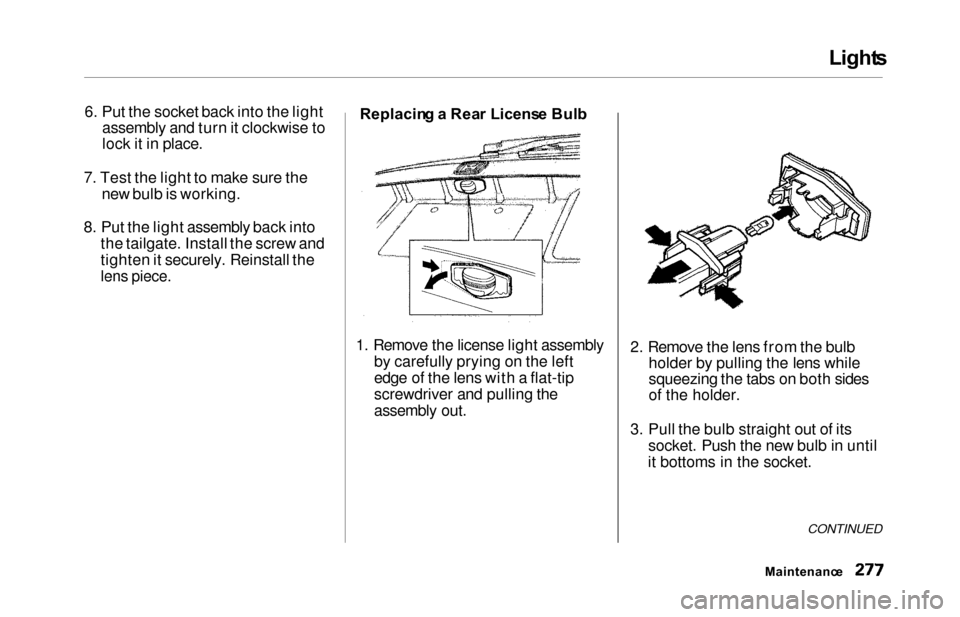
Replacin g a Rea r Licens e Bul b
1. Remove the license light assembly by carefully prying on the left
edge of the lens with a flat-tip
screwdriver and pulling the
assembly out. 2. Remove the lens from the bulb
holder by pulling the lens while
squeezing the tabs on both sides
of the holder.
3. Pull the bulb straight out of its socket. Push the new bulb in until
it bottoms in the socket.
CONTINUED
Maintenanc e