bolt HONDA ODYSSEY 2011 RB3-RB4 / 4.G Owners Manual
[x] Cancel search | Manufacturer: HONDA, Model Year: 2011, Model line: ODYSSEY, Model: HONDA ODYSSEY 2011 RB3-RB4 / 4.GPages: 722, PDF Size: 17.18 MB
Page 594 of 722
Any hitch used on your vehicle must
be properly bolted to the underbody,
using the six threaded holes
provided. A hitch and the required
f luid coolers designed especially f or
your Odyssey can be obtained f rom
your Honda dealer.Always use saf ety chains when you
tow a trailer. Make sure the chains
are secured to the trailer and hitch,
and that they cross under the tongue
and can catch the trailer if it
becomes unhitched. Leave enough
slack to allow the trailer to turn
corners easily, but do not let the
chains drag on the ground.
An additional ATF (automatic
transmission f luid) cooler should be
installed. This device will help
prevent automatic transmission
overheating, which could cause
serious damage. The additional ATF
cooler can be obtained f rom your
dealer.
Your vehicle is designed to tow
without the need f or a load
distributing hitch. If you wish to use
one, please consult your trailer
maker f or proper installation and set-
up. Improper set-up could degrade
the handling, stability, and braking
perf ormance of your vehicle. A sway control device helps
minimize swaying that can occur in
crosswinds and in normal and
emergency driving maneuvers. If
you experience swaying when
pulling your trailer, consult the
trailer maker f or the specif ic type of
device and how to install it properly.
CONT INUED
Hitches
Weight Distributing Hitch Saf et y Chains
Sway Cont rol
A ut omat ic T ransmission FluidCooler
Towing a Trailer
Driving
591
10/07/17 10:53:34 31TK8600_596
2011 Odyssey
Page 619 of 722
Always change the oil and f ilter
according to the maintenance
messages shown on the odometer/
trip meter display or on the multi-
inf ormation display. The oil and f ilter
collect contaminants that can dam-
age your engine if they are not
removed regularly.
Changing the oil and f ilter requires
special tools and access f rom
underneath the vehicle. The vehicle
should be raised on a service station-
type hydraulic lif t f or this service.
Unless you have the knowledge and
proper equipment, you should have
this maintenance done by a skilled
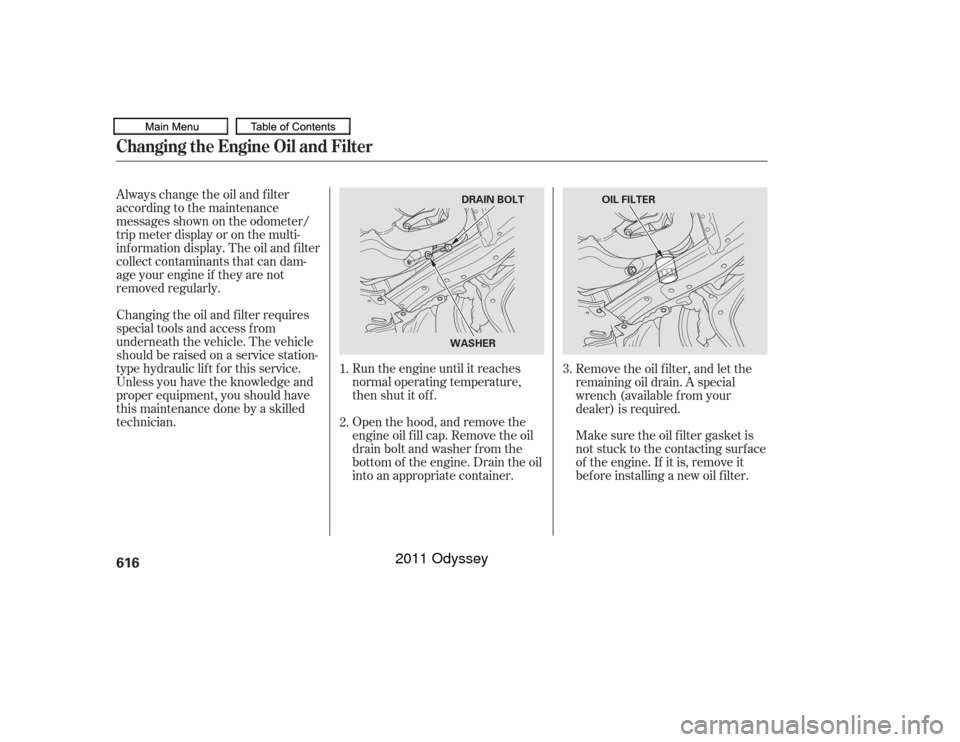
technician.Run the engine until it reaches
normal operating temperature,
then shut it off.
Open the hood, and remove the
engine oil f ill cap. Remove the oil
drain bolt and washer f rom the
bottom of the engine. Drain the oil
into an appropriate container.Remove the oil f ilter, and let the
remaining oil drain. A special
wrench (available from your
dealer) is required.
Make sure the oil f ilter gasket is
not stuck to the contacting surface
of the engine. If it is, remove it
bef ore installing a new oil f ilter.
1.
2.
3.Changing the Engine Oil and Filter616
DRAIN BOLT
OIL FILTER
WASHER
10/07/17 10:56:37 31TK8600_621
2011 Odyssey
Page 620 of 722
Install a new oil f ilter according to
the instructions that come with it.
Put a new washer on the drain bolt,
then reinstall the drain bolt.
Tighten the drain bolt to:
Refill the engine with the
recommended oil.
Engine oil change capacity
(including f ilter):Replace the engine oil f ill cap.
Start the engine. The oil pressure
indicator should go out within 5
seconds. If it does not, turn of f the
engine, and check your work.
Let the engine run f or several
minutes, then check the drain bolt
and oil f ilter f or leaks.
Turn of f the engine and let it sit
f or several minutes, then check
the oil level on the dipstick. If
necessary, add more oil.
4.
5.
6.
7.
8.
9.
Changing the Engine Oil and Filter
Maint enance
617
29 lbf·ft (39 N·m , 4.0 kgf·m)
4.5 US qt (4.3
) Improper disposal of engine oil can be
harmf ul to the environment. If you
change your own oil, please dispose of
the used oil properly. Put it in a sealed
container, and take it to a recycling
center. Do not discard it in a trash bin
or dump it on the ground.
10/07/17 10:56:46 31TK8600_622
2011 Odyssey
Page 632 of 722
CONT INUED
Your vehicle uses halogen light
bulbs. When replacing a bulb,
handle it by its plastic case, and
protect the glass f rom contact with
your skin or hard objects. If you
touch the glass, clean it with
denatured alcohol and a clean
cloth.Thefoglightswereproperlyaimed
when your vehicle was new. If you
regularly carry heavy items in the
cargo area or pull a trailer,
readjustment may be required.
Adjustment should be done by your
dealer or another qualif ied
technician.
Start the engine. If you are
replacing a driver’s side bulb, turn
the steering wheel all the way to
theright.If youarereplacinga
passenger’s side bulb, turn the
steering wheel to the lef t. Turn of f
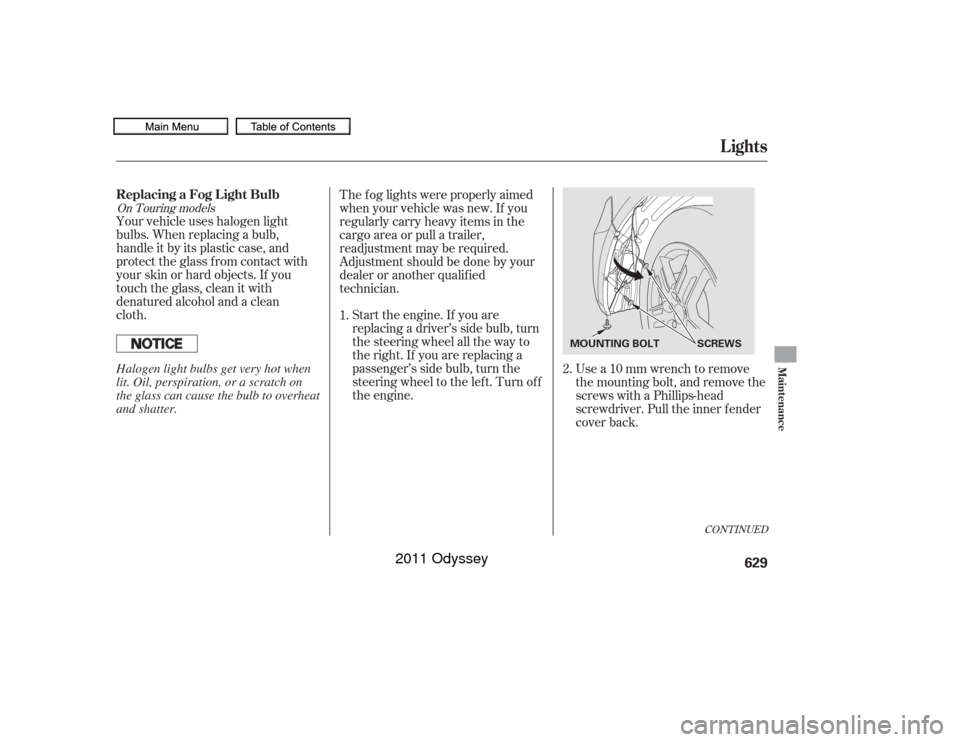
the engine. Use a 10 mm wrench to remove
the mounting bolt, and remove the
screws with a Phillips-head
screwdriver. Pull the inner f ender
cover back.
1.
2.On Touring models
Lights
ReplacingaFogLightBulb
Maint enance
629
SCREWS
MOUNTING BOLT
Halogen light bulbs get very hot when
lit. Oil, perspiration, or a scratch on
the glass can cause the bulb to overheat
and shatter.
10/07/17 10:58:25 31TK8600_634
2011 Odyssey
Page 633 of 722
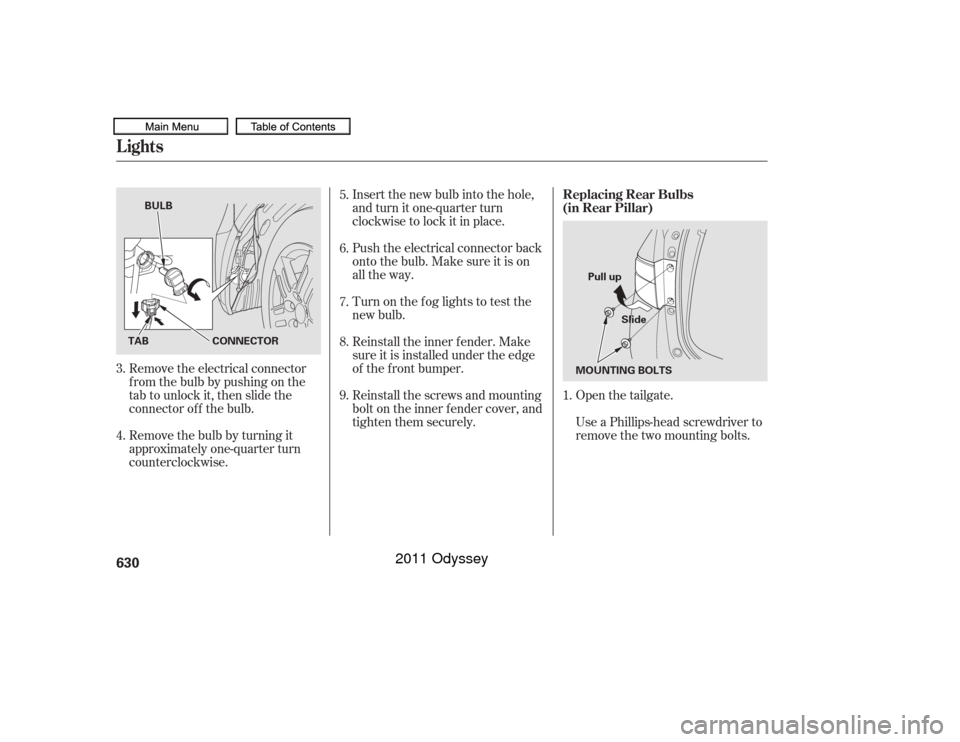
Remove the electrical connector
f rom the bulb by pushing on the
tab to unlock it, then slide the
connector of f the bulb.
Remove the bulb by turning it
approximately one-quarter turn
counterclockwise.Insert the new bulb into the hole,
and turn it one-quarter turn
clockwise to lock it in place.
Push the electrical connector back
onto the bulb. Make sure it is on
all the way.
Reinstall the inner f ender. Make
sure it is installed under the edge
of the f ront bumper.
Reinstall the screws and mounting
bolt on the inner f ender cover, and
tighten them securely. Turn on the f og lights to test the
new bulb.
Open the tailgate.
Use a Phillips-head screwdriver to
remove the two mounting bolts.
3.
4. 5.
7. 6.
8.
9.
1.
Lights
Replacing Rear Bulbs
(in Rear Pillar)
630
BULB
TAB CONNECTOR Pull up
Slide
MOUNTING BOLTS
10/07/17 10:58:35 31TK8600_635
2011 Odyssey
Page 635 of 722
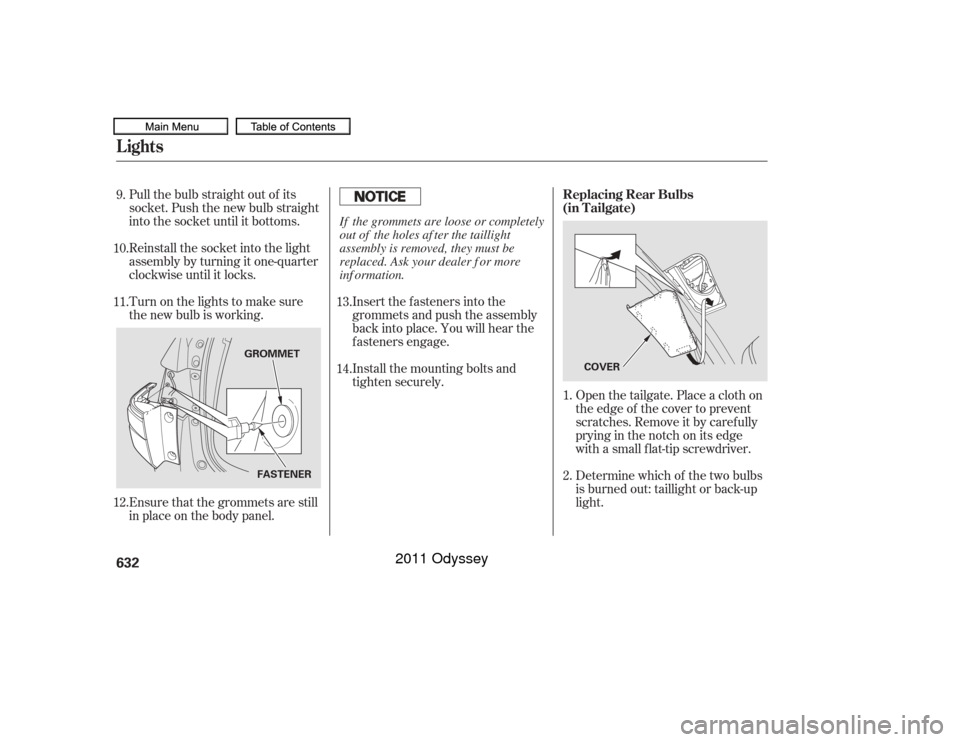
Pull the bulb straight out of its
socket. Push the new bulb straight
into the socket until it bottoms.
Reinstall the socket into the light
assembly by turning it one-quarter
clockwise until it locks.
Turn on the lights to make sure
the new bulb is working.
Ensure that the grommets are still
in place on the body panel.Open the tailgate. Place a cloth on
the edge of the cover to prevent
scratches. Remove it by caref ully
prying in the notch on its edge
with a small f lat-tip screwdriver.
Determine which of the two bulbs
is burned out: taillight or back-up
light.
Insert the fasteners into the
grommets and push the assembly
back into place. You will hear the
f asteners engage.
Install the mounting bolts and
tighten securely.
1.
2.
9.
11. 10.
12. 14. 13.
Lights
Replacing Rear Bulbs
(in Tailgate)
632
COVER
GROMMET
FASTENER
If the grommets are loose or completely
out of the holes af ter the taillight
assembly is removed, they must be
replaced. Ask your dealer f or more
inf ormation.
10/07/17 10:58:53 31TK8600_637
2011 Odyssey
Page 659 of 722
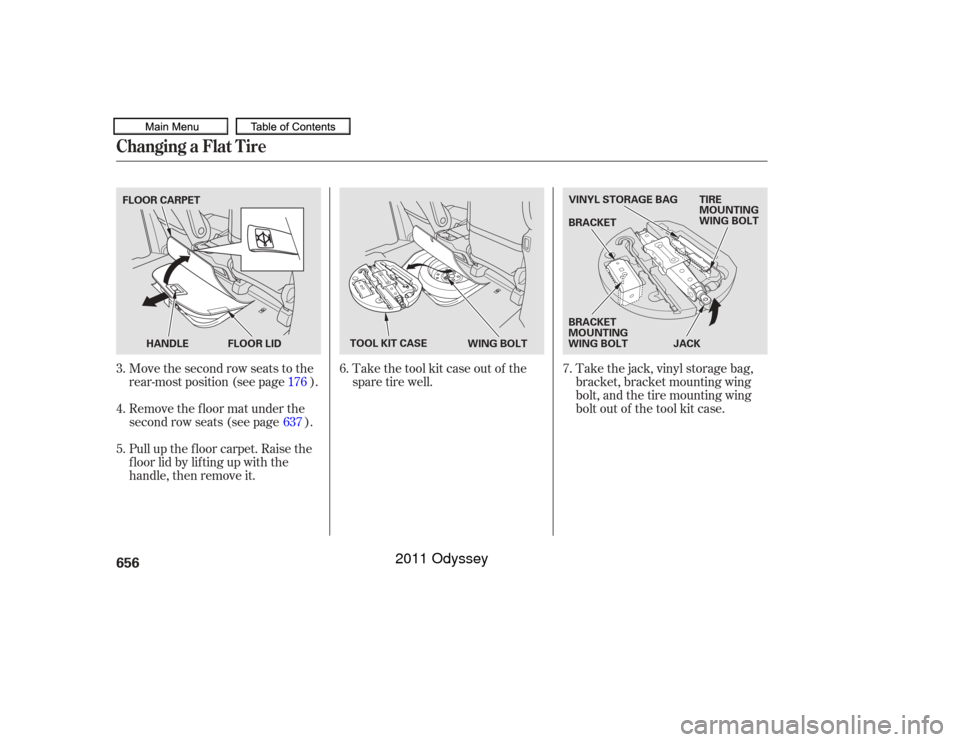
Move the second row seats to the
rear-most position (see page ).
Remove the f loor mat under the
second row seats (see page ).
Pull up the floor carpet. Raise the
f loor lid by lif ting up with the
handle, then remove it.Take the tool kit case out of the
spare tire well.
Take the jack, vinyl storage bag,
bracket, bracket mounting wing
bolt, and the tire mounting wing
bolt out of the tool kit case.
6.
7.
5. 4.
3. 637176
Changing a Flat Tire656
HANDLE FLOOR LID
FLOOR CARPET
TOOL KIT CASEBRACKET
VINYL STORAGE BAG
TIRE
MOUNTING
WING BOLT
BRACKET
MOUNTING
WING BOLT JACK
WING BOLT
10/07/17 11:02:07 31TK8600_661
2011 Odyssey
Page 660 of 722
CONT INUED
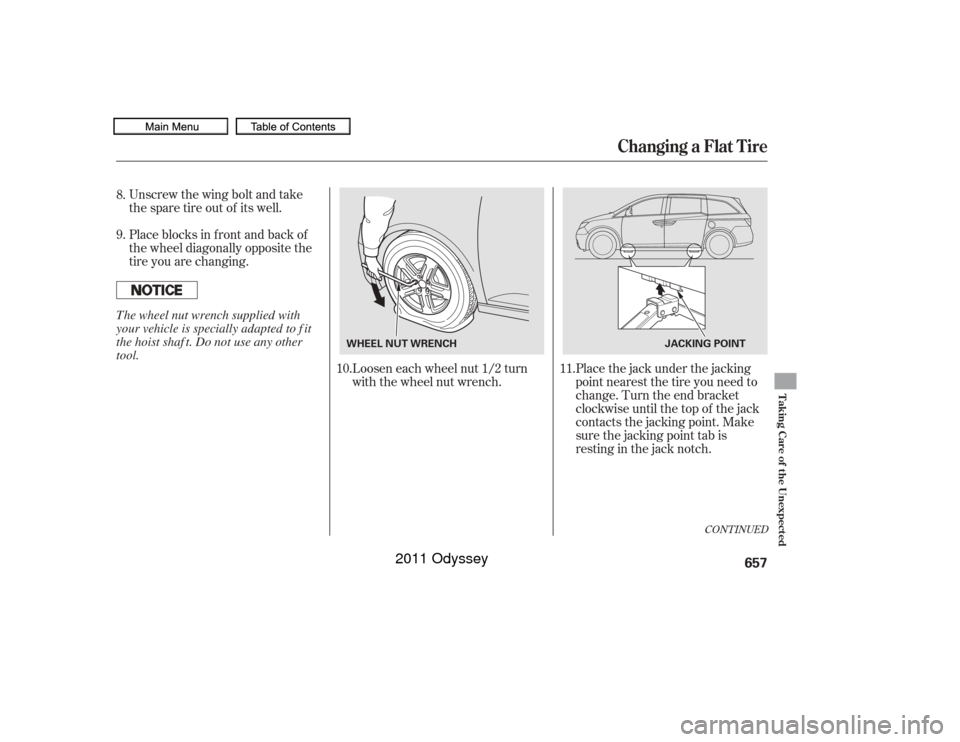
Unscrew the wing bolt and take
the spare tire out of its well.
Place blocks in front and back of
the wheel diagonally opposite the
tire you are changing.Loosen each wheel nut 1/2 turn
with the wheel nut wrench.Placethejackunderthejacking
point nearest the tire you need to
change. Turn the end bracket
clockwise until the top of the jack
contacts the jacking point. Make
sure the jacking point tab is
restinginthejacknotch.
8.
9.
10. 11.
Changing a Flat Tire
Taking Care of the Unexpected
657
WHEEL NUT WRENCH
JACKING POINT
The wheel nut wrench supplied with
your vehicle is specially adapted to f it
the hoist shaf t. Do not use any other
tool.
10/07/17 11:02:15 31TK8600_662
2011 Odyssey
Page 663 of 722
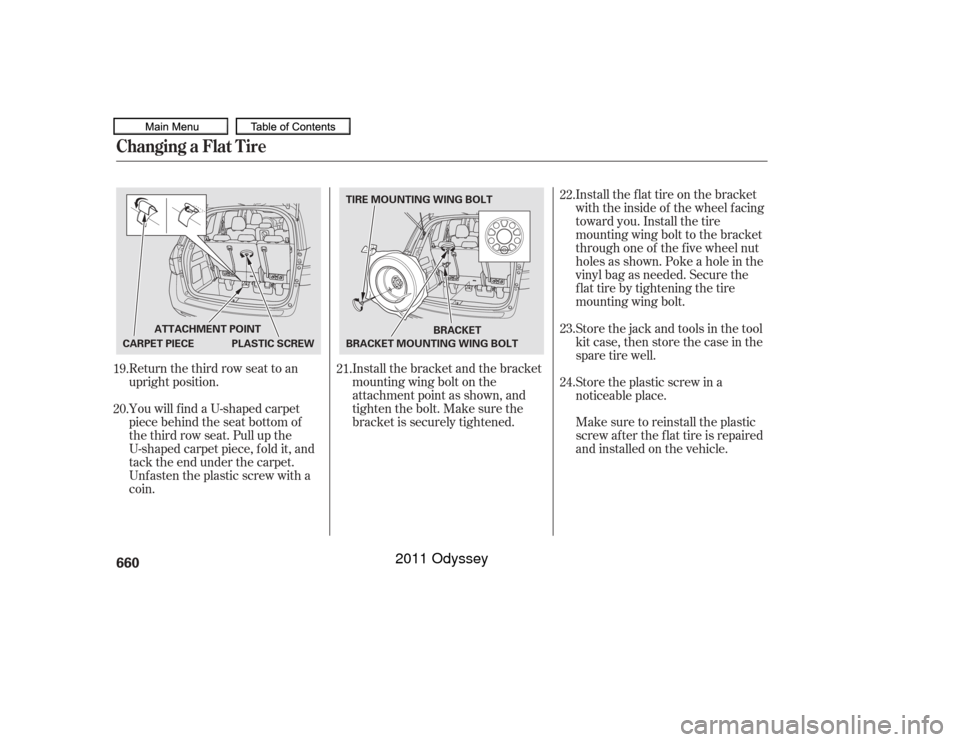
Install the flat tire on the bracket
with the inside of the wheel facing
toward you. Install the tire
mounting wing bolt to the bracket
through one of the f ive wheel nut
holes as shown. Poke a hole in the
vinyl bag as needed. Secure the
f lat tire by tightening the tire
mounting wing bolt.
Return the third row seat to an
upright position.
YouwillfindaU-shapedcarpet
piece behind the seat bottom of
the third row seat. Pull up the
U-shaped carpet piece, f old it, and
tack the end under the carpet.
Unf asten the plastic screw with a
coin. Install the bracket and the bracket
mountingwingboltonthe
attachment point as shown, and
tighten the bolt. Make sure the
bracket is securely tightened.
Store the jack and tools in the tool
kit case, then store the case in the
spare tire well.
Store the plastic screw in a
noticeable place.
Make sure to reinstall the plastic
screw af ter the f lat tire is repaired
andinstalledonthevehicle.
23.
19.
20. 21.22.
24.
Changing a Flat Tire660
BRACKET
CARPET PIECE PLASTIC SCREW TIRE MOUNTING WING BOLT
BRACKET MOUNTING WING BOLT
ATTACHMENT POINT
10/07/17 11:02:38 31TK8600_665
2011 Odyssey
Page 664 of 722
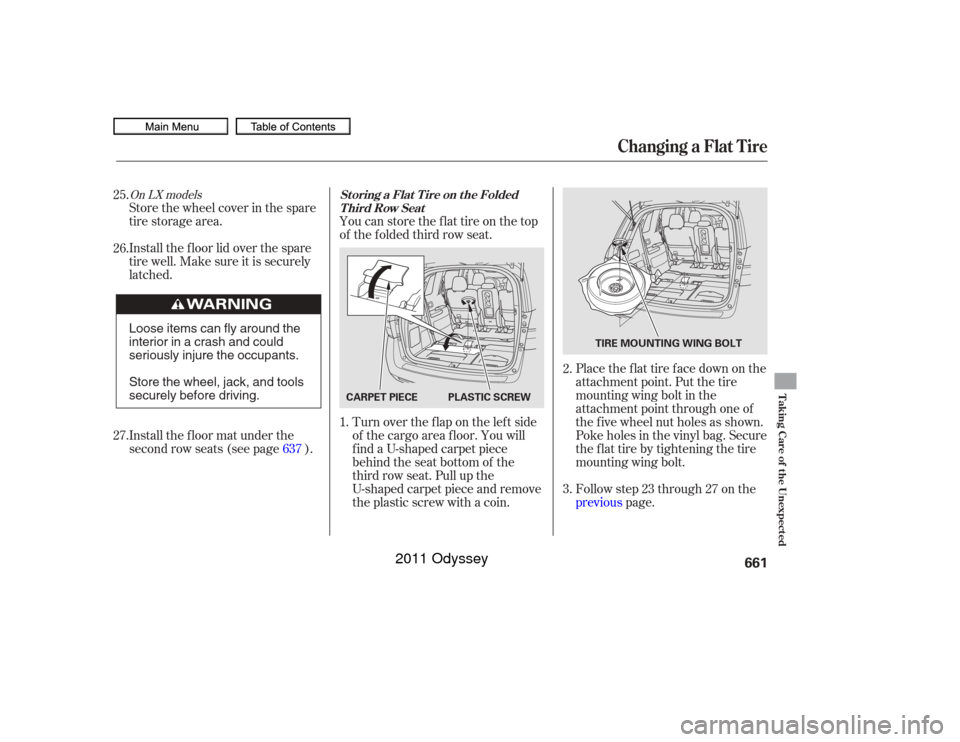
You can store the f lat tire on the top
of the f olded third row seat.Turn over the f lap on the lef t side
of the cargo area f loor. You will
f ind a U-shaped carpet piece
behind the seat bottom of the
third row seat. Pull up the
U-shaped carpet piece and remove
the plastic screw with a coin.
Store the wheel cover in the spare
tire storage area.
Install the f loor lid over the spare
tire well. Make sure it is securely
latched.
Install the f loor mat under the
second row seats (see page ).
Place the flat tire face down on the
attachment point. Put the tire
mountingwingboltinthe
attachment point through one of
the f ive wheel nut holes as shown.
Poke holes in the vinyl bag. Secure
the f lat tire by tightening the tire
mounting wing bolt.
Follow step 23 through 27 on the
previous
page.
2.
1.
26. 25.
27.
3.
637
On LX models
Changing a Flat Tire
St oring a Flat T ire on t he Folded
Third Row Seat
Taking Care of the Unexpected
661
CARPET PIECE PLASTIC SCREW TIRE MOUNTING WING BOLT
Loose items can fly around the
interior in a crash and could
seriously injure the occupants.
Store the wheel, jack, and tools
securely before driving.
10/07/17 11:02:48 31TK8600_666
2011 Odyssey