key HONDA ODYSSEY 2012 RB3-RB4 / 4.G Owners Manual
[x] Cancel search | Manufacturer: HONDA, Model Year: 2012, Model line: ODYSSEY, Model: HONDA ODYSSEY 2012 RB3-RB4 / 4.GPages: 441, PDF Size: 14.07 MB
Page 22 of 441
21Quick Reference Guide
What to Do If
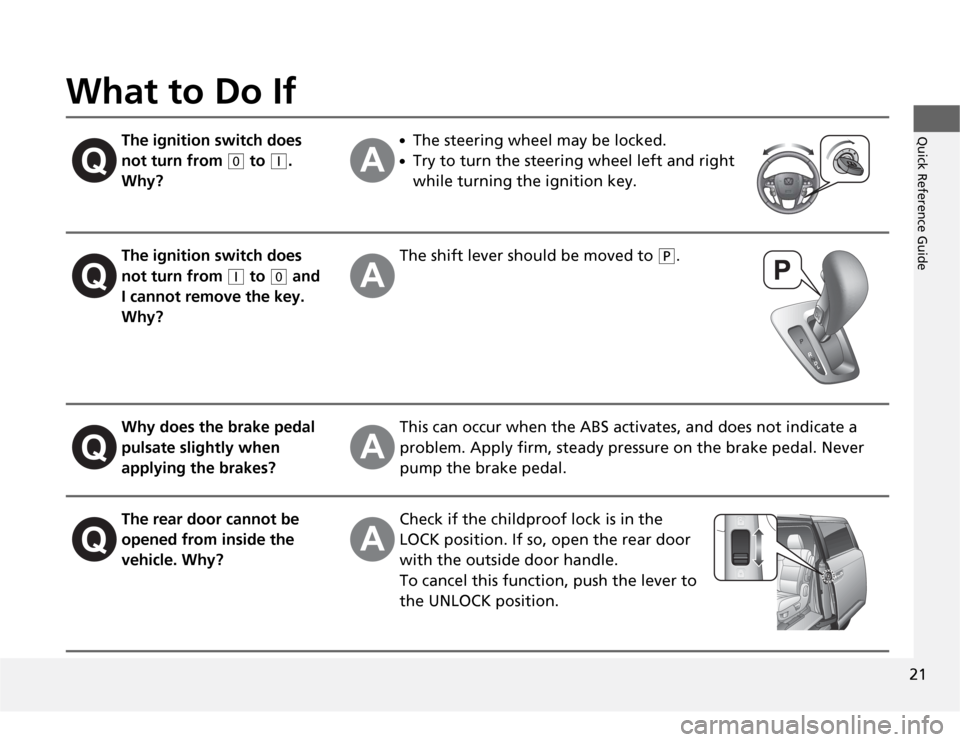
The ignition switch does
not turn from
(0
to
(q
.
Why?
●
The steering wheel may be locked.
●
Try to turn the steering wheel left and right
while turning the ignition key.
The ignition switch does
not turn from
(q
to
(0
and
I cannot remove the key.
Why?
The shift lever should be moved to
(P
.
Why does the brake pedal
pulsate slightly when
applying the brakes?
This can occur when the ABS activates, and does not indicate a
problem. Apply firm, steady pressure on the brake pedal. Never
pump the brake pedal.
The rear door cannot be
opened from inside the
vehicle. Why?
Check if the childproof lock is in the
LOCK position. If so, open the rear door
with the outside door handle.
To cancel this function, push the lever to
the UNLOCK position.
Page 23 of 441
22Quick Reference Guide
Why do the doors lock
after I unlocked the doors
using a remote
transmitter?
If you do not open the doors within 30 seconds, the doors are
relocked automatically for security.
Why does the beeper
sound when I open the
driver's door?
The beeper sounds when:●
The key is left in the ignition switch.
●
The exterior lights are left on.
Why does the beeper
sound when I start driving?
The beeper sounds when:●
Driver and/or front passenger are not wearing their seat belts.
●
The parking brake lever is not fully released.
Why do I hear a screeching
sound when I apply the
brake pedal?
The brake pads may need to be replaced. Have your vehicle
inspected by a dealer.
Page 37 of 441
uuSeat BeltsuFastening a Seat Belt
36Safe Driving
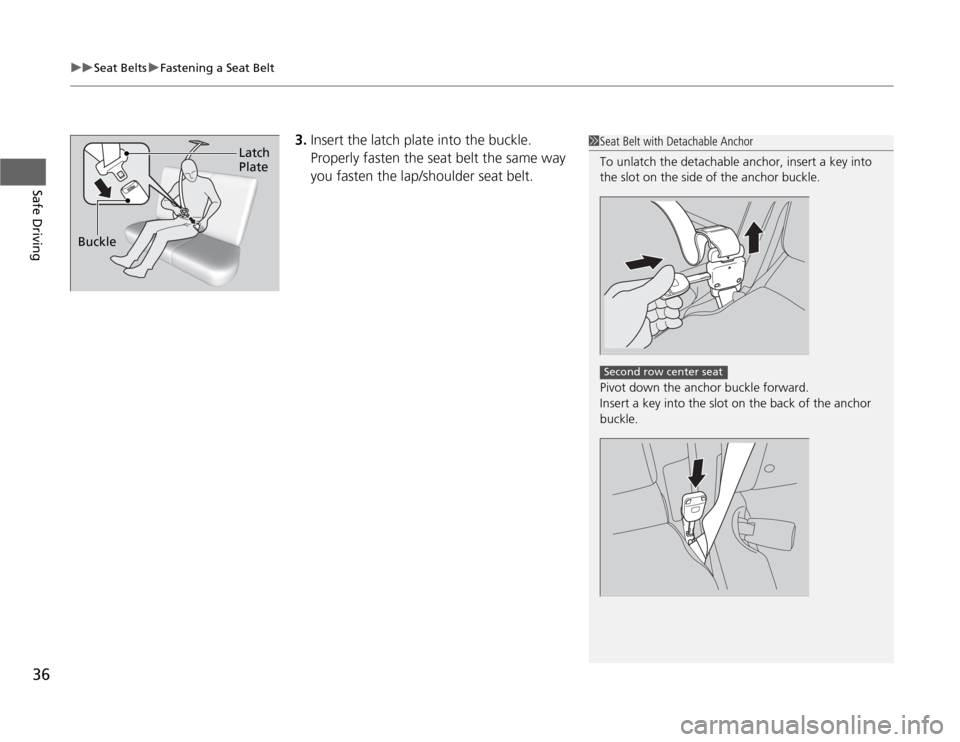
3.Insert the latch plate into the buckle.
Properly fasten the seat belt the same way
you fasten the lap/shoulder seat belt.
1Seat Belt with Detachable Anchor
To unlatch the detachable anchor, insert a key into
the slot on the side of the anchor buckle.
Pivot down the anchor buckle forward.
Insert a key into the slot on the back of the anchor
buckle.
Second row center seat
Buckle
Latch
Plate
Page 59 of 441
uuChild SafetyuSafety of Infants and Small Children
58Safe Driving
Most child seats are LATCH-compatible (Lower Anchors and Tethers for CHildren).
Some have a rigid-type connector, while others have a flexible-type connector. Both
are equally easy to use. Some existing and previously owned child seats can only be
installed using the seat belt. Whichever type you choose, follow the child seat
manufacturer's use and care instructions as well as the instructions in this manual.
Proper installation is key to maximizing your child's safety.
In seating positions and vehicles not equipped with LATCH, a LATCH compatible
child seat can be installed using the seat belt and a top tether for added security.
This is because all child seats are required to be designed so that they can be secured
with a lap belt or the lap part of a lap/shoulder belt. In addition, the child seat
manufacturer may advise that a seat belt be used to attach a LATCH-compatible seat
once a child reaches a specified weight. Please read the child seat owner’s manual
for proper installation instructions.■
Important consideration when selecting a child seat
Make sure the child seat meets the following three requirements:
•The child seat is the correct type and size for the child.
•The child seat is the correct type for the seating position.
•The child seat is compliant with Federal Motor Vehicle Safety Standard 213 or
Canadian Motor Vehicle Safety Standard 213.
■
Selecting a Child Seat
1Selecting a Child Seat
Installation of a LATCH-compatible child seat is
simple.
LATCH-compatible child seats have been developed
to simplify the installation process and reduce the
likelihood of injuries caused by incorrect installation.
Page 80 of 441
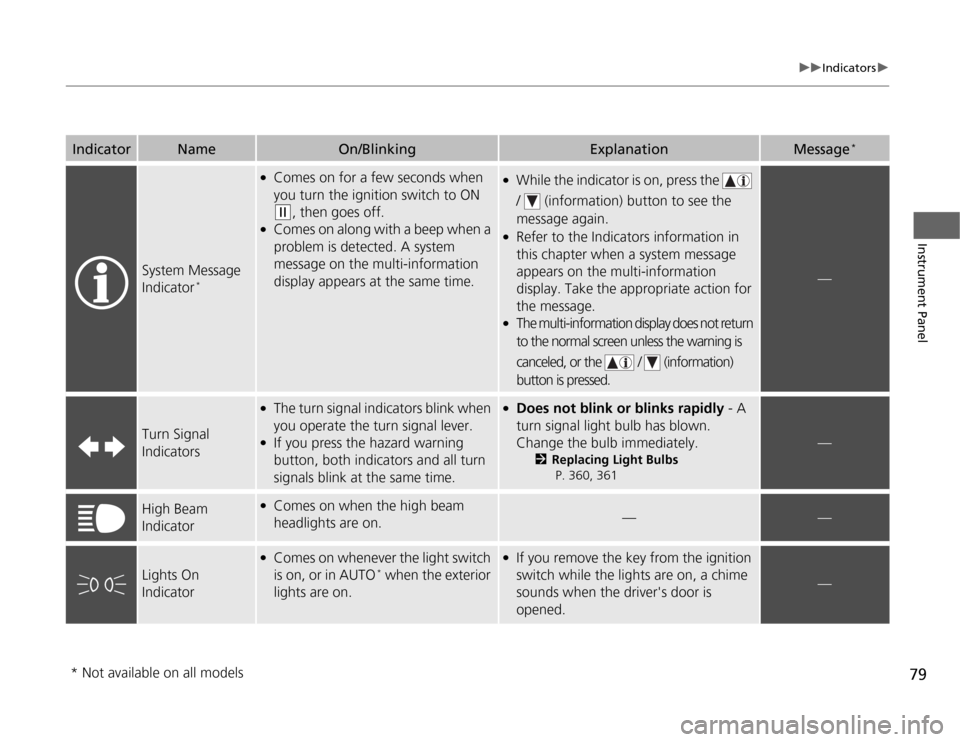
79
uuIndicatorsu
Instrument Panel
System Message
Indicator
*
●
Comes on for a few seconds when
you turn the ignition switch to ON (w
, then goes off.
●
Comes on along with a beep when a
problem is detected. A system
message on the multi-information
display appears at the same time.
●
While the indicator is on, press the
/ (information) button to see the
message again.
●
Refer to the Indicators information in
this chapter when a system message
appears on the multi-information
display. Take the appropriate action for
the message.
●
The multi-information display does not return
to the normal screen unless the warning is
canceled, or the / (information)
button is pressed.
—
Turn Signal
Indicators
●
The turn signal indicators blink when
you operate the turn signal lever.
●
If you press the hazard warning
button, both indicators and all turn
signals blink at the same time.
●
Does not blink or blinks rapidly - A
turn signal light bulb has blown.
Change the bulb immediately.
2Replacing Light Bulbs
P. 360, 361
—
High Beam
Indicator
●
Comes on when the high beam
headlights are on.
—
—
Lights On
Indicator
●
Comes on whenever the light switch
is on, or in AUTO
* when the exterior
lights are on.
●
If you remove the key from the ignition
switch while the lights are on, a chime
sounds when the driver's door is
opened.
—
Indicator
Name
On/Blinking
Explanation
Message
*
* Not available on all models
Page 81 of 441
80
uuIndicatorsu
Instrument Panel
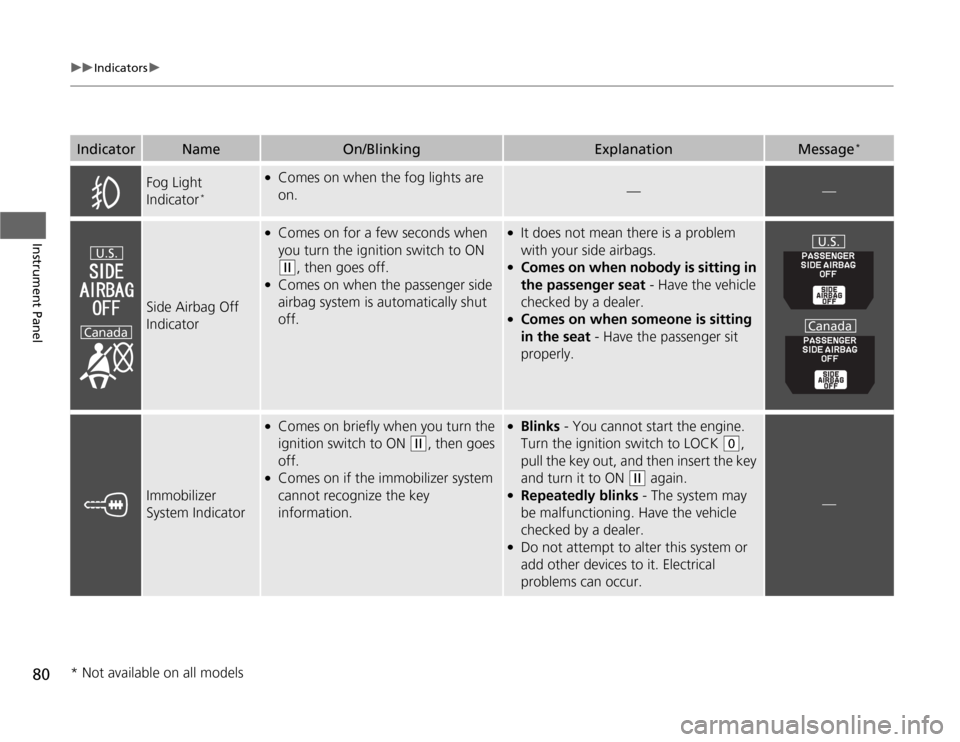
Fog Light
Indicator
*
●
Comes on when the fog lights are
on.
—
—
Side Airbag Off
Indicator
●
Comes on for a few seconds when
you turn the ignition switch to ON (w
, then goes off.
●
Comes on when the passenger side
airbag system is automatically shut
off.
●
It does not mean there is a problem
with your side airbags.
●
Comes on when nobody is sitting in
the passenger seat - Have the vehicle
checked by a dealer.
●
Comes on when someone is sitting
in the seat - Have the passenger sit
properly.
Immobilizer
System Indicator
●
Comes on briefly when you turn the
ignition switch to ON
(w
, then goes
off.
●
Comes on if the immobilizer system
cannot recognize the key
information.
●
Blinks - You cannot start the engine.
Turn the ignition switch to LOCK
(0
,
pull the key out, and then insert the key
and turn it to ON
(w
again.
●
Repeatedly blinks - The system may
be malfunctioning. Have the vehicle
checked by a dealer.
●
Do not attempt to alter this system or
add other devices to it. Electrical
problems can occur.
—
Indicator
Name
On/Blinking
Explanation
Message
*
U.S.
Canada
U.S.
Canada
* Not available on all models
Page 85 of 441
84
uuIndicatorsuMulti-Information Display Warning and Information Messages
*
Instrument Panel
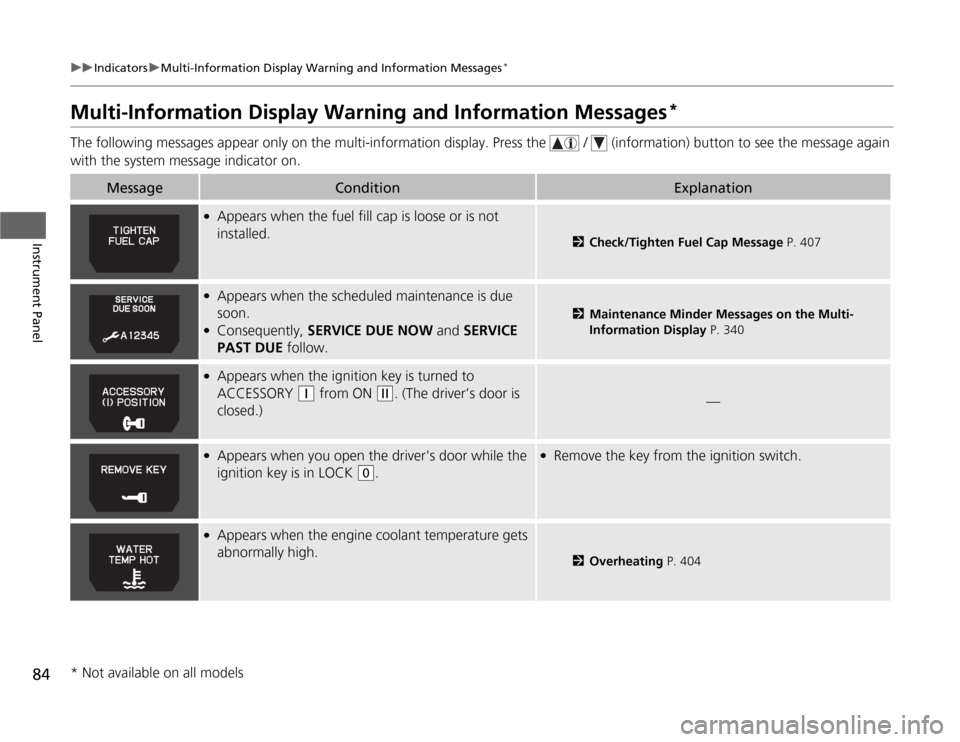
Multi-Information Display Warning and Information Messages
*
The following messages appear only on the multi-information display. Press the / (information) button to see the message again
with the system message indicator on.
Message
Condition
Explanation
●
Appears when the fuel fill cap is loose or is not
installed.
2Check/Tighten Fuel Cap Message P. 407
●
Appears when the scheduled maintenance is due
soon.
●
Consequently, SERVICE DUE NOW and SERVICE
PAST DUE follow.
2Maintenance Minder Messages on the Multi-
Information Display P. 340
●
Appears when the ignition key is turned to
ACCESSORY
(q
from ON
(w
. (The driver’s door is
closed.)
—
●
Appears when you open the driver's door while the
ignition key is in LOCK
(0
.
●
Remove the key from the ignition switch.
●
Appears when the engine coolant temperature gets
abnormally high.
2Overheating P. 404
* Not available on all models
Page 103 of 441
102
uuGauges and DisplaysuMulti-Information Display
*
Instrument Panel
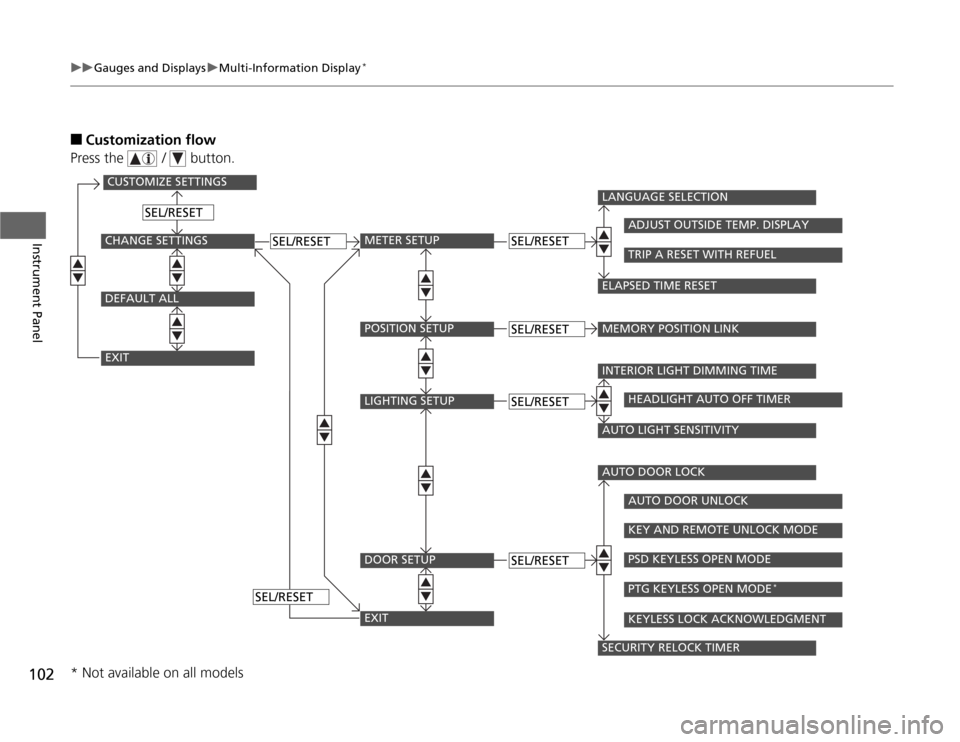
■
Customization flow
Press the / button.
CUSTOMIZE SETTINGSCHANGE SETTINGSEXITDEFAULT ALL
METER SETUP
SEL/RESET
SEL/RESET
SEL/RESET
SEL/RESET
POSITION SETUPLIGHTING SETUPDOOR SETUPEXIT
SEL/RESETSEL/RESETSEL/RESET
LANGUAGE SELECTIONMEMORY POSITION LINK
ADJUST OUTSIDE TEMP. DISPLAYTRIP A RESET WITH REFUEL
ELAPSED TIME RESETINTERIOR LIGHT DIMMING TIME
HEADLIGHT AUTO OFF TIMER
AUTO LIGHT SENSITIVITYAUTO DOOR LOCK
AUTO DOOR UNLOCKKEY AND REMOTE UNLOCK MODEPSD KEYLESS OPEN MODEPTG KEYLESS OPEN MODE
*
KEYLESS LOCK ACKNOWLEDGMENT
SECURITY RELOCK TIMER
* Not available on all models
Page 105 of 441
104
uuGauges and DisplaysuMulti-Information Display
*
Instrument Panel
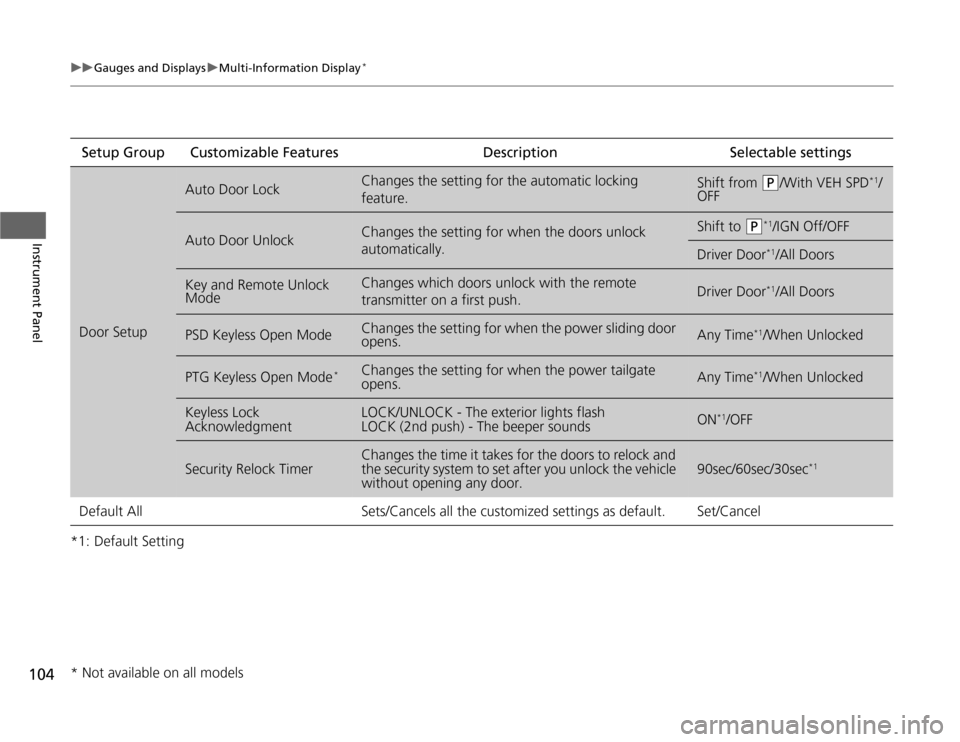
*1: Default SettingSetup Group Customizable Features Description Selectable settingsDoor Setup
Auto Door Lock
Changes the setting for the automatic locking
feature.
Shift from
(P
/With VEH SPD
*1/
OFF
Auto Door Unlock
Changes the setting for when the doors unlock
automatically.
Shift to
(P
*1/IGN Off/OFF
Driver Door
*1/All Doors
Key and Remote Unlock
Mode
Changes which doors unlock with the remote
transmitter on a first push.
Driver Door
*1/All Doors
PSD Keyless Open Mode
Changes the setting for when the power sliding door
opens.
Any Time
*1/When Unlocked
PTG Keyless Open Mode
*
Changes the setting for when the power tailgate
opens.
Any Time
*1/When Unlocked
Keyless Lock
Acknowledgment
LOCK/UNLOCK - The exterior lights flash
LOCK (2nd push) - The beeper sounds
ON
*1/OFF
Security Relock Timer
Changes the time it takes for the doors to relock and
the security system to set after you unlock the vehicle
without opening any door.
90sec/60sec/30sec
*1
Default All Sets/Cancels all the customized settings as default. Set/Cancel* Not available on all models
Page 108 of 441
107
Controls
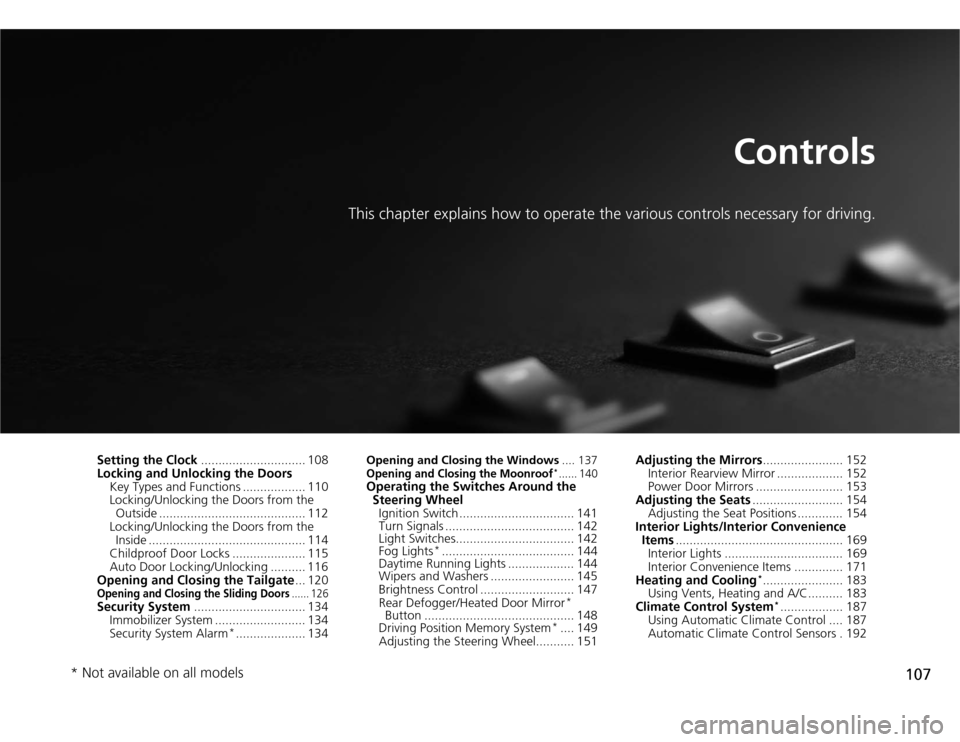
This chapter explains how to operate the various controls necessary for driving.
Setting the Clock.............................. 108
Locking and Unlocking the Doors
Key Types and Functions .................. 110
Locking/Unlocking the Doors from the
Outside .......................................... 112
Locking/Unlocking the Doors from the
Inside ............................................. 114
Childproof Door Locks ..................... 115
Auto Door Locking/Unlocking .......... 116
Opening and Closing the Tailgate... 120Opening and Closing the Sliding Doors
...... 126
Security System................................ 134
Immobilizer System .......................... 134
Security System Alarm
*.................... 134
Opening and Closing the Windows.... 137Opening and Closing the Moonroof
*...... 140
Operating the Switches Around the
Steering Wheel
Ignition Switch ................................. 141
Turn Signals ..................................... 142
Light Switches.................................. 142
Fog Lights
*...................................... 144
Daytime Running Lights ................... 144
Wipers and Washers ........................ 145
Brightness Control ........................... 147
Rear Defogger/Heated Door Mirror
*
Button ........................................... 148
Driving Position Memory System
*.... 149
Adjusting the Steering Wheel........... 151Adjusting the Mirrors....................... 152
Interior Rearview Mirror ................... 152
Power Door Mirrors ......................... 153
Adjusting the Seats.......................... 154
Adjusting the Seat Positions ............. 154
Interior Lights/Interior Convenience
Items................................................ 169
Interior Lights .................................. 169
Interior Convenience Items .............. 171
Heating and Cooling
*....................... 183
Using Vents, Heating and A/C.......... 183
Climate Control System*.................. 187
Using Automatic Climate Control .... 187
Automatic Climate Control Sensors . 192
* Not available on all models