key HONDA ODYSSEY 2012 RB3-RB4 / 4.G Owner's Manual
[x] Cancel search | Manufacturer: HONDA, Model Year: 2012, Model line: ODYSSEY, Model: HONDA ODYSSEY 2012 RB3-RB4 / 4.GPages: 441, PDF Size: 14.07 MB
Page 143 of 441
142
uuOperating the Switches Around the Steering WheeluTurn Signals
Controls
Turn Signals
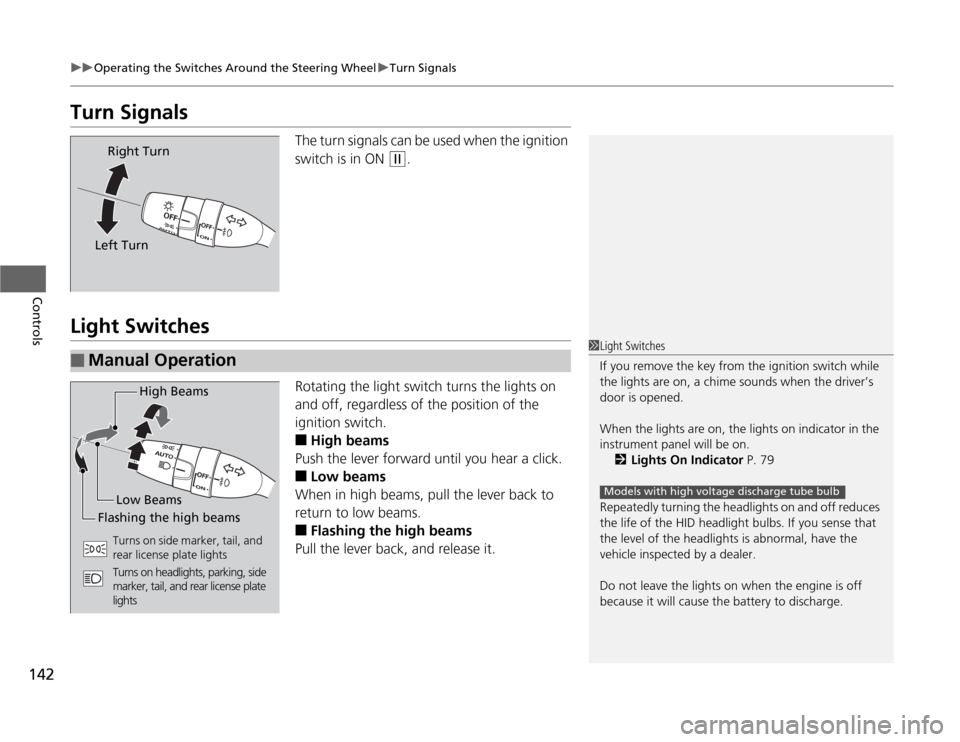
The turn signals can be used when the ignition
switch is in ON
(w
.
Light Switches
Rotating the light switch turns the lights on
and off, regardless of the position of the
ignition switch.■
High beams
Push the lever forward until you hear a click.
■
Low beams
When in high beams, pull the lever back to
return to low beams.
■
Flashing the high beams
Pull the lever back, and release it.
Right Turn
Left Turn
■
Manual Operation
1Light Switches
If you remove the key from the ignition switch while
the lights are on, a chime sounds when the driver’s
door is opened.
When the lights are on, the lights on indicator in the
instrument panel will be on.
2Lights On Indicator P. 79
Repeatedly turning the headlights on and off reduces
the life of the HID headlight bulbs. If you sense that
the level of the headlights is abnormal, have the
vehicle inspected by a dealer.
Do not leave the lights on when the engine is off
because it will cause the battery to discharge.
Models with high voltage discharge tube bulb
High Beams
Flashing the high beamsLow Beams
Turns on side marker, tail, and
rear license plate lights
Turns on headlights, parking, side
marker, tail, and rear license plate
lights
Page 144 of 441
143
uuOperating the Switches Around the Steering WheeluLight Switches
Controls
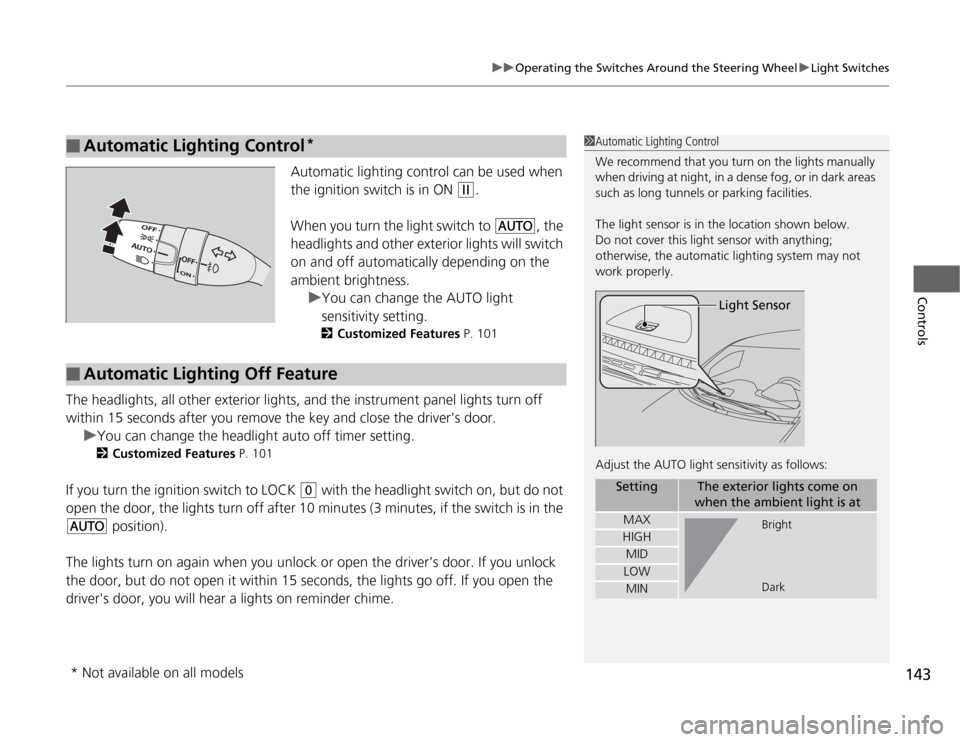
Automatic lighting control can be used when
the ignition switch is in ON
(w
.
When you turn the light switch to
#Y
, the
headlights and other exterior lights will switch
on and off automatically depending on the
ambient brightness.
uYou can change the AUTO light
sensitivity setting.
2Customized Features P. 101
The headlights, all other exterior lights, and the instrument panel lights turn off
within 15 seconds after you remove the key and close the driver's door.
uYou can change the headlight auto off timer setting.
2Customized Features P. 101
If you turn the ignition switch to LOCK
(0
with the headlight switch on, but do not
open the door, the lights turn off after 10 minutes (3 minutes, if the switch is in the
#Y
position).
The lights turn on again when you unlock or open the driver's door. If you unlock
the door, but do not open it within 15 seconds, the lights go off. If you open the
driver's door, you will hear a lights on reminder chime.
■
Automatic Lighting Control
*
1Automatic Lighting Control
We recommend that you turn on the lights manually
when driving at night, in a dense fog, or in dark areas
such as long tunnels or parking facilities.
The light sensor is in the location shown below.
Do not cover this light sensor with anything;
otherwise, the automatic lighting system may not
work properly.
Adjust the AUTO light sensitivity as follows:
Setting
The exterior lights come on
when the ambient light is at
MAXHIGHMIDLOWMIN
Light Sensor
Bright
Dark
■
Automatic Lighting Off Feature
* Not available on all models
Page 166 of 441
Continued
165
uuAdjusting the SeatsuRear Seats
Controls
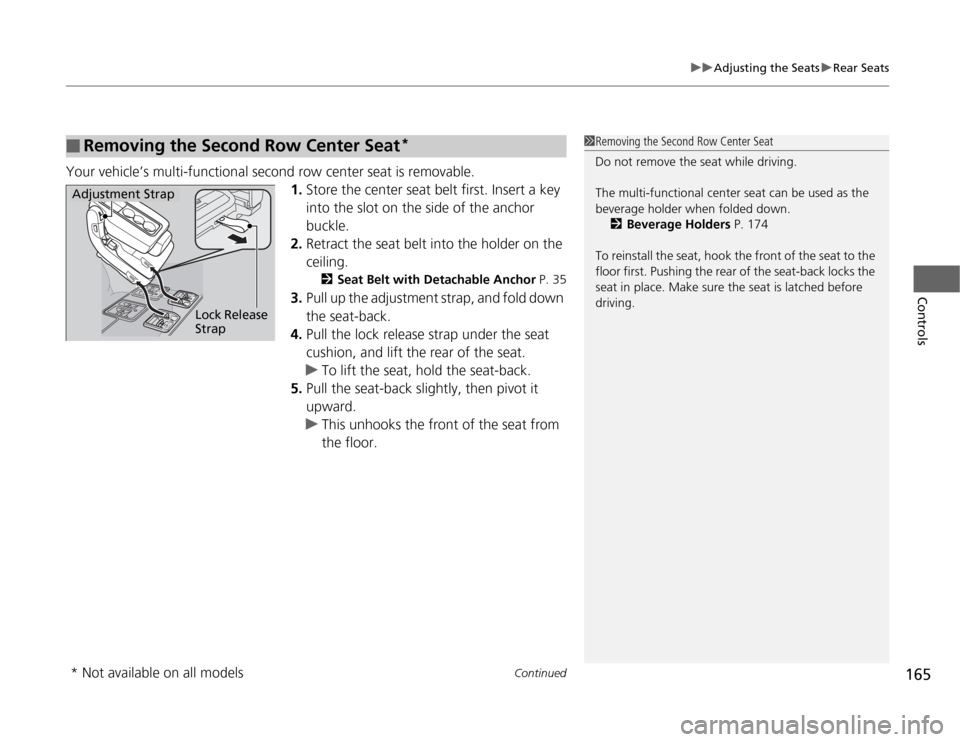
Your vehicle’s multi-functional second row center seat is removable.
1.Store the center seat belt first. Insert a key
into the slot on the side of the anchor
buckle.
2.Retract the seat belt into the holder on the
ceiling.
2Seat Belt with Detachable Anchor P. 35
3.Pull up the adjustment strap, and fold down
the seat-back.
4.Pull the lock release strap under the seat
cushion, and lift the rear of the seat.
uTo lift the seat, hold the seat-back.
5.Pull the seat-back slightly, then pivot it
upward.
uThis unhooks the front of the seat from
the floor.
■
Removing the Second Row Center Seat
*
1Removing the Second Row Center Seat
Do not remove the seat while driving.
The multi-functional center seat can be used as the
beverage holder when folded down.
2Beverage Holders P. 174
To reinstall the seat, hook the front of the seat to the
floor first. Pushing the rear of the seat-back locks the
seat in place. Make sure the seat is latched before
driving.
Adjustment Strap
Lock Release
Strap* Not available on all models
Page 167 of 441
uuAdjusting the SeatsuRear Seats
166Controls
1.Store the center seat belt first. Insert a key
into the slot on the side of the anchor
buckle.
2.Retract the seat belt into the holder on the
ceiling.
2Seat Belt with Detachable Anchor P. 35
3.Lower the head restraints to their lowest
position.
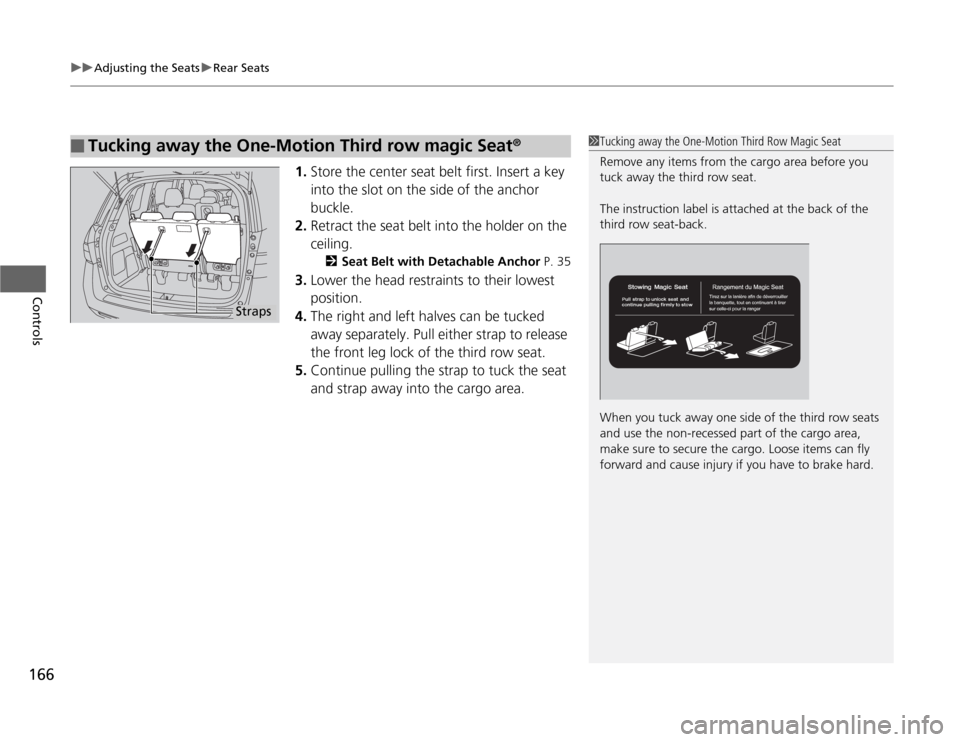
4.The right and left halves can be tucked
away separately. Pull either strap to release
the front leg lock of the third row seat.
5.Continue pulling the strap to tuck the seat
and strap away into the cargo area.
■
Tucking away the One-Motion Third row magic Seat
®
1Tucking away the One-Motion Third Row Magic Seat
Remove any items from the cargo area before you
tuck away the third row seat.
The instruction label is attached at the back of the
third row seat-back.
When you tuck away one side of the third row seats
and use the non-recessed part of the cargo area,
make sure to secure the cargo. Loose items can fly
forward and cause injury if you have to brake hard.
Straps
Page 170 of 441
169
Continued
Controls
Interior Lights/Interior Convenience ItemsInterior Lights
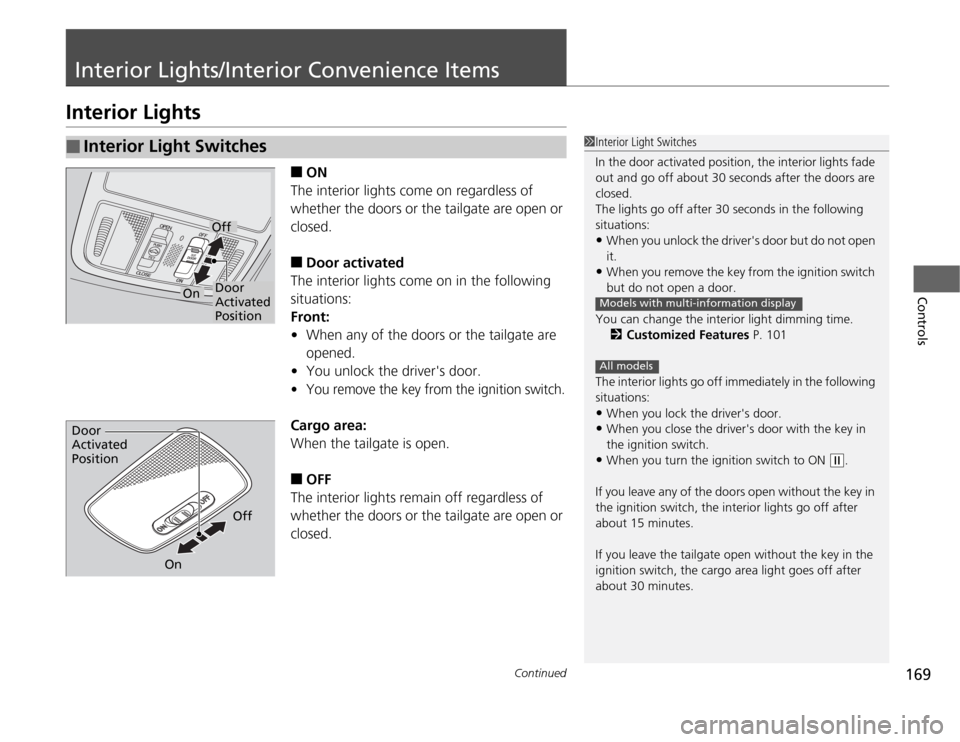
■
ON
The interior lights come on regardless of
whether the doors or the tailgate are open or
closed.
■
Door activated
The interior lights come on in the following
situations:
Front:
•When any of the doors or the tailgate are
opened.
•You unlock the driver's door.
•
You remove the key from the ignition switch.
Cargo area:
When the tailgate is open.■
OFF
The interior lights remain off regardless of
whether the doors or the tailgate are open or
closed.
■
Interior Light Switches
1Interior Light Switches
In the door activated position, the interior lights fade
out and go off about 30 seconds after the doors are
closed.
The lights go off after 30 seconds in the following
situations:•When you unlock the driver's door but do not open
it.•When you remove the key from the ignition switch
but do not open a door.
You can change the interior light dimming time.
2Customized Features P. 101
The interior lights go off immediately in the following
situations:•When you lock the driver's door.•When you close the driver's door with the key in
the ignition switch.•When you turn the ignition switch to ON
(w
.
If you leave any of the doors open without the key in
the ignition switch, the interior lights go off after
about 15 minutes.
If you leave the tailgate open without the key in the
ignition switch, the cargo area light goes off after
about 30 minutes.
Models with multi-information displayAll models
Door
Activated
PositionOff
On
Door
Activated
Position
Off
On
Page 172 of 441
171
uuInterior Lights/Interior Convenience ItemsuInterior Convenience Items
Continued
Controls
Interior Convenience Items
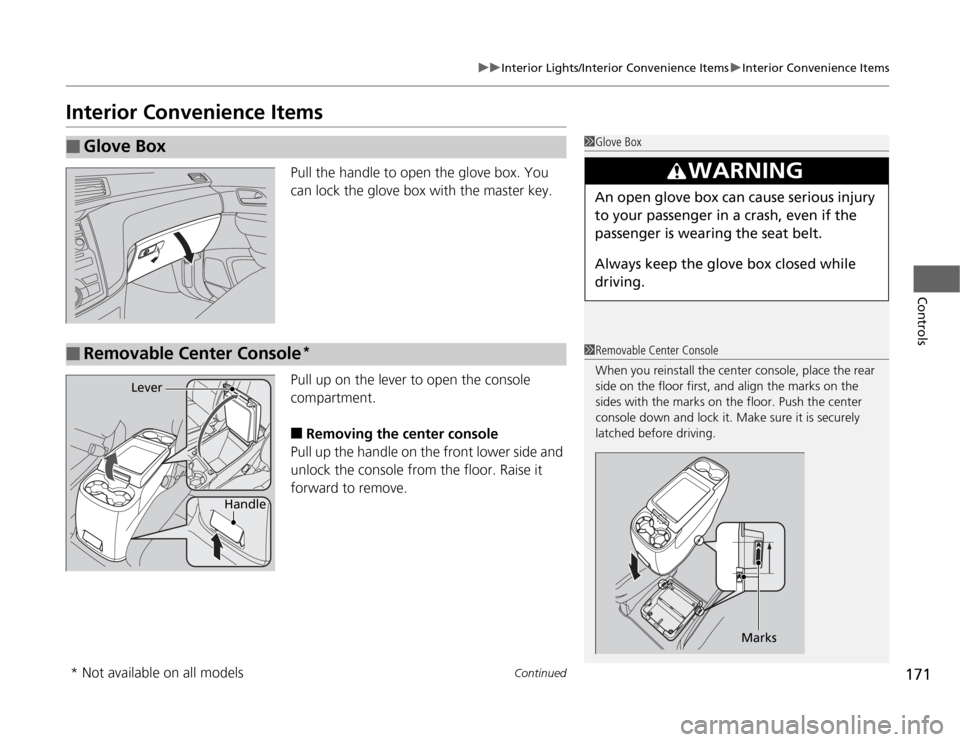
Pull the handle to open the glove box. You
can lock the glove box with the master key.
Pull up on the lever to open the console
compartment.■
Removing the center console
Pull up the handle on the front lower side and
unlock the console from the floor. Raise it
forward to remove.
■
Glove Box
1Glove Box
3
WARNING
An open glove box can cause serious injury
to your passenger in a crash, even if the
passenger is wearing the seat belt.
Always keep the glove box closed while
driving.
■
Removable Center Console
*
1Removable Center Console
When you reinstall the center console, place the rear
side on the floor first, and align the marks on the
sides with the marks on the floor. Push the center
console down and lock it. Make sure it is securely
latched before driving.
Marks
Handle
Lever
* Not available on all models
Page 287 of 441
286Driving
Before DrivingDriving PreparationCheck the following items before you start driving.
•Make sure there are no obstructions on the windows, door mirrors, exterior
lights, or other parts of the vehicle.
uRemove any frost, snow, or ice.
uRemove any snow on the roof, as this can slip down and obstruct your field of
vision while driving. If frozen solid, remove ice once it has softened.
uWhen removing ice from around the wheels, be sure not to damage the wheel
or wheel components.
•Make sure the hood is securely closed.
uIf the hood opens while driving, your front view will be blocked.
•Make sure the tires are in good condition.
uCheck air pressure, and check for damage and excessive wear.
2Checking and Maintaining Tires P. 370
•Make sure there are no people or objects behind or around the vehicle.
uThere are blind spots from the inside.■
Exterior Checks
1Exterior Checks
NOTICEWhen doors are frozen shut, use warm water around
the door edges to melt any ice. Do not try to force
them open, as this can damage the rubber trim
around the doors. When done, wipe dry to avoid
further freezing.
Do not pour warm water into the key cylinder.
You will be unable to insert key if the water freezes in
the hole.
Page 299 of 441
uuWhen DrivinguStarting the Engine
298Driving
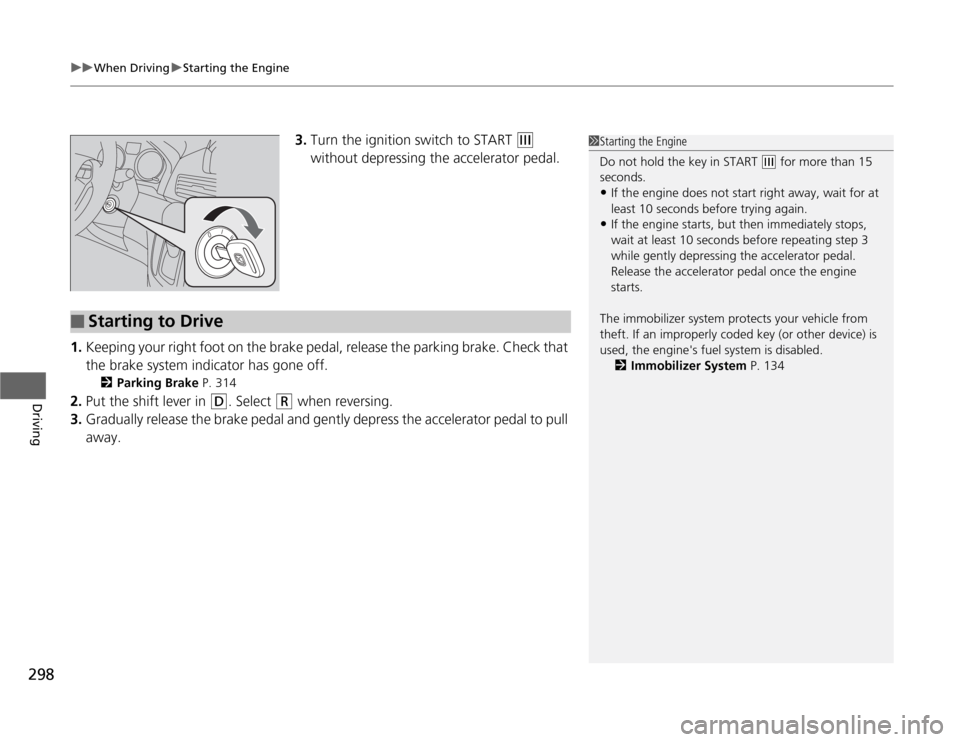
3.Turn the ignition switch to START
(e
without depressing the accelerator pedal.
1.Keeping your right foot on the brake pedal, release the parking brake. Check that
the brake system indicator has gone off.
2Parking Brake P. 314
2.Put the shift lever in
(D
. Select
(R
when reversing.
3.Gradually release the brake pedal and gently depress the accelerator pedal to pull
away.
1Starting the Engine
Do not hold the key in START
(e
for more than 15
seconds.
•If the engine does not start right away, wait for at
least 10 seconds before trying again.•If the engine starts, but then immediately stops,
wait at least 10 seconds before repeating step 3
while gently depressing the accelerator pedal.
Release the accelerator pedal once the engine
starts.
The immobilizer system protects your vehicle from
theft. If an improperly coded key (or other device) is
used, the engine's fuel system is disabled.
2Immobilizer System P. 134
■
Starting to Drive
Page 302 of 441
301
uuWhen DrivinguShifting
Continued
Driving
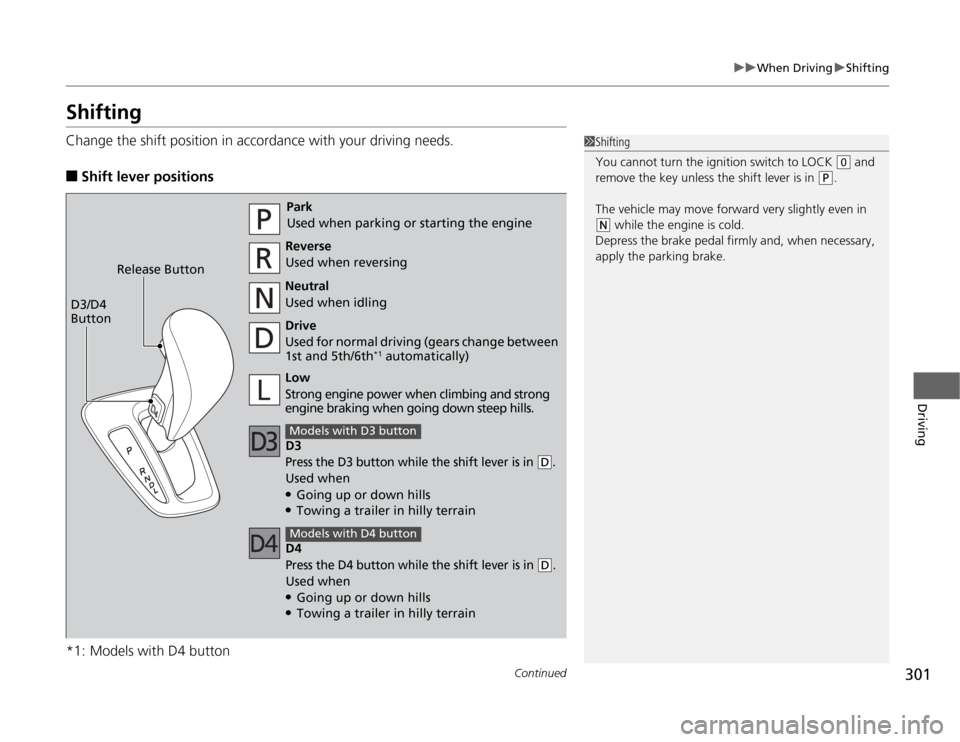
ShiftingChange the shift position in accordance with your driving needs.■
Shift lever positions
*1: Models with D4 button
1Shifting
You cannot turn the ignition switch to LOCK
(0
and
remove the key unless the shift lever is in
(P
.
The vehicle may move forward very slightly even in
(N
while the engine is cold.
Depress the brake pedal firmly and, when necessary,
apply the parking brake.
Park
Used when parking or starting the engine
Reverse
Used when reversing
Neutral
Used when idling
Drive
Used for normal driving (gears change between
1st and 5th/6th
*1 automatically)
D3
Press the D3 button while the shift lever is in
(D
.
Used when●Going up or down hills●Towing a trailer in hilly terrainModels with D3 buttonLow
Strong engine power when climbing and strong
engine braking when going down steep hills. Release Button
D3/D4
Button
D4Press the D4 button while the shift lever is in
(D
.
Used when●Going up or down hills●Towing a trailer in hilly terrainModels with D4 button
Page 381 of 441
380Maintenance
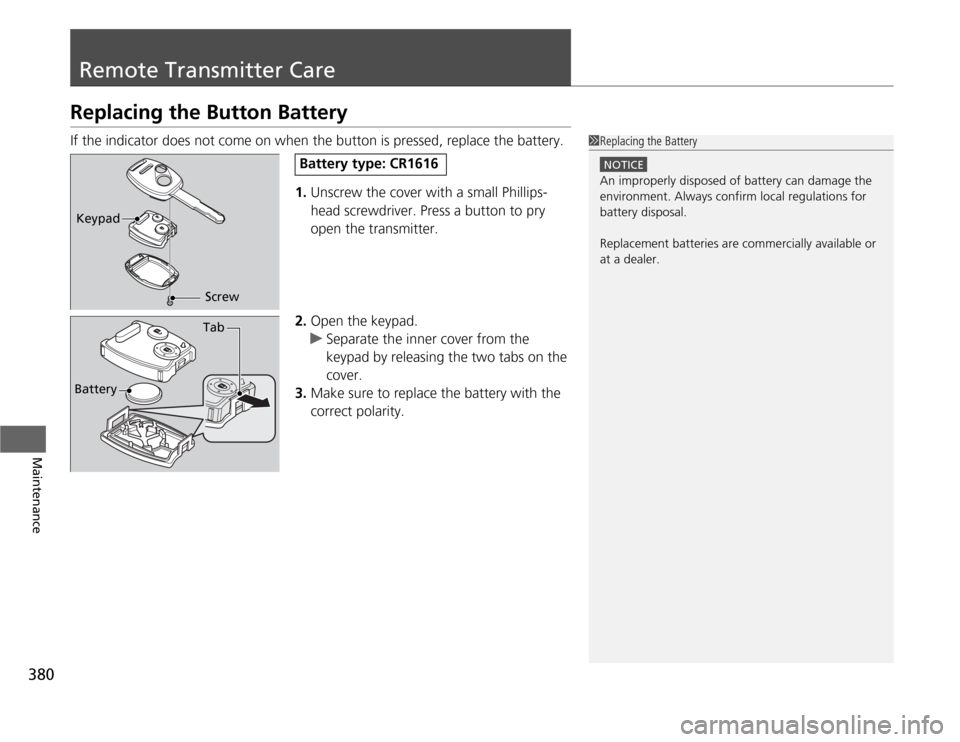
Remote Transmitter CareReplacing the Button BatteryIf the indicator does not come on when the button is pressed, replace the battery.
1.Unscrew the cover with a small Phillips-
head screwdriver. Press a button to pry
open the transmitter.
2.Open the keypad.
uSeparate the inner cover from the
keypad by releasing the two tabs on the
cover.
3.Make sure to replace the battery with the
correct polarity.
1Replacing the Battery
NOTICEAn improperly disposed of battery can damage the
environment. Always confirm local regulations for
battery disposal.
Replacement batteries are commercially available or
at a dealer.
Keypad
Screw
Battery type: CR1616
Battery
Tab