ABS HONDA ODYSSEY 2012 RB3-RB4 / 4.G User Guide
[x] Cancel search | Manufacturer: HONDA, Model Year: 2012, Model line: ODYSSEY, Model: HONDA ODYSSEY 2012 RB3-RB4 / 4.GPages: 441, PDF Size: 14.07 MB
Page 327 of 441
uuRefuelinguHow to Refuel
326Driving
Qualifying gasoline retailers will, in most cases, identify their gasoline as having met
"TOP TIER Detergent Gasoline" standards at the retail location. This fuel is
guaranteed to contain the proper level of detergent additives and be free of metallic
additives. The proper level of detergent additives, and absence of harmful metallic
additives in gasoline, help avoid build-up of deposits in your engine and emission
control system.
For further important fuel-related information for your vehicle, or on information on
gasoline that does not contain MMT, visit www.hondacars.com. In Canada, visit
www.honda.ca for additional information on gasoline. For more information on top
tier gasoline, visit www.toptiergas.com.■
Fuel tank capacity: 21 US gal (79.5 liters)
How to Refuel
1.Stop your vehicle with the service station
pump on the left side of the vehicle in the
rear.
2.Turn off the engine.
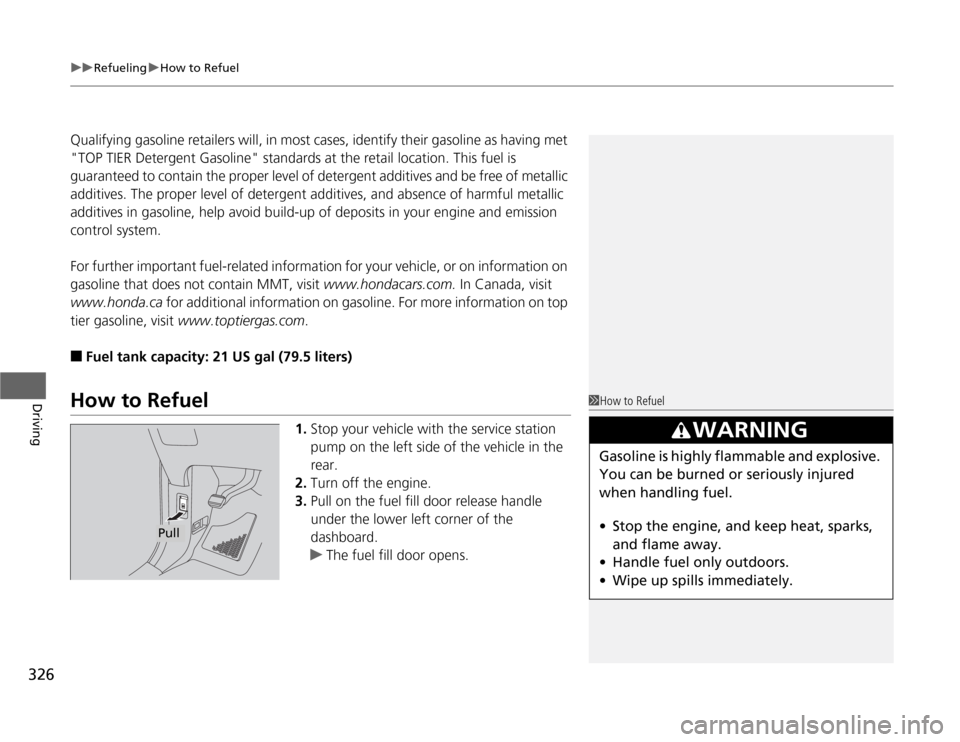
3.Pull on the fuel fill door release handle
under the lower left corner of the
dashboard.
uThe fuel fill door opens.
1How to Refuel
3
WARNING
Gasoline is highly flammable and explosive.
You can be burned or seriously injured
when handling fuel.
•Stop the engine, and keep heat, sparks,
and flame away.
•Handle fuel only outdoors.
•Wipe up spills immediately.
Pull
Page 338 of 441
337
uuMaintenance Minder™uTo Use Maintenance Minder
TM
Continued
Maintenance
■
Maintenance Service Items
1Maintenance Service Items•Independent of the Maintenance Minder
information, replace the brake fluid every 3 years.•Inspect idle speed every 160,000 miles (256,000
km).•Adjust the valves during services A, B, 1, 2, or 3 if
they are noisy.
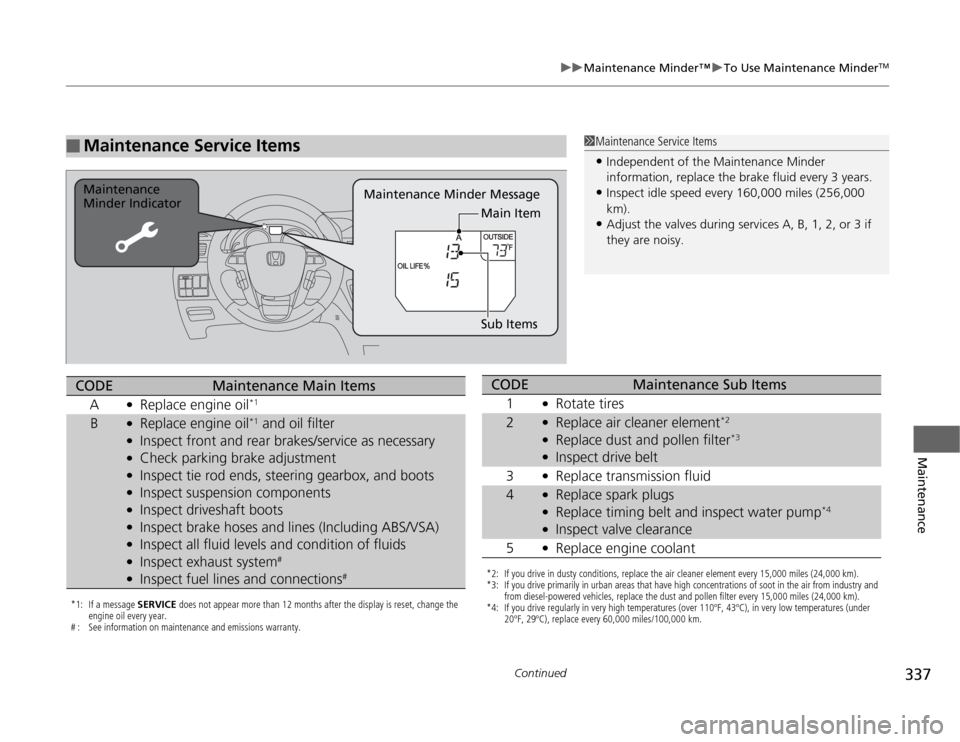
Maintenance Minder Message Maintenance
Minder Indicator
Sub Items Main Item
*1: If a message SERVICE does not appear more than 12 months after the display is reset, change the
engine oil every year.
# : See information on maintenance and emissions warranty.CODE
Maintenance Main Items
A
●
Replace engine oil
*1
B
●
Replace engine oil
*1 and oil filter
●
Inspect front and rear brakes/service as necessary
●
Check parking brake adjustment
●
Inspect tie rod ends, steering gearbox, and boots
●
Inspect suspension components
●
Inspect driveshaft boots
●
Inspect brake hoses and lines (Including ABS/VSA)
●
Inspect all fluid levels and condition of fluids
●
Inspect exhaust system
#
●
Inspect fuel lines and connections
#
*2: If you drive in dusty conditions, replace the air cleaner element every 15,000 miles (24,000 km).
*3: If you drive primarily in urban areas that have high concentrations of soot in the air from industry and
from diesel-powered vehicles, replace the dust and pollen filter every 15,000 miles (24,000 km).
*4: If you drive regularly in very high temperatures (over 110ºF, 43ºC), in very low temperatures (under
20ºF, 29ºC), replace every 60,000 miles/100,000 km.CODE
Maintenance Sub Items
1
●
Rotate tires
2
●
Replace air cleaner element
*2
●
Replace dust and pollen filter
*3
●
Inspect drive belt
3
●
Replace transmission fluid
4
●
Replace spark plugs
●
Replace timing belt and inspect water pump
*4
●
Inspect valve clearance
5
●
Replace engine coolant
Page 342 of 441
341
uuMaintenance Minder™uTo Use Maintenance Minder
TM
Continued
Maintenance
■
Maintenance Service Items
1Maintenance Service Items•Independent of the Maintenance Minder
information, replace the brake fluid every 3 years.•Inspect idle speed every 160,000 miles (256,000
km).•Adjust the valves during services A, B, 1, 2, or 3
only if they are noisy.
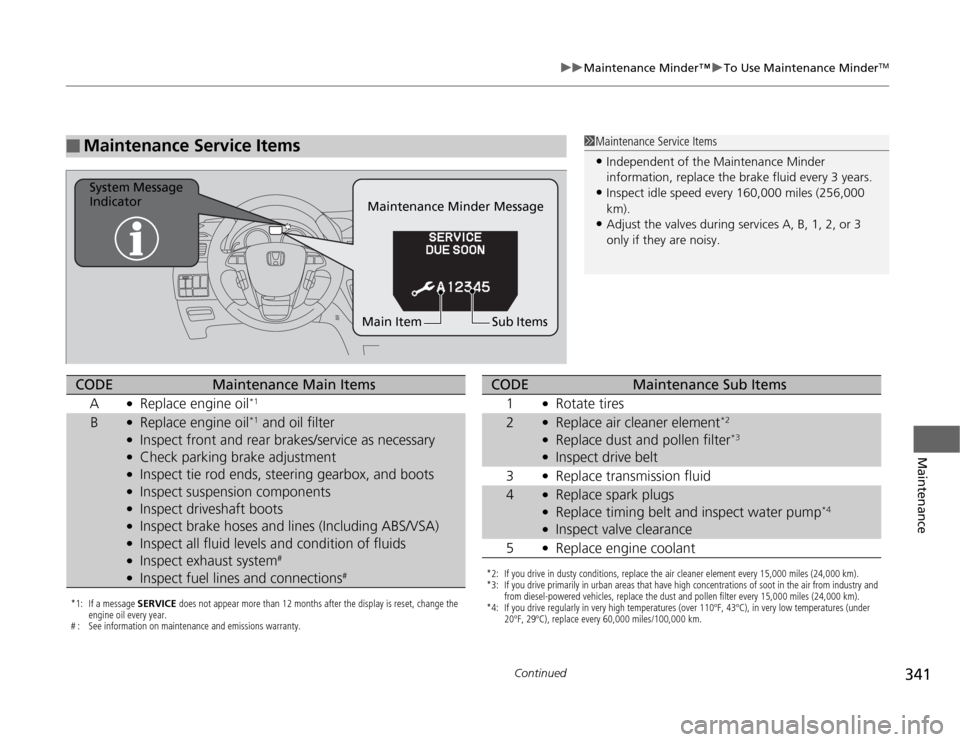
Maintenance Minder Message System Message
Indicator
Sub Items Main Item
*1: If a message SERVICE does not appear more than 12 months after the display is reset, change the
engine oil every year.
# : See information on maintenance and emissions warranty.CODE
Maintenance Main Items
A
●
Replace engine oil
*1
B
●
Replace engine oil
*1 and oil filter
●
Inspect front and rear brakes/service as necessary
●
Check parking brake adjustment
●
Inspect tie rod ends, steering gearbox, and boots
●
Inspect suspension components
●
Inspect driveshaft boots
●
Inspect brake hoses and lines (Including ABS/VSA)
●
Inspect all fluid levels and condition of fluids
●
Inspect exhaust system
#
●
Inspect fuel lines and connections
#
*2: If you drive in dusty conditions, replace the air cleaner element every 15,000 miles (24,000 km).
*3: If you drive primarily in urban areas that have high concentrations of soot in the air from industry and
from diesel-powered vehicles, replace the dust and pollen filter every 15,000 miles (24,000 km).
*4: If you drive regularly in very high temperatures (over 110ºF, 43ºC), in very low temperatures (under
20ºF, 29ºC), replace every 60,000 miles/100,000 km.CODE
Maintenance Sub Items
1
●
Rotate tires
2
●
Replace air cleaner element
*2
●
Replace dust and pollen filter
*3
●
Inspect drive belt
3
●
Replace transmission fluid
4
●
Replace spark plugs
●
Replace timing belt and inspect water pump
*4
●
Inspect valve clearance
5
●
Replace engine coolant
Page 365 of 441
364
uuReplacing Light BulbsuRear License Plate Light Bulbs
Maintenance
Rear License Plate Light BulbsWhen replacing, use the following bulbs.
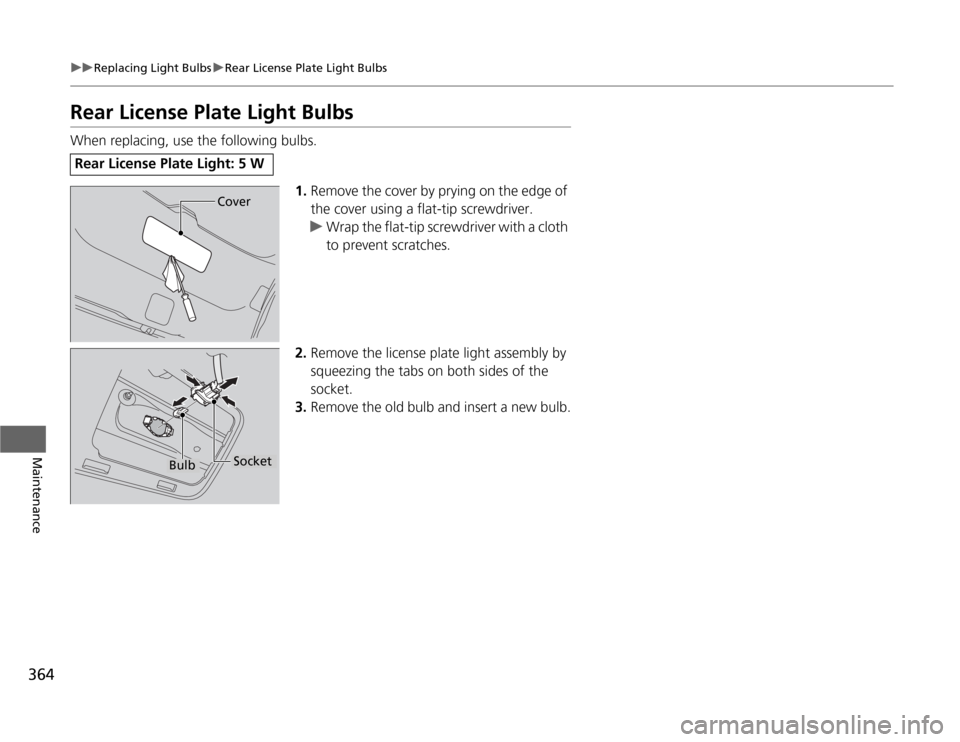
1.Remove the cover by prying on the edge of
the cover using a flat-tip screwdriver.
uWrap the flat-tip screwdriver with a cloth
to prevent scratches.
2.Remove the license plate light assembly by
squeezing the tabs on both sides of the
socket.
3.Remove the old bulb and insert a new bulb.Rear License Plate Light: 5 W
Cover
Bulb
Socket
Page 377 of 441
376
uuChecking and Maintaining TiresuTire and Wheel Replacement
Maintenance
Tire and Wheel ReplacementReplace your tires with radials of the same size, load range, speed rating, and
maximum cold tire pressure rating (as shown on the tire’s sidewall). Using tires of a
different size or construction can cause the ABS and VSA
® (vehicle stability assist)
system to work incorrectly.
It is best to replace all four tires at the same time. If that isn’t possible, replace the
front or rear tires in pairs.
If you replace a wheel, only use TPMS specified wheels approved for your vehicle.
Make sure that the wheel’s specifications match those of the original wheels.
1Tire and Wheel Replacement
3
WARNING
Installing improper tires on your vehicle can
affect handling and stability. This can cause
a crash in which you can be seriously hurt or
killed.
Always use the size and type of tires
recommended in this owner’s manual.
Page 381 of 441
380Maintenance
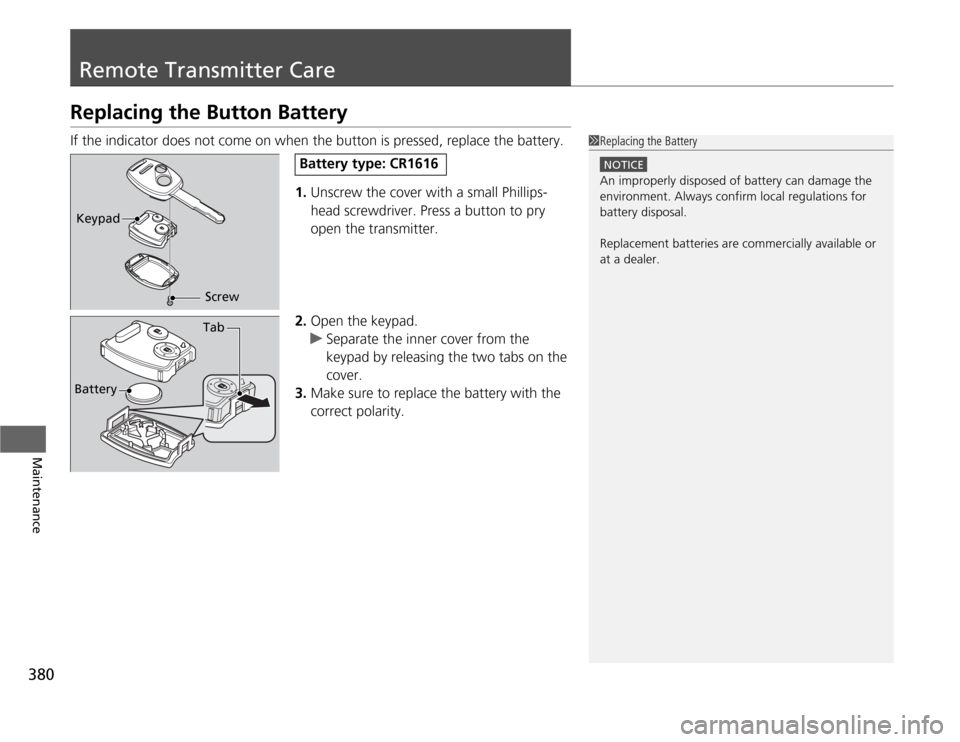
Remote Transmitter CareReplacing the Button BatteryIf the indicator does not come on when the button is pressed, replace the battery.
1.Unscrew the cover with a small Phillips-
head screwdriver. Press a button to pry
open the transmitter.
2.Open the keypad.
uSeparate the inner cover from the
keypad by releasing the two tabs on the
cover.
3.Make sure to replace the battery with the
correct polarity.
1Replacing the Battery
NOTICEAn improperly disposed of battery can damage the
environment. Always confirm local regulations for
battery disposal.
Replacement batteries are commercially available or
at a dealer.
Keypad
Screw
Battery type: CR1616
Battery
Tab
Page 382 of 441
381
uuRemote Transmitter CareuReplacing the Button Battery
Maintenance
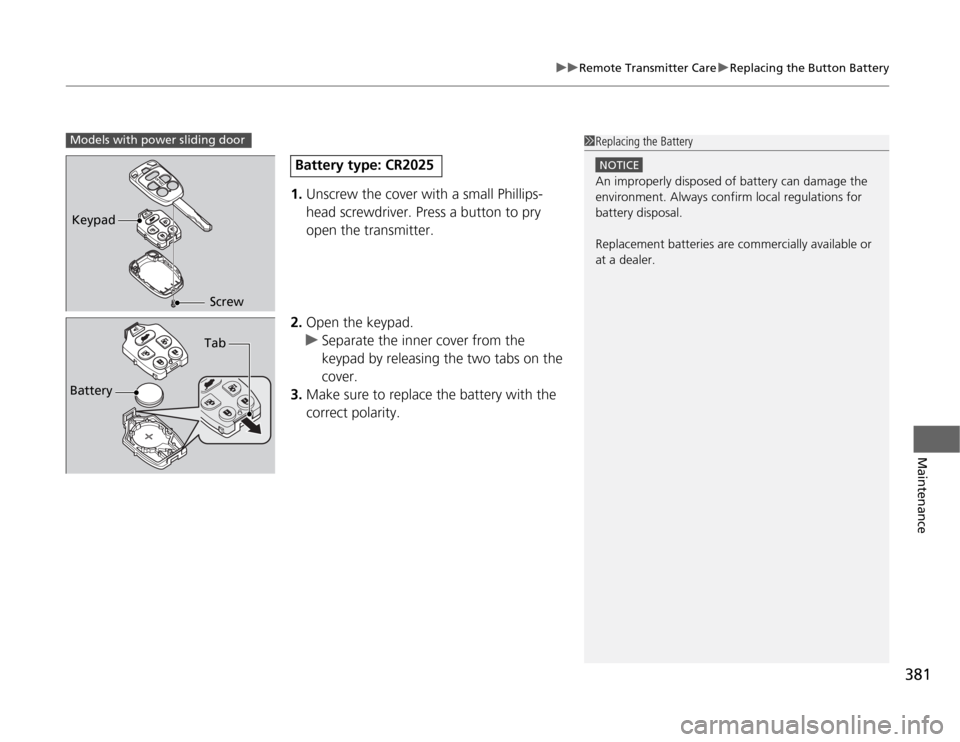
1.Unscrew the cover with a small Phillips-
head screwdriver. Press a button to pry
open the transmitter.
2.Open the keypad.
uSeparate the inner cover from the
keypad by releasing the two tabs on the
cover.
3.Make sure to replace the battery with the
correct polarity.
1Replacing the Battery
NOTICEAn improperly disposed of battery can damage the
environment. Always confirm local regulations for
battery disposal.
Replacement batteries are commercially available or
at a dealer.
Models with power sliding doorKeypad
Screw
Battery type: CR2025
BatteryTab
Page 409 of 441
408
uuIndicator, Coming On/BlinkinguIf the Brake System Indicator Comes On
Handling the Unexpected
If the Brake System Indicator Comes On
■
Reasons for the indicator to come on
•The brake fluid is low.
•There is a malfunction in the brake system.
■
What to do when the indicator comes on while driving
Press the brake pedal lightly to check pedal pressure.
•If normal, check the brake fluid level the next time you stop.
•If abnormal, take immediate action. If necessary, downshift the
transmission to slow the vehicle using engine braking.
1If the Brake System Indicator Comes On
Have your vehicle repaired immediately.
It is dangerous to drive with low brake fluid. If there
is no resistance from the brake pedal, stop
immediately in a safe place. If necessary downshift
the gears.
If the brake system indicator and ABS indicator come
on simultaneously, the electronic brake distribution
system is not working. This can result in vehicle
instability under sudden braking.
Have your vehicle inspected by a dealer immediately.
U.S.
Canada
Page 412 of 441
411
Continued
Handling the Unexpected
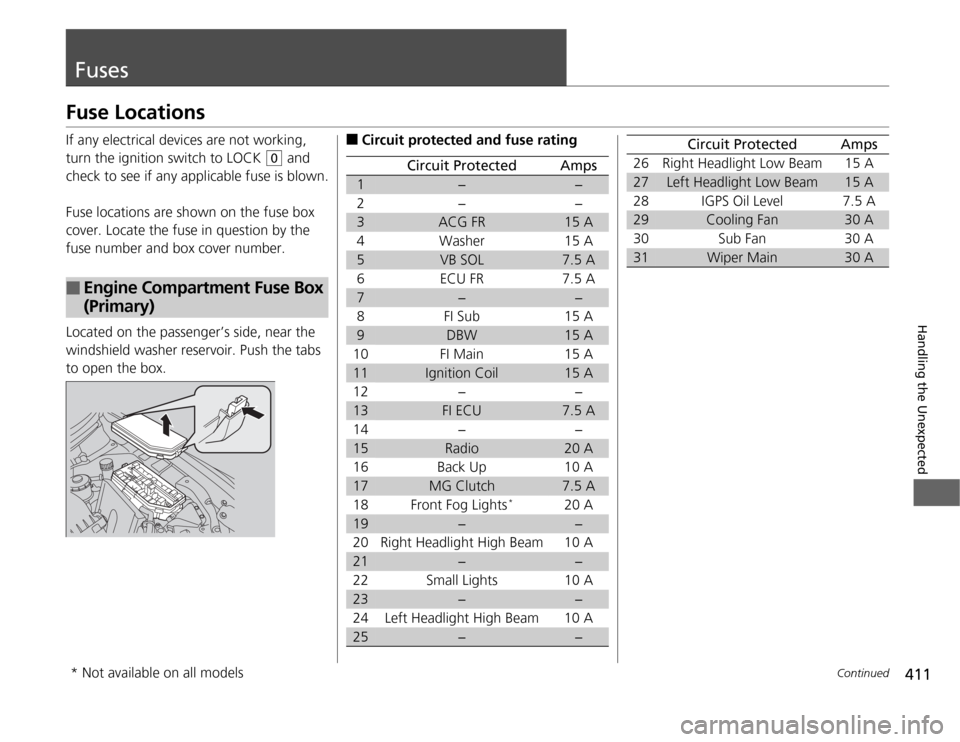
FusesFuse LocationsIf any electrical devices are not working,
turn the ignition switch to LOCK
(0
and
check to see if any applicable fuse is blown.
Fuse locations are shown on the fuse box
cover. Locate the fuse in question by the
fuse number and box cover number.
Located on the passenger’s side, near the
windshield washer reservoir. Push the tabs
to open the box.
■
Engine Compartment Fuse Box
(Primary)
■
Circuit protected and fuse rating
Circuit Protected
Amps
1
−
−
2− −
3
ACG FR
15 A
4Washer 15 A
5
VB SOL
7.5 A
6 ECU FR 7.5 A
7
−
−
8FI Sub 15A
9
DBW
15 A
10 FI Main 15 A11
Ignition Coil
15 A
12 − −13
FI ECU
7.5 A
14 − −15
Radio
20 A
16 Back Up 10 A17
MG Clutch
7.5 A
18 Front Fog Lights
*
20 A
19
−
−
20 Right Headlight High Beam 10 A
21
−
−
22 Small Lights 10 A
23
−
−
24 Left Headlight High Beam 10 A
25
−
−
26 Right Headlight Low Beam 15 A27
Left Headlight Low Beam
15 A
28 IGPS Oil Level 7.5 A
29
Cooling Fan
30 A
30 Sub Fan 30 A
31
Wiper Main
30 A
Circuit Protected
Amps
* Not available on all models
Page 413 of 441
412
uuFusesuFuse Locations
Handling the Unexpected
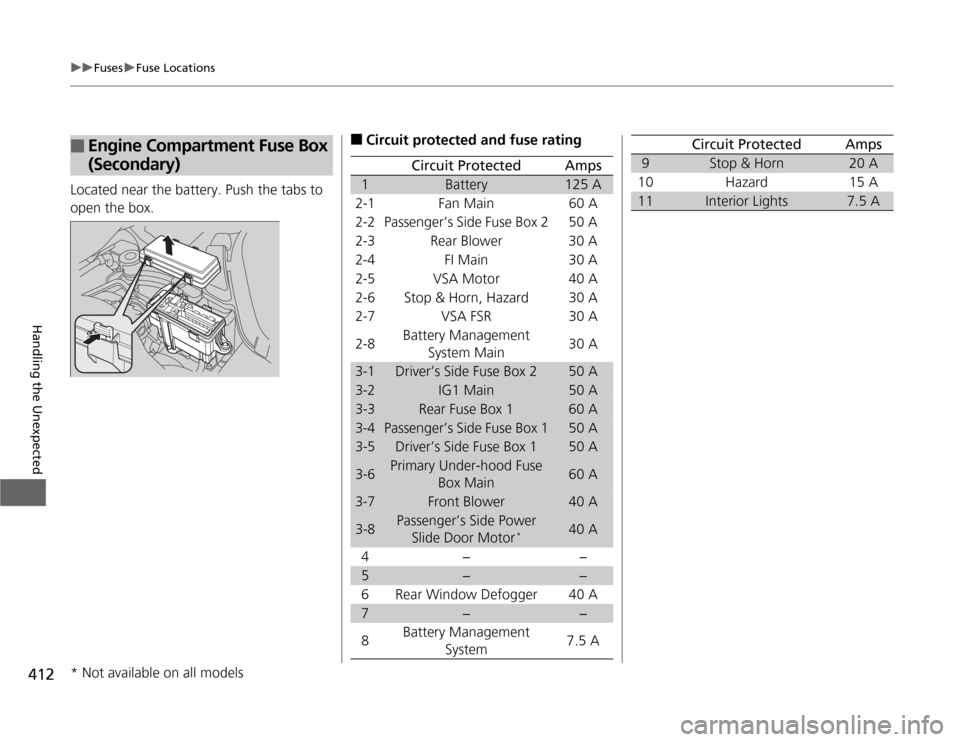
Located near the battery. Push the tabs to
open the box.■
Engine Compartment Fuse Box
(Secondary)
■
Circuit protected and fuse rating
Circuit Protected
Amps
1
Battery
125 A
2-1
Fan Main 60 A
2-2
Passenger’s Side Fuse Box 2 50 A
2-3
Rear Blower 30 A
2-4
FI Main 30 A
2-5
VSA Motor 40 A
2-6
Stop & Horn, Hazard 30 A
2-7
VSA FSR 30 A
2-8
Battery Management
System Main30 A
3-1
Driver’s Side Fuse Box 2
50 A
3-2
IG1 Main
50 A
3-3
Rear Fuse Box 1
60 A
3-4
Passenger’s Side Fuse Box 1
50 A
3-5
Driver’s Side Fuse Box 1
50 A
3-6
Primary Under-hood Fuse
Box Main
60 A
3-7
Front Blower
40 A
3-8
Passenger’s Side Power
Slide Door Motor
*
40 A
4
−−
5
−
−
6 Rear Window Defogger 40 A
7
−
−
8Battery Management
System7.5 A
9
Stop & Horn
20 A
10 Hazard 15 A
11
Interior Lights
7.5 A
Circuit Protected
Amps
* Not available on all models