Sensor HONDA ODYSSEY 2012 RB3-RB4 / 4.G Owner's Manual
[x] Cancel search | Manufacturer: HONDA, Model Year: 2012, Model line: ODYSSEY, Model: HONDA ODYSSEY 2012 RB3-RB4 / 4.GPages: 441, PDF Size: 14.07 MB
Page 108 of 441
107
Controls
This chapter explains how to operate the various controls necessary for driving.
Setting the Clock.............................. 108
Locking and Unlocking the Doors
Key Types and Functions .................. 110
Locking/Unlocking the Doors from the
Outside .......................................... 112
Locking/Unlocking the Doors from the
Inside ............................................. 114
Childproof Door Locks ..................... 115
Auto Door Locking/Unlocking .......... 116
Opening and Closing the Tailgate... 120Opening and Closing the Sliding Doors
...... 126
Security System................................ 134
Immobilizer System .......................... 134
Security System Alarm
*.................... 134
Opening and Closing the Windows.... 137Opening and Closing the Moonroof
*...... 140
Operating the Switches Around the
Steering Wheel
Ignition Switch ................................. 141
Turn Signals ..................................... 142
Light Switches.................................. 142
Fog Lights
*...................................... 144
Daytime Running Lights ................... 144
Wipers and Washers ........................ 145
Brightness Control ........................... 147
Rear Defogger/Heated Door Mirror
*
Button ........................................... 148
Driving Position Memory System
*.... 149
Adjusting the Steering Wheel........... 151Adjusting the Mirrors....................... 152
Interior Rearview Mirror ................... 152
Power Door Mirrors ......................... 153
Adjusting the Seats.......................... 154
Adjusting the Seat Positions ............. 154
Interior Lights/Interior Convenience
Items................................................ 169
Interior Lights .................................. 169
Interior Convenience Items .............. 171
Heating and Cooling
*....................... 183
Using Vents, Heating and A/C.......... 183
Climate Control System*.................. 187
Using Automatic Climate Control .... 187
Automatic Climate Control Sensors . 192
* Not available on all models
Page 124 of 441
Continued
123
uuOpening and Closing the TailgateuOpening/Closing the Power Tailgate
*
Controls
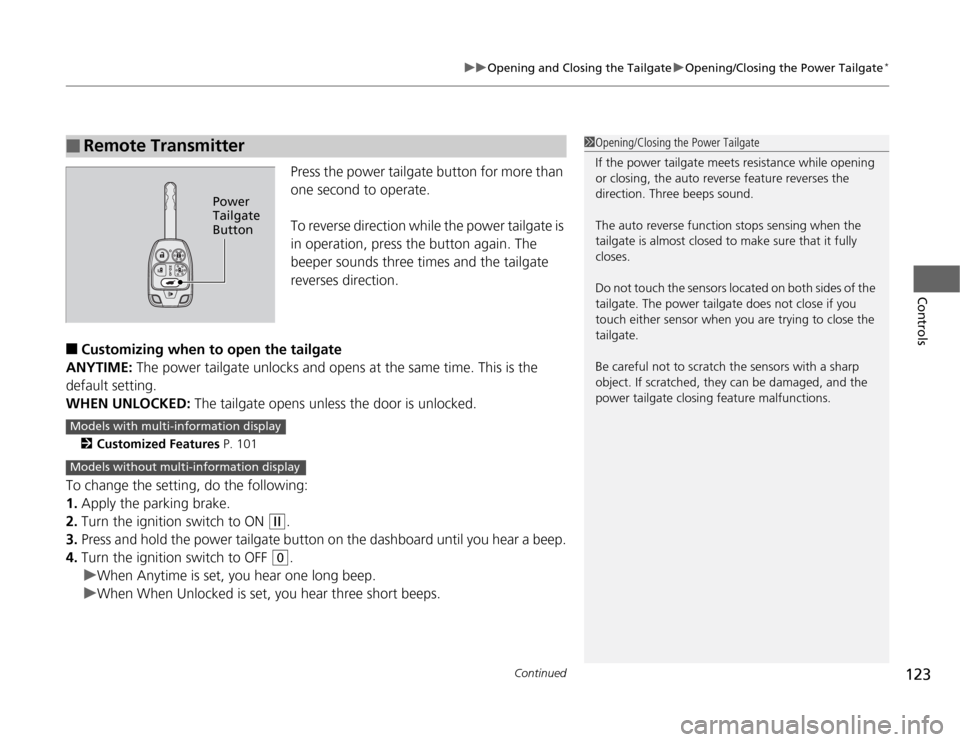
Press the power tailgate button for more than
one second to operate.
To reverse direction while the power tailgate is
in operation, press the button again. The
beeper sounds three times and the tailgate
reverses direction.
■
Customizing when to open the tailgate
ANYTIME: The power tailgate unlocks and opens at the same time. This is the
default setting.
WHEN UNLOCKED: The tailgate opens unless the door is unlocked.2Customized Features P. 101
To change the setting, do the following:
1.Apply the parking brake.
2.Turn the ignition switch to ON
(w
.
3.Press and hold the power tailgate button on the dashboard until you hear a beep.
4.Turn the ignition switch to OFF
(0
.
uWhen Anytime is set, you hear one long beep.
uWhen When Unlocked is set, you hear three short beeps.
■
Remote Transmitter
1Opening/Closing the Power Tailgate
If the power tailgate meets resistance while opening
or closing, the auto reverse feature reverses the
direction. Three beeps sound.
The auto reverse function stops sensing when the
tailgate is almost closed to make sure that it fully
closes.
Do not touch the sensors located on both sides of the
tailgate. The power tailgate does not close if you
touch either sensor when you are trying to close the
tailgate.
Be careful not to scratch the sensors with a sharp
object. If scratched, they can be damaged, and the
power tailgate closing feature malfunctions.
Power
Tailgate
Button
Models with multi-information displayModels without multi-information display
Page 131 of 441
uuOpening and Closing the Sliding DoorsuOpening/Closing the Power Sliding Doors
*
130Controls
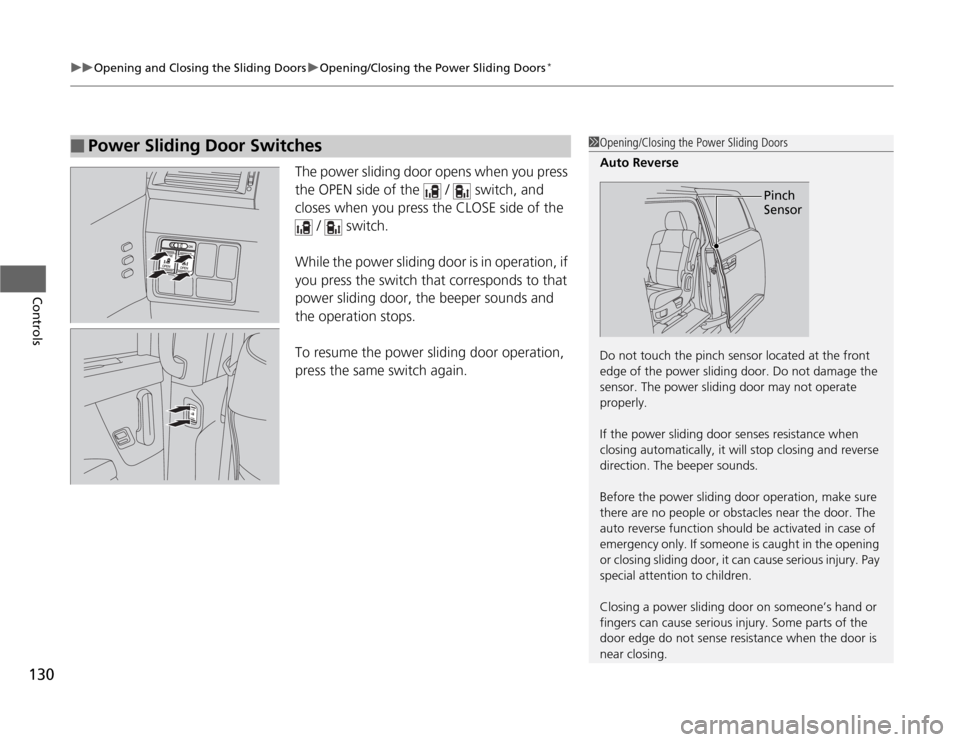
The power sliding door opens when you press
the OPEN side of the / switch, and
closes when you press the CLOSE side of the
/ switch.
While the power sliding door is in operation, if
you press the switch that corresponds to that
power sliding door, the beeper sounds and
the operation stops.
To resume the power sliding door operation,
press the same switch again.
■
Power Sliding Door Switches
1Opening/Closing the Power Sliding Doors
Auto Reverse
Do not touch the pinch sensor located at the front
edge of the power sliding door. Do not damage the
sensor. The power sliding door may not operate
properly.
If the power sliding door senses resistance when
closing automatically, it will stop closing and reverse
direction. The beeper sounds.
Before the power sliding door operation, make sure
there are no people or obstacles near the door. The
auto reverse function should be activated in case of
emergency only. If someone is caught in the opening
or closing sliding door, it can cause serious injury. Pay
special attention to children.
Closing a power sliding door on someone’s hand or
fingers can cause serious injury. Some parts of the
door edge do not sense resistance when the door is
near closing.
Pinch
Sensor
Page 144 of 441
143
uuOperating the Switches Around the Steering WheeluLight Switches
Controls
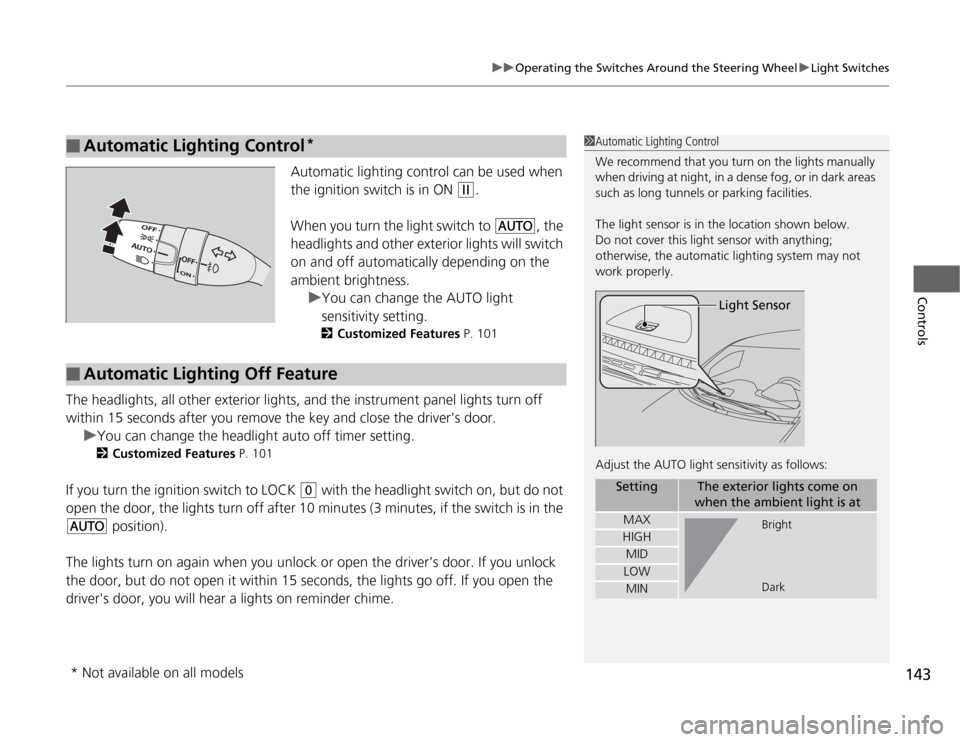
Automatic lighting control can be used when
the ignition switch is in ON
(w
.
When you turn the light switch to
#Y
, the
headlights and other exterior lights will switch
on and off automatically depending on the
ambient brightness.
uYou can change the AUTO light
sensitivity setting.
2Customized Features P. 101
The headlights, all other exterior lights, and the instrument panel lights turn off
within 15 seconds after you remove the key and close the driver's door.
uYou can change the headlight auto off timer setting.
2Customized Features P. 101
If you turn the ignition switch to LOCK
(0
with the headlight switch on, but do not
open the door, the lights turn off after 10 minutes (3 minutes, if the switch is in the
#Y
position).
The lights turn on again when you unlock or open the driver's door. If you unlock
the door, but do not open it within 15 seconds, the lights go off. If you open the
driver's door, you will hear a lights on reminder chime.
■
Automatic Lighting Control
*
1Automatic Lighting Control
We recommend that you turn on the lights manually
when driving at night, in a dense fog, or in dark areas
such as long tunnels or parking facilities.
The light sensor is in the location shown below.
Do not cover this light sensor with anything;
otherwise, the automatic lighting system may not
work properly.
Adjust the AUTO light sensitivity as follows:
Setting
The exterior lights come on
when the ambient light is at
MAXHIGHMIDLOWMIN
Light Sensor
Bright
Dark
■
Automatic Lighting Off Feature
* Not available on all models
Page 153 of 441
152Controls
Adjusting the MirrorsInterior Rearview MirrorAdjust the angle of the rearview mirror when you are sitting in the correct driving
position.
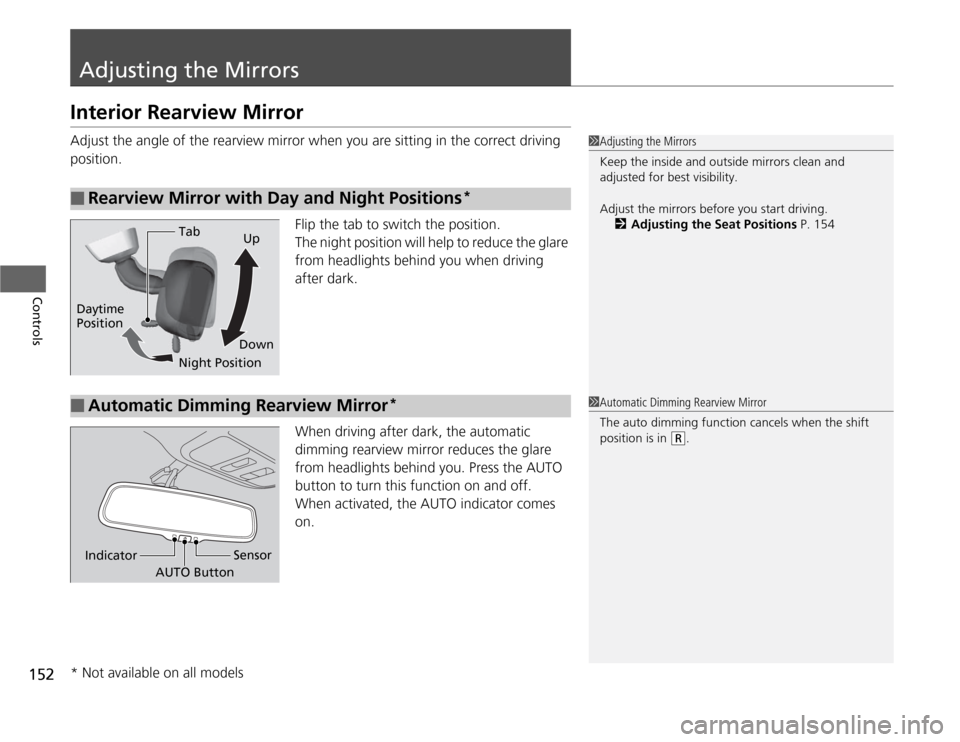
Flip the tab to switch the position.
The night position will help to reduce the glare
from headlights behind you when driving
after dark.
When driving after dark, the automatic
dimming rearview mirror reduces the glare
from headlights behind you. Press the AUTO
button to turn this function on and off.
When activated, the AUTO indicator comes
on.■
Rearview Mirror with Day and Night Positions
*
1Adjusting the Mirrors
Keep the inside and outside mirrors clean and
adjusted for best visibility.
Adjust the mirrors before you start driving.
2Adjusting the Seat Positions P. 154
Tab
Daytime
Position
Night PositionUp
Down■
Automatic Dimming Rearview Mirror
*
1Automatic Dimming Rearview Mirror
The auto dimming function cancels when the shift
position is in
(R
.
Sensor
AUTO Button Indicator
* Not available on all models
Page 178 of 441
Continued
177
uuInterior Lights/Interior Convenience ItemsuInterior Convenience Items
Controls
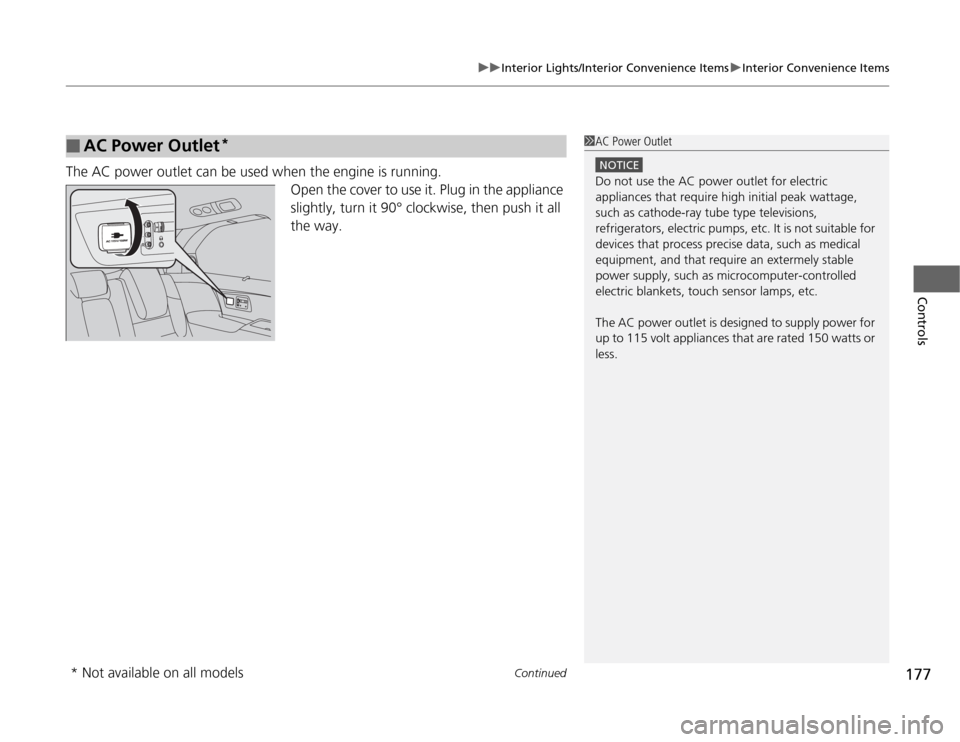
The AC power outlet can be used when the engine is running.
Open the cover to use it. Plug in the appliance
slightly, turn it 90° clockwise, then push it all
the way.■
AC Power Outlet
*
1AC Power Outlet
NOTICEDo not use the AC power outlet for electric
appliances that require high initial peak wattage,
such as cathode-ray tube type televisions,
refrigerators, electric pumps, etc. It is not suitable for
devices that process precise data, such as medical
equipment, and that require an extermely stable
power supply, such as microcomputer-controlled
electric blankets, touch sensor lamps, etc.
The AC power outlet is designed to supply power for
up to 115 volt appliances that are rated 150 watts or
less.
* Not available on all models
Page 193 of 441
192
uuClimate Control System
*uAutomatic Climate Control Sensors
Controls
Automatic Climate Control Sensors
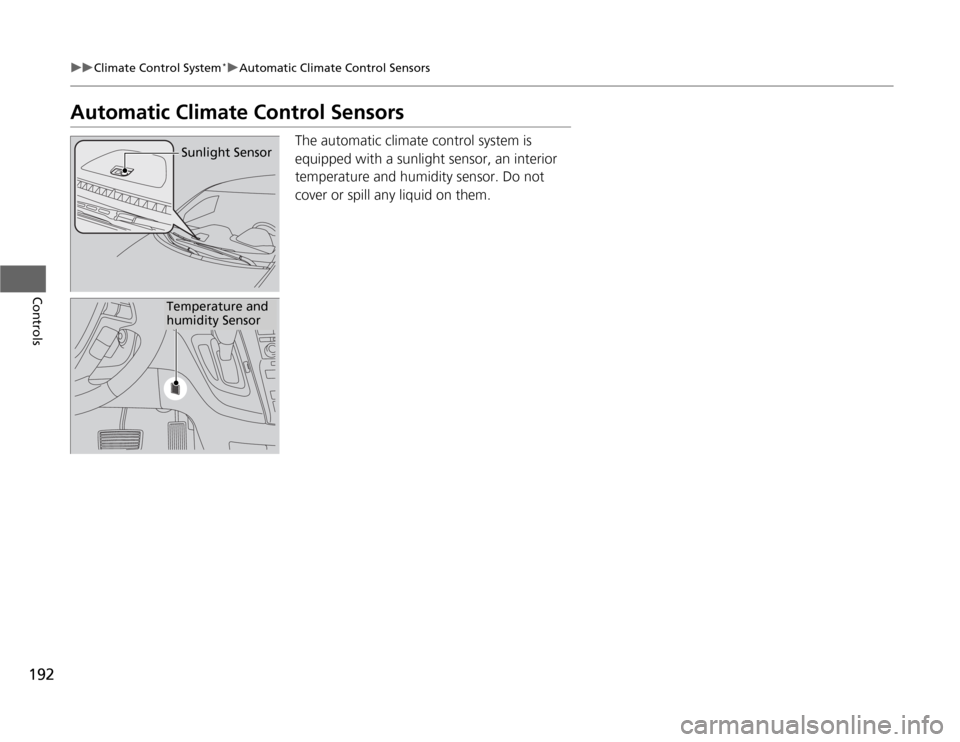
The automatic climate control system is
equipped with a sunlight sensor, an interior
temperature and humidity sensor. Do not
cover or spill any liquid on them.
Sunlight Sensor
Temperature and
humidity Sensor
Page 286 of 441
285
Driving
This chapter discusses driving, refueling, and information on items such as accessories.
Before Driving
Driving Preparation .......................... 286
Maximum Load Limit........................ 289
Towing a Trailer
Towing Preparation .......................... 291
Driving Safely with a Trailer .............. 295
Towing Your Vehicle ........................ 296
When Driving
Starting the Engine .......................... 297
Precautions While Driving................. 299
Automatic Transmission ................... 300
Shifting ............................................ 301Cruise Control ................................. 303
VSA
® (Vehicle Stability Assist), aka ESC
(Electronic Stability Control), System ...... 306
TPMS (Tire Pressure Monitoring System) ... 308
Tire Pressure Monitoring System (TPMS) -
Required Federal Explanation ......... 309BSI (Blind Spot Information) System
*.... 312
Braking
Brake System ................................... 314
ABS (Anti-lock Brake System) ........... 316
Brake Assist System.......................... 317
Parking Your Vehicle
When Stopped................................. 318Parking ............................................ 318
Parking Sensor System
*................... 319
Rearview Camera
*............................ 323
Rearview Display Image ................... 324
Refueling
Fuel Information .............................. 325
How to Refuel ................................. 326
Fuel Economy.................................... 328
Improving Fuel Economy .................. 328
Accessories and Modifications
Accessories ...................................... 329
Modifications................................... 329
* Not available on all models
Page 289 of 441

288
uuBefore DrivinguDriving Preparation
Driving
•Be sure items placed on the floor behind the front seats cannot roll under the
seats.
uThey can interfere with the driver's ability to operate the pedals, the operation
of the seats, or the operation of the sensors under the seats.
•Everyone in the vehicle must fasten their seat belt.
2Fastening a Seat Belt P. 33
•Make sure that the indicators in the instrument panel come on when you start the
vehicle, and go off soon after.
uAlways have a dealer check the vehicle if a problem is indicated.
2Indicators P. 72
Page 313 of 441
312
uuWhen DrivinguBSI (Blind Spot Information) System
*
Driving
BSI (Blind Spot Information) System
*
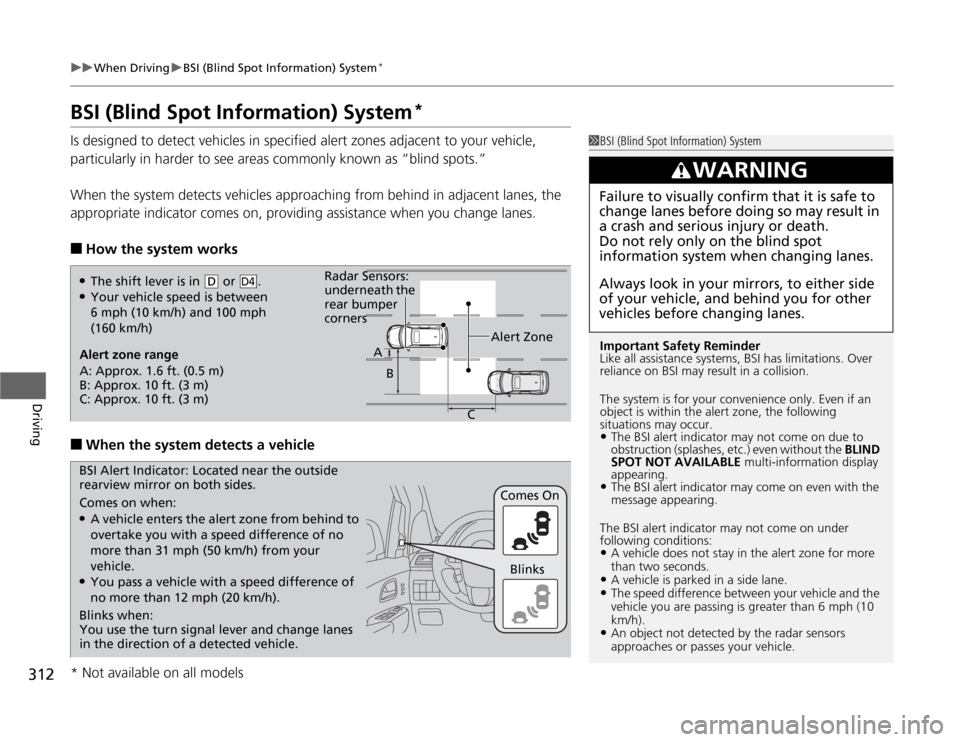
Is designed to detect vehicles in specified alert zones adjacent to your vehicle,
particularly in harder to see areas commonly known as “blind spots.”
When the system detects vehicles approaching from behind in adjacent lanes, the
appropriate indicator comes on, providing assistance when you change lanes.■
How the system works
■
When the system detects a vehicle
1BSI (Blind Spot Information) System
Important Safety Reminder
Like all assistance systems, BSI has limitations. Over
reliance on BSI may result in a collision.
The system is for your convenience only. Even if an
object is within the alert zone, the following
situations may occur.•The BSI alert indicator may not come on due to
obstruction (splashes, etc.) even without the BLIND
SPOT NOT AVAILABLE multi-information display
appearing.•The BSI alert indicator may come on even with the
message appearing.
The BSI alert indicator may not come on under
following conditions:•A vehicle does not stay in the alert zone for more
than two seconds.•A vehicle is parked in a side lane.•The speed difference between your vehicle and the
vehicle you are passing is greater than 6 mph (10
km/h).•An object not detected by the radar sensors
approaches or passes your vehicle.
3
WARNING
Failure to visually confirm that it is safe to
change lanes before doing so may result in
a crash and serious injury or death.
Do not rely only on the blind spot
information system when changing lanes.
Always look in your mirrors, to either side
of your vehicle, and behind you for other
vehicles before changing lanes.
●The shift lever is in
(D
or .
●Your vehicle speed is between
6 mph (10 km/h) and 100 mph
(160 km/h)
D4
Alert zone range
A: Approx. 1.6 ft. (0.5 m)
B: Approx. 10 ft. (3 m)
C: Approx. 10 ft. (3 m)Alert Zone Radar Sensors:
underneath the
rear bumper
corners
A
B
C
Comes on when:●A vehicle enters the alert zone from behind to
overtake you with a speed difference of no
more than 31 mph (50 km/h) from your
vehicle.●You pass a vehicle with a speed difference of
no more than 12 mph (20 km/h).Comes On BSI Alert Indicator: Located near the outside
rearview mirror on both sides.
Blinks when:
You use the turn signal lever and change lanes
in the direction of a detected vehicle.Blinks
* Not available on all models