indicator HONDA ODYSSEY 2012 RB3-RB4 / 4.G Manual PDF
[x] Cancel search | Manufacturer: HONDA, Model Year: 2012, Model line: ODYSSEY, Model: HONDA ODYSSEY 2012 RB3-RB4 / 4.GPages: 441, PDF Size: 14.07 MB
Page 323 of 441
uuParking Your VehicleuParking Sensor System
*
322Driving
■
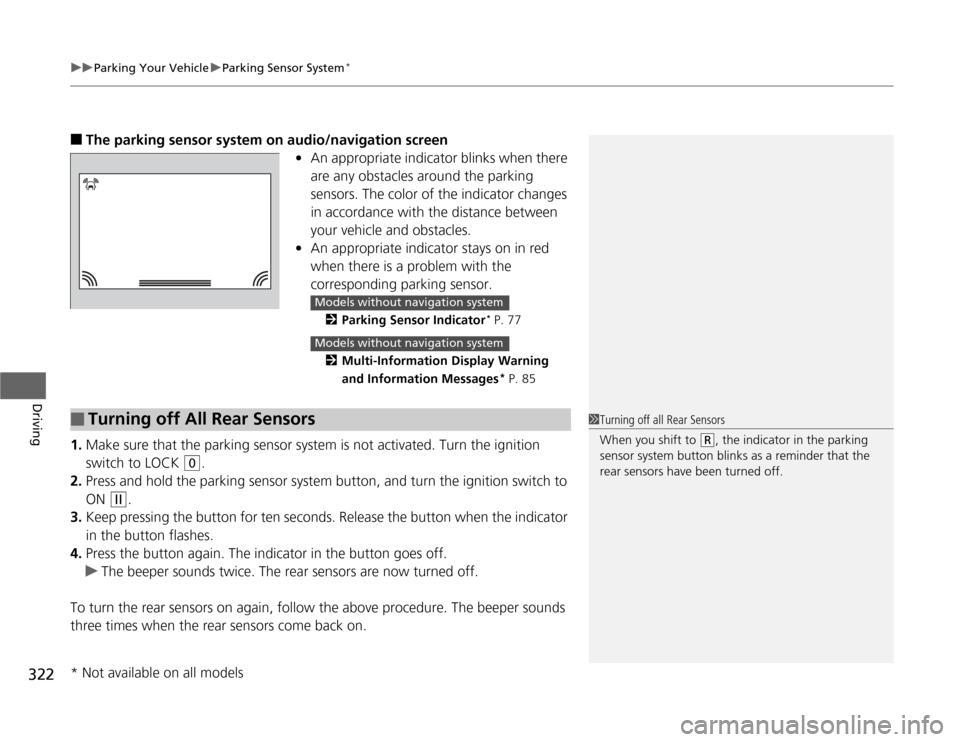
The parking sensor system on audio/navigation screen
•An appropriate indicator blinks when there
are any obstacles around the parking
sensors. The color of the indicator changes
in accordance with the distance between
your vehicle and obstacles.
•An appropriate indicator stays on in red
when there is a problem with the
corresponding parking sensor.
2Parking Sensor Indicator
* P. 77
2Multi-Information Display Warning
and Information Messages* P. 85
1.Make sure that the parking sensor system is not activated. Turn the ignition
switch to LOCK
(0
.
2.Press and hold the parking sensor system button, and turn the ignition switch to
ON
(w
.
3.Keep pressing the button for ten seconds. Release the button when the indicator
in the button flashes.
4.Press the button again. The indicator in the button goes off.
uThe beeper sounds twice. The rear sensors are now turned off.
To turn the rear sensors on again, follow the above procedure. The beeper sounds
three times when the rear sensors come back on.
Models without navigation systemModels without navigation system
■
Turning off All Rear Sensors
1Turning off all Rear Sensors
When you shift to
(R
, the indicator in the parking
sensor system button blinks as a reminder that the
rear sensors have been turned off.
* Not available on all models
Page 326 of 441
325
Continued
Driving
RefuelingFuel Information■
Fuel recommendation
Use of a lower octane gasoline can cause a persistent, heavy metallic knocking noise
that can lead to engine damage.
■
Top tier detergent gasoline
Because the level of detergency and additives in gasoline vary in the market, Honda
endorses the use of “TOP TIER Detergent Gasoline” where available to help
maintain the performance and reliability of your vehicle. TOP TIER Detergent
Gasoline meets a new gasoline standard jointly established by leading automotive
manufacturers to meet the needs of today’s advanced engines.Unleaded gasoline, pump octane number 87 or higher
1Fuel Information
NOTICEWe recommend quality gasoline containing
detergent additives that help prevent fuel system and
engine deposits. In addition, in order to maintain
good performance, fuel economy, and emissions
control, we strongly recommend the use of gasoline
that does NOT contain harmful manganese-based
fuel additives such as MMT, if such gasoline is
available.
Use of gasoline with these additives may adversely
affect performance, and cause the malfunction
indicator lamp on your instrument panel to come on.
If this happens, contact a dealer for service.
Some gasoline today is blended with oxygenates such
as ethanol. Your vehicle is designed to operate on
oxygenated gasoline containing up to 10% ethanol
by volume. Do not use gasoline containing methanol.
If you notice any undesirable operating symptoms, try
another service station or switch to another brand of
gasoline.
Page 332 of 441
331
Maintenance
This chapter discusses basic maintenance.
Before Performing Maintenance
Inspection and Maintenance ............ 332
Safety When Performing Maintenance..... 333Parts and Fluids Used in Maintenance
Service ........................................... 334
Maintenance Minder™.................... 335
Maintenance Under the HoodMaintenance Items Under the Hood ..... 343Opening the Hood ........................... 344
Recommended Engine Oil ................ 345
Oil Check ......................................... 346
Adding Engine Oil ............................ 347Changing the Engine Oil and Oil Filter ..... 348
Engine Coolant ................................ 350
Transmission Fluid ............................ 352
Brake Fluid ....................................... 353
Power Steering Fluid Check.............. 354
Refilling Window Washer Fluid......... 354
Replacing Light Bulbs....................... 355
Checking and Maintaining Wiper Blades
.... 366
Checking and Maintaining Tires
Checking Tires ................................. 370
Tire and Loading Information Label ...... 371Tire Labeling .................................... 371DOT Tire Quality Grading (U.S. Vehicles)....... 373Wear Indicators................................ 375Tire Service Life ................................ 375
Tire and Wheel Replacement ........... 376
Tire Rotation .................................... 377
Winter Tires ..................................... 378
Battery............................................... 379
Remote Transmitter Care................. 380
Remote Control and Wireless
Headphone Care
*........................... 382
Heating and Cooling System
*/Climate
Control System
* Maintenance....... 384
Cleaning
Interior Care .................................... 385
Exterior Care.................................... 387
* Not available on all models
Page 336 of 441
335
Continued
Maintenance
Maintenance Minder™If the engine oil life is less than 15%, you will see the Maintenance Minder messages
appear on the information display
* or the multi-information display
* every time you
turn the ignition switch to ON
(w
. The messages notify you when to change the
engine oil, or when to bring your vehicle to a dealer for indicated maintenance
services.
To Use Maintenance Minder
TM
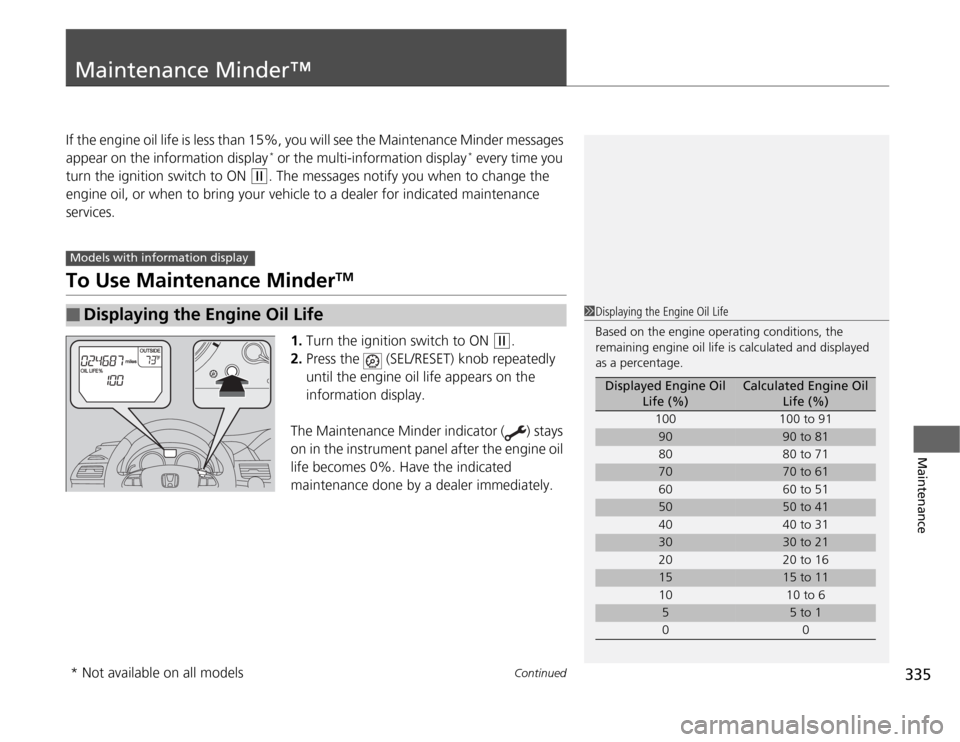
1.Turn the ignition switch to ON
(w
.
2.Press the (SEL/RESET) knob repeatedly
until the engine oil life appears on the
information display.
The Maintenance Minder indicator ( ) stays
on in the instrument panel after the engine oil
life becomes 0%. Have the indicated
maintenance done by a dealer immediately.
■
Displaying the Engine Oil Life
Models with information display
1Displaying the Engine Oil Life
Based on the engine operating conditions, the
remaining engine oil life is calculated and displayed
as a percentage.
Displayed Engine Oil
Life (%)
Calculated Engine Oil
Life (%)
100 100 to 91
90
90 to 81
80 80 to 71
70
70 to 61
60 60 to 51
50
50 to 41
40 40 to 31
30
30 to 21
20 20 to 16
15
15 to 11
10 10 to 6
5
5 to 1
00
* Not available on all models
Page 337 of 441
336
uuMaintenance Minder™uTo Use Maintenance Minder
TM
Maintenance
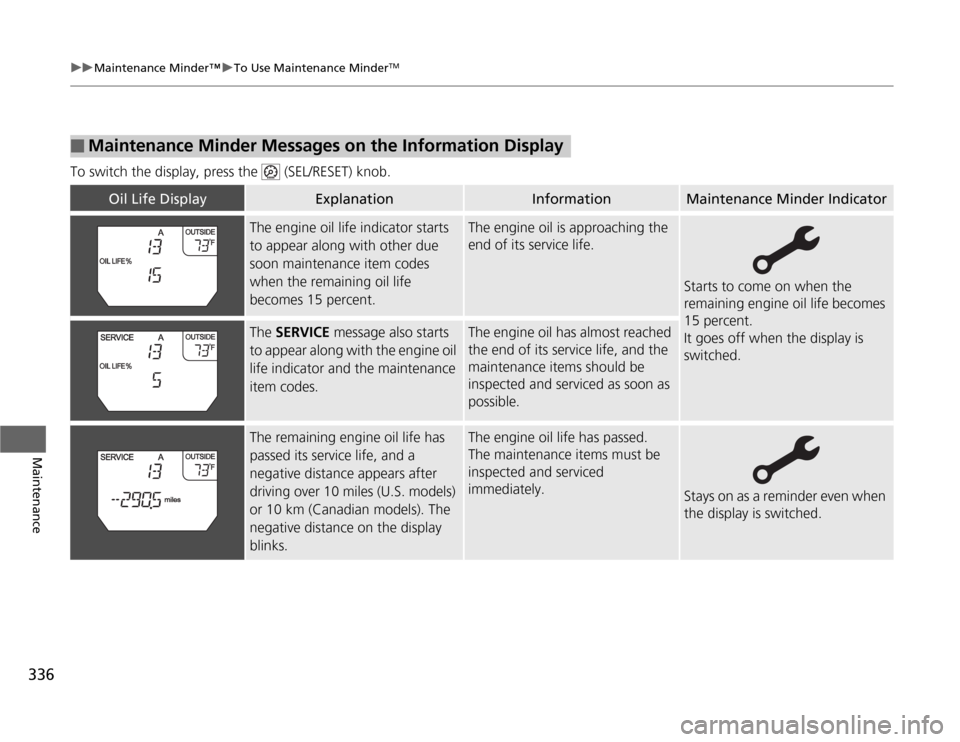
To switch the display, press the (SEL/RESET) knob.■
Maintenance Minder Messages on the Information Display
Oil Life Display
Explanation
Information
Maintenance Minder Indicator
The engine oil life indicator starts
to appear along with other due
soon maintenance item codes
when the remaining oil life
becomes 15 percent.
The engine oil is approaching the
end of its service life.
Starts to come on when the
remaining engine oil life becomes
15 percent.
It goes off when the display is
switched.
The SERVICE message also starts
to appear along with the engine oil
life indicator and the maintenance
item codes.
The engine oil has almost reached
the end of its service life, and the
maintenance items should be
inspected and serviced as soon as
possible.
The remaining engine oil life has
passed its service life, and a
negative distance appears after
driving over 10 miles (U.S. models)
or 10 km (Canadian models). The
negative distance on the display
blinks.
The engine oil life has passed.
The maintenance items must be
inspected and serviced
immediately.
Stays on as a reminder even when
the display is switched.
Page 338 of 441
337
uuMaintenance Minder™uTo Use Maintenance Minder
TM
Continued
Maintenance
■
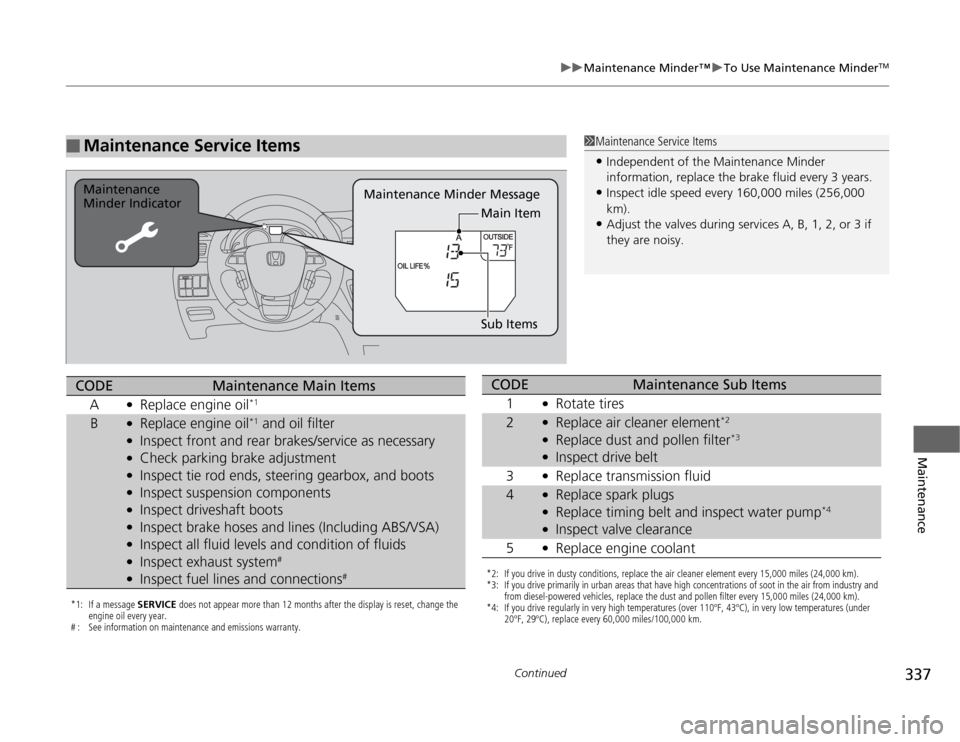
Maintenance Service Items
1Maintenance Service Items•Independent of the Maintenance Minder
information, replace the brake fluid every 3 years.•Inspect idle speed every 160,000 miles (256,000
km).•Adjust the valves during services A, B, 1, 2, or 3 if
they are noisy.
Maintenance Minder Message Maintenance
Minder Indicator
Sub Items Main Item
*1: If a message SERVICE does not appear more than 12 months after the display is reset, change the
engine oil every year.
# : See information on maintenance and emissions warranty.CODE
Maintenance Main Items
A
●
Replace engine oil
*1
B
●
Replace engine oil
*1 and oil filter
●
Inspect front and rear brakes/service as necessary
●
Check parking brake adjustment
●
Inspect tie rod ends, steering gearbox, and boots
●
Inspect suspension components
●
Inspect driveshaft boots
●
Inspect brake hoses and lines (Including ABS/VSA)
●
Inspect all fluid levels and condition of fluids
●
Inspect exhaust system
#
●
Inspect fuel lines and connections
#
*2: If you drive in dusty conditions, replace the air cleaner element every 15,000 miles (24,000 km).
*3: If you drive primarily in urban areas that have high concentrations of soot in the air from industry and
from diesel-powered vehicles, replace the dust and pollen filter every 15,000 miles (24,000 km).
*4: If you drive regularly in very high temperatures (over 110ºF, 43ºC), in very low temperatures (under
20ºF, 29ºC), replace every 60,000 miles/100,000 km.CODE
Maintenance Sub Items
1
●
Rotate tires
2
●
Replace air cleaner element
*2
●
Replace dust and pollen filter
*3
●
Inspect drive belt
3
●
Replace transmission fluid
4
●
Replace spark plugs
●
Replace timing belt and inspect water pump
*4
●
Inspect valve clearance
5
●
Replace engine coolant
Page 341 of 441
340
uuMaintenance Minder™uTo Use Maintenance Minder
TM
Maintenance
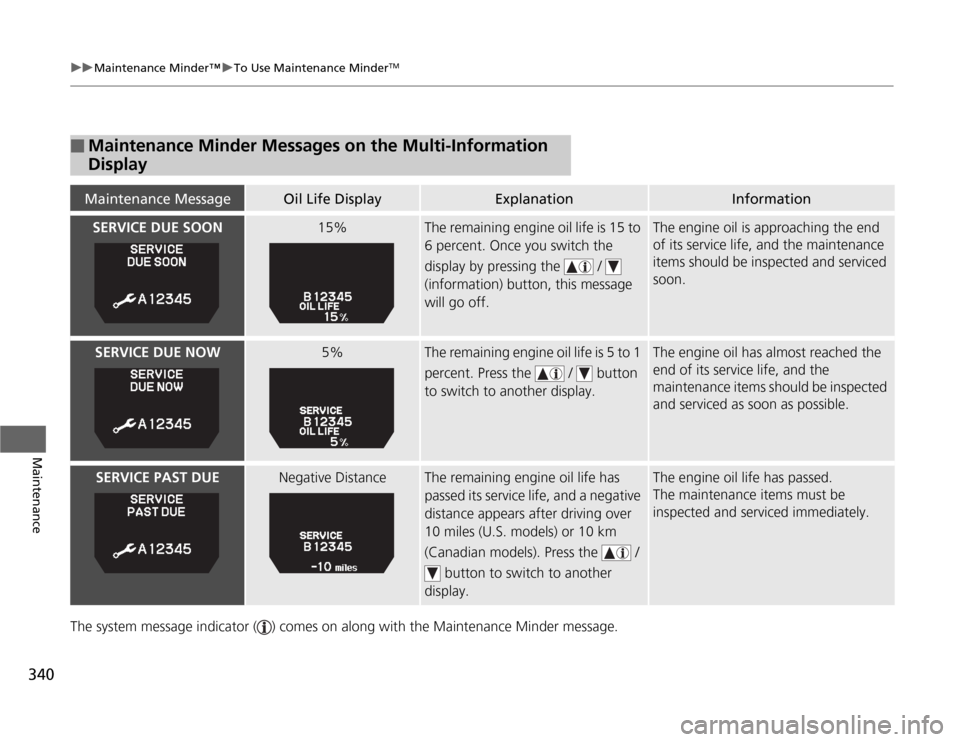
The system message indicator ( ) comes on along with the Maintenance Minder message.■
Maintenance Minder Messages on the Multi-Information
DisplayMaintenance Message
Oil Life Display
Explanation
Information
SERVICE DUE SOON
15%
The remaining engine oil life is 15 to
6 percent. Once you switch the
display by pressing the /
(information) button, this message
will go off.
The engine oil is approaching the end
of its service life, and the maintenance
items should be inspected and serviced
soon.
SERVICE DUE NOW
5%
The remaining engine oil life is 5 to 1
percent. Press the / button
to switch to another display.
The engine oil has almost reached the
end of its service life, and the
maintenance items should be inspected
and serviced as soon as possible.
SERVICE PAST DUE
Negative Distance
The remaining engine oil life has
passed its service life, and a negative
distance appears after driving over
10 miles (U.S. models) or 10 km
(Canadian models). Press the /
button to switch to another
display.
The engine oil life has passed.
The maintenance items must be
inspected and serviced immediately.
Page 342 of 441
341
uuMaintenance Minder™uTo Use Maintenance Minder
TM
Continued
Maintenance
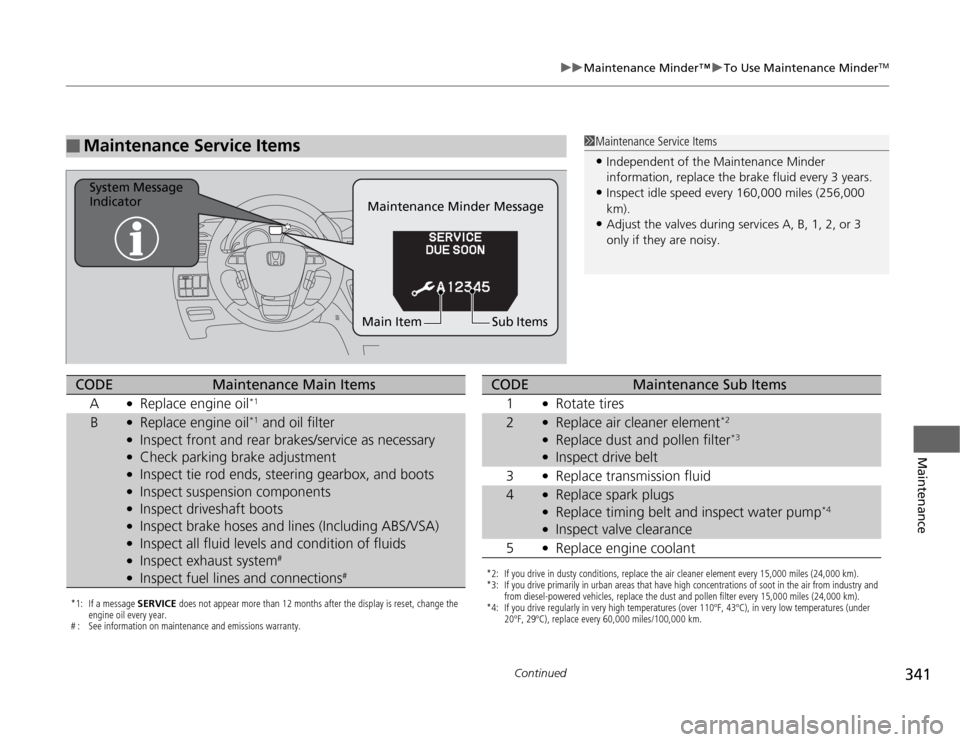
■
Maintenance Service Items
1Maintenance Service Items•Independent of the Maintenance Minder
information, replace the brake fluid every 3 years.•Inspect idle speed every 160,000 miles (256,000
km).•Adjust the valves during services A, B, 1, 2, or 3
only if they are noisy.
Maintenance Minder Message System Message
Indicator
Sub Items Main Item
*1: If a message SERVICE does not appear more than 12 months after the display is reset, change the
engine oil every year.
# : See information on maintenance and emissions warranty.CODE
Maintenance Main Items
A
●
Replace engine oil
*1
B
●
Replace engine oil
*1 and oil filter
●
Inspect front and rear brakes/service as necessary
●
Check parking brake adjustment
●
Inspect tie rod ends, steering gearbox, and boots
●
Inspect suspension components
●
Inspect driveshaft boots
●
Inspect brake hoses and lines (Including ABS/VSA)
●
Inspect all fluid levels and condition of fluids
●
Inspect exhaust system
#
●
Inspect fuel lines and connections
#
*2: If you drive in dusty conditions, replace the air cleaner element every 15,000 miles (24,000 km).
*3: If you drive primarily in urban areas that have high concentrations of soot in the air from industry and
from diesel-powered vehicles, replace the dust and pollen filter every 15,000 miles (24,000 km).
*4: If you drive regularly in very high temperatures (over 110ºF, 43ºC), in very low temperatures (under
20ºF, 29ºC), replace every 60,000 miles/100,000 km.CODE
Maintenance Sub Items
1
●
Rotate tires
2
●
Replace air cleaner element
*2
●
Replace dust and pollen filter
*3
●
Inspect drive belt
3
●
Replace transmission fluid
4
●
Replace spark plugs
●
Replace timing belt and inspect water pump
*4
●
Inspect valve clearance
5
●
Replace engine coolant
Page 350 of 441
349
uuMaintenance Under the HooduChanging the Engine Oil and Oil Filter
Maintenance
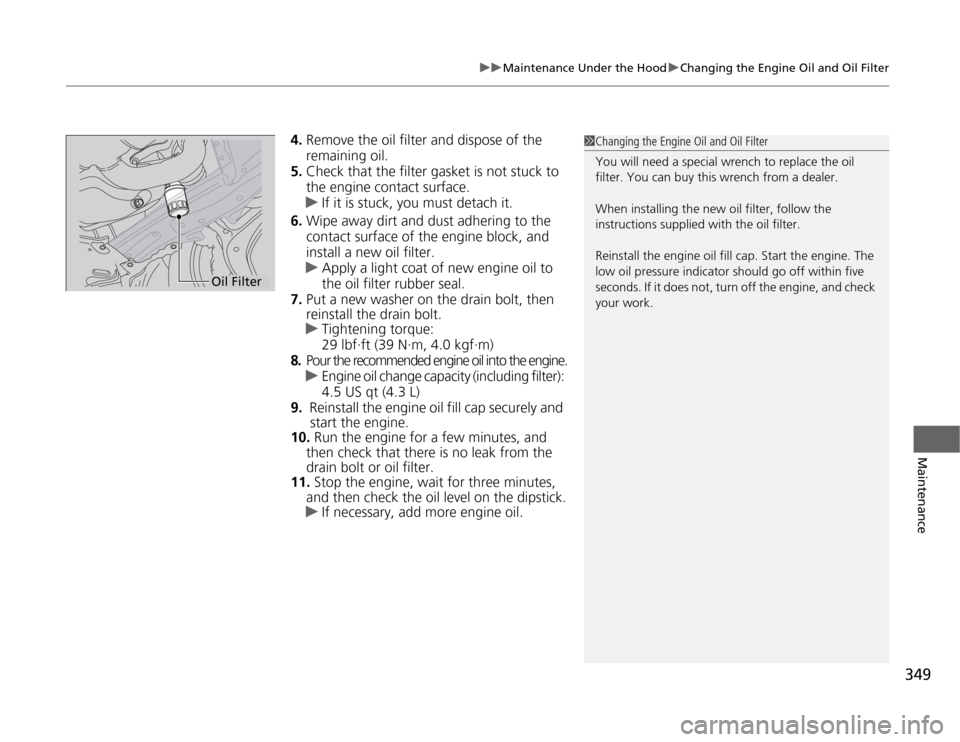
4.Remove the oil filter and dispose of the
remaining oil.
5.Check that the filter gasket is not stuck to
the engine contact surface.
uIf it is stuck, you must detach it.
6.Wipe away dirt and dust adhering to the
contact surface of the engine block, and
install a new oil filter.
uApply a light coat of new engine oil to
the oil filter rubber seal.
7.Put a new washer on the drain bolt, then
reinstall the drain bolt.
uTightening torque:
29 lbf∙ft (39 N∙m, 4.0 kgf∙m)
8.Pour the recommended engine oil into the engine.
uEngine oil change capacity (including filter):
4.5 US qt (4.3 L)
9. Reinstall the engine oil fill cap securely and
start the engine.
10. Run the engine for a few minutes, and
then check that there is no leak from the
drain bolt or oil filter.
11. Stop the engine, wait for three minutes,
and then check the oil level on the dipstick.
uIf necessary, add more engine oil.
1Changing the Engine Oil and Oil Filter
You will need a special wrench to replace the oil
filter. You can buy this wrench from a dealer.
When installing the new oil filter, follow the
instructions supplied with the oil filter.
Reinstall the engine oil fill cap. Start the engine. The
low oil pressure indicator should go off within five
seconds. If it does not, turn off the engine, and check
your work.
Oil Filter
Page 371 of 441
370Maintenance
Checking and Maintaining TiresChecking TiresTo safely operate your vehicle, your tires must be of the proper type and size, in
good condition with adequate tread, and properly inflated.■
Inflation guidelines
Properly inflated tires provide the best combination of handling, tread life, and comfort.
Refer to the driver’s doorjamb label or specification’s page for the specified pressure.
Underinflated tires wear unevenly, adversely affect handling and fuel economy, and
are more likely to fail from overheating.
Overinflated tires make your vehicle ride harshly, are more prone to road hazards,
and wear unevenly.
Every day before you drive, look at each of the tires. If one looks lower than the
others, check the pressure with a tire gauge.
At least once a month or before long trips, use a gauge to measure the pressure in
all tires, including the spare. Even tires in good condition can lose 1 to 2 psi (10 to
20 kPa, 0.1 to 0.2 kgf/cm
2) per month.
■
Inspection guidelines
Every time you check inflation, also examine the tires and valve stems.
Look for:
•Bumps or bulges on the side or in the tread. Replace the tire if you find any cuts,
splits, or cracks in the side of the tire. Replace it if you see fabric or cord.
•Remove any foreign objects and inspect for air leaks.
•Uneven tread wear. Have a dealer check the wheel alignment.
•Excessive tread wear.
2Wear Indicators P. 375
•Cracks or other damage around valve stem.
1Checking Tires
Measure the air pressure when tires are cold. This
means the vehicle has been parked for at least three
hours, or driven less than 1 mile (1.6 km). If
necessary, add or release air until the specified
pressure is reached.
If checked when hot, tire pressure can be as much as
4–6 psi (30–40 kPa, 0.3–0.4 kgf/cm
2) higher than if
checked when cold.
Have a dealer check the tires if you feel a consistent
vibration while driving. New tires and any that have
been removed and reinstalled should be properly
balanced.
3
WARNING
Using tires that are excessively worn or
improperly inflated can cause a crash in
which you can be seriously hurt or killed.
Follow all instructions in this owner’s
manual regarding tire inflation and
maintenance.