Eps HONDA ODYSSEY 2012 RB3-RB4 / 4.G Owners Manual
[x] Cancel search | Manufacturer: HONDA, Model Year: 2012, Model line: ODYSSEY, Model: HONDA ODYSSEY 2012 RB3-RB4 / 4.GPages: 441, PDF Size: 14.07 MB
Page 14 of 441
13Quick Reference Guide
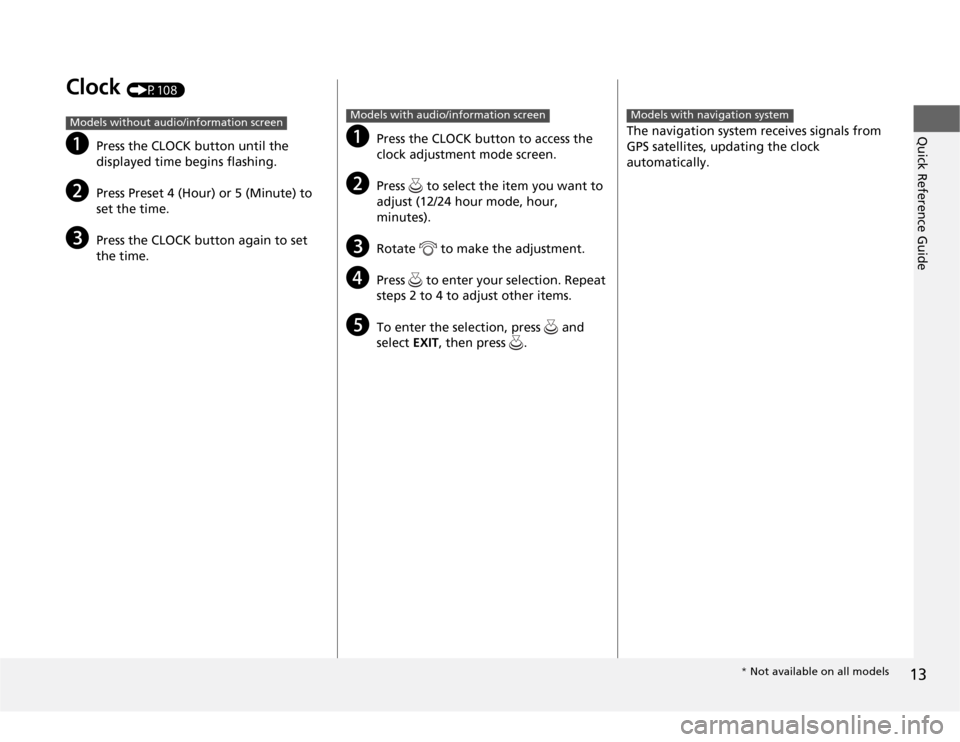
Clock
(P108)
a
Press the CLOCK button until the
displayed time begins flashing.
b
Press Preset 4 (Hour) or 5 (Minute) to
set the time.
c
Press the CLOCK button again to set
the time.
Models without audio/information screen
a
Press the CLOCK button to access the
clock adjustment mode screen.
b
Press to select the item you want to
adjust (12/24 hour mode, hour,
minutes).
c
Rotate to make the adjustment.
d
Press to enter your selection. Repeat
steps 2 to 4 to adjust other items.
e
To enter the selection, press and
select EXIT, then press .
Models with audio/information screen
The navigation system receives signals from
GPS satellites, updating the clock
automatically.Models with navigation system
* Not available on all models
Page 63 of 441
uuChild SafetyuSafety of Infants and Small Children
62Safe Driving
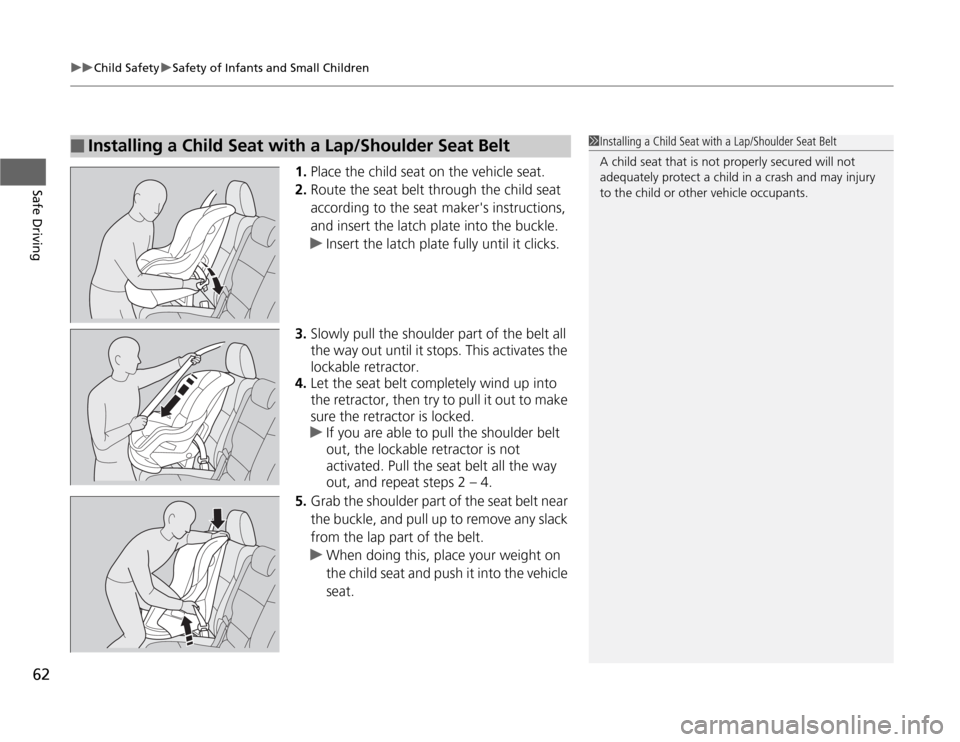
1.Place the child seat on the vehicle seat.
2.Route the seat belt through the child seat
according to the seat maker's instructions,
and insert the latch plate into the buckle.
uInsert the latch plate fully until it clicks.
3.Slowly pull the shoulder part of the belt all
the way out until it stops. This activates the
lockable retractor.
4.Let the seat belt completely wind up into
the retractor, then try to pull it out to make
sure the retractor is locked.
uIf you are able to pull the shoulder belt
out, the lockable retractor is not
activated. Pull the seat belt all the way
out, and repeat steps 2 – 4.
5.Grab the shoulder part of the seat belt near
the buckle, and pull up to remove any slack
from the lap part of the belt.
uWhen doing this, place your weight on
the child seat and push it into the vehicle
seat.
■
Installing a Child Seat with a Lap/Shoulder Seat Belt
1Installing a Child Seat with a Lap/Shoulder Seat Belt
A child seat that is not properly secured will not
adequately protect a child in a crash and may injury
to the child or other vehicle occupants.
Page 103 of 441
102
uuGauges and DisplaysuMulti-Information Display
*
Instrument Panel
■
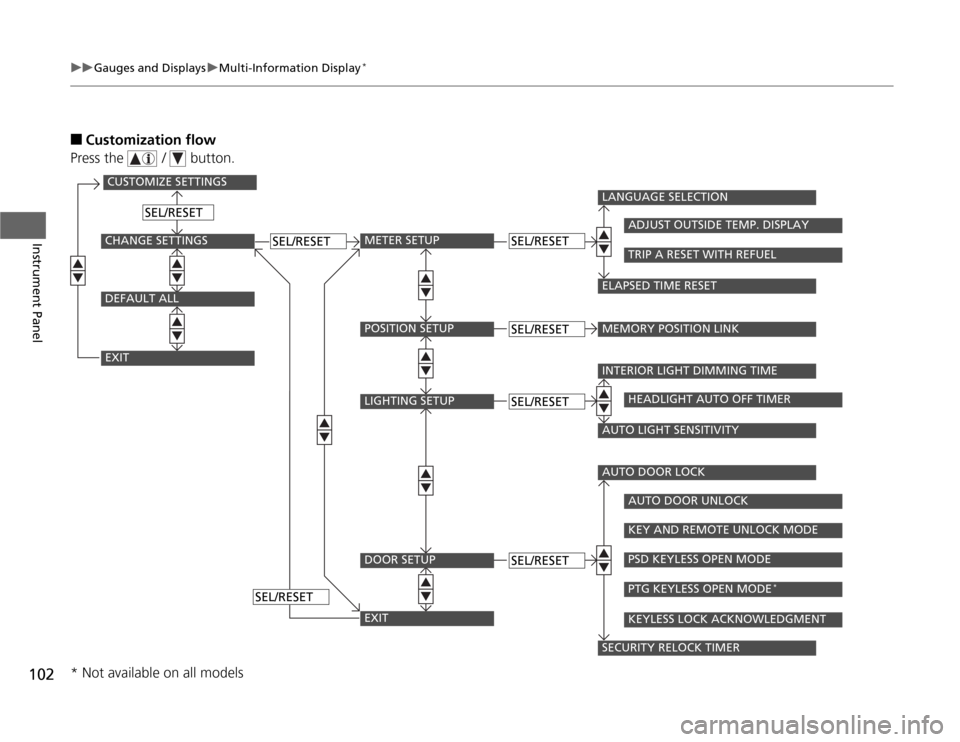
Customization flow
Press the / button.
CUSTOMIZE SETTINGSCHANGE SETTINGSEXITDEFAULT ALL
METER SETUP
SEL/RESET
SEL/RESET
SEL/RESET
SEL/RESET
POSITION SETUPLIGHTING SETUPDOOR SETUPEXIT
SEL/RESETSEL/RESETSEL/RESET
LANGUAGE SELECTIONMEMORY POSITION LINK
ADJUST OUTSIDE TEMP. DISPLAYTRIP A RESET WITH REFUEL
ELAPSED TIME RESETINTERIOR LIGHT DIMMING TIME
HEADLIGHT AUTO OFF TIMER
AUTO LIGHT SENSITIVITYAUTO DOOR LOCK
AUTO DOOR UNLOCKKEY AND REMOTE UNLOCK MODEPSD KEYLESS OPEN MODEPTG KEYLESS OPEN MODE
*
KEYLESS LOCK ACKNOWLEDGMENT
SECURITY RELOCK TIMER
* Not available on all models
Page 106 of 441
105
uuGauges and DisplaysuMulti-Information Display
*
Continued
Instrument Panel
■
Example of customization settings
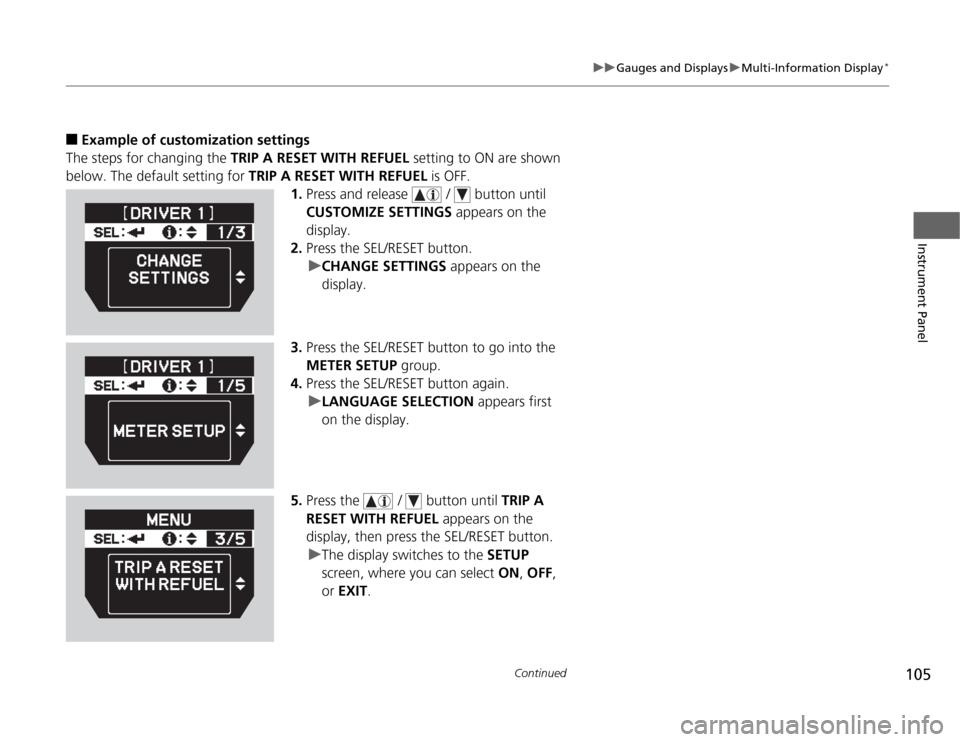
The steps for changing the TRIP A RESET WITH REFUEL setting to ON are shown
below. The default setting for TRIP A RESET WITH REFUEL is OFF.
1.Press and release / button until
CUSTOMIZE SETTINGS appears on the
display.
2.Press the SEL/RESET button.
uCHANGE SETTINGS appears on the
display.
3.Press the SEL/RESET button to go into the
METER SETUP group.
4.Press the SEL/RESET button again.
uLANGUAGE SELECTION appears first
on the display.
5.Press the / button until TRIP A
RESET WITH REFUEL appears on the
display, then press the SEL/RESET button.
uThe display switches to the SETUP
screen, where you can select ON, OFF,
or EXIT.
Page 110 of 441
109
uuSetting the ClockuClock
Controls
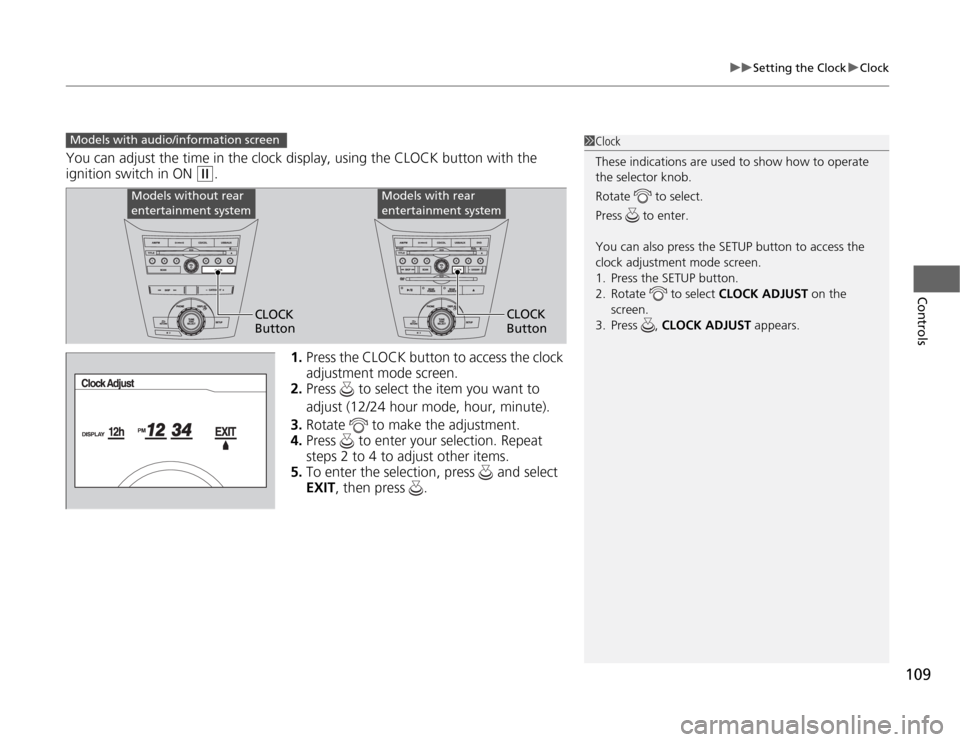
You can adjust the time in the clock display, using the CLOCK button with the
ignition switch in ON
(w
.
1.Press the CLOCK button to access the clock
adjustment mode screen.
2.Press to select the item you want to
adjust (12/24 hour mode, hour, minute).
3.Rotate to make the adjustment.
4.Press to enter your selection. Repeat
steps 2 to 4 to adjust other items.
5.To enter the selection, press and select
EXIT, then press .
Models with audio/information screen
1Clock
These indications are used to show how to operate
the selector knob.
Rotate to select.
Press to enter.
You can also press the SETUP button to access the
clock adjustment mode screen.
1. Press the SETUP button.
2. Rotate to select CLOCK ADJUST on the
screen.
3. Press , CLOCK ADJUST appears.
Models without rear
entertainment system
Models with rear
entertainment system
CLOCK
ButtonCLOCK
Button
Page 119 of 441
118
uuLocking and Unlocking the DoorsuCustomizing the Auto Door Locking/Unlocking Setting
*
Controls
*1: Default setting■
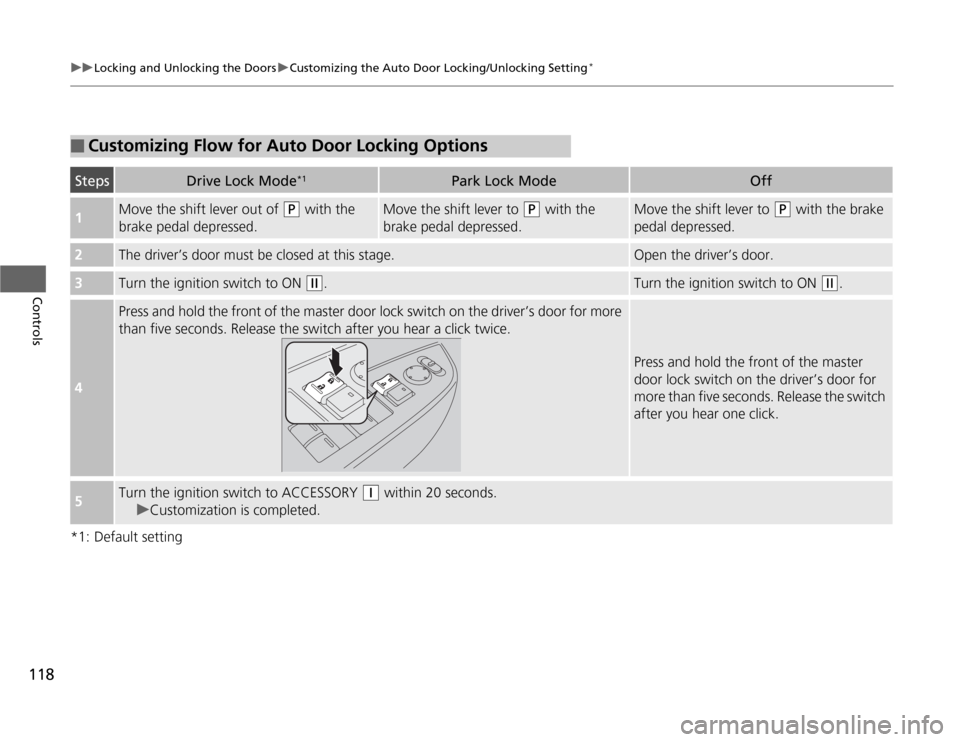
Customizing Flow for Auto Door Locking Options
Steps
Drive Lock Mode
*1
Park Lock Mode
Off
1
Move the shift lever out of
(P
with the
brake pedal depressed.
Move the shift lever to
(P
with the
brake pedal depressed.
Move the shift lever to
(P
with the brake
pedal depressed.
2
The driver’s door must be closed at this stage.
Open the driver’s door.
3
Turn the ignition switch to ON
(w
.
Turn the ignition switch to ON
(w
.
4
Press and hold the front of the master door lock switch on the driver’s door for more
than five seconds. Release the switch after you hear a click twice.
Press and hold the front of the master
door lock switch on the driver’s door for
more than five seconds. Release the switch
after you hear one click.
5
Turn the ignition switch to ACCESSORY
(q
within 20 seconds.
uCustomization is completed.
Page 120 of 441
119
uuLocking and Unlocking the DoorsuCustomizing the Auto Door Locking/Unlocking Setting
*
Controls
*1: Default setting■
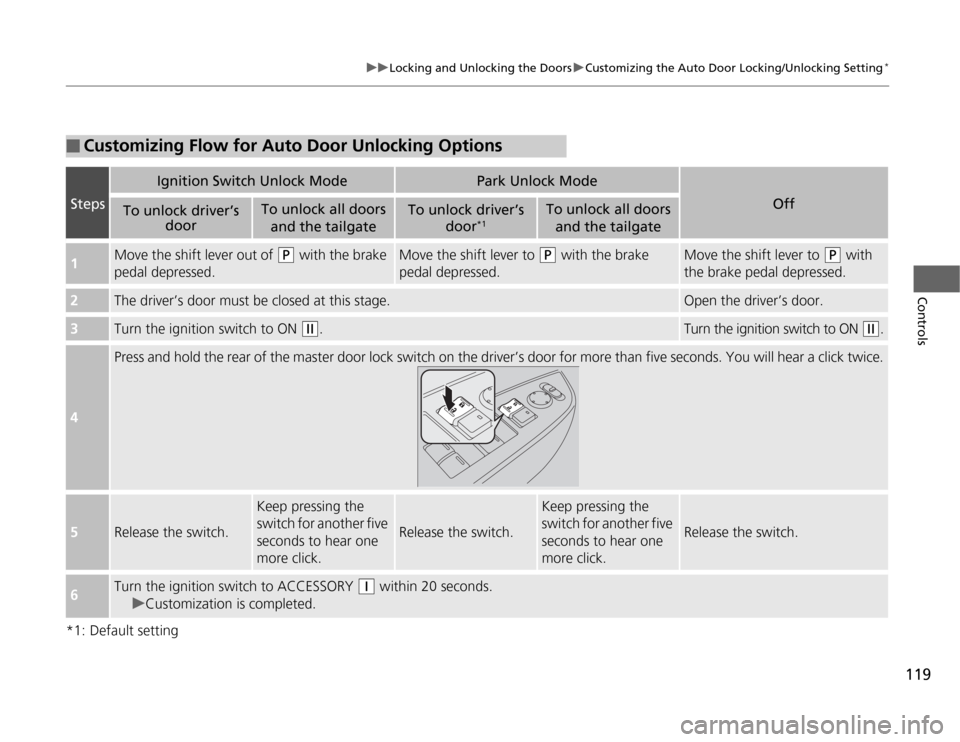
Customizing Flow for Auto Door Unlocking Options
Steps
Ignition Switch Unlock Mode
Park Unlock Mode
Off
To unlock driver’s
door
To unlock all doors
and the tailgate
To unlock driver’s
door
*1
To unlock all doors
and the tailgate
1
Move the shift lever out of
(P
with the brake
pedal depressed.
Move the shift lever to
(P
with the brake
pedal depressed.
Move the shift lever to
(P
with
the brake pedal depressed.
2
The driver’s door must be closed at this stage.
Open the driver’s door.
3
Turn the ignition switch to ON
(w
.
Turn the ignition switch to ON
(w
.
4
Press and hold the rear of the master door lock switch on the driver’s door for more than five seconds. You will hear a click twice.
5
Release the switch.
Keep pressing the
switch for another five
seconds to hear one
more click.
Release the switch.
Keep pressing the
switch for another five
seconds to hear one
more click.
Release the switch.
6
Turn the ignition switch to ACCESSORY
(q
within 20 seconds.
uCustomization is completed.
Page 124 of 441
Continued
123
uuOpening and Closing the TailgateuOpening/Closing the Power Tailgate
*
Controls
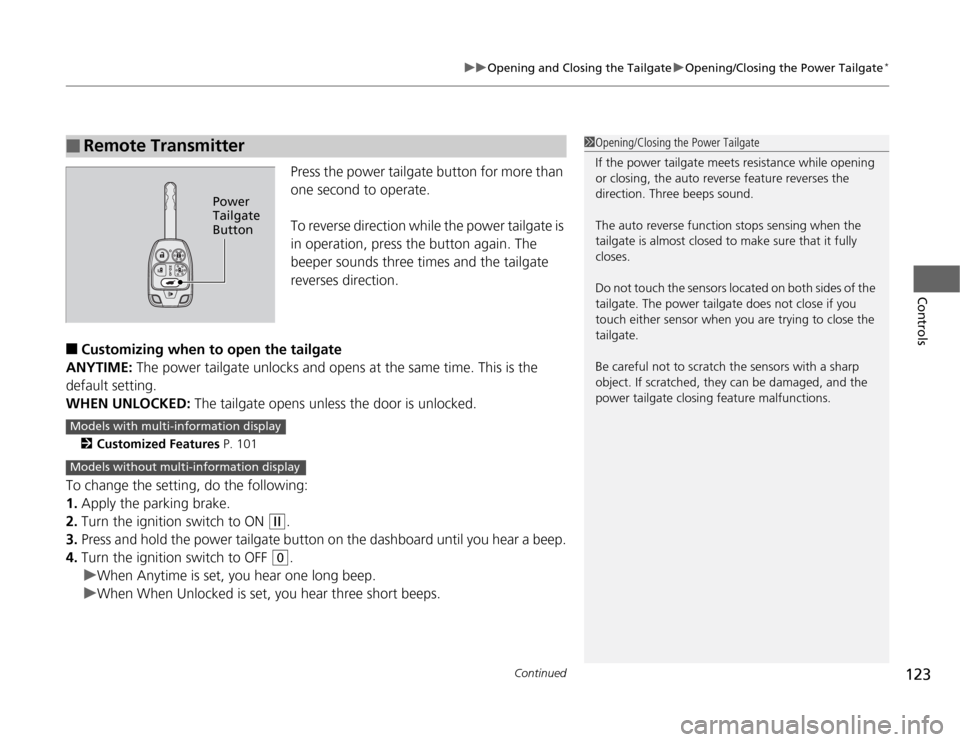
Press the power tailgate button for more than
one second to operate.
To reverse direction while the power tailgate is
in operation, press the button again. The
beeper sounds three times and the tailgate
reverses direction.
■
Customizing when to open the tailgate
ANYTIME: The power tailgate unlocks and opens at the same time. This is the
default setting.
WHEN UNLOCKED: The tailgate opens unless the door is unlocked.2Customized Features P. 101
To change the setting, do the following:
1.Apply the parking brake.
2.Turn the ignition switch to ON
(w
.
3.Press and hold the power tailgate button on the dashboard until you hear a beep.
4.Turn the ignition switch to OFF
(0
.
uWhen Anytime is set, you hear one long beep.
uWhen When Unlocked is set, you hear three short beeps.
■
Remote Transmitter
1Opening/Closing the Power Tailgate
If the power tailgate meets resistance while opening
or closing, the auto reverse feature reverses the
direction. Three beeps sound.
The auto reverse function stops sensing when the
tailgate is almost closed to make sure that it fully
closes.
Do not touch the sensors located on both sides of the
tailgate. The power tailgate does not close if you
touch either sensor when you are trying to close the
tailgate.
Be careful not to scratch the sensors with a sharp
object. If scratched, they can be damaged, and the
power tailgate closing feature malfunctions.
Power
Tailgate
Button
Models with multi-information displayModels without multi-information display
Page 132 of 441
Continued
131
uuOpening and Closing the Sliding DoorsuOpening/Closing the Power Sliding Doors
*
Controls
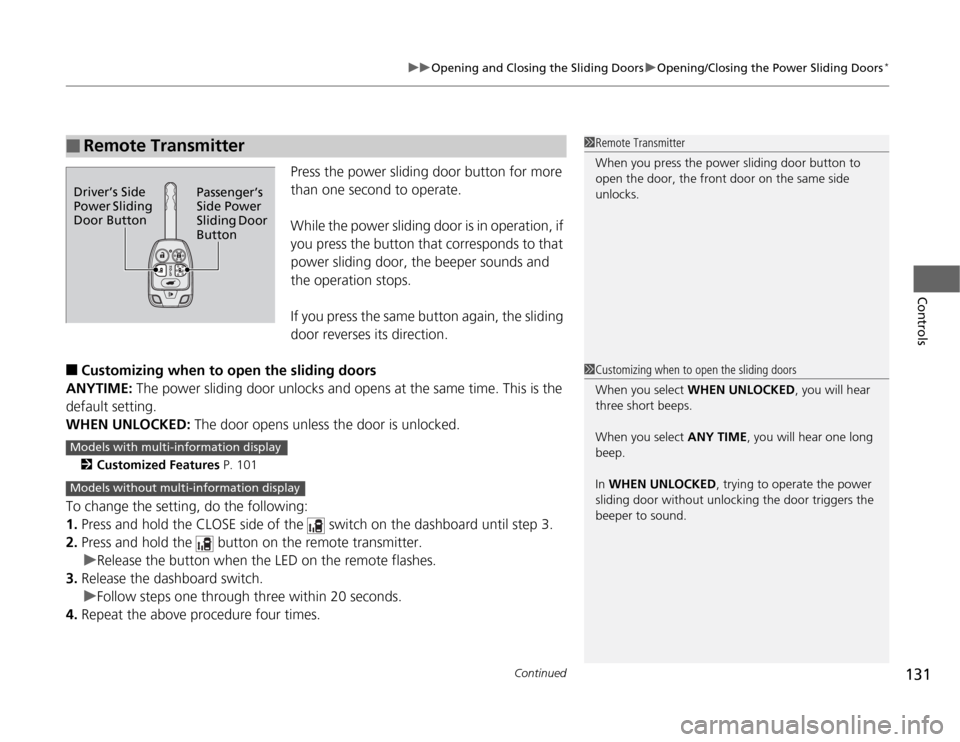
Press the power sliding door button for more
than one second to operate.
While the power sliding door is in operation, if
you press the button that corresponds to that
power sliding door, the beeper sounds and
the operation stops.
If you press the same button again, the sliding
door reverses its direction.
■
Customizing when to open the sliding doors
ANYTIME: The power sliding door unlocks and opens at the same time. This is the
default setting.
WHEN UNLOCKED: The door opens unless the door is unlocked.2Customized Features P. 101
To change the setting, do the following:
1.Press and hold the CLOSE side of the switch on the dashboard until step 3.
2.Press and hold the button on the remote transmitter.
uRelease the button when the LED on the remote flashes.
3.Release the dashboard switch.
uFollow steps one through three within 20 seconds.
4.Repeat the above procedure four times.■
Remote Transmitter
1Remote Transmitter
When you press the power sliding door button to
open the door, the front door on the same side
unlocks.
Driver’s Side
Power Sliding
Door ButtonPassenger’s
Side Power
Sliding Door
Button
1Customizing when to open the sliding doors
When you select WHEN UNLOCKED, you will hear
three short beeps.
When you select ANY TIME, you will hear one long
beep.
In WHEN UNLOCKED, trying to operate the power
sliding door without unlocking the door triggers the
beeper to sound.
Models with multi-information displayModels without multi-information display
Page 146 of 441
145
uuOperating the Switches Around the Steering WheeluWipers and Washers
Continued
Controls
Wipers and Washers
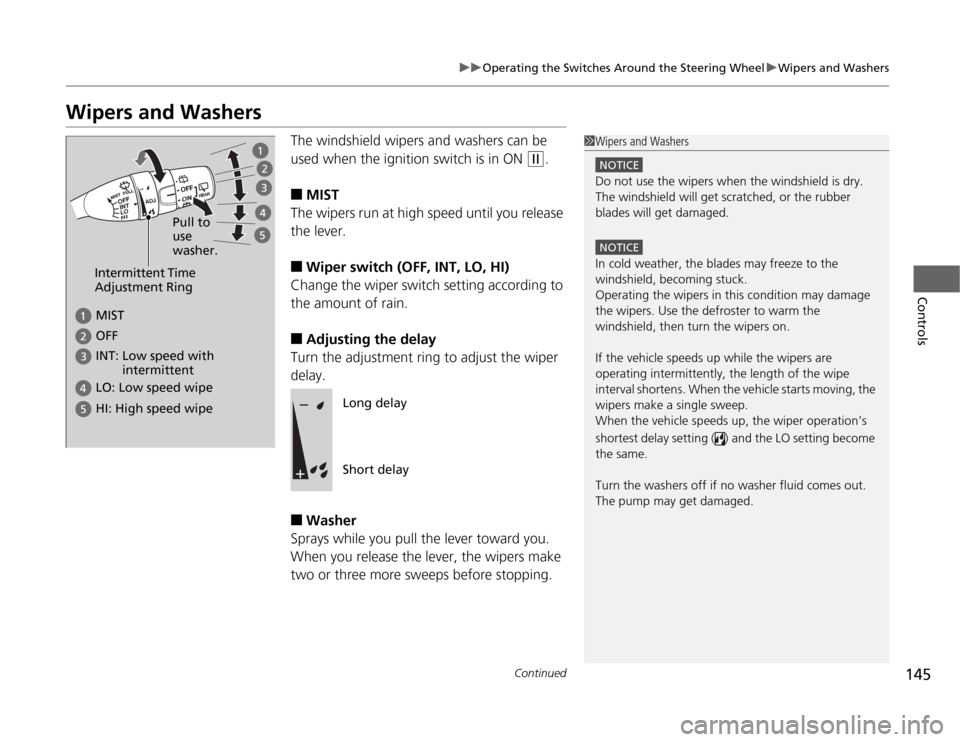
The windshield wipers and washers can be
used when the ignition switch is in ON
(w
.
■
MIST
The wipers run at high speed until you release
the lever.
■
Wiper switch (OFF, INT, LO, HI)
Change the wiper switch setting according to
the amount of rain.
■
Adjusting the delay
Turn the adjustment ring to adjust the wiper
delay.
■
Washer
Sprays while you pull the lever toward you.
When you release the lever, the wipers make
two or three more sweeps before stopping.
1Wipers and Washers
NOTICEDo not use the wipers when the windshield is dry.
The windshield will get scratched, or the rubber
blades will get damaged.NOTICEIn cold weather, the blades may freeze to the
windshield, becoming stuck.
Operating the wipers in this condition may damage
the wipers. Use the defroster to warm the
windshield, then turn the wipers on.
If the vehicle speeds up while the wipers are
operating intermittently, the length of the wipe
interval shortens. When the vehicle starts moving, the
wipers make a single sweep.
When the vehicle speeds up, the wiper operation’s
shortest delay setting ( ) and the LO setting become
the same.
Turn the washers off if no washer fluid comes out.
The pump may get damaged.
Intermittent Time
Adjustment Ring
MIST INT: Low speed with
intermittent OFF LO: Low speed wipe HI: High speed wipe
Pull to
use
washer.
Long delay
Short delay