light HONDA ODYSSEY 2013 RC1-RC2 / 5.G Navigation Manual
[x] Cancel search | Manufacturer: HONDA, Model Year: 2013, Model line: ODYSSEY, Model: HONDA ODYSSEY 2013 RC1-RC2 / 5.GPages: 267, PDF Size: 8.64 MB
Page 7 of 267
5Quick Reference Guide
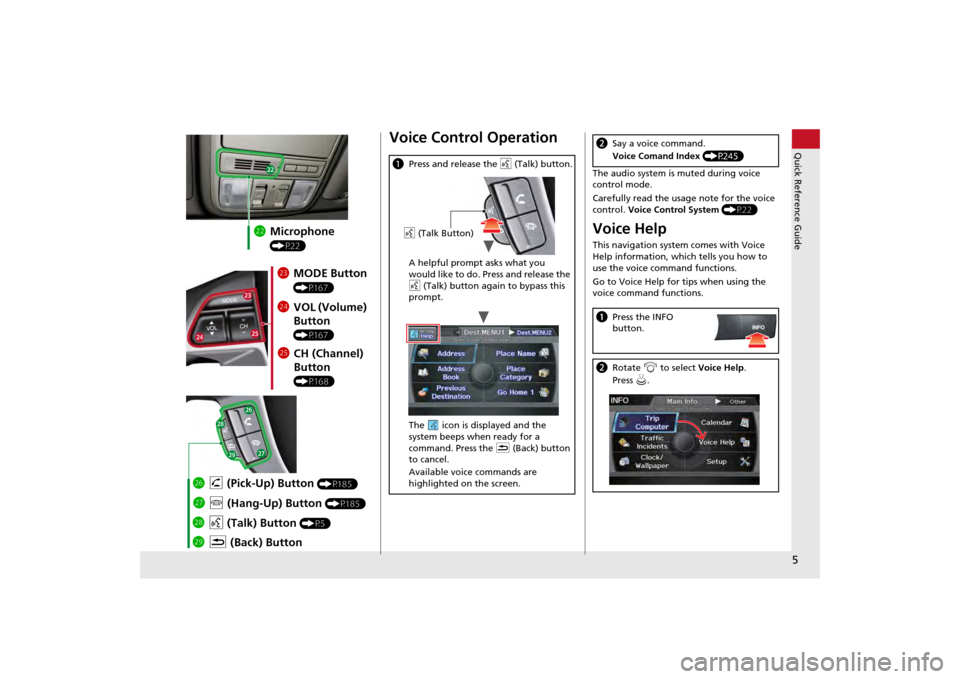
mcMicrophone
(P22)mdMODE Button
(P167)
meVOL (Volume)
Button
(P167)
mfCH (Channel)
Button
(P168)
mj K (Back) Button
mi
d (Talk) Button
(P5)
mh j (Hang-Up) Button
(P185)
mg h (Pick-Up) Button
(P185)
Voice Control Operationa Press and release the d (Talk) button.
A helpful prompt asks what you
would like to do. Press and release the
d (Talk) button again to bypass this
prompt.
The icon is displayed and the
system beeps when ready for a
command. Press the K (Back) button
to cancel.
Available voice commands are
highlighted on the screen.d (Talk Button)
The audio system is muted during voice
control mode.
Carefully read the usage note for the voice
control. Voice Control System (P22)Voice HelpThis navigation system comes with Voice
Help information, which tells you how to
use the voice command functions.
Go to Voice Help for tips when using the
voice command functions.bSay a voice command.
Voice Comand Index (P245)aPress the INFO
button.bRotate i to select Voice Help .
Press u.
Page 10 of 267
8Quick Reference Guide
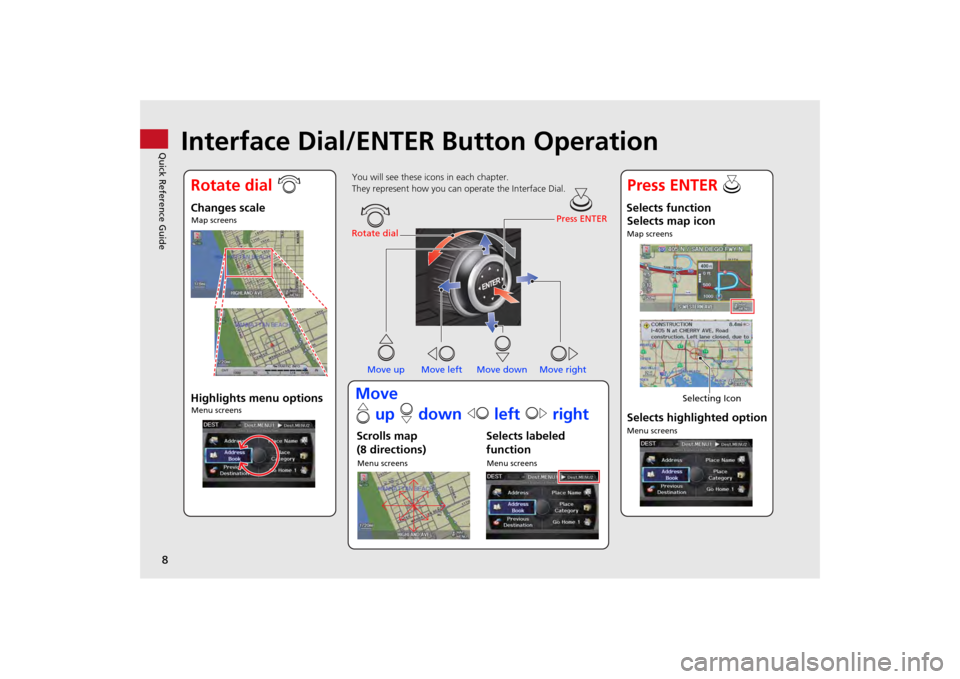
Interface Dial/ENTER Button Operation
You will see these icons in each chapter.
They represent how you can operate the Interface Dial.
Changes scaleMap screensHighlights menu optionsMenu screens
Rotate dial Press ENTER
Move up Move left Move down Move rightScrolls map
(8 directions)Menu screens
Selects labeled
functionMenu screens
Selects function Selects map iconMap screens
Selecting Icon
Selects highlighted optionMenu screens
Rotate dial i Press ENTER u
Move
e up r down w left y right
Page 11 of 267
9Quick Reference Guide
How to Enter InformationYou can enter information (e.g., city names, street names, personal names, and business names comprising letters, numbers, and symbols)
when prompted on input screens by two different methods.Using Voice ControlWhen you see d in this manual, voice commands are available for
that feature.
Say the letter, number, or symbol (e.g., say d “A”).
Use spelling assist (e.g., say d “Alpha” to enter the letter “A” or
d “Hyphen” to enter a hyphen).
The system beeps if you say an unavailable (grayed out) letter or
number.
If a voice command is not recognized, a list is displayed with
possible options.On list screens:Say the number of the list item (e.g., say d “Five” to select item
5).
Say d “Up” or d “Previous” to scroll up one page.
Say d “Down” or d “Next” to scroll down one page.
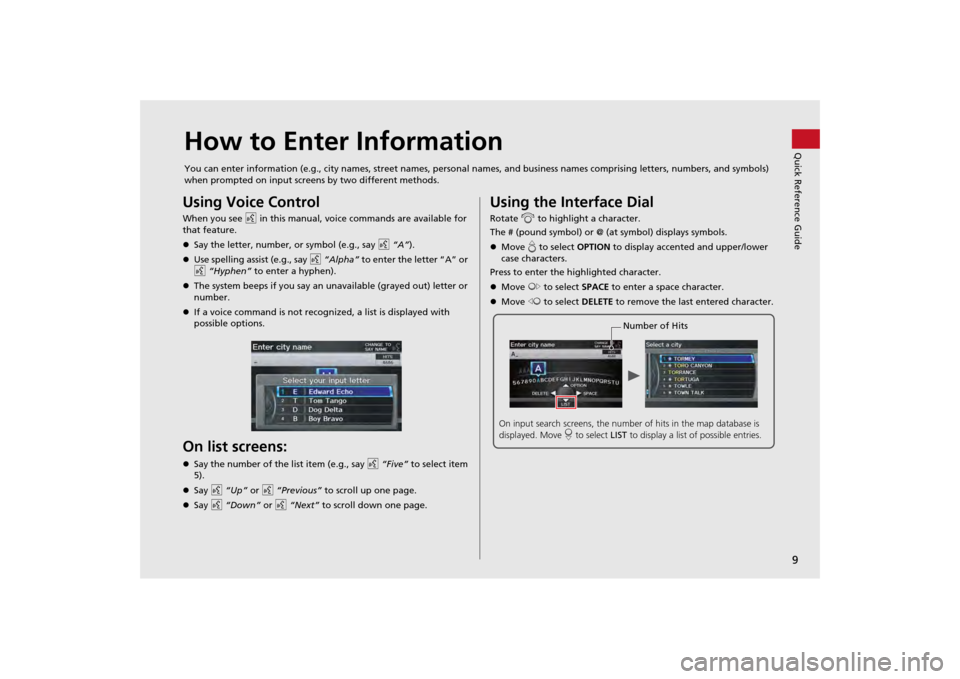
Using the Interface DialRotate i to highlight a character.
The # (pound symbol) or @ (a t symbol) displays symbols.
Move e to select OPTION to display accented and upper/lower
case characters.
Press to enter the highlighted character.
Move y to select SPACE to enter a space character.
Move w to select DELETE to remove the last entered character.
Number of Hits
On input search screens, the number of hits in the map database is
displayed. Move r to select LIST to display a list of possible entries.
Page 17 of 267
15Quick Reference Guide
Rear Entertainment System
(P189)
The rear passengers can enjoy a wide array of audio/visual sources with the Rear Entertainment System (RES). The rear passengers can use
wireless headphones and operate the system with the remote control panel.
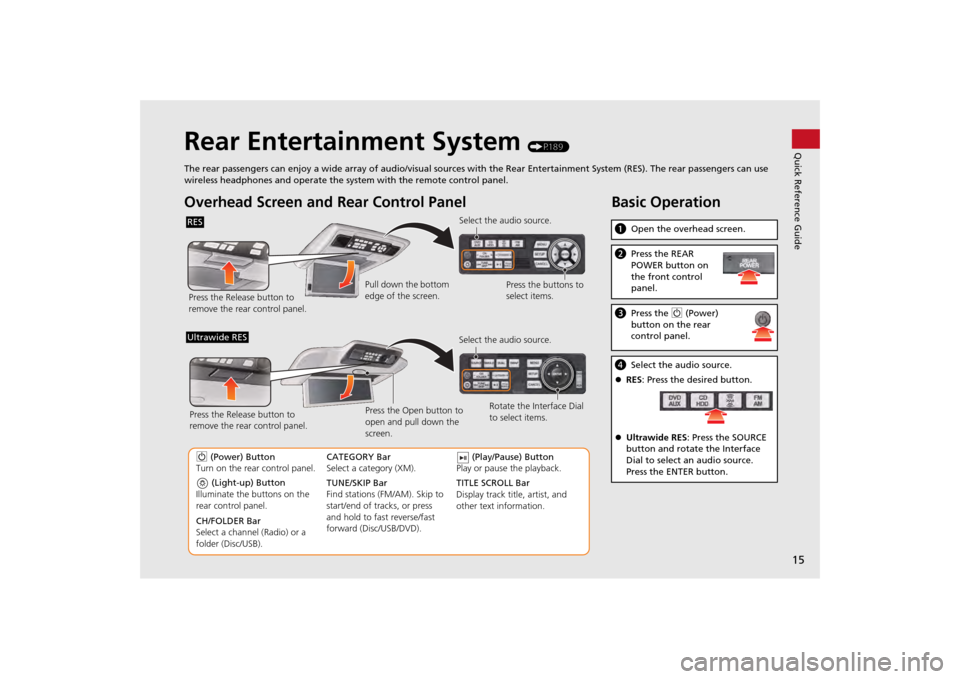
Overhead Screen and Rear Control PanelRESPress the Release button to
remove the rear control panel. Select the audio source.
Press the buttons to
select items.
Pull down the bottom
edge of the screen.
(Light-up) Button
Illuminate the buttons on the
rear control panel.
9 (Power) Button
Turn on the rear control panel.
CH/FOLDER Bar
Select a channel (Radio) or a
folder (Disc/USB). TUNE/SKIP Bar
Find stations (FM/AM). Skip to
start/end of tracks, or press
and hold to fast reverse/fast
forward (Disc/USB/DVD). CATEGORY Bar
Select a category (XM).
(Play/Pause) Button
Play or pause the playback.
TITLE SCROLL Bar
Display track title, artist, and
other text information. Select the audio source.
Rotate the Interface Dial
to select items.
Ultrawide RES
Press the Open button to
open and pull down the
screen.
Press the Release button to
remove the rear control panel.
Basic Operationa
Open the overhead screen.bPress the REAR
POWER button on
the front control
panel.cPress the 9 (Power)
button on the rear
control panel.d Select the audio source.
RES : Press the desired button.
Ultrawide RES : Press the SOURCE
button and rotate the Interface
Dial to select an audio source.
Press the ENTER button.
Page 24 of 267
22System Setup
Voice Control SystemYour vehicle has a voice control system that allows hands-free operation of most of
the navigation system functions. You can also control the audio and climate control
system, and make and rece ive phone calls using Bluetooth ® HandsFreeLink®.
The voice control system uses the d (Talk) and K (Back) buttons on the steering
wheel and a microphone near the map lights on the ceiling.
A “Voice Help” feature provides a tutorial that explains how to use the voice control
system.2 Voice Help
P. 5
Command InputIf the system does not understand a command or you wait too long to give a
command, it responds with “Pardon,” “Please repeat,” or “Would you say again.”
When you give a command, the system ge nerally either repeats the command as a
confirmation or asks you for further informa tion. If you do not wish to hear this
feedback, you can turn it off. However, list ening to the feedback will help familiarize
you with the way the system expe cts commands to be phrased. 2Basic Settings
P. 26
If the system cannot perform a command or the command is not appropriate for the
screen you are on, the system beeps.
If the system responds with prompts such as “Please use the Interface Dial to…” or
“Please choose an area with the Interface Di al,” the system is asking for input that
cannot be performed using the voice control system.
On character input screens, a list of possi ble characters is displayed if the system
does not recognize your command.
You can find out which voice commands are available for a particular screen using
the d Help command. The system will disp lay and read the list of available
commands to you.
1 d (Talk) Button
When you press the d (Talk) button, a helpful
prompt asks what you would like to do. Press
and release the d (Talk) button again to bypass
this prompt and give a command.1 Command Input
The audio system is muted while using the voice
control system.
Page 32 of 267
30
Interface Settings
Color
System Setup
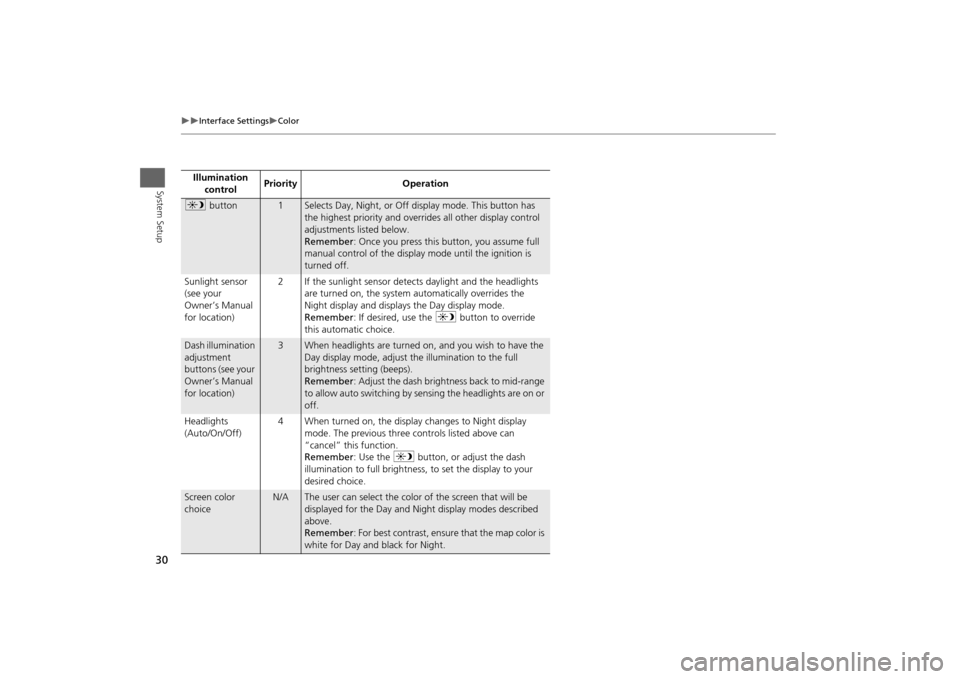
Illumination control Priority Operationa
button
1
Selects Day, Night, or Off display mode. This button has
the highest priority and overrides all other display control
adjustments listed below.
Remember : Once you press this button, you assume full
manual control of the display mode until the ignition is
turned off.
Sunlight sensor
(see your
Owner’s Manual
for location) 2 If the sunlight sensor detects daylight and the headlights
are turned on, the system automatically overrides the
Night display and displays the Day display mode.
Remember : If desired, use the a button to override
this automatic choice.
Dash illumination
adjustment
buttons (see your
Owner’s Manual
for location)
3
When headlights are turned on, and you wish to have the
Day display mode, adjust the illumination to the full
brightness setting (beeps).
Remember : Adjust the dash brightness back to mid-range
to allow auto switching by sensing the headlights are on or
off.
Headlights
(Auto/On/Off) 4 When turned on, the display changes to Night display
mode. The previous three controls listed above can
“cancel” this function.
Remember : Use the a button, or adjust the dash
illumination to full brightness, to set the display to your
desired choice.
Screen color
choice
N/A
The user can select the color of the screen that will be
displayed for the Day and Night display modes described
above.
Remember : For best contrast, ensure that the map color is
white for Day and black for Night.
Page 46 of 267
44
Personal Information
Previous Destinations
System Setup
Previous DestinationsHINFO button
Setup
Personal Information
Previous Destinations
The navigation system maintains a list of your previously routed destinations as a
shortcut for entering the same destination in the future. You can delete some or all
of your previous destinations from the list.
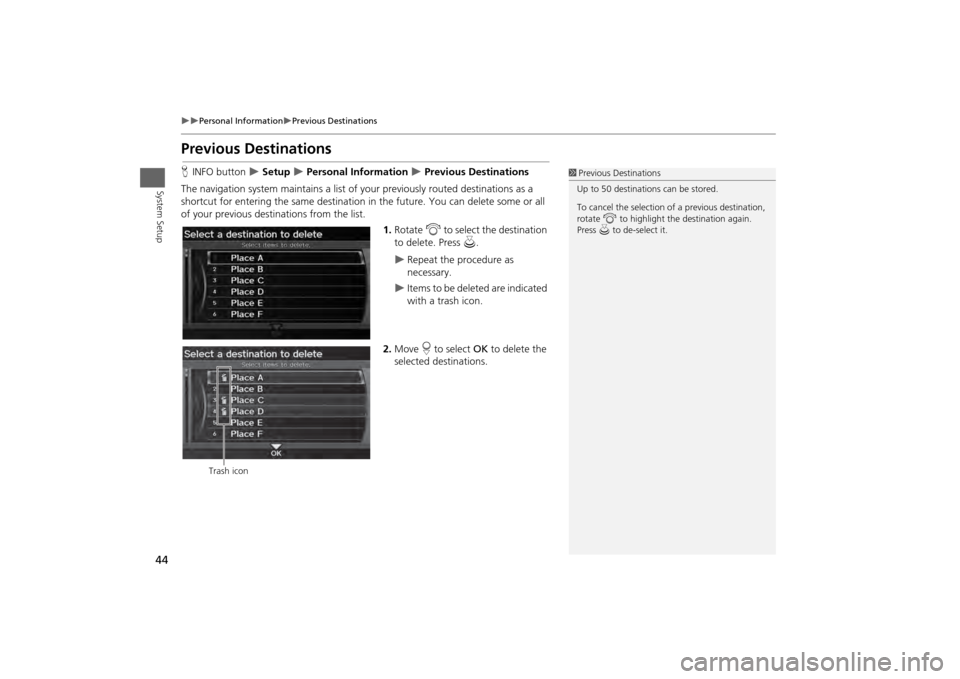
1.Rotate i to select the destination
to delete. Press u.
Repeat the procedure as
necessary.
Items to be deleted are indicated
with a trash icon.
2. Move r to select OK to delete the
selected destinations.
1 Previous Destinations
Up to 50 destinations can be stored.
To cancel the selection of a previous destination,
rotate i to highlight the destination again.
Press u to de-select it.
Trash icon
Page 53 of 267
51
Routing & Guidance
Unverified Area Routing
System Setup
Unverified Area RoutingHINFO button
Setup
Other
Routing & Guidance
Unverified Area
Routing
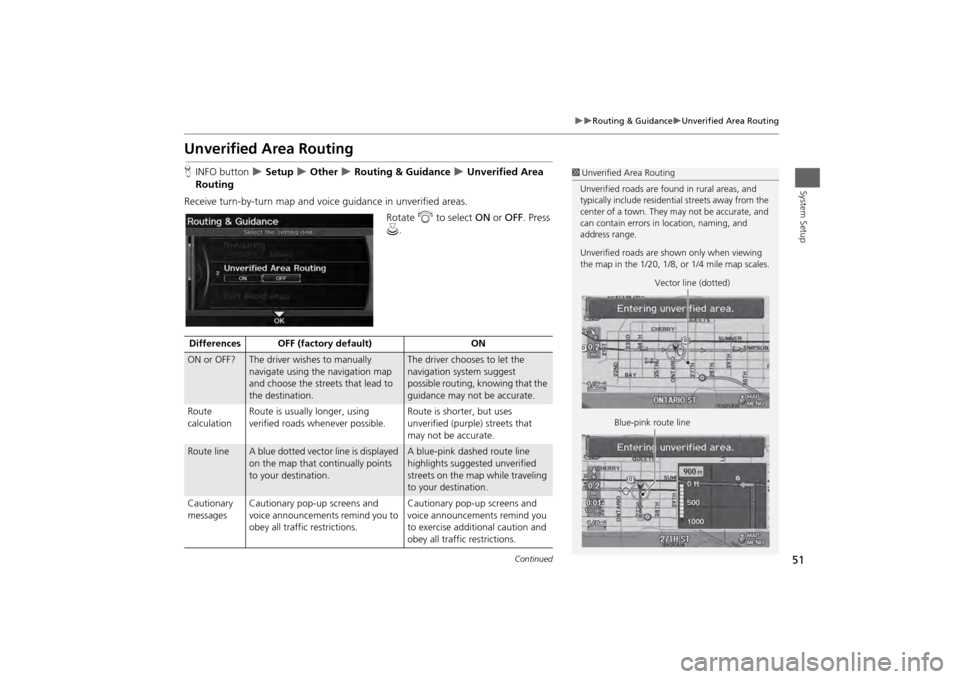
Receive turn-by-turn map and voice guidance in unverified areas. Rotate i to select ON or OFF. Press
u .
1Unverified Area Routing
Unverified roads are found in rural areas, and
typically include residential streets away from the
center of a town. They may not be accurate, and
can contain errors in location, naming, and
address range.
Unverified roads are s hown only when viewing
the map in the 1/20, 1/8, or 1/4 mile map scales.
Vector line (dotted)
Blue-pink route line
Differences OFF (factory default) ONON or OFF?
The driver wishes to manually
navigate using the navigation map
and choose the streets that lead to
the destination.
The driver chooses to let the
navigation system suggest
possible routing, knowing that the
guidance may not be accurate.
Route
calculation Route is usually longer, using
verified roads whenever possible. Route is shorter, but uses
unverified (purple)
streets that
may not be accurate.
Route line
A blue dotted vector line is displayed
on the map that continually points
to your destination.
A blue-pink dashed route line
highlights suggested unverified
streets on the map while traveling
to your destination.
Cautionary
messages Cautionary pop-up screens and
voice announcements remind you to
obey all traffic restrictions. Cautionary pop-up screens and
voice announcements remind you
to exercise additional caution and
obey all traffic restrictions.
Continued
Page 57 of 267
55
Routing & Guidance
Edit Waypoint Search Area
System Setup
Edit Waypoint Search AreaHINFO button
Setup
Other
Routing & Guidance
Edit Waypoint
Search Area
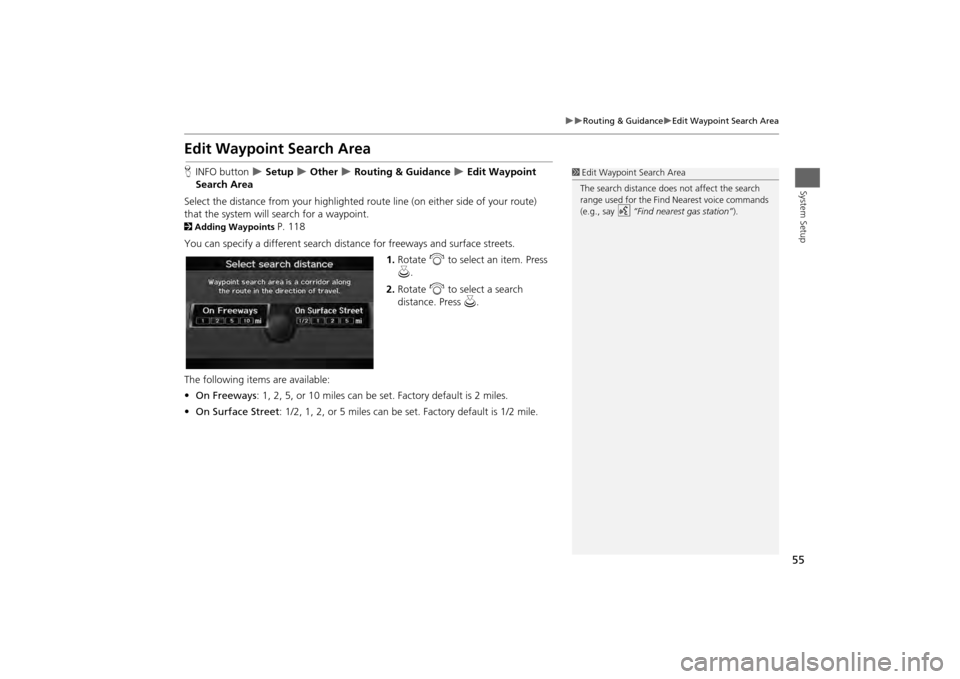
Select the distance from your highlighted ro ute line (on either side of your route)
that the system will search for a waypoint.
2 Adding Waypoints
P. 118
You can specify a different search distance for freeways and surface streets. 1.Rotate i to select an item. Press
u .
2. Rotate i to select a search
distance. Press u.
The following items are available:
• On Freeways : 1, 2, 5, or 10 miles can be set. Factory default is 2 miles.
• On Surface Street : 1/2, 1, 2, or 5 miles can be set. Factory default is 1/2 mile.
1Edit Waypoint Search Area
The search distance does not affect the search
range used for the Find Nearest voice commands
(e.g., say
d
“Find nearest gas station” ).
Page 60 of 267
58System Setup
Clock AdjustmentHINFO button
Clock/Wallpaper
Clock Adjustment
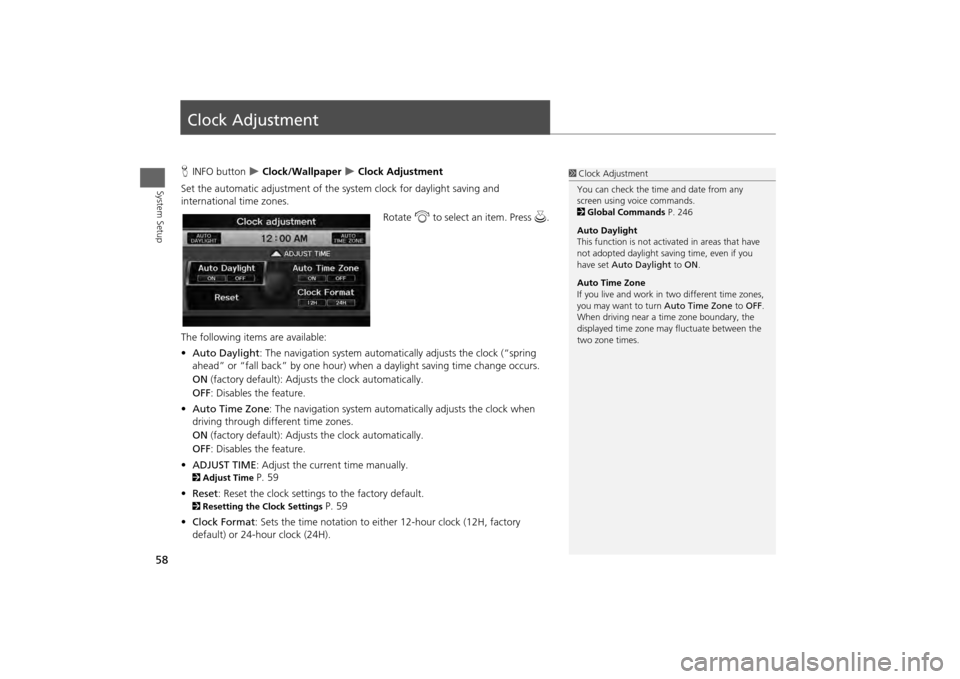
Set the automatic adjustment of the system clock for daylight saving and
international time zones.
Rotate i to select an item. Press u .
The following item s are available:
• Auto Daylight : The navigation system automati cally adjusts the clock (“spring
ahead” or “fall back” by one hour) when a daylight saving time change occurs.
ON (factory default): Adjust s the clock automatically.
OFF : Disables the feature.
• Auto Time Zone : The navigation system automati cally adjusts the clock when
driving through different time zones.
ON (factory default): Adjust s the clock automatically.
OFF : Disables the feature.
• ADJUST TIME : Adjust the current time manually.
2Adjust Time
P. 59
• Reset : Reset the clock settings to the factory default.
2Resetting the Clock Settings
P. 59
• Clock Format : Sets the time notation to either 12-hour clock (12H, factory
default) or 24-hour clock (24H).
1 Clock Adjustment
You can check the time and date from any
screen using voice commands.
2 Global Commands P. 246
Auto Daylight
This function is not activated in areas that have
not adopted daylight saving time, even if you
have set Auto Daylight to ON .
Auto Time Zone
If you live and work in two different time zones,
you may want to turn Auto Time Zone to OFF.
When driving near a time zone boundary, the
displayed time zone ma y fluctuate between the
two zone times.