ignition HONDA ODYSSEY 2013 RC1-RC2 / 5.G Technology Reference Guide
[x] Cancel search | Manufacturer: HONDA, Model Year: 2013, Model line: ODYSSEY, Model: HONDA ODYSSEY 2013 RC1-RC2 / 5.GPages: 21, PDF Size: 2.87 MB
Page 3 of 21

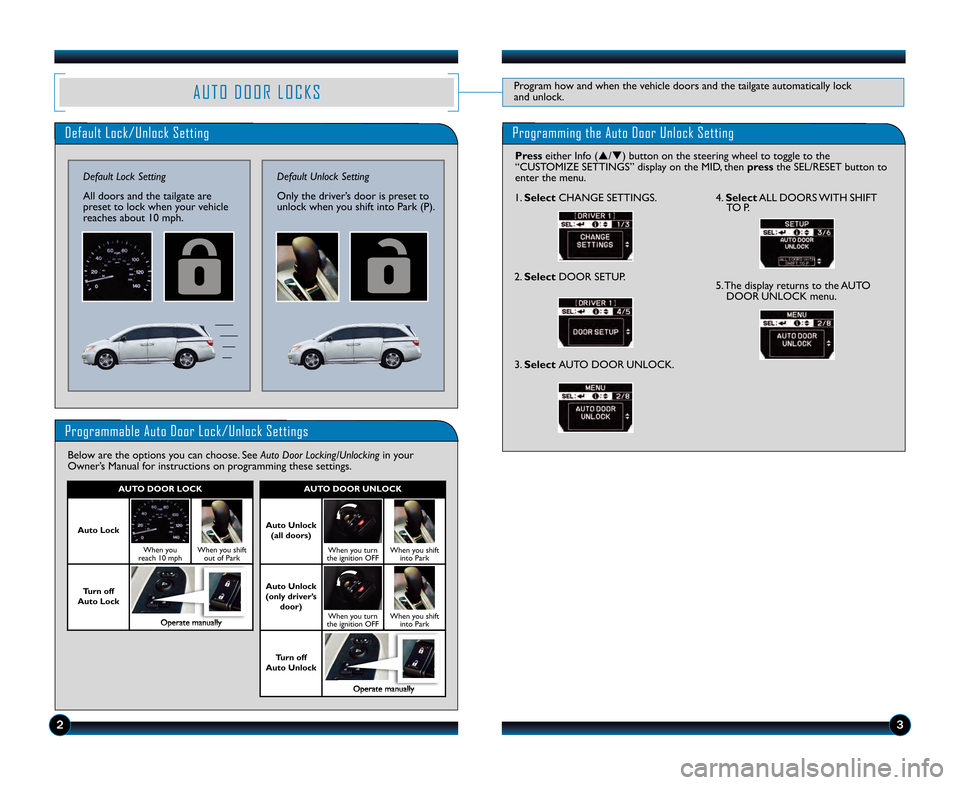
A U T O D O O R L O C K SProgram how and when the vehicle doors and the tailgate automatically lock
and unlock.
Default Lock/Unlock Setting
Default Lock Setting
All doors and the tailgate are
preset to lock when your vehicle
reaches about \f0 mph.
Programming the Auto Door Unlock Setting
Programmable Auto Door Lock/Unlock Settings
Press either Info (p/q) button on the steering wheel to toggle to \2the
“CUSTOMIZE SETTINGS” display on the MID, then press the SEL/RESET button to
enter the menu.
Below are the options you can choose. See Auto Door Locking/Unlocking in your
Owner’s Manual for instructions on programming these settings. \f. Select CHANGE SETTINGS.
2. Select DOOR SETUP.
3. Select AUTO DOOR UNLOCK.
4 . Select
ALL DOORS WITH SHIFT
TO P.
5. The display returns to the AUTO
DOOR UNLOCK menu.
Default Unlock Setting
Only the driver’s door is preset to
unlock when you shift into Park (P).
23
AUTO DOOR UNLO\fK
Auto Unlock
(all doors)
When you turn
the ignition OFFWhen you shift into Park
Auto Unlock
(only driver’s door)
When you turn
the ignition OFFWhen you shift into Park
Turn off
Auto Unlock
Operate manually
AUTO DOOR LO\fK
Auto Lock
When you
reach \f0 mphWhen you shift out of Park
Turn off
Auto Lock
Operate manually
13 Odyssey TRG_TOURIN\AG_qv9_ATG_NEW STYLE \A 8/\b/2012 12\f2\b PM \A Page 3
Page 6 of 21

9\b
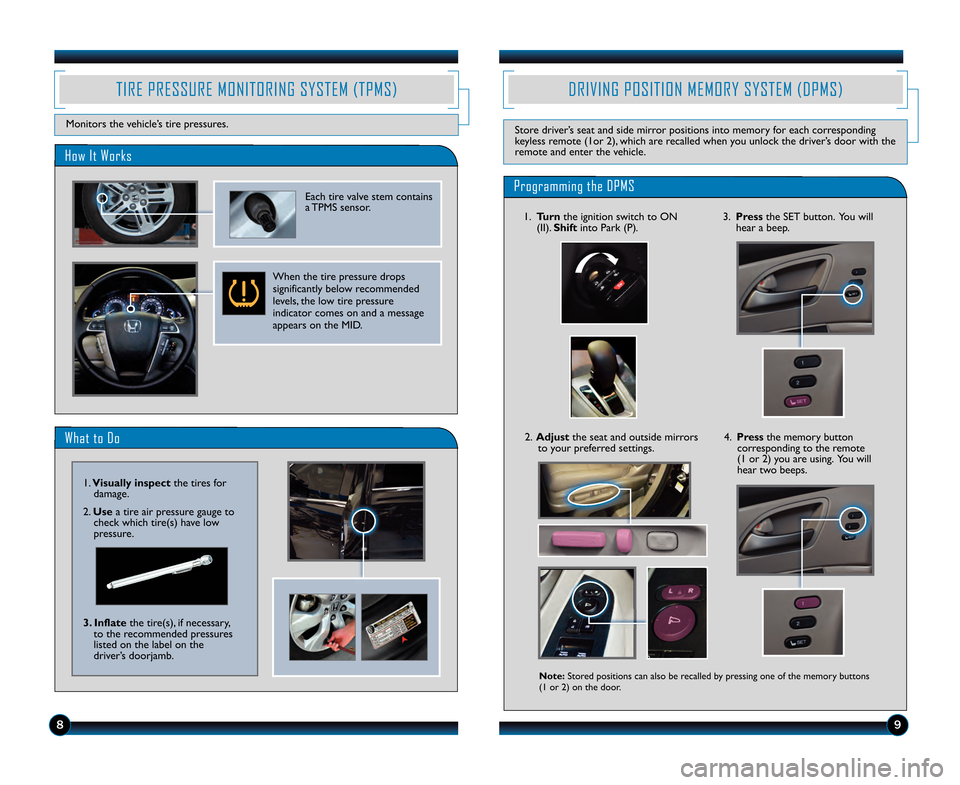
DRIVING POSITION MEMORY SYSTEM (DPMS)
Store driver’s seat and side mirror positions into memory for each corresponding
keyless remote (\for 2), which are recalled when you unlock the driver’s door with the
remote and enter the vehicle.
Programming the DPMS
Note: Stored positions can also be recalled by pressing one of the memory buttons
(\f or 2) on the door.
\f. Turn the ignition switch to ON (II). Shift into Park (P).
2. Adjust the seat and outside mirrors
to your preferred settings. 3. Press the SET button. You will
hear a beep.
4. Press the memory button
corresponding to the remote
(\f or 2) you are using. You will
hear two beeps.
What to Do
How It Works
TIRE PRESSURE MONITORING SYSTEM (TPMS)
Monitors the vehicle’s tire pressures.
Each tire valve stem contains
a TPMS sensor.
When the tire pressure drops
significantly below recommended
levels, the low tire pressure
indicator comes on and a message
appears on the MID.
\f. Visually inspect the tires for
damage.
2. Use a tire air pressure gauge to
check which tire(s) have low
pressure.
\b. Inflate the tire(s), if necessary,
to the recommended pressures
listed on the label on the
driver’s doorjamb.
13 Odyssey TRG_TOURIN\AG_qv9_ATG_NEW STYLE \A 8/\b/2012 12\f2\b PM \A Page \b
Page 8 of 21

1312
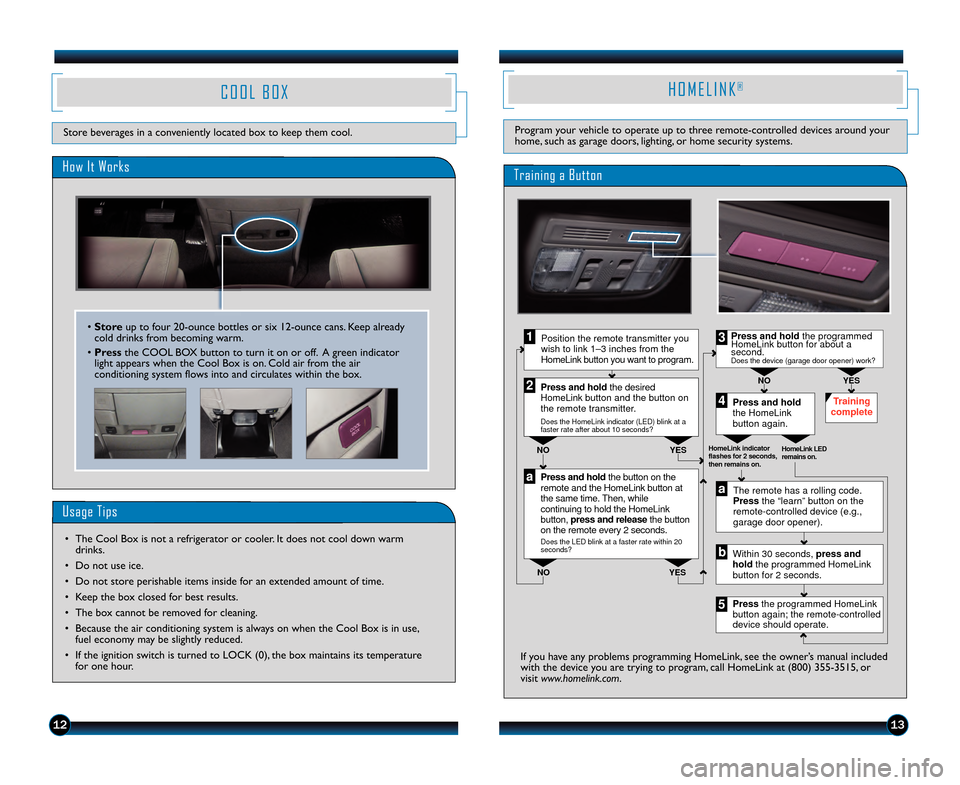
H O M E L I N K®
Program your vehicle to operate up to three remote\bcontrolled devices around your
home, such as garage doors, lighting, or home security systems.
Pres s and hold the button on the
remot e and the Hom eLink button at
the same t im e. T hen, whi le
continuing to hold the HomeL ink
button, press and release the button
on the remote every 2 seconds.
Does the LED blink at a f aster rate within 2 0
seconds ?
Press and hold
the HomeLink
button again. Training
complete
YES
NO
HomeLink indi cator
flashes for 2 seconds,
then remains on. HomeLink LED
remains on.YES
NO YES
NO
Position the remote transmitter you
wish to link 1–3 i nches from the
Home Link button you want to program .1
Press and h old the desired
Home Link button and the button on
the remote transmitter.
Does the HomeLin k indic ator (LED) blink at a
faster rate after about 10 seconds?
2
a
The remote has a rolling code.
Press the “learn” button on the
remote-controlled device (e.g.,
garage door op ener).
Press the prog rammed Home Link
button agai n; the remote-controlle d
device sho uld operate.
Within 30
seconds, press and
hold the programmed Hom eLink
button for 2 seconds.a
Press and hold the programm ed
HomeLink butt on for about a
second.
Does the device (garage do or opener) work?
3
b
4
5
Training a Button
If you have any problems programming HomeLink, see the owner’s manual included
with the device you are trying to program, call HomeLink at (800) 355\b3\25\f5, or
visit www.homelink.com.
C O O L B O X
Store beverages in a conveniently located box to keep them cool.
How It Works
Usage Tips
• The Cool Box is not a refrigerator or cooler. It does not cool down warm drinks.
• Do not use ice.
• Do not store perishable items inside for an extended amount of time.
• Keep the box closed for best results.
• The box cannot be removed for cleaning.
• Because the air conditioning system is always on when the Cool Box is in use, fuel economy may be slightly reduced.
• If the ignition switch is turned to LOCK (0), the box maintains its temperature for one hour.
• Store up to four 20\bounce bottles or six \f2\bounce cans. Keep already
cold drinks from becoming warm.
• Press the COOL BOX button to turn it on or off. A green indicator
light appears when the Cool Box is on. Cold air from the air
conditioning system flows into and circulates within the box.
13 Odyssey TRG_TOURIN\AG_qv9_ATG_NEW STYLE \A 8/\b/2012 12\f2\b PM \A Page 8