display HONDA ODYSSEY 2014 RC1-RC2 / 5.G Navigation Manual
[x] Cancel search | Manufacturer: HONDA, Model Year: 2014, Model line: ODYSSEY, Model: HONDA ODYSSEY 2014 RC1-RC2 / 5.GPages: 327, PDF Size: 19.96 MB
Page 238 of 327
237
Text Message/E-mail
Displaying Messages
Bluetooth® HandsFreeLink®
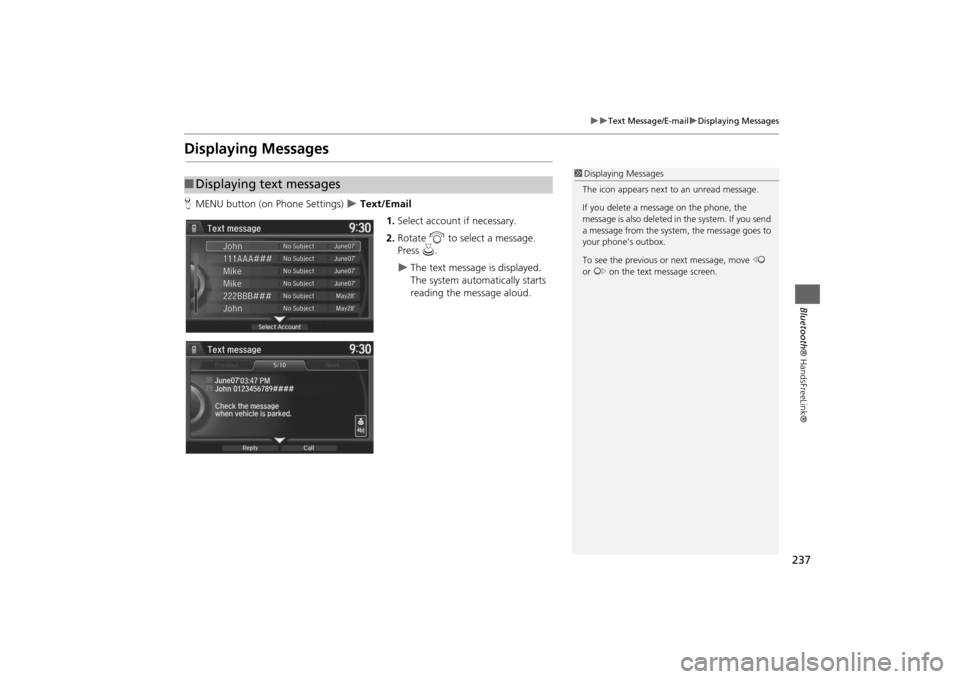
Displaying MessagesHMENU button (on Phone Settings)
Text/Email
1.Select account if necessary.
2.Rotate i to select a message.
Press u.
The text message is displayed.
The system automatically starts
reading the message aloud.
■Displaying text messages
1Displaying Messages
The icon appears next to an unread message.
If you delete a message on the phone, the
message is also deleted in the system. If you send
a message from the system, the message goes to
your phone’s outbox.
To see the previous or next message, move w
or y on the text message screen.
Page 239 of 327
238
Text Message/E-mail
Displaying Messages
Bluetooth® HandsFreeLink®
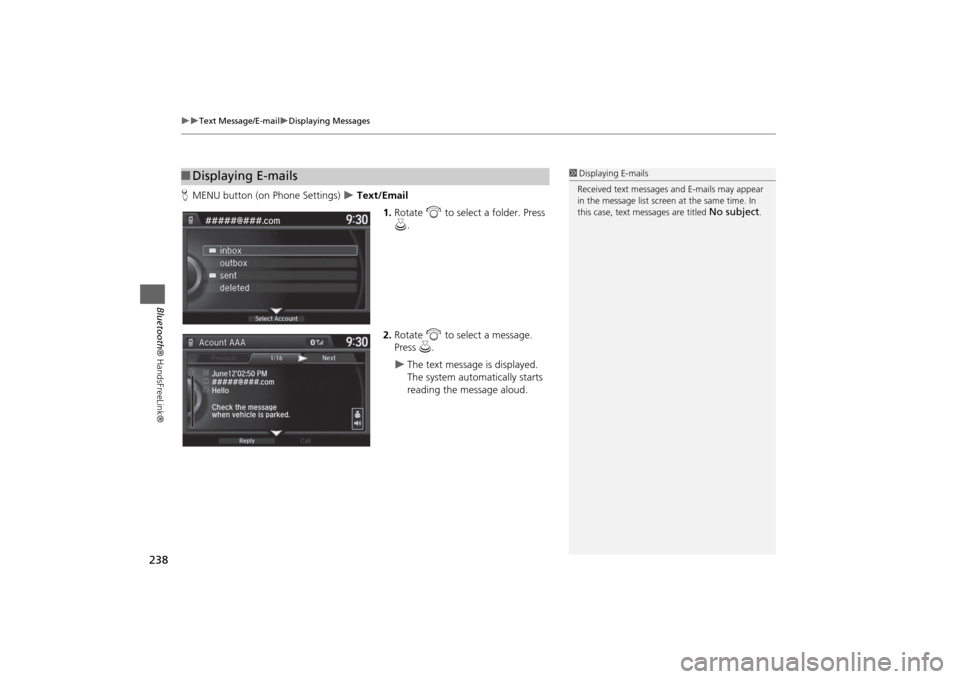
HMENU button (on Phone Settings)
Text/Email
1.Rotate i to select a folder. Press
u.
2.Rotate i to select a message.
Press u.
The text message is displayed.
The system automatically starts
reading the message aloud.
■Displaying E-mails
1Displaying E-mails
Received text messages and E-mails may appear
in the message list screen at the same time. In
this case, text messages are titled
No subject
.
Page 240 of 327
239
Text Message/E-mail
Displaying Messages
Bluetooth® HandsFreeLink®
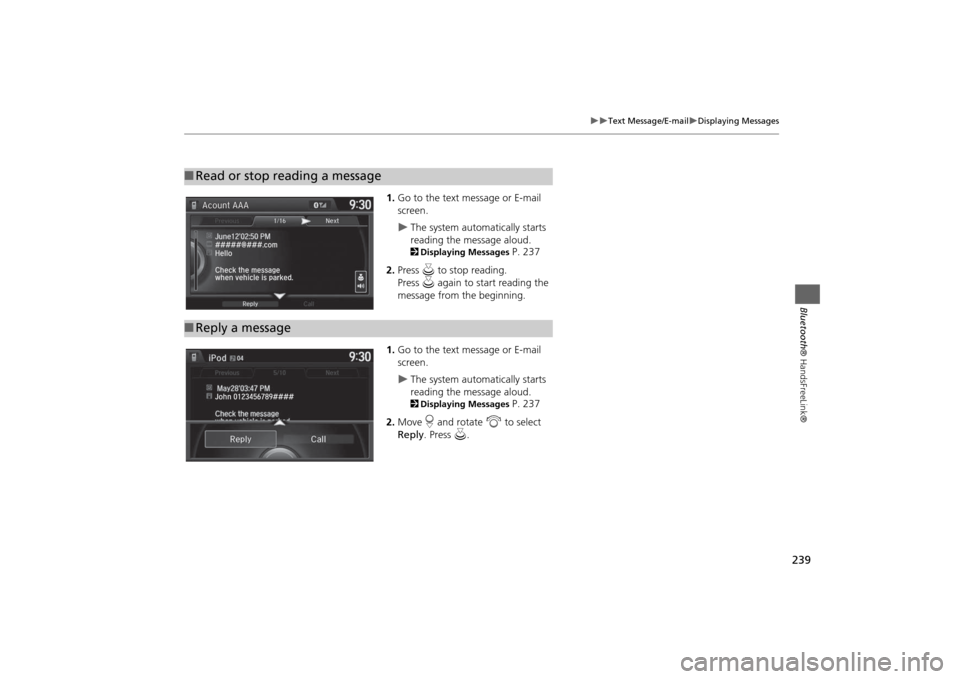
1.Go to the text message or E-mail
screen.
The system automatically starts
reading the message aloud.2Displaying Messages
P. 237
2.Press u to stop reading.
Press u again to start reading the
message from the beginning.
1.Go to the text message or E-mail
screen.
The system automatically starts
reading the message aloud.2Displaying Messages
P. 237
2.Move r and rotate i to select
Reply. Press u.
■Read or stop reading a message■Reply a message
Page 241 of 327
240
Text Message/E-mail
Displaying Messages
Bluetooth® HandsFreeLink®
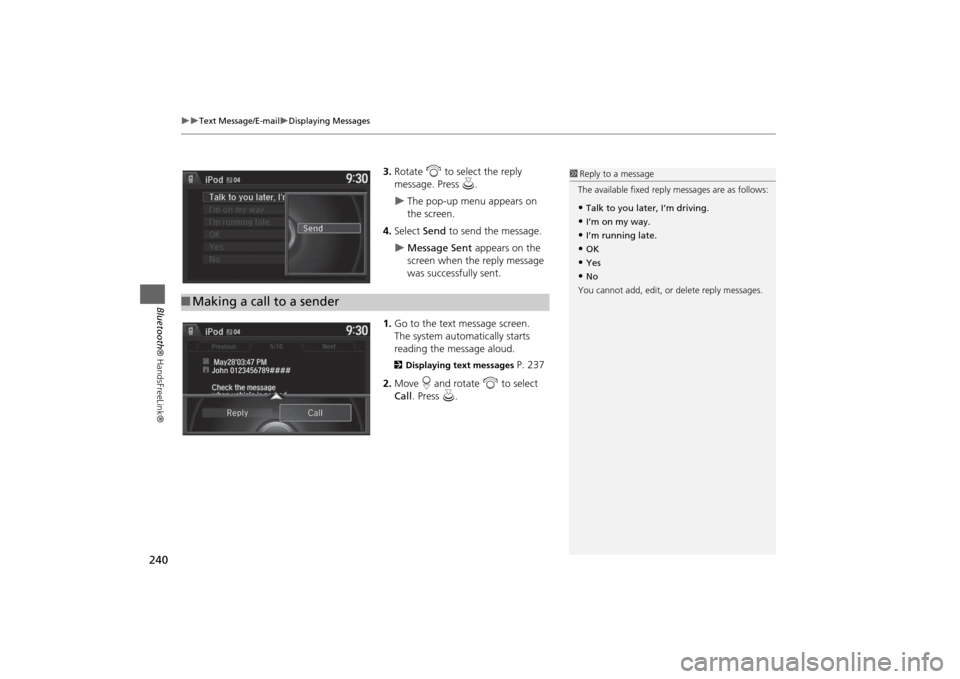
3.Rotate i to select the reply
message. Press u.
The pop-up menu appears on
the screen.
4.Select Send to send the message.
Message Sent appears on the
screen when the reply message
was successfully sent.
1.Go to the text message screen.
The system automatically starts
reading the message aloud.
2Displaying text messages
P. 237
2.Move r and rotate i to select
Call. Press u.
■Making a call to a sender
1Reply to a message
The available fixed reply messages are as follows:•Talk to you later, I’m driving.•I’m on my way.•I’m running late.•OK•Yes•No
You cannot add, edit, or delete reply messages.
Page 243 of 327
242
Text Message/E-mail
HFL Menus
Bluetooth® HandsFreeLink®
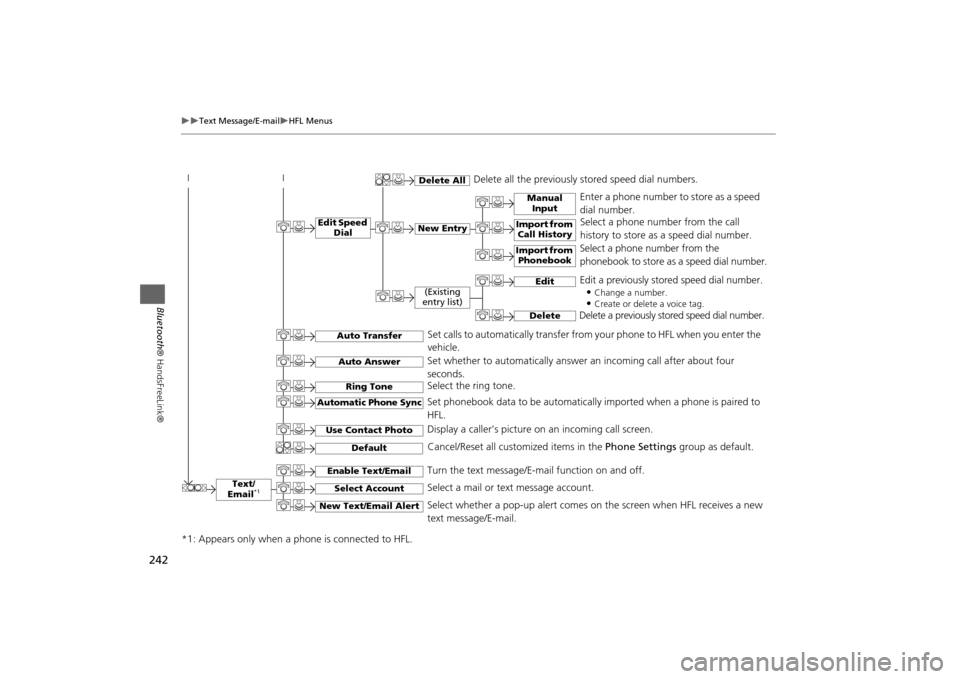
Text/
Email
*1
Manual
Input
Edit Speed
Dial
New Entry
Import from
Call History
*1: Appears only when a phone is connected to HFL.
Import from
Phonebook
Delete All
Delete all the previously stored speed dial numbers.
Select a phone number from the call
history to store as a speed dial number.
Select a phone number from the
phonebook to store as a speed dial number. Enter a phone number to store as a speed
dial number.
Edit
Delete
(Existing
entry list)
Edit a previously stored speed dial number.
•
Change a number.•Create or delete a voice tag.
Delete a previously stored speed dial number.
Set calls to automatically transfer from your phone to HFL when you enter the
vehicle.
Auto TransferAuto AnswerRing Tone
Set whether to automatically answer an incoming call after about four
seconds.
Select the ring tone.
Use Contact Photo
Set phonebook data to be automatically imported when a phone is paired to
HFL.
Display a caller’s picture on an incoming call screen.
Automatic Phone Sync
Select Account
Select a mail or text message account.
Enable Text/Email
Turn the text message/E-mail function on and off.
New Text/Email Alert
Select whether a pop-up alert comes on the screen when HFL receives a new
text message/E-mail.
Cancel/Reset all customized items in the Phone Settings group as default.
Default
Page 244 of 327
243
Text Message/E-mail
HFL Menus
Bluetooth® HandsFreeLink®
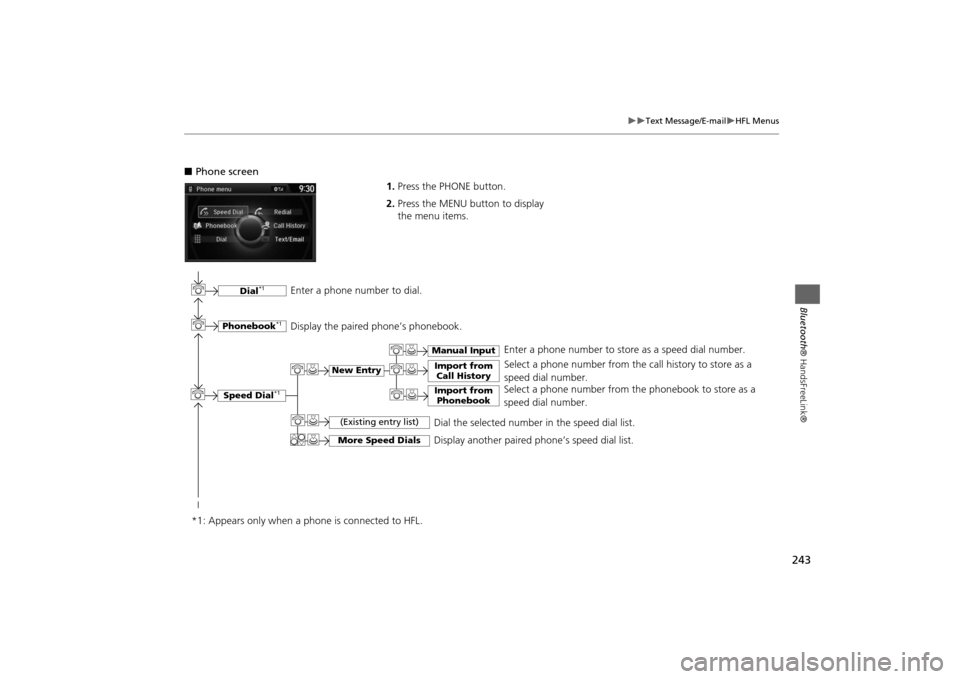
■Phone screen
1.Press the PHONE button.
2.Press the MENU button to display
the menu items.
Select a phone number from the call history to store as a
speed dial number.
Speed Dial
*1
Manual Input
New Entry
Import from
Call HistoryImport from
Phonebook
Select a phone number from the phonebook to store as a
speed dial number.Enter a phone number to store as a speed dial number.
More Speed Dials
Display another paired phone’s speed dial list.
*1: Appears only when a phone is connected to HFL.
(Existing entry list)
Dial the selected number in the speed dial list.
Phonebook
*1
Dial
*1
Display the paired phone’s phonebook. Enter a phone number to dial.
Page 245 of 327
244
Text Message/E-mail
HFL Menus
Bluetooth® HandsFreeLink®
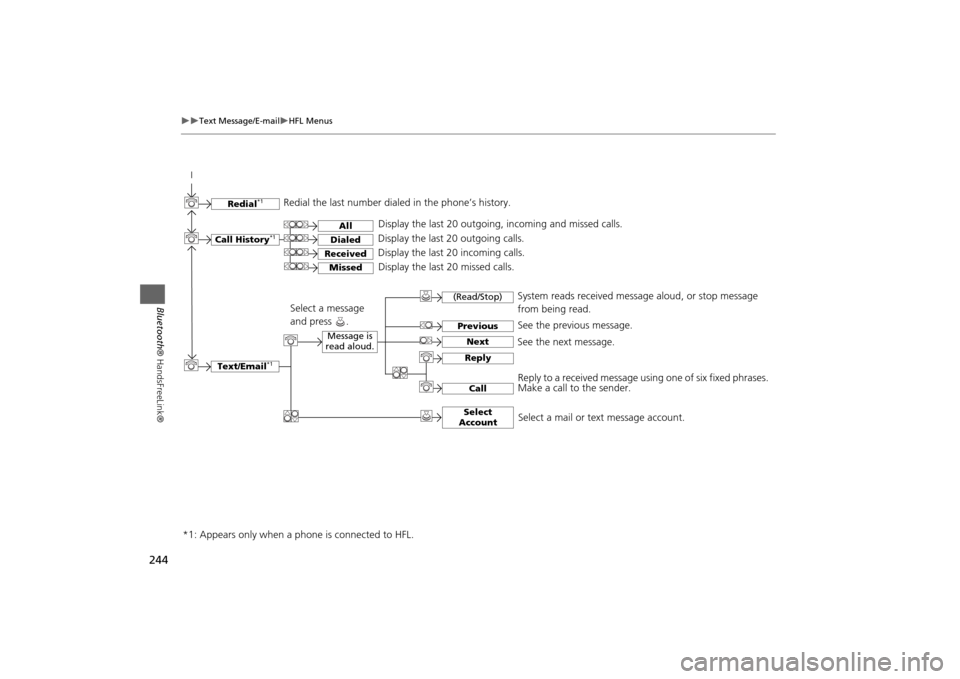
Text/Email
*1
Message is
read aloud.
See the previous message.
(Read/Stop)PreviousNext
See the next message.System reads received message aloud, or stop message
from being read.
ReplyCall
Reply to a received message using one of six fixed phrases.
Make a call to the sender.
Select
Account
Select a message
and press .
Select a mail or text message account.
Redial
*1
Redial the last number dialed in the phone’s history.
Display the last 20 outgoing, incoming and missed calls.
Call History
*1
AllDialedReceived
Display the last 20 outgoing calls.
Display the last 20 incoming calls.
Missed
Display the last 20 missed calls.
*1: Appears only when a phone is connected to HFL.
Page 247 of 327
246Rear Entertainment System
Rear Entertainment SystemThe Rear Entertainment System (RES) is operable from both the front control panel
and the rear control panel.2Front Control Panel Operation
P. 261
2Rear Control Panel Operation
P. 250
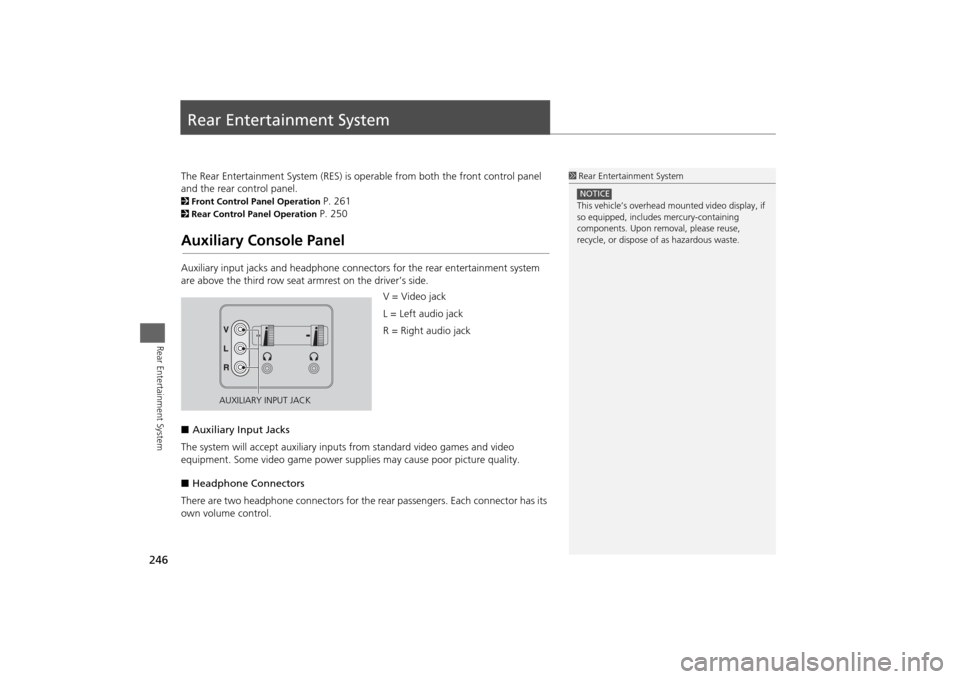
Auxiliary Console PanelAuxiliary input jacks and headphone connectors for the rear entertainment system
are above the third row seat armrest on the driver’s side.
V = Video jack
L = Left audio jack
R = Right audio jack
■Auxiliary Input Jacks
The system will accept auxiliary inputs from standard video games and video
equipment. Some video game power supplies may cause poor picture quality.
■Headphone Connectors
There are two headphone connectors for the rear passengers. Each connector has its
own volume control.
1Rear Entertainment System
This vehicle’s overhead mounted video display, if
so equipped, includes mercury-containing
components. Upon removal, please reuse,
recycle, or dispose of as hazardous waste.NOTICE
AUXILIARY INPUT JACK
Page 251 of 327
250Rear Entertainment System
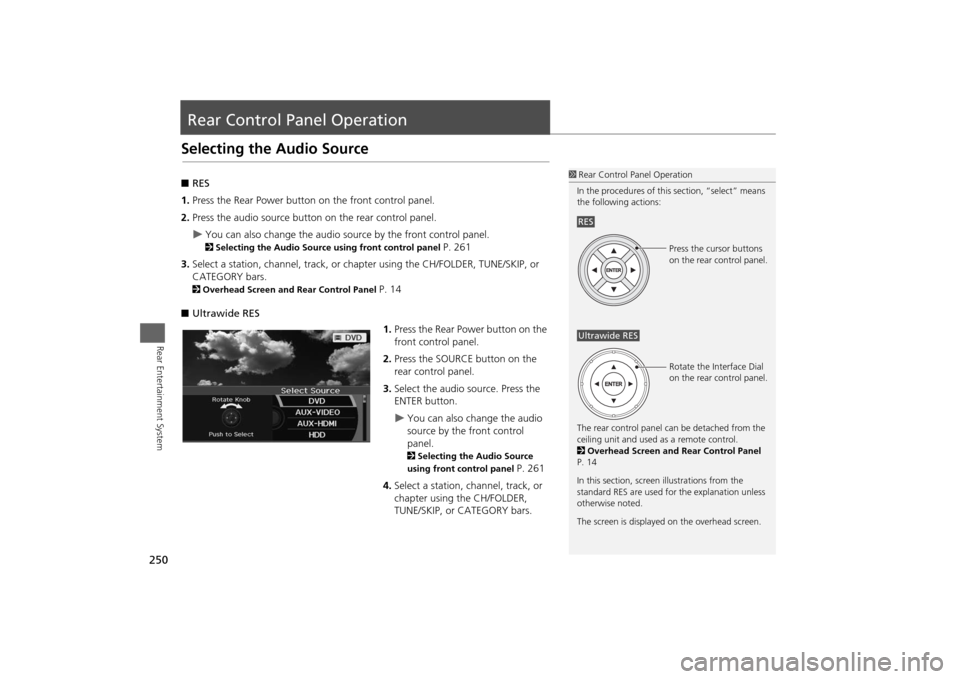
Rear Control Panel OperationSelecting the Audio Source■RES
1.Press the Rear Power button on the front control panel.
2.Press the audio source button on the rear control panel.
You can also change the audio source by the front control panel. 2Selecting the Audio Source using front control panel
P. 261
3.Select a station, channel, track, or chapter using the CH/FOLDER, TUNE/SKIP, or
CATEGORY bars.
2Overhead Screen and Rear Control Panel
P. 14
■Ultrawide RES
1.Press the Rear Power button on the
front control panel.
2.Press the SOURCE button on the
rear control panel.
3.Select the audio source. Press the
ENTER button.
You can also change the audio
source by the front control
panel. 2Selecting the Audio Source
using front control panel
P. 261
4.Select a station, channel, track, or
chapter using the CH/FOLDER,
TUNE/SKIP, or CATEGORY bars.
1Rear Control Panel Operation
In the procedures of this section, “select” means
the following actions:
The rear control panel can be detached from the
ceiling unit and used as a remote control.
2Overhead Screen and Rear Control Panel
P. 14
In this section, screen illustrations from the
standard RES are used for the explanation unless
otherwise noted.
The screen is displayed on the overhead screen.RES
Press the cursor buttons
on the rear control panel.
Ultrawide RES
Rotate the Interface Dial
on the rear control panel.
Page 252 of 327
251
Rear Control Panel Operation
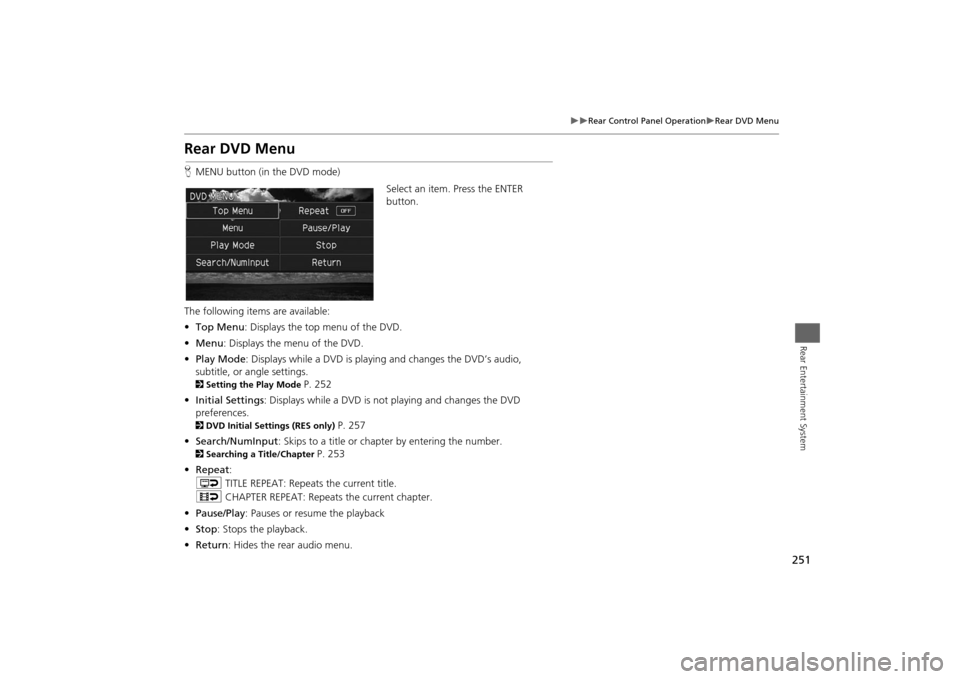
Rear DVD Menu
Rear Entertainment System
Rear DVD MenuHMENU button (in the DVD mode)
Select an item. Press the ENTER
button.
The following items are available:
•Top Menu: Displays the top menu of the DVD.
•Menu: Displays the menu of the DVD.
•Play Mode: Displays while a DVD is playing and changes the DVD’s audio,
subtitle, or angle settings.2Setting the Play Mode
P. 252
•Initial Settings: Displays while a DVD is not playing and changes the DVD
preferences.
2DVD Initial Settings (RES only)
P. 257
•Search/NumInput: Skips to a title or chapter by entering the number.
2Searching a Title/Chapter
P. 253
•Repeat:
o TITLE REPEAT: Repeats the current title.
p CHAPTER REPEAT: Repeats the current chapter.
•Pause/Play: Pauses or resume the playback
•Stop: Stops the playback.
•Return: Hides the rear audio menu.