ECU HONDA ODYSSEY 2014 RC1-RC2 / 5.G Navigation Manual
[x] Cancel search | Manufacturer: HONDA, Model Year: 2014, Model line: ODYSSEY, Model: HONDA ODYSSEY 2014 RC1-RC2 / 5.GPages: 327, PDF Size: 19.96 MB
Page 21 of 327
20System Setup
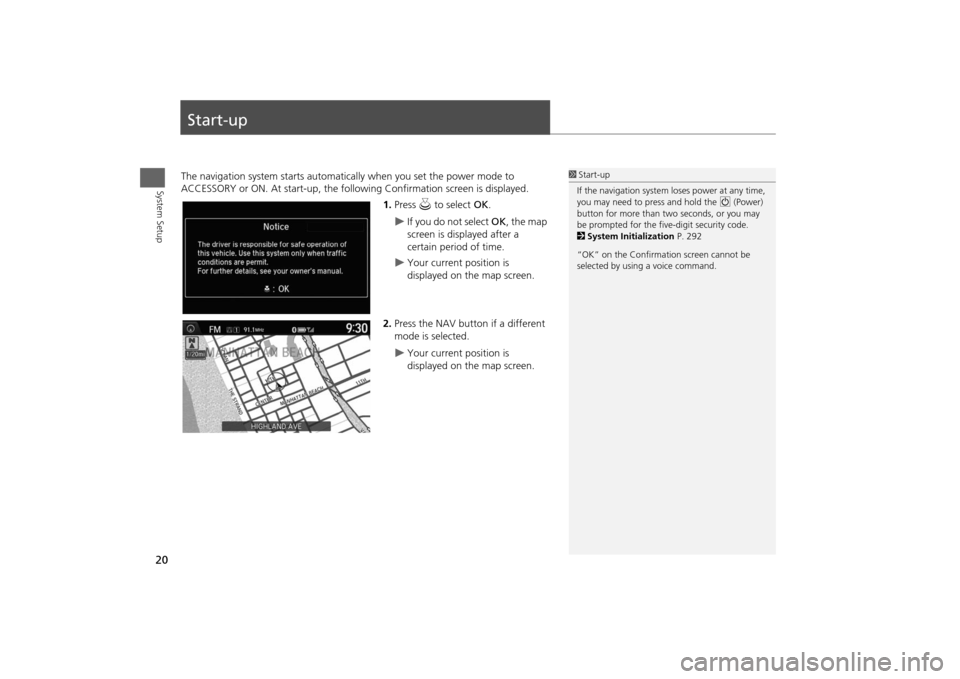
Start-upThe navigation system starts automatically when you set the power mode to
ACCESSORY or ON. At start-up, the following Confirmation screen is displayed.
1.Press u to select OK.
If you do not select OK, the map
screen is displayed after a
certain period of time.
Your current position is
displayed on the map screen.
2.Press the NAV button if a different
mode is selected.
Your current position is
displayed on the map screen.
1Start-up
If the navigation system loses power at any time,
you may need to press and hold the 9 (Power)
button for more than two seconds, or you may
be prompted for the five-digit security code.
2System Initialization P. 292
“OK” on the Confirmation screen cannot be
selected by using a voice command.
Page 44 of 327
43
Personal Information
PIN Numbers
System Setup
PIN NumbersHSETTINGS button
Navi Settings
Personal Info
PIN Number
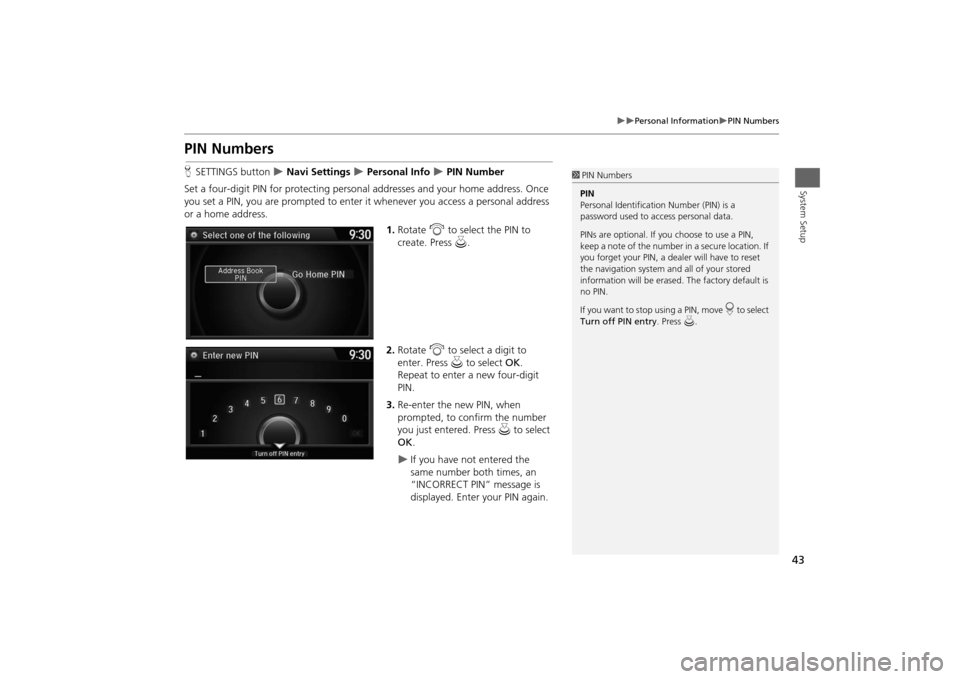
Set a four-digit PIN for protecting personal addresses and your home address. Once
you set a PIN, you are prompted to enter it whenever you access a personal address
or a home address.
1.Rotate i to select the PIN to
create. Press u.
2.Rotate i to select a digit to
enter. Press u to select OK.
Repeat to enter a new four-digit
PIN.
3.Re-enter the new PIN, when
prompted, to confirm the number
you just entered. Press u to select
OK.
If you have not entered the
same number both times, an
“INCORRECT PIN” message is
displayed. Enter your PIN again.
1PIN Numbers
PIN
Personal Identification Number (PIN) is a
password used to access personal data.
PINs are optional. If you choose to use a PIN,
keep a note of the number in a secure location. If
you forget your PIN, a dealer will have to reset
the navigation system and all of your stored
information will be erased. The factory default is
no PIN.
If you want to stop using a PIN, move
r to select
Turn off PIN entry. Press u.
Page 194 of 327
193Audio
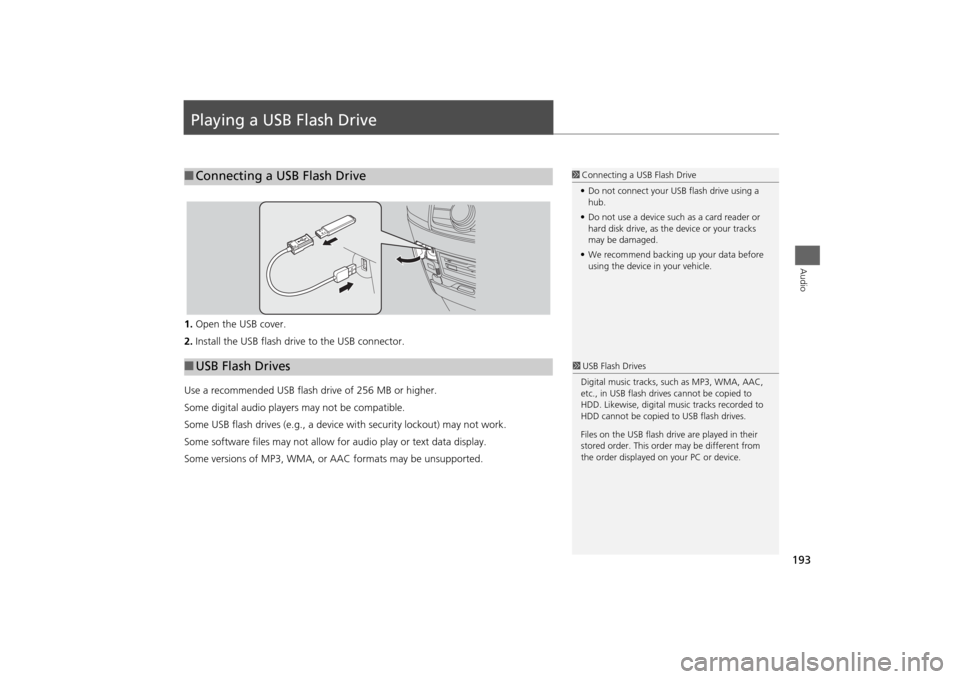
Playing a USB Flash Drive1.Open the USB cover.
2.Install the USB flash drive to the USB connector.
Use a recommended USB flash drive of 256 MB or higher.
Some digital audio players may not be compatible.
Some USB flash drives (e.g., a device with security lockout) may not work.
Some software files may not allow for audio play or text data display.
Some versions of MP3, WMA, or AAC formats may be unsupported.■Connecting a USB Flash Drive
1Connecting a USB Flash Drive
•Do not connect your USB flash drive using a
hub.
•Do not use a device such as a card reader or
hard disk drive, as the device or your tracks
may be damaged.
•We recommend backing up your data before
using the device in your vehicle.
■USB Flash Drives
1USB Flash Drives
Digital music tracks, such as MP3, WMA, AAC,
etc., in USB flash drives cannot be copied to
HDD. Likewise, digital music tracks recorded to
HDD cannot be copied to USB flash drives.
Files on the USB flash drive are played in their
stored order. This order may be different from
the order displayed on your PC or device.
Page 211 of 327
210
Bluetooth® HandsFreeLink®
Pairing a Phone
Bluetooth® HandsFreeLink®
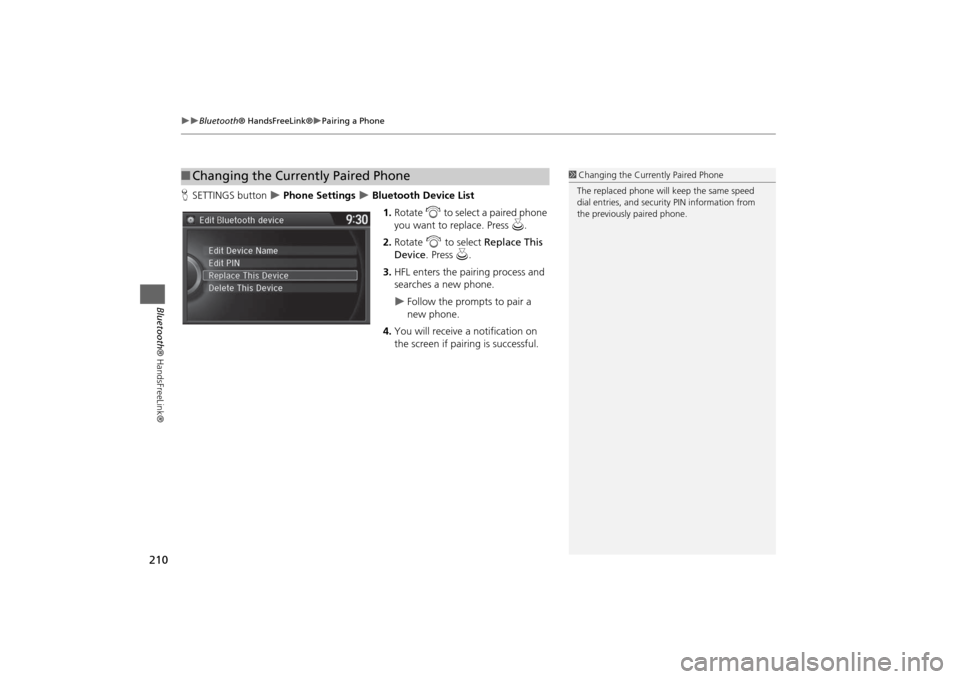
HSETTINGS button
Phone Settings
Bluetooth Device List
1.Rotate i to select a paired phone
you want to replace. Press u.
2.Rotate i to select Replace This
Device. Press u.
3.HFL enters the pairing process and
searches a new phone.
Follow the prompts to pair a
new phone.
4.You will receive a notification on
the screen if pairing is successful.
■Changing the Currently Paired Phone
1Changing the Currently Paired Phone
The replaced phone will keep the same speed
dial entries, and security PIN information from
the previously paired phone.
Page 222 of 327
221
Bluetooth® HandsFreeLink®
Phone Settings
Bluetooth® HandsFreeLink®
Phone SettingsHSETTINGS button
Phone Settings
Set HFL options and features.
HSETTINGS button Phone Settings
Bluetooth Device List
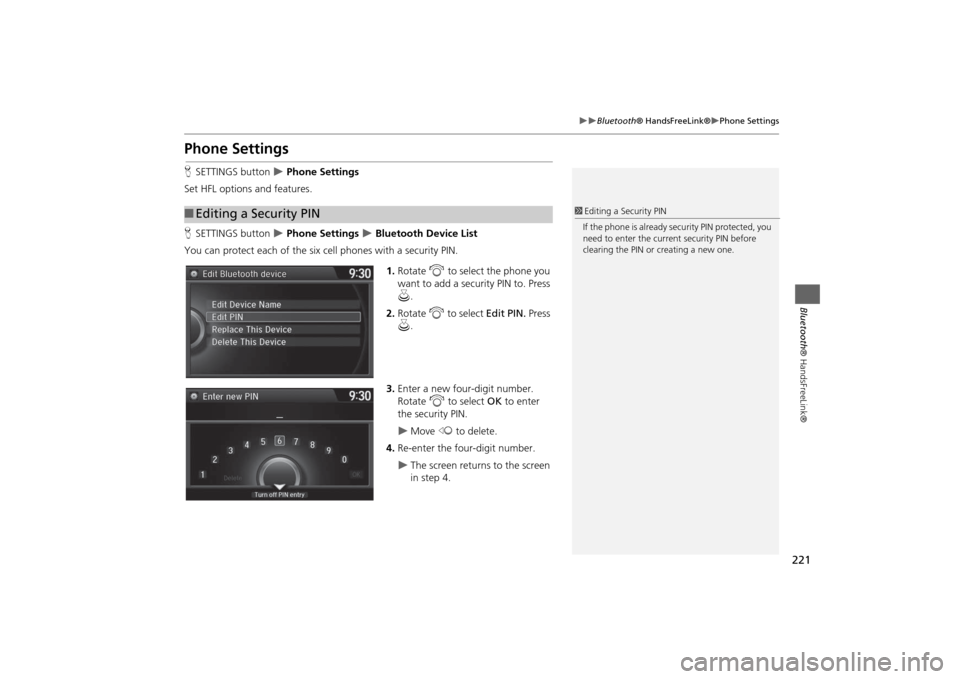
You can protect each of the six cell phones with a security PIN.
1.Rotate i to select the phone you
want to add a security PIN to. Press
u.
2.Rotate i to select Edit PIN. Press
u.
3.Enter a new four-digit number.
Rotate i to select OK to enter
the security PIN.
Move w to delete.
4.Re-enter the four-digit number.
The screen returns to the screen
in step 4.
■Editing a Security PIN
1Editing a Security PIN
If the phone is already security PIN protected, you
need to enter the current security PIN before
clearing the PIN or creating a new one.
Page 242 of 327
241
Text Message/E-mail
HFL Menus
Bluetooth® HandsFreeLink®
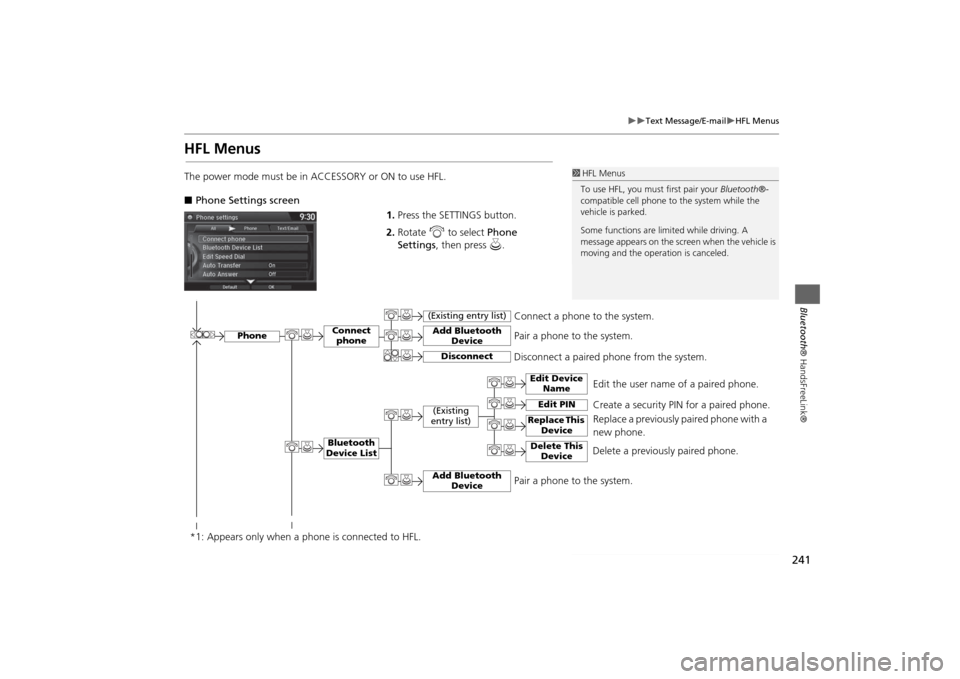
HFL MenusThe power mode must be in ACCESSORY or ON to use HFL.
■Phone Settings screen
1.Press the SETTINGS button.
2.Rotate i to select Phone
Settings, then press u.
1HFL Menus
To use HFL, you must first pair your Bluetooth®-
compatible cell phone to the system while the
vehicle is parked.
Some functions are limited while driving. A
message appears on the screen when the vehicle is
moving and the operation is canceled.
Edit the user name of a paired phone.
Phone
Edit Device
Name
Connect
phoneBluetooth
Device List
(Existing
entry list)
Replace This
Device
Add Bluetooth
Device
Disconnect a paired phone from the system.Connect a phone to the system.
*1: Appears only when a phone is connected to HFL.
Disconnect
(Existing entry list)
Pair a phone to the system.
Edit PIN
Create a security PIN for a paired phone.
Replace a previously paired phone with a
new phone.
Delete This
Device
Delete a previously paired phone.
Add Bluetooth
Device
Pair a phone to the system.
Page 292 of 327
291
Reference Information
System Initialization..............................292
Entering the Security Code ....................292
Acquiring GPS Information ....................292
Startup Confirmation Screen .................293
Map Matching ......................................293
System Limitations................................294
GPS System...........................................294
Address Calculation ..............................294
Database ..............................................294
Customer Assistance.............................296
Resolving Problems ...............................296
Reporting Errors ....................................296
Honda Automobile Customer Service
Contact Information ............................296Visiting a Dealer ................................... 296
Map Coverage ..................................... 297
Obtaining a Navigation Update ............ 297
Traffic Information ............................... 298
Operation in Alaska, Hawaii, Canada,
Puerto Rico, and Mexico ..................... 298
Legal Information................................. 299
Copyrights ........................................... 299
User Agreements ................................. 299
As required by the FCC ........................ 305
Page 293 of 327
292Reference Information
System InitializationThe navigation system must be initialized if
power to the navigation system is
interrupted for any reason (e.g., the
battery was disconnected).Entering the Security CodeIn most cases, you do not need to enter a
security code. Follow the steps to
reactivate the system.
1.Set the power mode to ON, and turn on
the audio system.
2. Press and hold the 9 (Power) button
for more than two seconds.
The system is reac tivated when the
system’s control unit recognizes that
the system is in your vehicle.
If the control unit fails to recognize,
you must go to a dealer and have the
system checked.
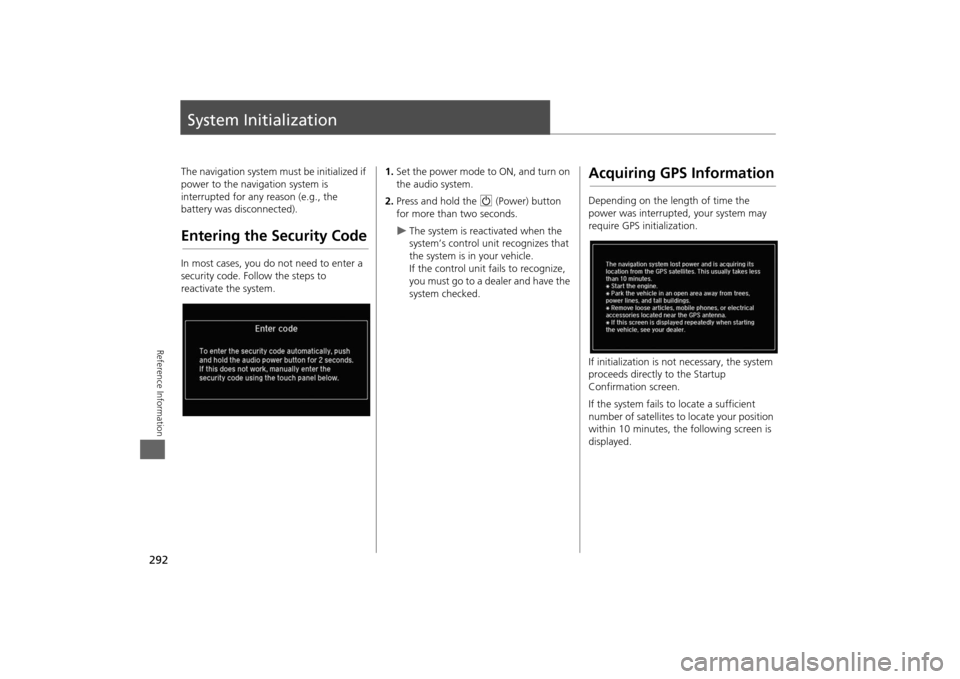
Acquiring GPS InformationDepending on the length of time the
power was interrupted, your system may
require GPS initialization.
If initialization is not necessary, the system
proceeds directly to the Startup
Confirmation screen.
If the system fails to locate a sufficient
number of satellites to locate your position
within 10 minutes, the following screen is
displayed.
Page 295 of 327
294Reference Information
System LimitationsGPS SystemThe signals received from the GPS satellites
are extremely weak (less than a millionth
of the strength of a local FM station) and
require an unobstructed view of the sky.
The GPS antenna is located in the
dashboard. The signal reception can easily
be interrupted or interfered with by the
following:
•Metallic window tint on the front or side
windows
•Cell phones, PDAs, or other electronic
devices docked in a cradle or lying loose
on the dashboard
•Remote starters or “hidden” vehicle
tracking systems mounted near the
navigation unit
•Audio electronic devices mounted near
the navigation unit
•Trees, tall buildings, freeway overpasses,
tunnels, or overhead electrical power
wires
The GPS is operated by the U.S.
Department of Defense. For security
reasons, there are certain inaccuracies built
into the GPS for which the navigation
system must constantly compensate. This can cause occasional positioning errors of
up to several hundred feet.
Address CalculationThe destination icon shows only the
approximate location of a destination
address. This occurs if the number of
possible addresses is different from the
number of actual addresses on a block. For
example, the address 1425 on a 1400
block with 100 possible addresses
(because it is followed by the 1500 block)
will be shown a quarter of the way down
the block by the system. If there are only
25 actual addresses on the block, the
actual location of address 1425 would be
at the end of the block.
DatabaseThe digitized map database reflects
conditions as they existed at various points
in time before production. Accordingly,
your database may contain inaccurate or
incomplete data or information due to the
passage of time, road construction,
changing conditions, or other causes.
For example, some places/landmarks may
be missing when you search the database
because the name was misspelled, the
place was improperly categorized, or a
place/landmark is not yet in the database.
This is also true for police stations,
hospitals, and other public institutions. Do
not rely on the navigation system if you
need law enforcement or hospital services.
Always check with local information
sources.
Page 324 of 327

323Index
IndexSymbolsa (Display Mode) Button ..................... 70
J (Hang-Up/Back) Button ............... 5, 22
d (Talk) Button..................................... 5, 22Numerics3D Angle Adjustment ................................ 73AAddress
Editing Address Book ................................ 39
Editing Avoid Area .................................... 56
Setting Destination.................................... 86
Address Book
Editing Address Book ................................ 37
Setting Destination.................................... 92
Address Book PIN ....................................... 43
Aha
TM Radio.............................................. 289
ATM/Bank (Place Category) ....................... 94
Audio
Remote Control ...................................... 142
Settings .................................................. 143
Touchscreen ............................................... 6
Voice Commands List .............................. 312
Audio Menu
Bluetooth® Audio ................................. 199
Disc ........................................................ 158
FM/AM Radio .......................................... 147
HDD ....................................................... 165
Internet Radio ......................................... 189
iPod® ..................................................... 177
USB Flash drive........................................ 193XM® Radio ............................................ 153
Audio System
Auxiliary Input Jack ................................. 138
Security Code ......................................... 139
Theft Protection ...................................... 139
USB Port ................................................. 137
Auxiliary Input Jack ................................. 138
Avoid Streets ............................................ 130
Avoided Area ............................................. 55
BBlack Level.................................................. 25
Bluetooth® Audio
Playing.................................................... 199
Voice Commands List ............................. 314
Bluetooth® HandsFreeLink®
Editing User Name/PIN .................... 221, 222
Importing Phonebook Data ..................... 212
Making a Call ......................................... 226
Pairing a Phone....................................... 206
Phone Settings........................................ 221
Receiving a Call ...................................... 231
Setting Up Speed Dialing ........................ 213
Brightness................................................... 25CCalendar ................................................... 271
Call
Calculate Route Screen ................... 108, 134
Call History ............................................... 229
Cancel Route ............................................ 123
Category
Editing Address Book ................................ 39Place Category List .................................. 320
Setting Destination .................................... 94
Category History
Deleting .................................................... 45
Change State .............................................. 87
City .............................................................. 88
City Vicinity
Setting Destination .................................... 95
Clock Adjustment ....................................... 27
Community (Place Category) ..................... 94
Continue Trip............................................ 134
Contrast ...................................................... 25
Coordinate ................................................ 107
Correct Vehicle Position ............................. 80
Current Location ........................................ 74
Current Position
Editing Address Book ................................ 39
Setting Destination .................................. 105
DDay Mode
Day ........................................................... 69
Night......................................................... 69
Switching Display Mode ............................ 70
Delete Tracking .......................................... 79
Destination List
Adding Waypoint .................................... 124
Editing .................................................... 128
Detour ....................................................... 130
Dial ............................................................ 228
Directions .................................................. 118
Disc
Playing .................................................... 158
Voice Commands List .............................. 313