lock HONDA ODYSSEY 2015 RC1-RC2 / 5.G Quick Guide
[x] Cancel search | Manufacturer: HONDA, Model Year: 2015, Model line: ODYSSEY, Model: HONDA ODYSSEY 2015 RC1-RC2 / 5.GPages: 80, PDF Size: 10.54 MB
Page 25 of 80
42 || 43
VEHICLE CONTROLSVEHICLE CONTROLS
Sitting improperly or out of position can result in serious injury or de\
ath in a
crash.
Always sit upright, well back in the seat, with your feet on the floor.
WARNING
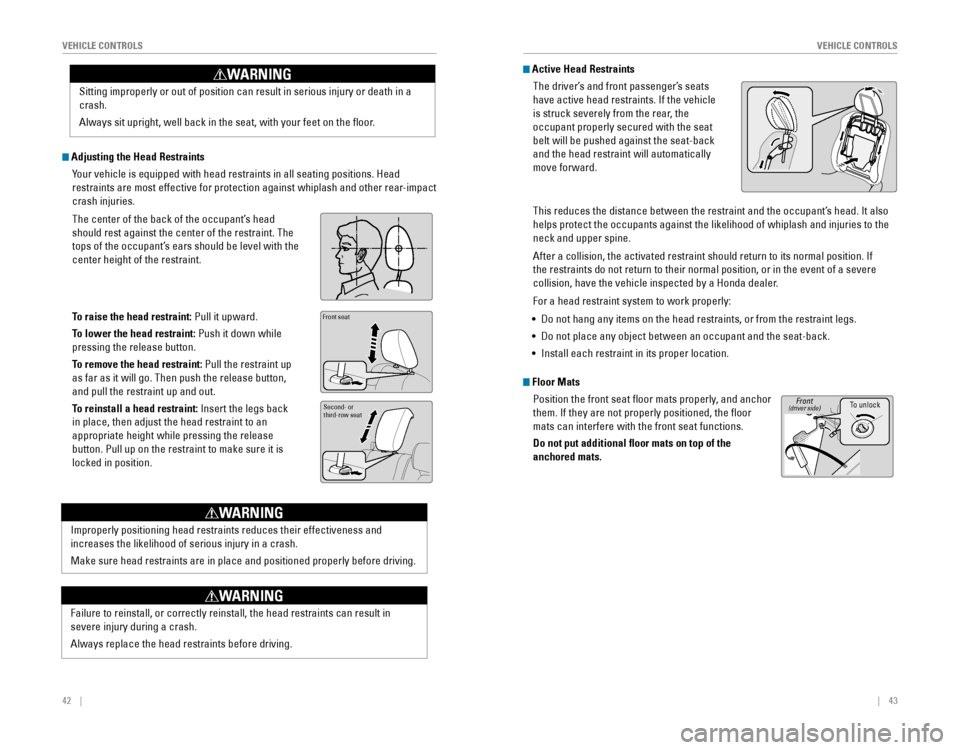
Adjusting the Head Restraints
Your vehicle is equipped with head restraints in all seating positions. Head
restraints are most effective for protection against whiplash and other \
rear-impact
crash injuries.
The center of the back of the occupant’s head
should rest against the center of the restraint. The
tops of the occupant’s ears should be level with the
center height of the restraint.
To raise the head restraint: Pull it upward.
To lower the head restraint: Push it down while
pressing the release button.
To remove the head restraint: Pull the restraint up
as far as it will go. Then push the release button,
and pull the restraint up and out.
To reinstall a head restraint:
Insert the legs back
in place, then adjust the head restraint to an
appropriate height while pressing the release
button. Pull up on the restraint to make sure it is
locked in position.
Position head in the
center of the head
restraint.Front seat
Second- or
third-row seat
Improperly positioning head restraints reduces their effectiveness and
increases the likelihood of serious injury in a crash.
Make sure head restraints are in place and positioned properly before driving.
Failure to reinstall, or correctly reinstall, the head restraints can re\
sult in
severe injury during a crash.
Always replace the head restraints before driving.
WARNING
WARNING
Active Head Restraints
The driver’s and front passenger’s seats
have active head restraints. If the vehicle
is struck severely from the rear, the
occupant properly secured with the seat
belt will be pushed against the seat-back
and the head restraint will automatically
move forward.
This reduces the distance between the restraint and the occupant’s head. It also
helps protect the occupants against the likelihood of whiplash and injur\
ies to the
neck and upper spine.
After a collision, the activated restraint should return to its normal position. If
the restraints do not return to their normal position, or in the event o\
f a severe
collision, have the vehicle inspected by a Honda dealer.
For a head restraint system to work properly:
•
Do not hang any items on the head restraints, or from the restraint legs.
• Do not place any object between an occupant and the seat-back.
• Install each restraint in its proper location.
Floor Mats Position the front seat floor mats properly, and anchor
them. If they are not properly positioned, the floor
mats can interfere with the front seat functions.
Do not put additional floor mats on top of the
anchored mats.
To unlockFront(driver side)
Page 26 of 80
44 || 45
VEHICLE CONTROLSVEHICLE CONTROLS
Seat-back angle adjustment
Pull up the lever
to change the
angle.
Seat-back angle
adjustment*
Pull the strap to
change the angle.
Horizontal position adjustment
Pull up the bar to move the seat, then release the bar.
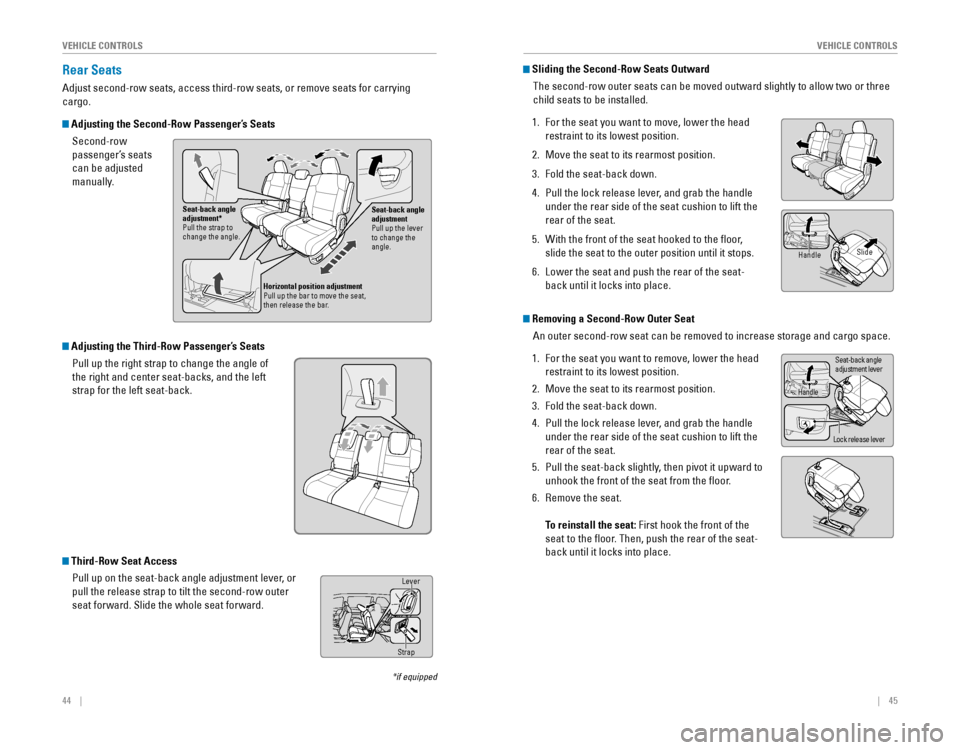
Rear Seats
Adjust second-row seats, access third-row seats, or remove seats for carrying
cargo.
Adjusting the Second-Row Passenger’s SeatsSecond-row
passenger’s seats
can be adjusted
manually.
*if equipped
Sliding the Second-Row Seats Outward
The second-row outer seats can be moved outward slightly to allow two or three
child seats to be installed.
1. For the seat you want to move, lower the head
restraint to its lowest position.
2. Move the seat to its rearmost position.
3. Fold the seat-back down.
4. Pull the lock release lever, and grab the handle
under the rear side of the seat cushion to lift the
rear of the seat.
5. With the front of the seat hooked to the floor,
slide the seat to the outer position until it stops.
6. Lower the seat and push the rear of the seat-
back until it locks into place.
HandleSlide
Removing a Second-Row Outer Seat
An outer second-row seat can be removed to increase storage and cargo space.
1. For the seat you want to remove, lower the head
restraint to its lowest position.
2. Move the seat to its rearmost position.
3. Fold the seat-back down.
4. Pull the lock release lever, and grab the handle
under the rear side of the seat cushion to lift the
rear of the seat.
5. Pull the seat-back slightly, then pivot it upward to
unhook the front of the seat from the floor.
6. Remove the seat.
To reinstall the seat: First hook the front of the
seat to the floor. Then, push the rear of the seat-
back until it locks into place.
Handle
Lock release lever
Seat-back angleadjustment lever
Third-Row Seat Access
Pull up on the seat-back angle adjustment lever, or
pull the release strap to tilt the second-row outer
seat forward. Slide the whole seat forward.Lever
Strap
Adjusting the Third-Row Passenger’s SeatsPull up the right strap to change the angle of
the right and center seat-backs, and the left
strap for the left seat-back.
Page 27 of 80
46 || 47
VEHICLE CONTROLSVEHICLE CONTROLS
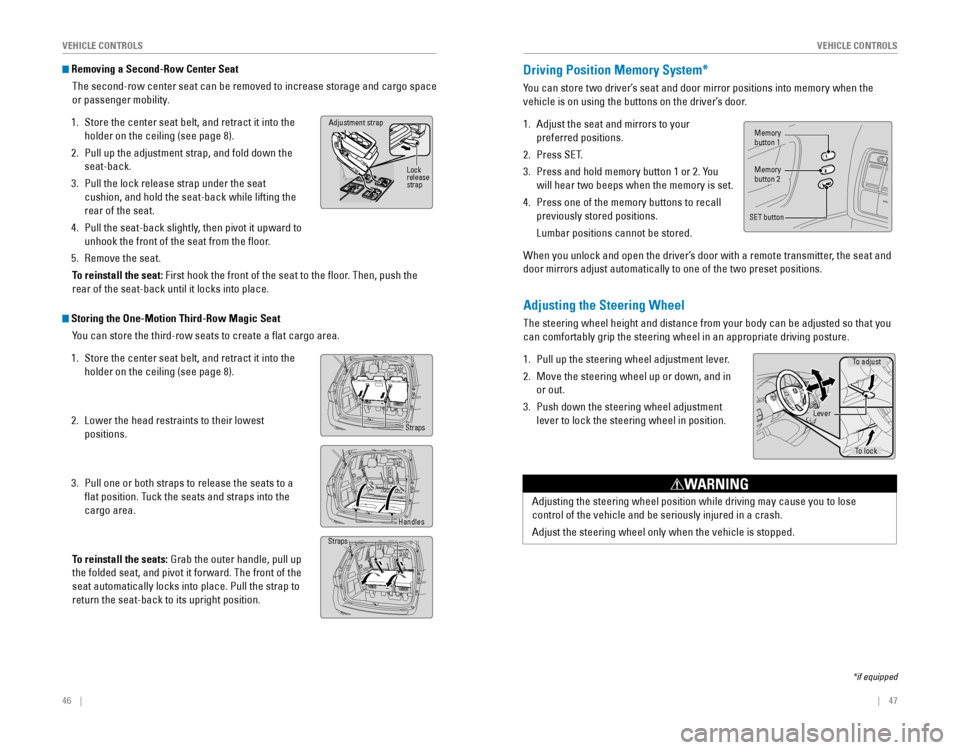
Removing a Second-Row Center Seat
The second-row center seat can be removed to increase storage and cargo space
or passenger mobility.
1. Store the center seat belt, and retract it into the
holder on the ceiling (see page 8).
2. Pull up the adjustment strap, and fold down the
seat-back.
3. Pull the lock release strap under the seat
cushion, and hold the seat-back while lifting the
rear of the seat.
4. Pull the seat-back slightly, then pivot it upward to
unhook the front of the seat from the floor.
5. Remove the seat.
To reinstall the seat: First hook the front of the seat to the floor. Then, push the
rear of the seat-back until it locks into place.
Adjustment strap
Lock
release
strap
Storing the One-Motion Third-Row Magic Seat You can store the third-row seats to create a flat cargo area.
1. Store the center seat belt, and retract it into the
holder on the ceiling (see page 8).
2. Lower the head restraints to their lowest
positions.
3. Pull one or both straps to release the seats to a
flat position. Tuck the seats and straps into the
cargo area.
To reinstall the seats:
Grab the outer handle, pull up
the folded seat, and pivot it forward. The front of the
seat automatically locks into place. Pull the strap to
return the seat-back to its upright position.
Straps
Handles
Straps
Adjusting the Steering Wheel
The steering wheel height and distance from your body can be adjusted so that you
can comfortably grip the steering wheel in an appropriate driving posture.
1. Pull up the steering wheel adjustment lever.
2. Move the steering wheel up or down, and in
or out.
3. Push down the steering wheel adjustment
lever to lock the steering wheel in position.
Adjusting the steering wheel position while driving may cause you to los\
e
control of the vehicle and be seriously injured in a crash.
Adjust the steering wheel only when the vehicle is stopped.
WARNING
To adjust
To lock
Lever
Driving Position Memory System*
You can store two driver’s seat and door mirror positions into memory when the
vehicle is on using the buttons on the driver’s door.
1. Adjust the seat and mirrors to your
preferred positions.
2. Press SET.
3. Press and hold memory button 1 or 2. You
will hear two beeps when the memory is set.
4. Press one of the memory buttons to recall
previously stored positions.
Lumbar positions cannot be stored.
When you unlock and open the driver’s door with a remote transmitter, the seat and
door mirrors adjust automatically to one of the two preset positions.
Memorybutton 1
Memorybutton 2
SET button
*if equipped
Page 30 of 80
52 || 53
VEHICLE CONTROLSVEHICLE CONTROLS
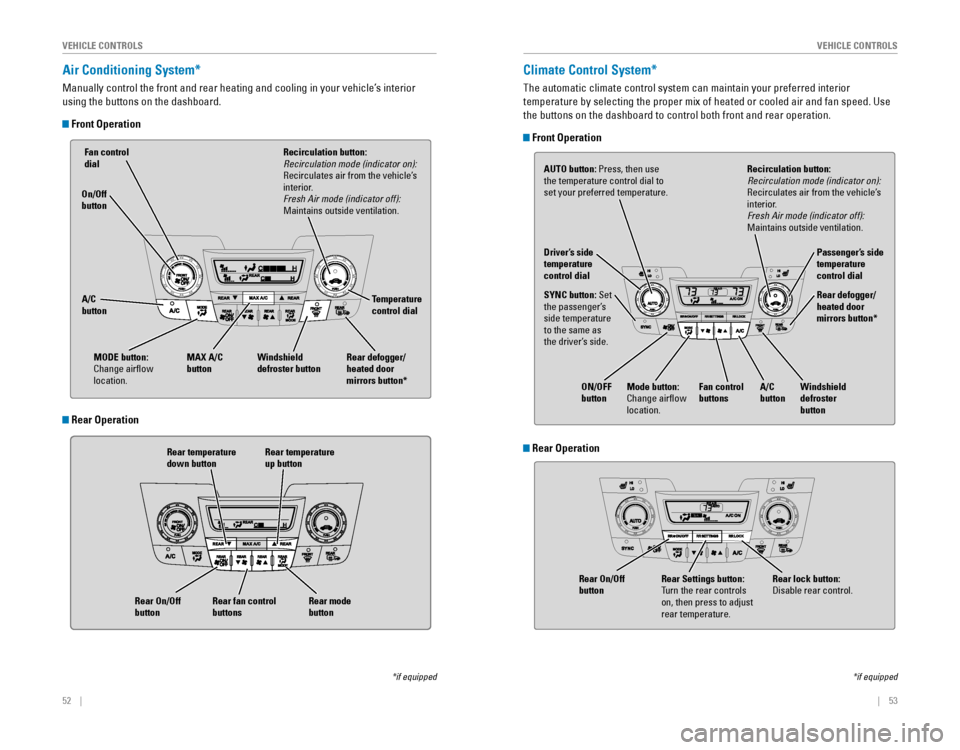
Air Conditioning System*
Manually control the front and rear heating and cooling in your vehicle’\
s interior
using the buttons on the dashboard.
Front Operation
Fan control dial
A/C
button MAX A/C
button Windshield
defroster button Temperature
control dial
Rear temperature
down button Rear temperature
up buttonRecirculation button: Recirculation mode (indicator on):
Recirculates air from the vehicle’s
interior.
Fresh Air mode (indicator off):
Maintains outside ventilation.
Rear defogger/
heated door
mirrors button*
Rear fan control
buttons
On/Off
button
Rear On/Off
button
Rear mode
button
MODE button:
Change airflow
location.
*if equipped
Climate Control System*
The automatic climate control system can maintain your preferred interio\
r
temperature by selecting the proper mix of heated or cooled air and fan speed. Use
the buttons on the dashboard to control both front and rear operation.
Front Operation
AUTO button: Press, then use
the temperature control dial to
set your preferred temperature.
SYNC button: Set
the passenger’s
side temperature
to the same as
the driver’s side. Driver’s side
temperature
control dial
A/C
buttonPassenger’s side
temperature
control dial
Recirculation button: Recirculation mode (indicator on):
Recirculates air from the vehicle’s
interior.
Fresh Air mode (indicator off):
Maintains outside ventilation.
Rear defogger/
heated door
mirrors button*
Windshield
defroster
button
Fan control
buttons
ON/OFF
button
Mode button:
Change airflow
location.
*if equipped
Rear Operation
Rear Operation
Rear lock button: Disable rear control.Rear Settings button:
Turn the rear controls
on, then press to adjust
rear temperature.
Rear On/Off
button
Page 31 of 80
54 || 55
VEHICLE CONTROLSVEHICLE CONTROLS
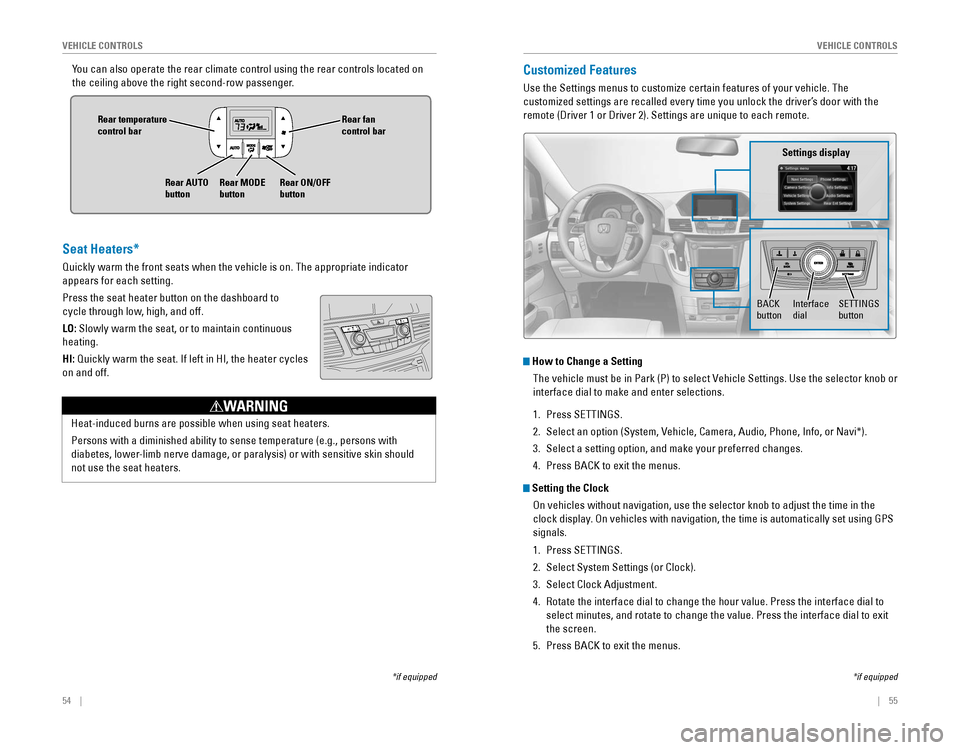
You can also operate the rear climate control using the rear controls loc\
ated on
the ceiling above the right second-row passenger.
Rear fan control bar
Rear ON/OFF
button
Rear temperature
control bar
Rear AUTO
buttonRear MODE
button
Customized Features
Use the Settings menus to customize certain features of your vehicle. The
customized settings are recalled every time you unlock the driver’s door with the
remote (Driver 1 or Driver 2). Settings are unique to each remote.
How to Change a Setting
The vehicle must be in Park (P) to select Vehicle Settings. Use the selector knob or
interface dial to make and enter selections.
1. Press SETTINGS.
2. Select an option (System, Vehicle, Camera, Audio, Phone, Info, or Navi*).
3. Select a setting option, and make your preferred changes.
4. Press BACK to exit the menus.
Setting the Clock
On vehicles without navigation, use the selector knob to adjust the time in the
clock display. On vehicles with navigation, the time is automatically set using GPS
signals.
1. Press SETTINGS.
2. Select System Settings (or Clock).
3. Select Clock Adjustment.
4. Rotate the interface dial to change the hour value. Press the interface \
dial to
select minutes, and rotate to change the value. Press the interface dial\
to exit
the screen.
5. Press BACK to exit the menus.
SETTINGS button
Settings display
BACK
buttonInterface dial
*if equipped
Seat Heaters*
Quickly warm the front seats when the vehicle is on. The appropriate ind\
icator
appears for each setting.
Press the seat heater button on the dashboard to
cycle through low, high, and off.
LO: Slowly warm the seat, or to maintain continuous
heating.
HI:
Quickly warm the seat. If left in HI, the heater cycles
on and off.
Heat-induced burns are possible when using seat heaters.
Persons with a diminished ability to sense temperature (e.g., persons with
diabetes, lower-limb nerve damage, or paralysis) or with sensitive skin should
not use the seat heaters.
WARNING
*if equipped
Page 33 of 80
58 || 59
AUDIO AND CONNECTIVITY
AUDIO AND CONNECTIVITY
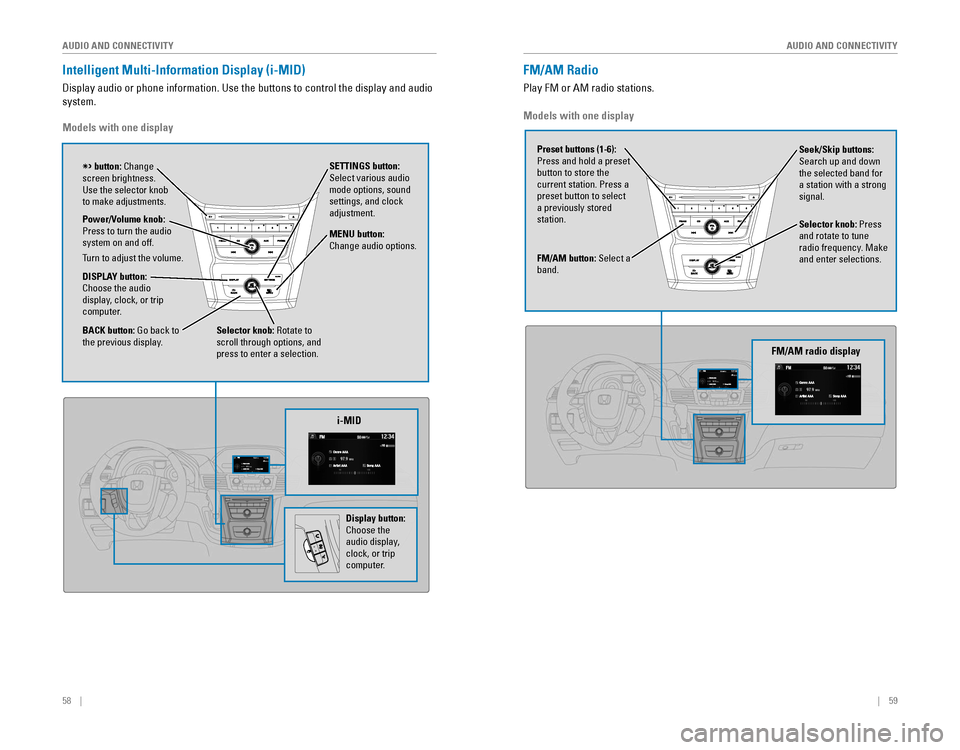
Intelligent Multi-Information Display (i-MID)
Display audio or phone information. Use the buttons to control the display and audio
system.
Models with one display
Selector knob: Rotate to
scroll through options, and
press to enter a selection. MENU button:
Change audio options.
DISPLAY button: Choose the audio
display, clock, or trip
computer. Power/Volume knob:
Press to turn the audio
system on and off.
Turn to adjust the volume.
SETTINGS button:
Select various audio
mode options, sound
settings, and clock
adjustment.
BACK button: Go back to the previous display.
button: Change screen brightness. Use the selector knob to make adjustments.
i-MID
Display button:
Choose the
audio display,
clock, or trip
computer.
Models with one display
FM/AM button: Select a
band.
Preset buttons (1-6):
Press and hold a preset
button to store the current station. Press a preset button to select a previously stored
station. Seek/Skip buttons:
Search up and down
the selected band for a station with a strong
signal.
Selector knob: Press
and rotate to tune
radio frequency. Make and enter selections.
FM/AM Radio
Play FM or AM radio stations.
FM/AM radio display
Page 36 of 80
64 || 65
AUDIO AND CONNECTIVITY
AUDIO AND CONNECTIVITY
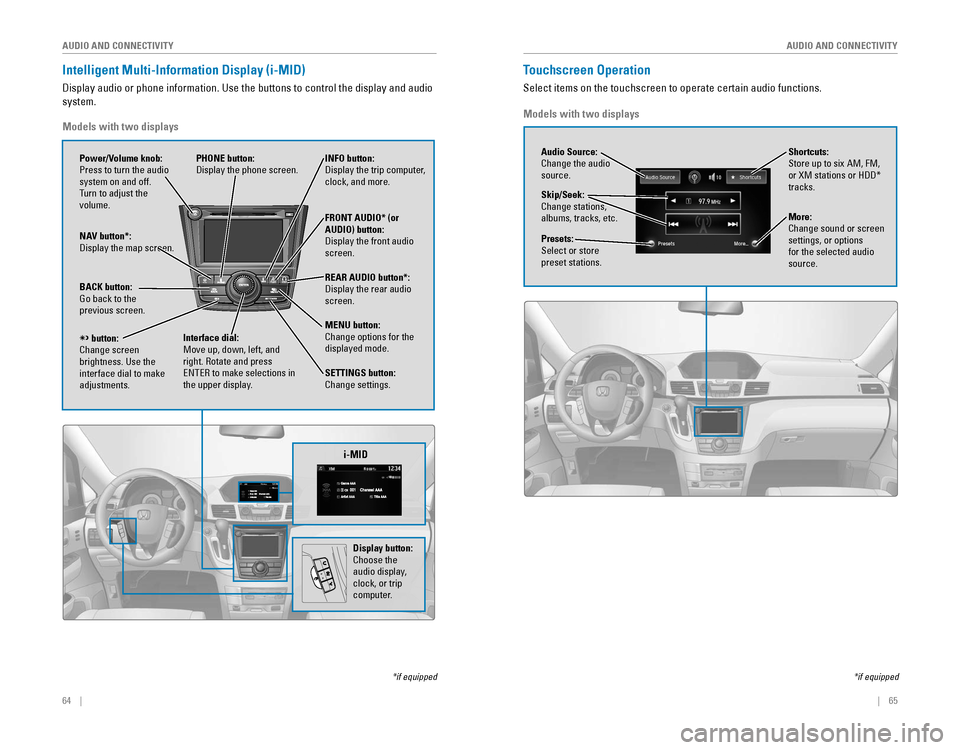
Intelligent Multi-Information Display (i-MID)
Display audio or phone information. Use the buttons to control the display and audio
system.
*if equipped
REAR
AUDIO
FRONT
AUDIO
NAV
i-MID
Power/Volume knob:
Press to turn the audio
system on and off.
Turn to adjust the
volume. INFO button: Display the trip computer, clock, and more.
FRONT AUDIO* (or
AUDIO) button:
Display the front audio screen.
REAR AUDIO button*:
Display the rear audio screen.
MENU button:
Change options for the
displayed mode.
SETTINGS button:
Change settings.
PHONE button:
Display the phone screen.
NAV button*: Display the map screen.
BACK button: Go back to the previous screen.
button:Change screen brightness. Use the interface dial to make
adjustments.
Interface dial:
Move up, down, left, and
right. Rotate and press ENTER to make selections in the upper display.
Models with two displays
Display button:
Choose the
audio display,
clock, or trip
computer.
Touchscreen Operation
Select items on the touchscreen to operate certain audio functions.
*if equipped
Audio Source:
Change the audio
source.
Shortcuts:
Store up to six AM, FM,
or XM stations or HDD* tracks.
More:
Change sound or screen
settings, or options
for the selected audio
source.
Skip/Seek:
Change stations,
albums, tracks, etc.
Presets:
Select or store
preset stations.
Models with two displays
Page 41 of 80
74 || 75
AUDIO AND CONNECTIVITY
AUDIO AND CONNECTIVITY
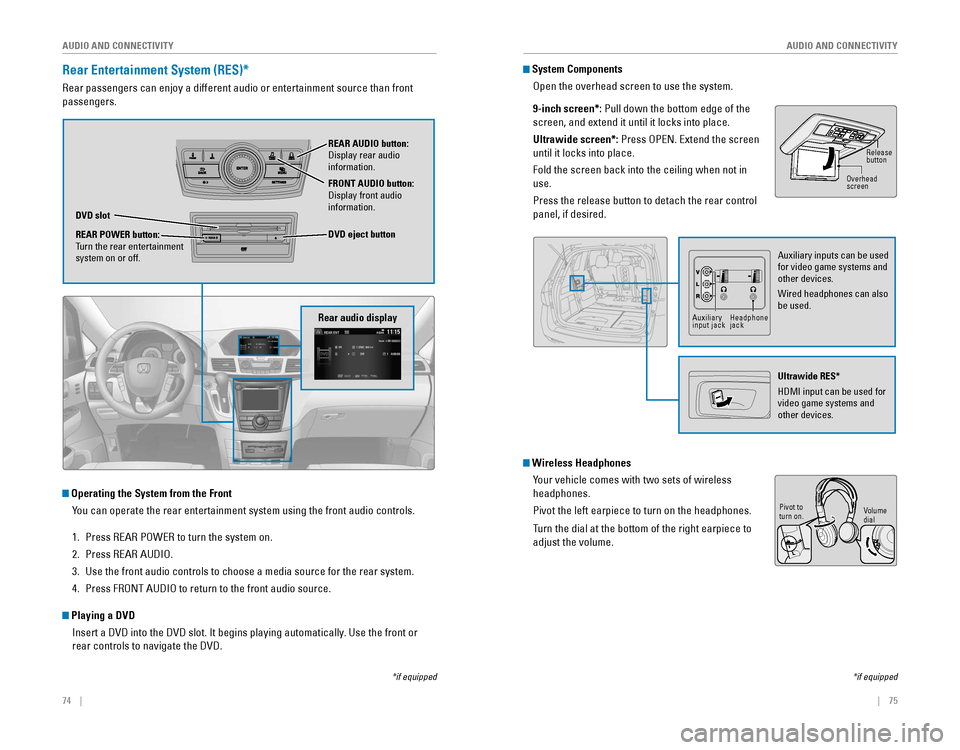
Rear Entertainment System (RES)*
Rear passengers can enjoy a different audio or entertainment source than\
front
passengers.
Rear audio display
DVD slot
REAR POWER button:
Turn the rear entertainment
system on or off. REAR AUDIO button:
Display rear audio information.
FRONT AUDIO button:
Display front audio information.
DVD eject button
Operating the System from the Front
You can operate the rear entertainment system using the front audio contr\
ols.
1. Press REAR POWER to turn the system on.
2. Press REAR AUDIO.
3. Use the front audio controls to choose a media source for the rear syste\
m.
4. Press FRONT AUDIO to return to the front audio source.
Playing a DVD
Insert a DVD into the DVD slot. It begins playing automatically. Use the front or
rear controls to navigate the DVD.
*if equipped
System ComponentsOpen the overhead screen to use the system.
9-inch screen*:
Pull down the bottom edge of the
screen, and extend it until it locks into place.
Ultrawide screen*:
Press OPEN. Extend the screen
until it locks into place.
Fold the screen back into the ceiling when not in
use.
Press the release button to detach the rear control
panel, if desired.
Wireless HeadphonesYour vehicle comes with two sets of wireless
headphones.
Pivot the left earpiece to turn on the headphones.
Turn the dial at the bottom of the right earpiece to
adjust the volume.
Overheadscreen Release
button
Auxiliary inputs can be used for video game systems and
other devices.
Wired headphones can also
be used.
Ultrawide RES*
HDMI input can be used for video game systems and
other devices.
Auxiliary input jackHeadphone jack
*if equipped
Volume
dial
Pivot to
turn on.
Page 49 of 80
90 || 91
DRIVING
DRIVING
Learn about preparation for driving, as well as other features.
Before Driving
Check the following items before you begin driving.
Exterior Checks
•
Make sure there are no obstructions on the windows, door mirrors, exterior
lights, or other parts of the vehicle.
• Remove any frost, snow, or ice.
• Make sure the hood is securely closed.
•
Heat from the engine and exhaust can ignite flammable materials left under
the hood, causing a fire. If you’ve parked your vehicle for an extended period,
inspect and remove any debris that may have collected, such as dried grass
and leaves that have fallen or have been carried in for use as a nest by a small
animal. Also check under the hood for leftover flammable materials after you or
someone else has performed maintenance on your vehicle.
• Make sure the tires are in good condition.
•
Make sure there are no people or objects behind or around the vehicle.
Interior Checks •
Store or secure all items on board properly.
• Do not pile items higher than the seat height.
• Do not place anything in the front seat footwells. Make sure to secure the floor
mats.
•
If you have any animals on board, do not let them move freely around in the
vehicle.
• Securely close and lock all doors and the tailgate.
• Adjust your seating position, mirrors, and steering wheel properly.
•
Make sure items placed on the floor behind the front seats cannot roll under the
seats.
•
Everyone in the vehicle must fasten their seat belt.
• Make sure that the indicators in the instrument panel come on when you s\
tart
the vehicle, and go off soon after.
DRIVING
If the doors are frozen shut, use warm water around the door edges to melt any
ice. Do not try to force them open, as this can damage the rubber trim around the
doors. When done, wipe dry to avoid further freezing.
NOTICE
Maximum Load Limit
Carrying too much cargo or improperly storing it can affect your vehicle\
’s handling,
stability, stopping distance, and tires, and make it unsafe.
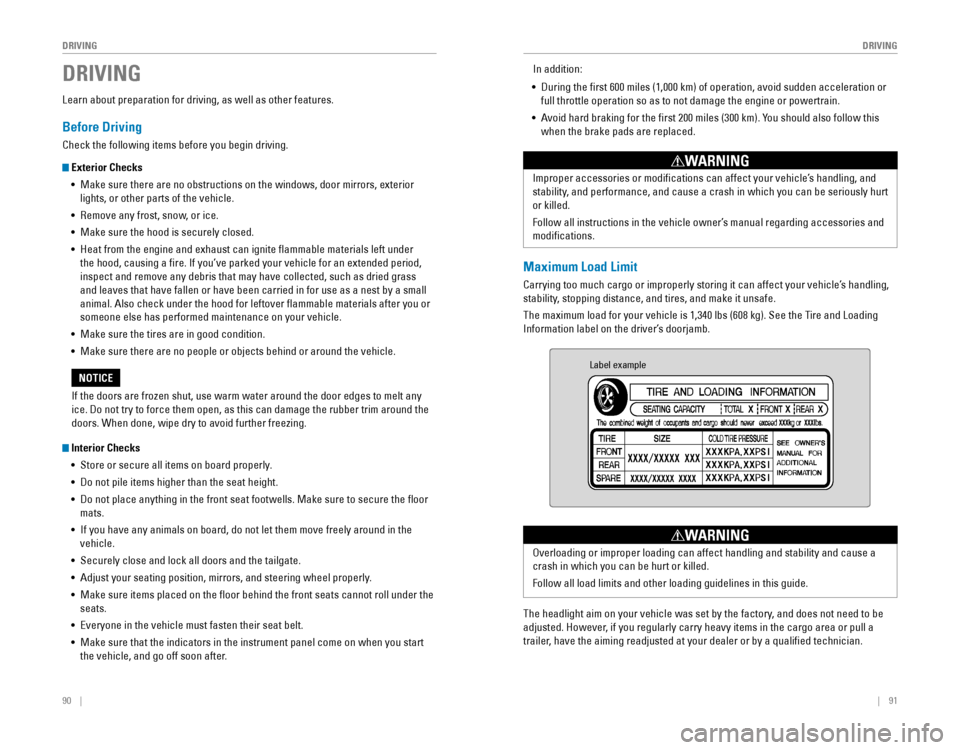
The maximum load for your vehicle is 1,340 lbs (608 kg). See the Tire and Loading
Information label on the driver’s doorjamb.
Improper accessories or modifications can affect your vehicle’s handling, and
stability, and performance, and cause a crash in which you can be seriously hurt
or killed.
Follow all instructions in the vehicle owner’s manual regarding accessories and
modifications.
WARNING
In addition:
• During the first 600 miles (1,000 km) of operation, avoid sudden acceleration or
full throttle operation so as to not damage the engine or powertrain.
•
Avoid hard braking for the first 200 miles (300 km). You should also follow this
when the brake pads are replaced.
Label example
The headlight aim on your vehicle was set by the factory, and does not need to be
adjusted. However, if you regularly carry heavy items in the cargo area or pull a
trailer, have the aiming readjusted at your dealer or by a qualified technician.
Overloading or improper loading can affect handling and stability and cause a
crash in which you can be hurt or killed.
Follow all load limits and other loading guidelines in this guide.
WARNING
Page 51 of 80
94 || 95
DRIVING
DRIVING
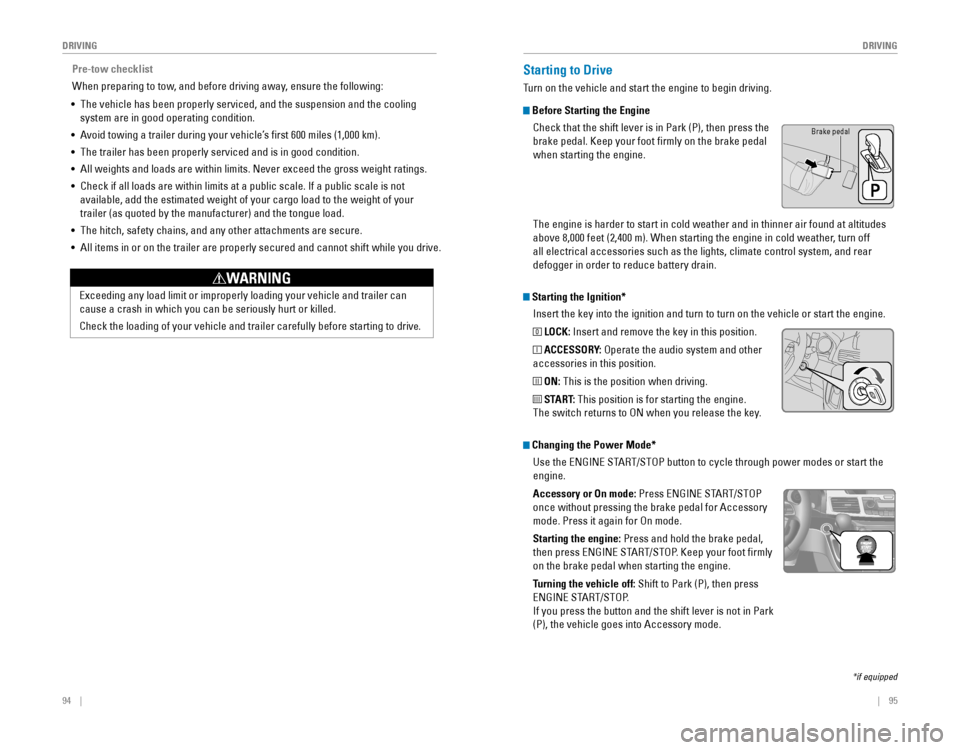
Starting the Ignition*
Insert the key into the ignition and turn to turn on the vehicle or start the engine.
0 LOCK: Insert and remove the key in this position.
I ACCESSORY: Operate the audio system and other
accessories in this position.
II ON: This is the position when driving.
III START: This position is for starting the engine.
The switch returns to ON when you release the key.
Starting to Drive
Turn on the vehicle and start the engine to begin driving.
Before Starting the Engine
Check that the shift lever is in Park (P), then press the
brake pedal. Keep your foot firmly on the brake pedal
when starting the engine.
Brake pedal
The engine is harder to start in cold weather and in thinner air found a\
t altitudes
above 8,000 feet (2,400 m). When starting the engine in cold weather, turn off
all electrical accessories such as the lights, climate control system, a\
nd rear
defogger in order to reduce battery drain.
*if equipped
Changing the Power Mode*Use the
ENGINE START/STOP button to cycle through power modes or start the
engine.
Accessory or On mode:
Press ENGINE START/STOP
once without pressing the brake pedal for Accessory
mode. Press it again for On mode.
Starting the engine:
Press and hold the brake pedal,
then press ENGINE START/STOP. Keep your foot firmly
on the brake pedal when starting the engine.
Turning the vehicle off: Shift to Park (P), then press
ENGINE START/STOP.
If you press the button and the shift lever is not in Park
(P), the vehicle goes into Accessory mode.
Pre-tow checklist
When preparing to tow, and before driving away, ensure the following:
• The vehicle has been properly serviced, and the suspension and the cooling
system are in good operating condition.
•
Avoid towing a trailer during your vehicle’s first 600 miles (1,000 km).
• The trailer has been properly serviced and is in good condition.
• All weights and loads are within limits. Never exceed the gross weight r\
atings.
•
Check if all loads are within limits at a public scale. If a public scale is not
available, add the estimated weight of your cargo load to the weight of your
trailer (as quoted by the manufacturer) and the tongue load.
• The hitch, safety chains, and any other attachments are secure.
• All items in or on the trailer are properly secured and cannot shift whi\
le you drive.
Exceeding any load limit or improperly loading your vehicle and trailer can
cause a crash in which you can be seriously hurt or killed.
Check the loading of your vehicle and trailer carefully before starting to drive.
WARNING