audio HONDA ODYSSEY 2015 RC1-RC2 / 5.G Quick Guide
[x] Cancel search | Manufacturer: HONDA, Model Year: 2015, Model line: ODYSSEY, Model: HONDA ODYSSEY 2015 RC1-RC2 / 5.GPages: 80, PDF Size: 10.54 MB
Page 2 of 80
Devices That Emit Radio WavesThe following products and systems on your vehicle emit radio waves when\
in
operation:
•
Audio system • Immobilizer system
• Bluetooth® Audio • Remote transmitter
• Bluetooth® HandsFreeLink® • Smart Entry System
• HomeLink® Universal Transceiver • Tire Pressure Monitoring System
Each of the above complies with the appropriate requirements or the required
standards of the FCC (Federal Communications Commission) and Industry Canada,
described below:
As required by the FCC:
This device complies with Part 15 of the FCC rules. Operation is subject to the
following two conditions: (1) This device may not cause harmful interference, and
(2) this device must accept any interference received, including interference that
may cause undesired operation.
Changes or modifications not expressly approved by the party responsible for
compliance could void the user’s authority to operate the equipment.
As required by Industry Canada:
This device complies with Industry Canada Standard RSS-Gen/210/310.
Operation is subject to the following two conditions: (1) this device may not
cause interference, and (2) this device must accept any interference, including
interference that may cause undesired operation of the device.
California Perchlorate Contamination Prevention Act
The airbags, seat belt tensioners, and CR-type batteries in this vehicle may
contain perchlorate materials—special handling may apply. See www.dtsc.
ca.gov/hazardouswaste/perchlorate/ for more information.
California Proposition 65 Warning
WARNING: This product contains or emits chemicals known to the state of
California to cause cancer and birth defects or other reproductive harm.
DISCLOSURES
Event Data RecordersThis vehicle is equipped with an event data recorder (EDR). The main purpose of
an EDR is to record, in certain crash or near crash-like situations, such as an air
bag deployment or hitting a road obstacle, data that will assist in understanding
how a vehicle’s systems performed. The EDR is designed to record data related to
vehicle dynamics and safety systems for a short period of time, typicall\
y
30 seconds or less. The EDR in this vehicle is designed to record such d\
ata as:
• How various systems in your vehicle were operating;
• Whether or not the driver and passenger safety belts were buckled/fasten\
ed;
• How far (if at all) the driver was depressing the accelerator and/or b\
rake
pedal; and,
• How fast the vehicle was traveling.
These data can help provide a better understanding of the circumstances in
which crashes and injuries occur. NOTE: EDR data are recorded by your vehicle
only if a non-trivial crash situation occurs; no data are recorded by the EDR under
normal driving conditions and no personal data (e.g., name, gender, age, and
crash location) are recorded. However, other parties, such as law enforcement,
could combine the EDR data with the type of personally identifying data routinely
acquired during a crash investigation.
To read data recorded by an EDR, special equipment is required, and access to
the vehicle or the EDR is needed. In addition to the vehicle manufacturer, other
parties such as law enforcement that have the special equipment can read the
information if they have access to the vehicle or the EDR.
The data belong to the vehicle owner and may not be accessed by anyone else
except as legally required or with the permission of the vehicle owner.
Service Diagnostic Recorders
This vehicle is equipped with service-related devices that record information
about powertrain performance. The data can be used to verify emissions law
requirements and/or help technicians diagnose and solve service problems. It may
also be combined with data from other sources for research purposes, but
it remains confidential.
Page 3 of 80
Honda Automobile Customer Service
Your authorized Honda dealer should be able to answer any questions you have
about your vehicle. However, if you are dissatisfied with the information you receive,
you can call Honda Automobile Customer Service (see page 141).
Honda Roadside Assistance
24-hour emergency road service is available to you in the United States and Canada
throughout your 3-year/36,000-mile warranty term. Services include jump starting,
flat tire and lockout assistance, towing, and more (limitations apply\
).
This Owner’s Guide is intended to help you quickly get acquainted with your 2015
Honda Odyssey. It provides basic information and instructions on technology and
convenience features, as well as emergency procedures and how to get ass\
istance.
This guide is for vehicles sold in the United States and Canada. It covers all Odyssey
models, so you may find descriptions of features and equipment that are not in your
vehicle. Images throughout this guide are from U.S. vehicles and represent features
and equipment that are available on some, but not all, models.
This guide is not intended to be a substitute for the Owner’s Manual. The Owner
Information CD enclosed in your glove box kit includes the Owner’s Manual,
Navigation Manual, and vehicle and tire warranties in electronic format.\
This
information can be viewed on a computer (PC or Mac platform) and saved or printed
for your reference. You can also visit owners.honda.com (U.S.) or myhonda.ca
(Canada) to view the complete and most current information.
If you are the first registered owner of your vehicle, you may request a complimentary
printed copy of the Owner’s Manual, Navigation Manual, or Vehicle Warranty within
the first six months of vehicle purchase. To request a copy, visit owners.honda.com
and create or log in to your account. In Canada, please request a copy from your
Honda dealer.
American Honda Motor Company strives to be proactive in protecting our
environment and natural resources. By using electronic delivery for a considerable
portion of the information typically found in a vehicle owner’s manual, we are further
reducing our impact on the environment.
INTRODUCTIONTABLE OF CONTENTS
Call (800) 999-1009 (U.S.) or (888) 946-6329 (Canada)
Call (866) 864-5211 (U.S) or (800) 465-7587 (Canada)
*if equipped
VISUAL INDEX .......................................1
Steering Wheel and Nearby Controls ...1
Dashboard and Ceiling Controls
........2
SAFETY INFORMATION
........................3
Important Safety Information
..............3
Seat Belts
...............................................5
Airbags
....................................................9
Child Safety
..........................................15
Safety Label Locations
.......................22
Reporting Safety Defects
...................23
INSTRUMENT PANEL
.........................24
Malfunction Indicators
......................24
Condition Indicators
...........................26
On/Off Indicators
.................................27
Information Display*
..........................28
Multi-Information Display*
...............29
VEHICLE CONTROLS
...........................30
Using the Key or Remote Transmitter
...30
Smart Entry System*
...........................31
Power Tailgate Operation*
...............32
Door Operation
....................................33
Power Window Operation
................36
Power Moonroof Operation*
...........37
Interior and Exterior Lights
...............38
One-Touch Turn Signal
.......................39
Wiper Operation
..................................40
Adjusting the Seats
............................41
Rear Seats
...........................................44
Driving Position Memory System*
...47
Adjusting the Steering Wheel
..........47
Adjusting the Mirrors
.........................48
HomeLink
® Garage Opener* .............49
HondaVAC
®* ........................................50
Cool Box*
.............................................51 Air Conditioning System*
.................52
Climate Control System*
..................53
Seat Heaters*
......................................54
Customized Features
..........................55
AUDIO AND CONNECTIVITY
.............56
Basic Audio Operation
.......................56
Models with one display
Intelligent Multi-Information Display
(i-MID)
...................................................58
FM/AM Radio
.......................................59
Compact Disc (CD)
..............................60
iPod
® or USB Flash Drive ...................61
Bluetooth
® Audio ................................62
Pandora
® ..............................................63
Models with two displays
Intelligent Multi-Information Display
(i-MID)
...................................................64
Touchscreen Operation
.....................65
FM/AM Radio
......................................66
SiriusXM
® Radio .................................67
Compact Disc (CD)
.............................68
Hard Disc Drive (HDD) Audio
..........69
iPod
® or USB Flash Drive .................70
Bluetooth
® Audio ................................71
Pandora
® ..............................................72
HondaLink featuring Aha™
...............73
Rear Entertainment System (RES)*
...74
BLUETOOTH
® HANDSFREELINK®..... 78
Basic HFL Operation
...........................78
Pairing a Phone
...................................80
Making a Call
......................................81
SMS Text Messaging and E-Mail*
...83
NAVIGATION*
......................................84
Basic Navigation Operation
.............84
Page 4 of 80
| 1
VISUAL INDEX
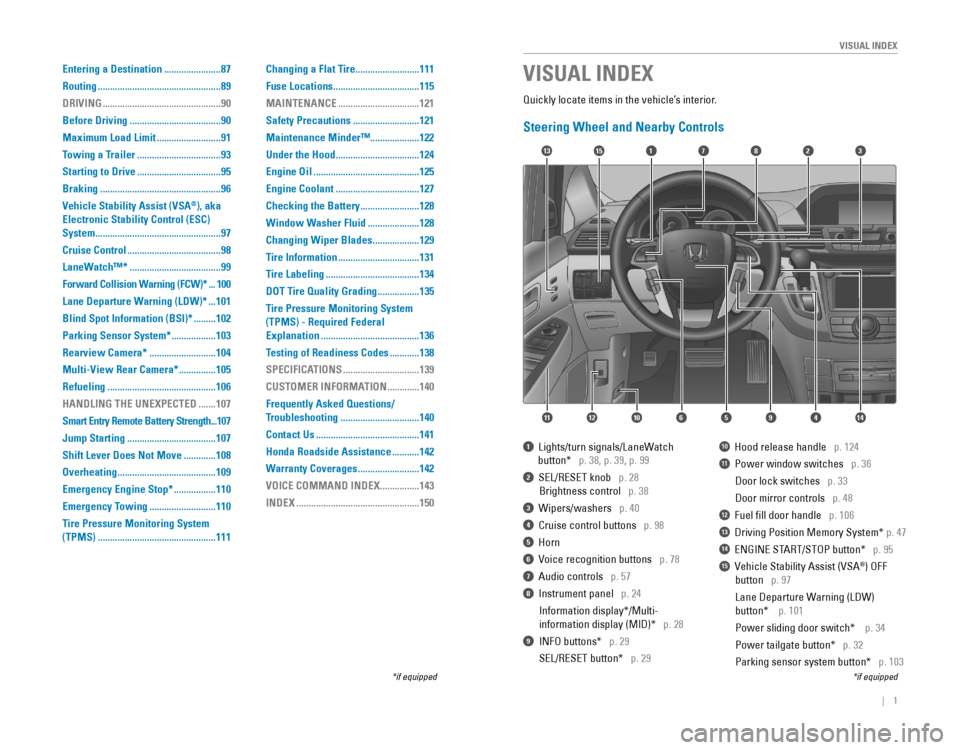
Quickly locate items in the vehicle’s interior.
Steering Wheel and Nearby Controls
17
4596111210
1513823
14
1 Lights/turn signals/LaneWatch
button* p. 38, p. 39, p. 99
2 SEL/RESET knob p. 28
Brightness control p. 38
3 Wipers/washers p. 40
4 Cruise control buttons p. 98
5 Horn
6 Voice recognition buttons p. 78
7 Audio controls p. 57
8 Instrument panel p. 24
Information display*/Multi-
information display (MID)* p. 28
9 INFO buttons* p. 29
SEL/RESET button* p. 29
10 Hood release handle p. 124
11 Power window switches p. 36
Door lock switches p. 33
Door mirror controls p. 48
12 Fuel fill door handle p. 106
13 Driving Position Memory System* p. 47
14 ENGINE START/STOP button* p. 95
15 Vehicle Stability Assist (VSA®) OFF
button p. 97
Lane Departure Warning (LDW)
button* p. 101
Power sliding door switch* p. 34
Power tailgate button* p. 32
Parking sensor system button* p. 103
VISUAL INDEX
*if equipped*if equipped
Entering a Destination .......................87
Routing
..................................................89
DRIVING
................................................90
Before Driving
.....................................90
Maximum Load Limit
..........................91
Towing a Trailer
..................................93
Starting to Drive
..................................95
Braking
.................................................96
Vehicle Stability Assist (VSA
®), aka
Electronic Stability Control (ESC)
System
...................................................97
Cruise Control
......................................98
LaneWatch™*
.....................................99
Forward Collision Warning (FCW)*
...100
Lane Departure Warning (LDW)*
...101
Blind Spot Information (BSI)*
.........102
Parking Sensor System*
..................103
Rearview Camera*
...........................104
Multi-View Rear Camera*
...............105
Refueling
............................................106
HANDLING THE UNEXPECTED
.......107
Smart Entry Remote Battery Strength
...107
Jump Starting
....................................107
Shift Lever Does Not Move
.............108
Overheating
........................................109
Emergency Engine Stop*
.................110
Emergency Towing
...........................110
Tire Pressure Monitoring System
(TPMS)
................................................111 Changing a Flat Tire
..........................111
Fuse Locations
...................................115
MAINTENANCE
.................................121
Safety Precautions
...........................121
Maintenance Minder™ ....................122
Under the Hood
..................................124
Engine Oil
...........................................125
Engine Coolant
..................................127
Checking the Battery
........................128
Window Washer Fluid
.....................128
Changing Wiper Blades
...................129
Tire Information
.................................131
Tire Labeling
......................................134
DOT Tire Quality Grading
.................135
Tire Pressure Monitoring System
(TPMS) - Required Federal
Explanation
........................................136
Testing of Readiness Codes
............138
SPECIFICATIONS
...............................139
CUSTOMER INFORMATION
.............140
Frequently Asked Questions/
Troubleshooting
................................140
Contact Us
..........................................141
Honda Roadside Assistance
...........142
Warranty Coverages
.........................142
VOICE COMMAND INDEX
................143
INDEX
..................................................150
Page 5 of 80
2 || 3
SAFETYVISUAL INDEX
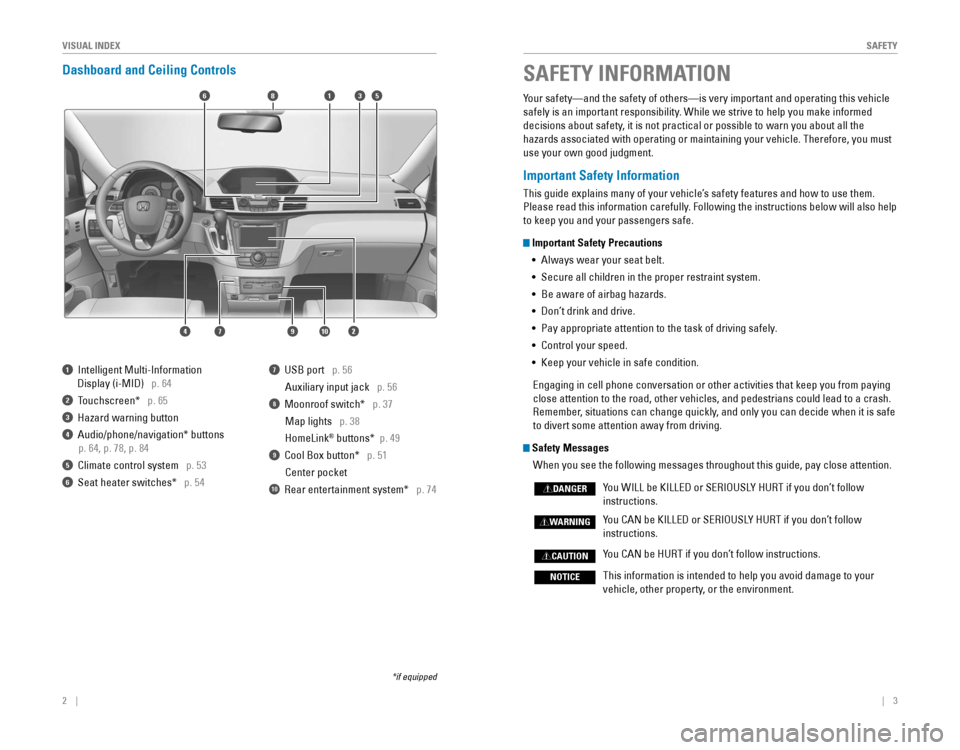
Dashboard and Ceiling Controls
6
1097
351
2
8
4
1 Intelligent Multi-Information
Display (i-MID) p. 64
2 Touchscreen* p. 65
3 Hazard warning button
4 Audio/phone/navigation* buttons
p. 64, p. 78, p. 84
5 Climate control system p. 53
6 Seat heater switches* p. 54
7 USB port p. 56
Auxiliary input jack p. 56
8 Moonroof switch* p. 37
Map lights p. 38
HomeLink
® buttons* p. 49
9 Cool Box button* p. 51
Center pocket
10 Rear entertainment system* p. 74
*if equipped
Your safety—and the safety of others—is very important and operatin\
g this vehicle
safely is an important responsibility. While we strive to help you make informed
decisions about safety, it is not practical or possible to warn you about all the
hazards associated with operating or maintaining your vehicle. Therefore, you must
use your own good judgment.
Important Safety Information
This guide explains many of your vehicle’s safety features and how to use them.
Please read this information carefully. Following the instructions below will also help
to keep you and your passengers safe.
Important Safety Precautions •
Always wear your seat belt.
• Secure all children in the proper restraint system.
•
Be aware of airbag hazards.
• Don’t drink and drive.
• Pay appropriate attention to the task of driving safely.
• Control your speed.
• Keep your vehicle in safe condition.
Engaging in cell phone conversation or other activities that keep you from paying
close attention to the road, other vehicles, and pedestrians could lead \
to a crash.
Remember, situations can change quickly, and only you can decide when it is safe
to divert some attention away from driving.
Safety Messages
When you see the following messages throughout this guide, pay close att\
ention.
You WILL be KILLED or SERIOUSLY HURT if you don’t follow
instructions.
You CAN be KILLED or SERIOUSLY HURT if you don’t follow
instructions.
You CAN be HURT if you don’t follow instructions.
This information is intended to help you avoid damage to your
vehicle, other property, or the environment.
DANGER
WARNING
CAUTION
NOTICE
SAFETY INFORMATION
Page 31 of 80
54 || 55
VEHICLE CONTROLSVEHICLE CONTROLS
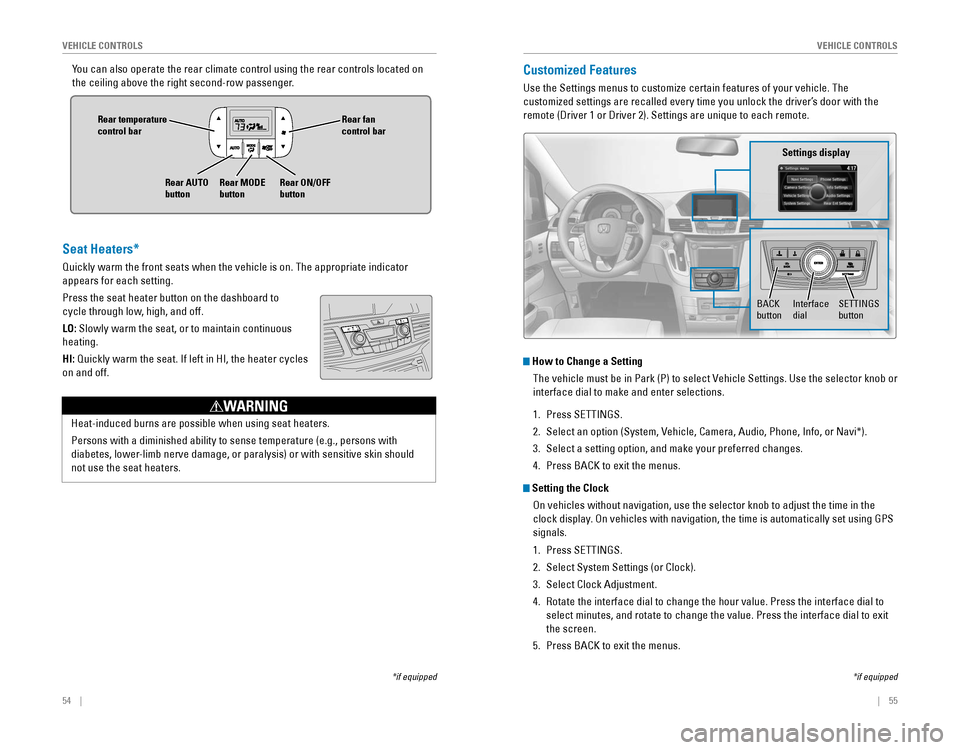
You can also operate the rear climate control using the rear controls loc\
ated on
the ceiling above the right second-row passenger.
Rear fan control bar
Rear ON/OFF
button
Rear temperature
control bar
Rear AUTO
buttonRear MODE
button
Customized Features
Use the Settings menus to customize certain features of your vehicle. The
customized settings are recalled every time you unlock the driver’s door with the
remote (Driver 1 or Driver 2). Settings are unique to each remote.
How to Change a Setting
The vehicle must be in Park (P) to select Vehicle Settings. Use the selector knob or
interface dial to make and enter selections.
1. Press SETTINGS.
2. Select an option (System, Vehicle, Camera, Audio, Phone, Info, or Navi*).
3. Select a setting option, and make your preferred changes.
4. Press BACK to exit the menus.
Setting the Clock
On vehicles without navigation, use the selector knob to adjust the time in the
clock display. On vehicles with navigation, the time is automatically set using GPS
signals.
1. Press SETTINGS.
2. Select System Settings (or Clock).
3. Select Clock Adjustment.
4. Rotate the interface dial to change the hour value. Press the interface \
dial to
select minutes, and rotate to change the value. Press the interface dial\
to exit
the screen.
5. Press BACK to exit the menus.
SETTINGS button
Settings display
BACK
buttonInterface dial
*if equipped
Seat Heaters*
Quickly warm the front seats when the vehicle is on. The appropriate ind\
icator
appears for each setting.
Press the seat heater button on the dashboard to
cycle through low, high, and off.
LO: Slowly warm the seat, or to maintain continuous
heating.
HI:
Quickly warm the seat. If left in HI, the heater cycles
on and off.
Heat-induced burns are possible when using seat heaters.
Persons with a diminished ability to sense temperature (e.g., persons with
diabetes, lower-limb nerve damage, or paralysis) or with sensitive skin should
not use the seat heaters.
WARNING
*if equipped
Page 32 of 80
56 || 57
AUDIO AND CONNECTIVITY
AUDIO AND CONNECTIVITY
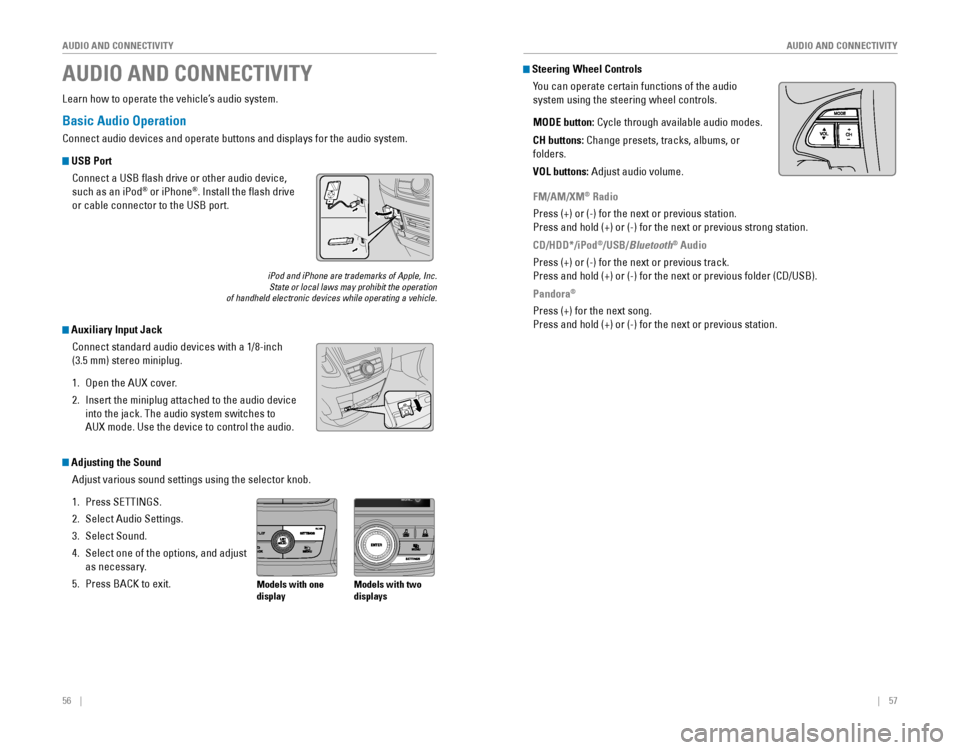
Basic Audio Operation
Connect audio devices and operate buttons and displays for the audio system.
USB Port
Connect a USB flash drive or other audio device,
such as an iPod
® or iPhone®. Install the flash drive
or cable connector to the USB port.
Auxiliary Input Jack
Connect standard audio devices with a 1/8-inch
(3.5 mm) stereo miniplug.
1. Open the AUX cover.
2. Insert the miniplug attached to the audio device
into the jack. The audio system switches to
AUX mode. Use the device to control the audio.
iPod and iPhone are trademarks of Apple, Inc.State or local laws may prohibit the operation of handheld electronic devices while operating a vehicle.
AUDIO AND CONNECTIVITY
Learn how to operate the vehicle’s audio system.
Adjusting the Sound
Adjust various sound settings using the selector knob.
1. Press SETTINGS.
2. Select Audio Settings.
3. Select Sound.
4. Select one of the options, and adjust
as necessary.
5. Press BACK to exit.Models with one
display Models with two
displays
Steering Wheel Controls
You can operate certain functions of the audio
system using the steering wheel controls.
MODE button:
Cycle through available audio modes.
CH buttons: Change presets, tracks, albums, or
folders.
VOL buttons: Adjust audio volume.
FM/AM/XM® Radio
Press (+) or (-) for the next or previous station.
Press and hold (+) or (-) for the next or previous strong station.
CD/HDD*/iPod
®/USB/Bluetooth® Audio
Press (+) or (-) for the next or previous track.
Press and hold (+) or (-) for the next or previous folder (CD/USB).
Pandora®
Press (+) for the next song.
Press and hold (+) or (-) for the next or previous station.
Page 33 of 80
58 || 59
AUDIO AND CONNECTIVITY
AUDIO AND CONNECTIVITY
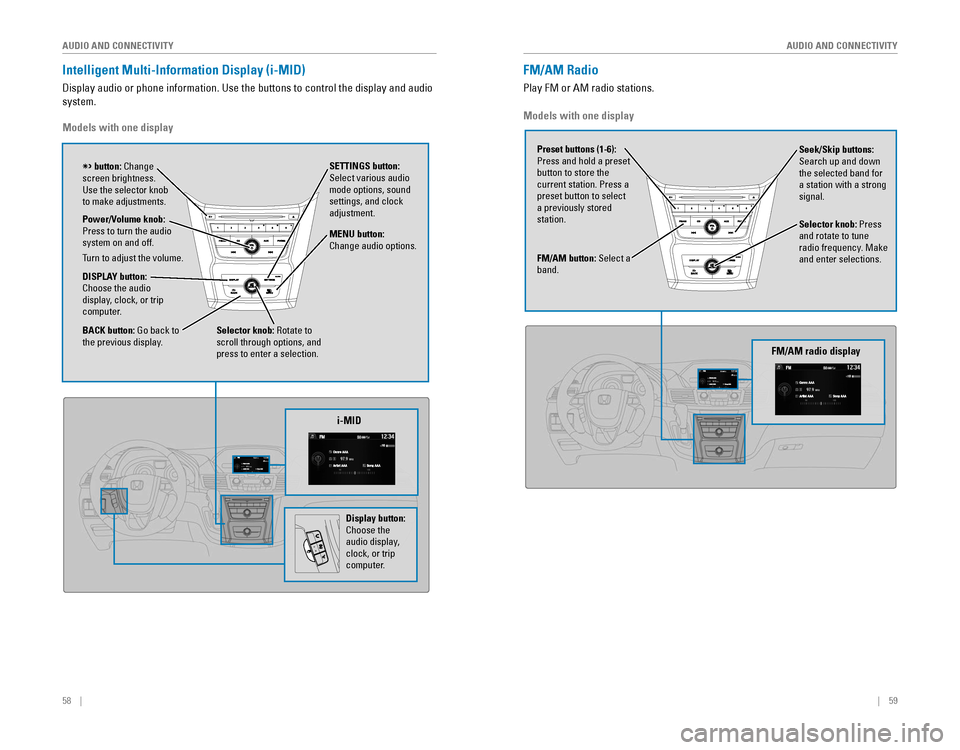
Intelligent Multi-Information Display (i-MID)
Display audio or phone information. Use the buttons to control the display and audio
system.
Models with one display
Selector knob: Rotate to
scroll through options, and
press to enter a selection. MENU button:
Change audio options.
DISPLAY button: Choose the audio
display, clock, or trip
computer. Power/Volume knob:
Press to turn the audio
system on and off.
Turn to adjust the volume.
SETTINGS button:
Select various audio
mode options, sound
settings, and clock
adjustment.
BACK button: Go back to the previous display.
button: Change screen brightness. Use the selector knob to make adjustments.
i-MID
Display button:
Choose the
audio display,
clock, or trip
computer.
Models with one display
FM/AM button: Select a
band.
Preset buttons (1-6):
Press and hold a preset
button to store the current station. Press a preset button to select a previously stored
station. Seek/Skip buttons:
Search up and down
the selected band for a station with a strong
signal.
Selector knob: Press
and rotate to tune
radio frequency. Make and enter selections.
FM/AM Radio
Play FM or AM radio stations.
FM/AM radio display
Page 34 of 80
60 || 61
AUDIO AND CONNECTIVITY
AUDIO AND CONNECTIVITY
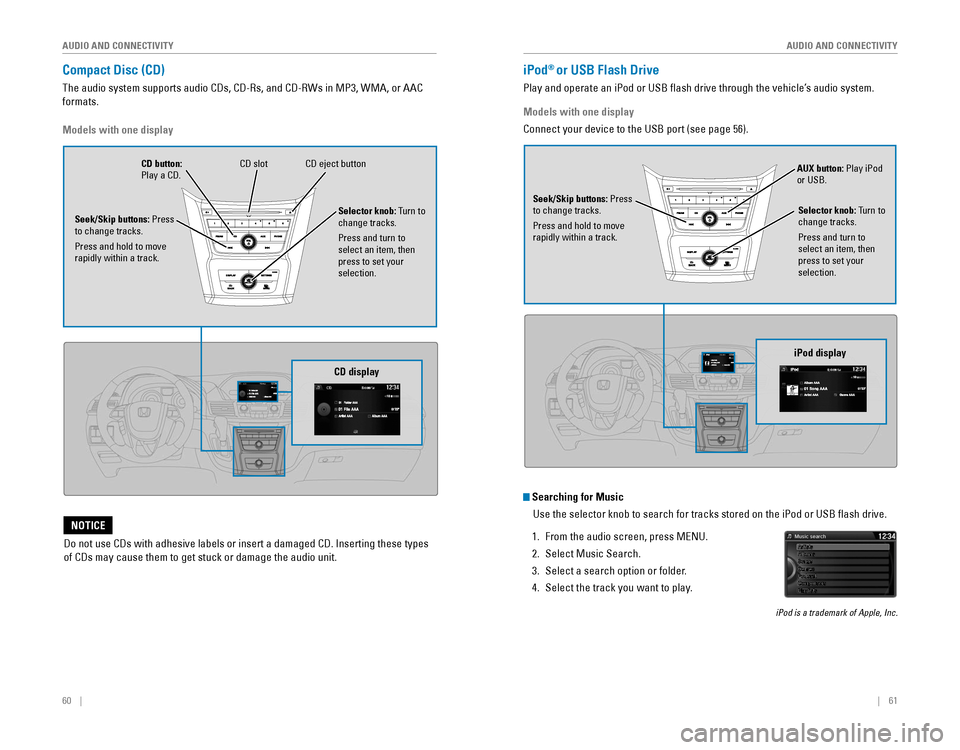
Compact Disc (CD)
The audio system supports audio CDs, CD-Rs, and CD-RWs in MP3, WMA, or AAC
formats.
CD eject buttonCD slotCD button: Play a CD.
Do not use CDs with adhesive labels or insert a damaged CD. Inserting these types
of CDs may cause them to get stuck or damage the audio unit.
NOTICE
Seek/Skip buttons: Press
to change tracks.
Press and hold to move
rapidly within a track. Selector knob: Turn to
change tracks.
Press and turn to
select an item, then
press to set your
selection.
CD display
Models with one display
Seek/Skip buttons: Press
to change tracks.
Press and hold to move
rapidly within a track. AUX button: Play iPod
or USB.
Selector knob: Turn to
change tracks.
Press and turn to
select an item, then
press to set your
selection.
iPod® or USB Flash Drive
Play and operate an iPod or USB flash drive through the vehicle’s audio system.
Searching for Music
Use the selector knob to search for tracks stored on the iPod or USB flash drive.
1. From the audio screen, press MENU.
2. Select Music Search.
3. Select a search option or folder.
4. Select the track you want to play.
iPod is a trademark of Apple, Inc.
Models with one display
Connect your device to the USB port (see page 56).
iPod display
Page 35 of 80
62 || 63
AUDIO AND CONNECTIVITY
AUDIO AND CONNECTIVITY
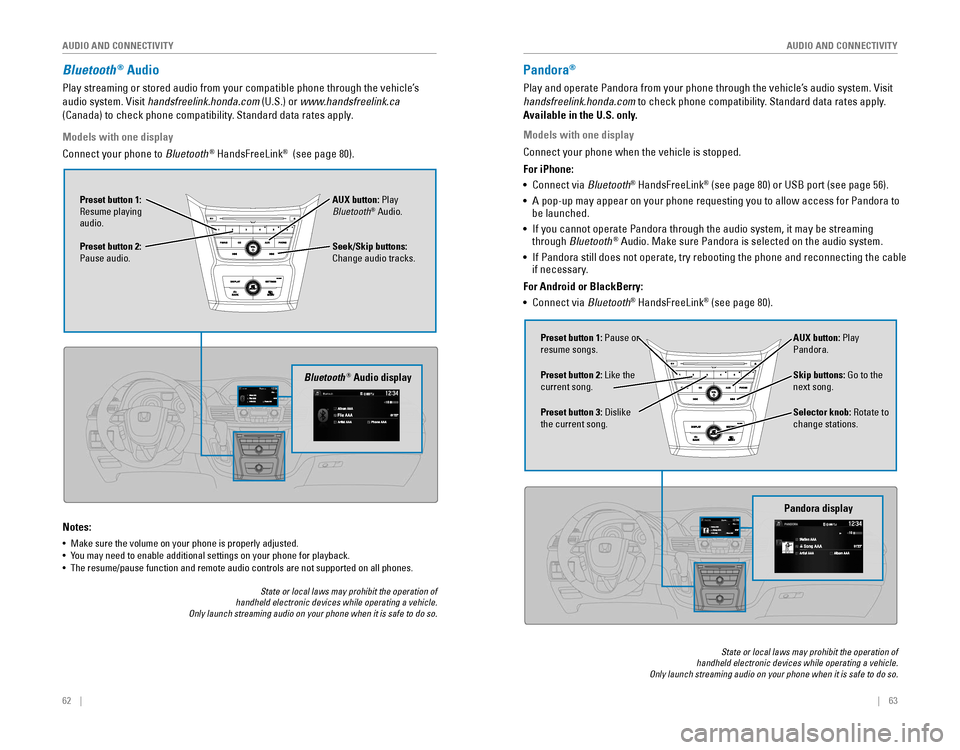
Bluetooth® Audio
Play streaming or stored audio from your compatible phone through the vehicle’s
audio system. Visit handsfreelink.honda.com (U.S.) or www.handsfreelink.ca
(Canada) to check phone compatibility. Standard data rates apply.
Notes:
• Make sure the volume on your phone is properly adjusted.
• You may need to enable additional settings on your phone for playback.• The resume/pause function and remote audio controls are not supported on all phones.
Seek/Skip buttons:
Change audio tracks. AUX button: Play
Bluetooth
® Audio.
Preset button 1:
Resume playing
audio.
Preset button 2:
Pause audio.
Bluetooth® Audio display
Models with one display
Connect your phone to Bluetooth® HandsFreeLink® (see page 80).
State or local laws may prohibit the operation of handheld electronic devices while operating a vehicle. Only launch streaming audio on your phone when it is safe to do so.
Pandora®
Play and operate Pandora from your phone through the vehicle’s audio system. Visit
handsfreelink.honda.com
to check phone compatibility. Standard data rates apply.
Available in the U.S. only.
Skip buttons: Go to the
next song.
Selector knob: Rotate to
change stations. AUX button: Play
Pandora.
Preset button 1: Pause or
resume songs.
Preset button 3:
Dislike the current song. Preset button 2: Like the
current song.
Pandora display
State or local laws may prohibit the operation of handheld electronic devices while operating a vehicle. Only launch streaming audio on your phone when it is safe to do so.
Models with one display
Connect your phone when the vehicle is stopped.
For iPhone:
•
Connect via Bluetooth
® HandsFreeLink® (see page 80) or USB port (see page 56).
• A pop-up may appear on your phone requesting you to allow access for Pandora to be launched.
• If you cannot operate Pandora through the audio system, it may be streaming through Bluetooth® Audio. Make sure Pandora is selected on the audio system.
•
If Pandora still does not operate, try rebooting the phone and reconnecting the cable if necessary.
For Android or BlackBerry:
• Connect via Bluetooth
® HandsFreeLink® (see page 80).
Page 36 of 80
64 || 65
AUDIO AND CONNECTIVITY
AUDIO AND CONNECTIVITY
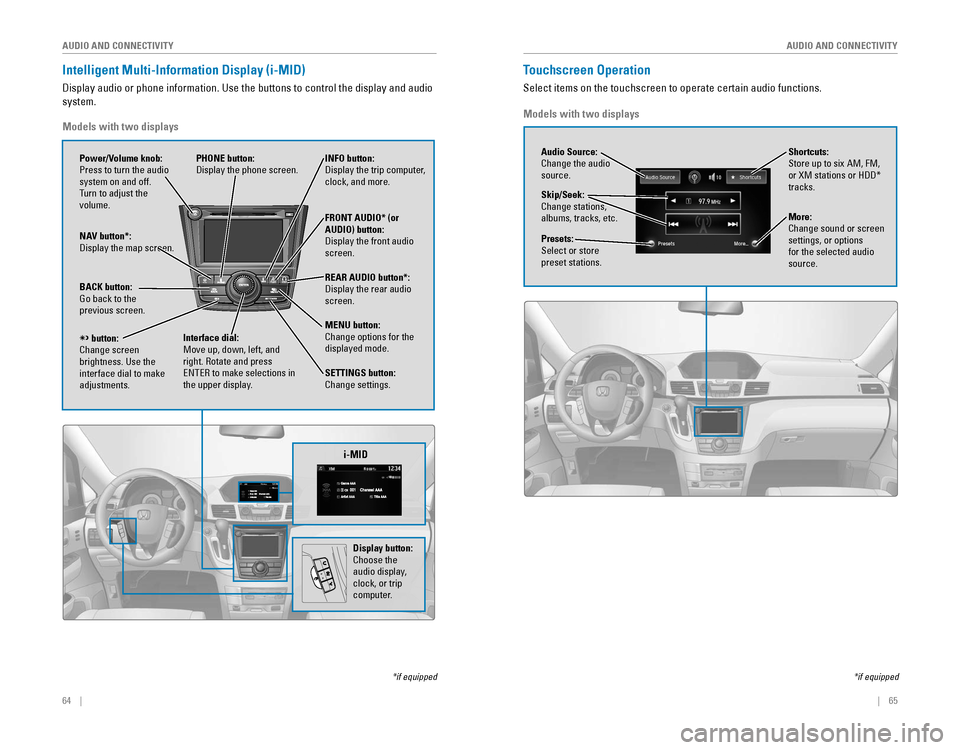
Intelligent Multi-Information Display (i-MID)
Display audio or phone information. Use the buttons to control the display and audio
system.
*if equipped
REAR
AUDIO
FRONT
AUDIO
NAV
i-MID
Power/Volume knob:
Press to turn the audio
system on and off.
Turn to adjust the
volume. INFO button: Display the trip computer, clock, and more.
FRONT AUDIO* (or
AUDIO) button:
Display the front audio screen.
REAR AUDIO button*:
Display the rear audio screen.
MENU button:
Change options for the
displayed mode.
SETTINGS button:
Change settings.
PHONE button:
Display the phone screen.
NAV button*: Display the map screen.
BACK button: Go back to the previous screen.
button:Change screen brightness. Use the interface dial to make
adjustments.
Interface dial:
Move up, down, left, and
right. Rotate and press ENTER to make selections in the upper display.
Models with two displays
Display button:
Choose the
audio display,
clock, or trip
computer.
Touchscreen Operation
Select items on the touchscreen to operate certain audio functions.
*if equipped
Audio Source:
Change the audio
source.
Shortcuts:
Store up to six AM, FM,
or XM stations or HDD* tracks.
More:
Change sound or screen
settings, or options
for the selected audio
source.
Skip/Seek:
Change stations,
albums, tracks, etc.
Presets:
Select or store
preset stations.
Models with two displays