reset HONDA ODYSSEY 2016 RC1-RC2 / 5.G Navigation Manual
[x] Cancel search | Manufacturer: HONDA, Model Year: 2016, Model line: ODYSSEY, Model: HONDA ODYSSEY 2016 RC1-RC2 / 5.GPages: 325, PDF Size: 8.63 MB
Page 146 of 325
145
Audio
Playing FM/AM Radio
Selecting FM/AM Mode
1.Press the MENU button.(in AUDIO mode)
2. Rotate i to select Change Source . Press u.
3. Rotate i to select the frequency band (FM, AM). Press u.
The band and frequency are displayed on the navigation screen.
1. Select Audio Source .
2. Select the frequency band (AM, FM) icon.
The band and frequency are displayed on the touchscreen.
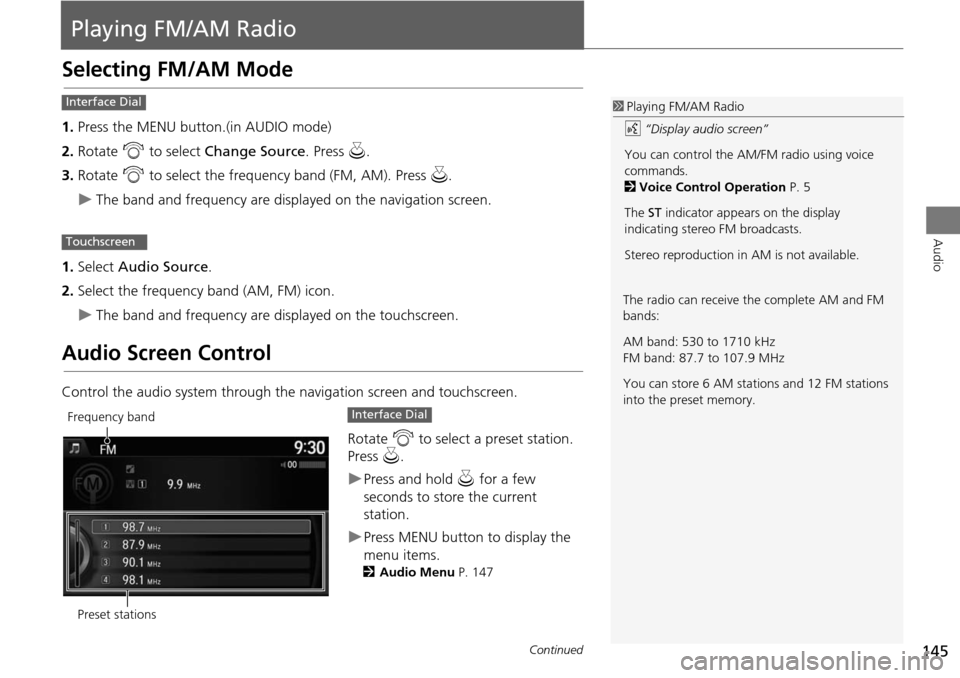
Audio Screen Control
Control the audio system through the navigation screen and touchscreen.
Rotate i to select a preset station.
Press u.
Press and hold u for a few
seconds to store the current
station.
Press MENU button to display the
menu items.
2 Audio Menu P. 147
1Playing FM/AM Radio
d “Display audio screen”
You can control the AM/FM radio using voice
commands.
2 Voice Control Operation P. 5
The ST indicator appears on the display
indicating stereo FM broadcasts.
Stereo reproduction in AM is not available.Interface Dial
Touchscreen
The radio can receive the complete AM and FM
bands:
AM band: 530 to 1710 kHz
FM band: 87.7 to 107.9 MHz
You can store 6 AM stations and 12 FM stations
into the preset memory.
Preset stations
Frequency bandInterface Dial
Continued
Page 147 of 325
146
Playing FM/AM RadioAudio Screen Control
Audio
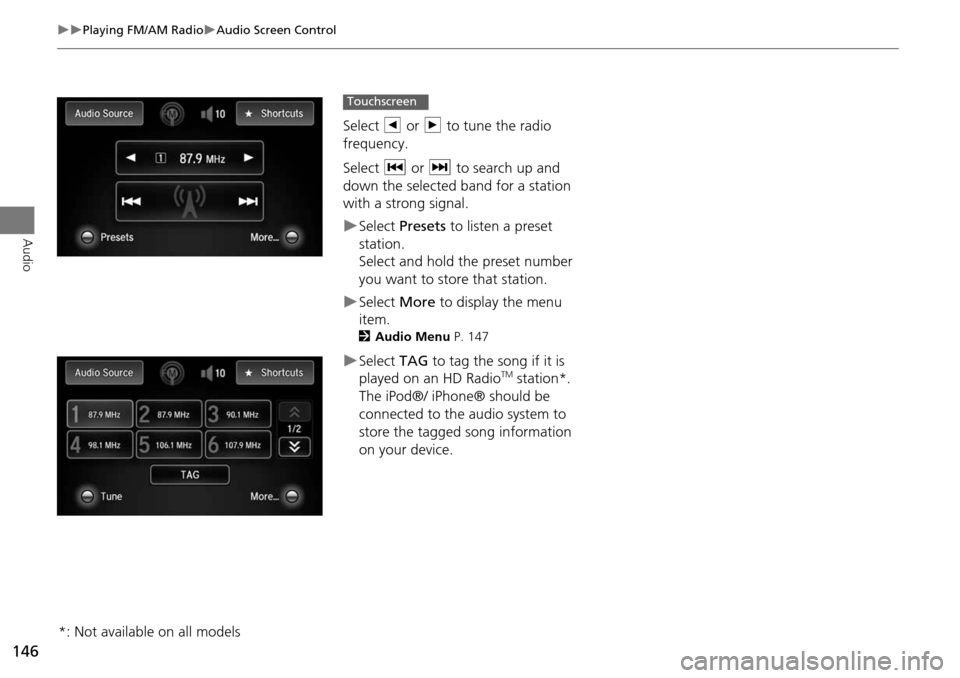
Select b or n to tune the radio
frequency.
Select c or x to search up and
down the selected band for a station
with a strong signal.
Select Presets to listen a preset
station.
Select and hold the preset number
you want to store that station.
Select More to display the menu
item.
2 Audio Menu P. 147
Select TAG to tag the song if it is
played on an HD RadioTM station*.
The iPod®/ iPhone® should be
connected to the audio system to
store the tagged song information
on your device.
Touchscreen
*: Not available on all models
Page 148 of 325
147
Playing FM/AM RadioAudio Menu
Audio
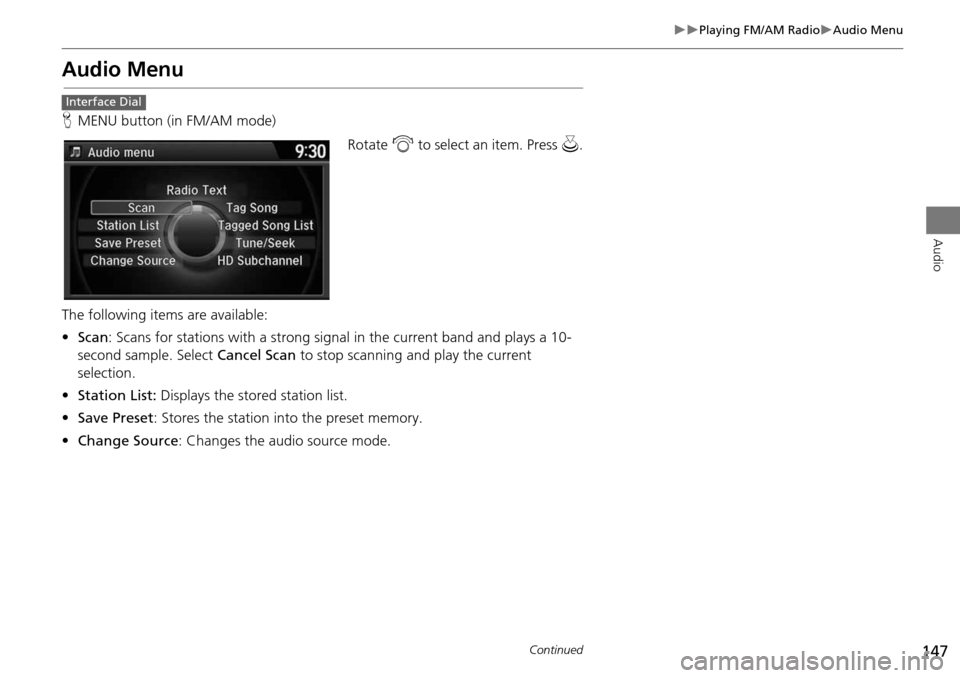
Audio Menu
HMENU button (in FM/AM mode)
Rotate i to select an item. Press u.
The following items are available:
• Scan : Scans for stations with a strong signal in the current band and plays a 10-
second sample. Select Cancel Scan to stop scanning and play the current
selection.
• Station List: Displays the stored station list.
• Save Preset : Stores the station into the preset memory.
• Change Source : Changes the audio source mode.
Interface Dial
Continued
Page 150 of 325
149
Playing FM/AM RadioAudio Menu
Audio
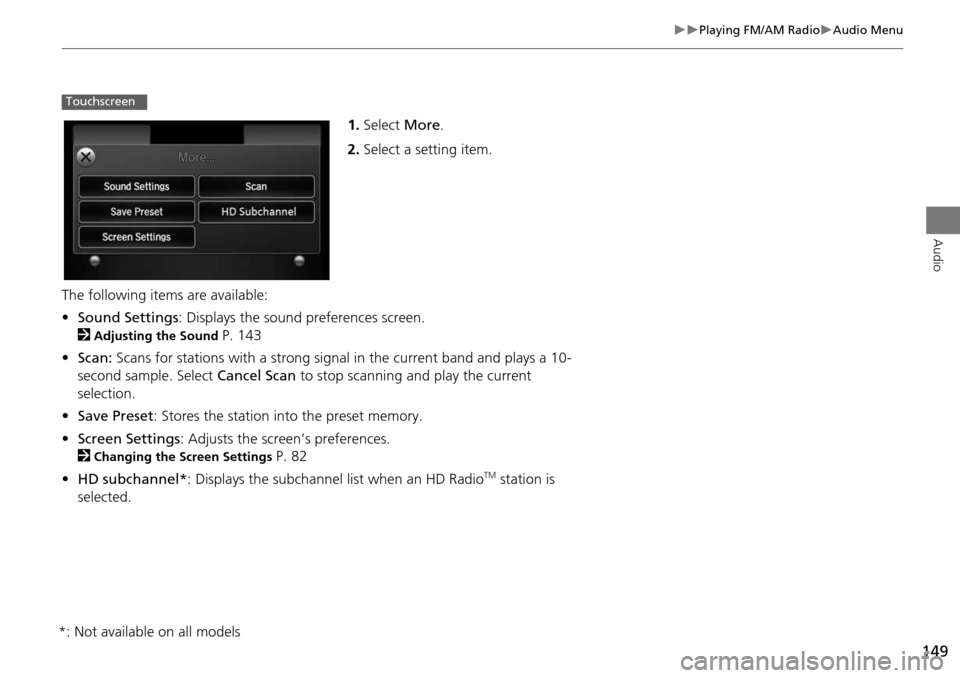
1.Select More.
2. Select a setting item.
The following items are available:
• Sound Settings : Displays the sound preferences screen.
2
Adjusting the Sound P. 143
• Scan: Scans for stations with a strong signal in the current band and plays a 10-
second sample. Select Cancel Scan to stop scanning and play the current
selection.
• Save Preset : Stores the station into the preset memory.
• Screen Settings : Adjusts the screen’s preferences.
2
Changing the Screen Settings P. 82
• HD subchannel* : Displays the subchannel list when an HD Radio
TM station is
selected.
Touchscreen
*: Not available on all models
Page 152 of 325
151
Audio
Playing SiriusXM® Radio
Selecting SiriusXM® Mode
1.Press the MENU button. (in AUDIO mode)
2. Rotate i to select Change Source . Press u.
3. Rotate i to select XM. Press u.
The band and channel are displayed on the navigation screen.
1. Select Audio Source .
2. Select the SiriusXM® icon.
The band and channel are displayed on the touchscreen.
Audio Screen Control
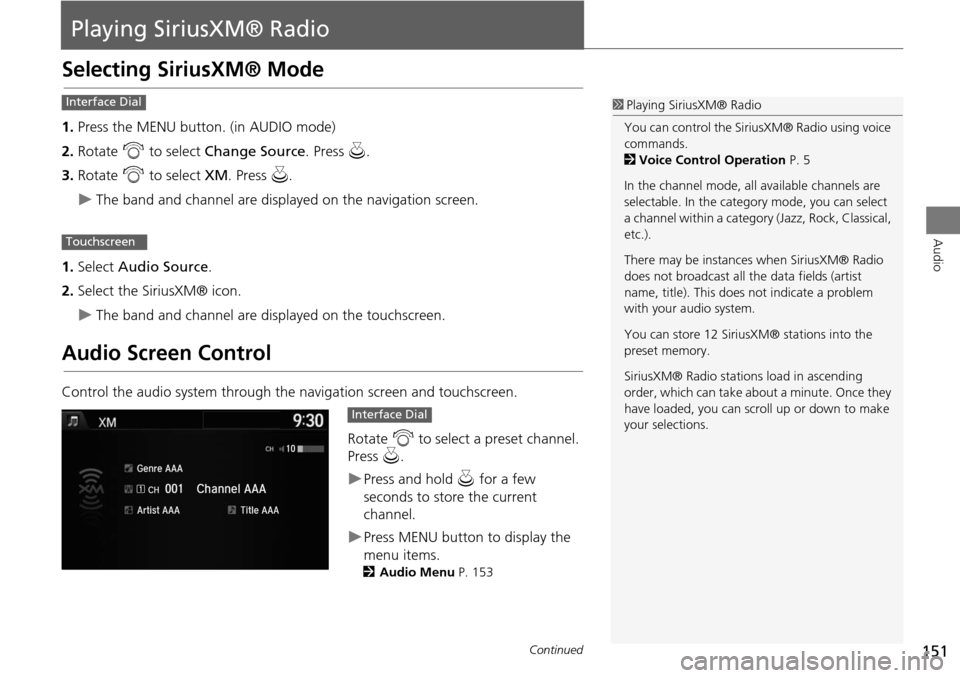
Control the audio system through the navigation screen and touchscreen.
Rotate i to select a preset channel.
Press u.
Press and hold u for a few
seconds to store the current
channel.
Press MENU button to display the
menu items.
2 Audio Menu P. 153
1Playing SiriusXM® Radio
You can control the SiriusXM® Radio using voice
commands.
2 Voice Control Operation P. 5
In the channel mode, all available channels are
selectable. In the categor y mode, you can select
a channel within a category (Jazz, Rock, Classical,
etc.).
There may be instances when SiriusXM® Radio
does not broadcast all the data fields (artist
name, title). This does not indicate a problem
with your audio system.
You can store 12 SiriusXM® stations into the
preset memory.
SiriusXM® Radio stations load in ascending
order, which can take about a minute. Once they
have loaded, you can scroll up or down to make
your selections.Interface Dial
Touchscreen
Interface Dial
Continued
Page 153 of 325
152
Playing SiriusXM® RadioAudio Screen Control
Audio
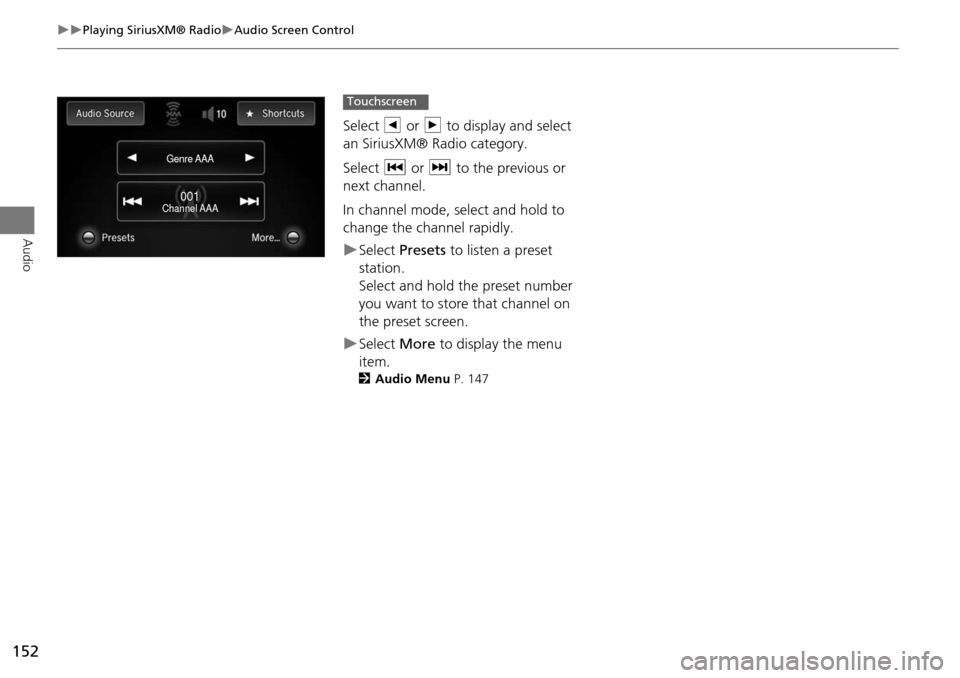
Select b or n to display and select
an SiriusXM® Radio category.
Select c or x to the previous or
next channel.
In channel mode, select and hold to
change the channel rapidly.
Select Presets to listen a preset
station.
Select and hold the preset number
you want to store that channel on
the preset screen.
Select More to display the menu
item.
2 Audio Menu P. 147
Genre AAAGenre AAAGenre AAA
Channel AAA
Channel AAAChannel AAA001001001
Touchscreen
Page 154 of 325
153
Playing SiriusXM® RadioAudio Menu
Audio
Audio Menu
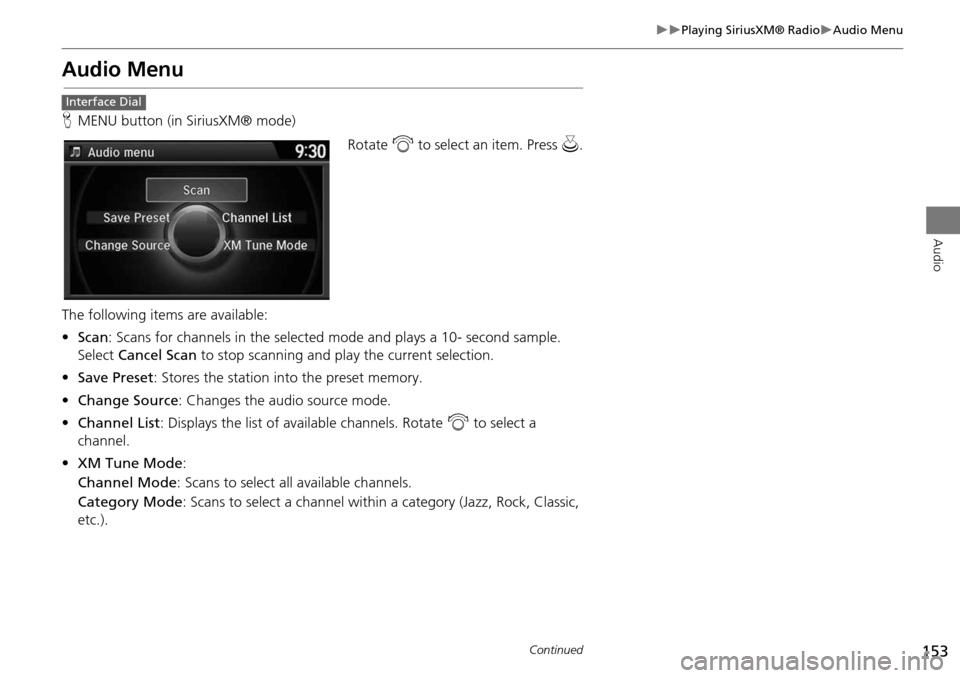
HMENU button (in SiriusXM® mode)
Rotate i to select an item. Press u.
The following items are available:
• Scan : Scans for channels in the selected mode and plays a 10- second sample.
Select Cancel Scan to stop scanning and play the current selection.
• Save Preset : Stores the station into the preset memory.
• Change Source : Changes the audio source mode.
• Channel List : Displays the list of available channels. Rotate i to select a
channel.
• XM Tune Mode :
Channel Mode : Scans to select all available channels.
Category Mode : Scans to select a channel within a category (Jazz, Rock, Classic,
etc.).
Interface Dial
Continued
Page 155 of 325
154
Playing SiriusXM® RadioAudio Menu
Audio
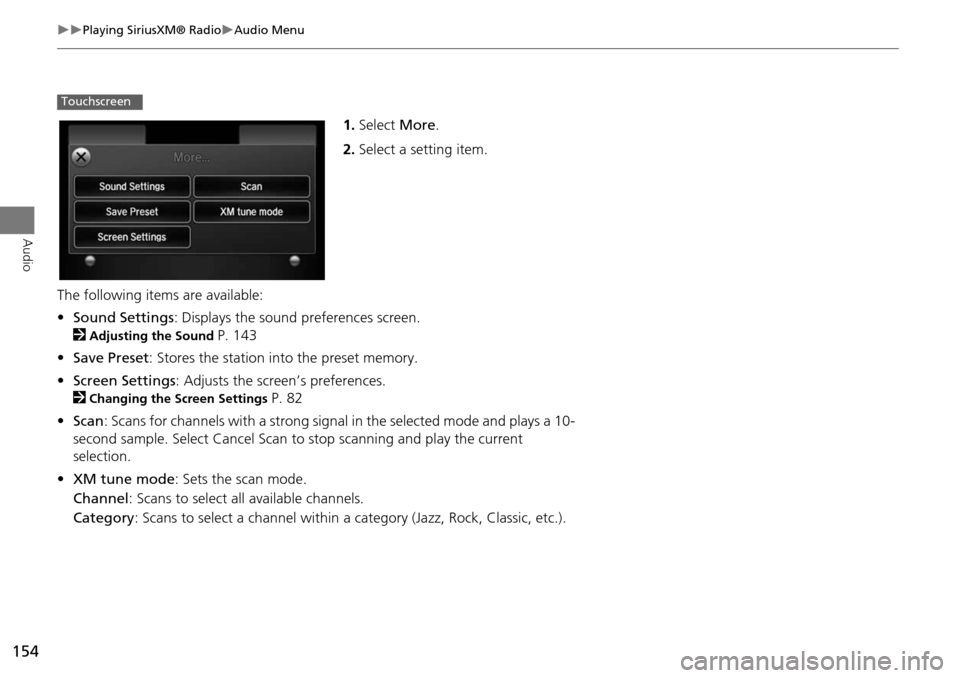
1.Select More.
2. Select a setting item.
The following item s are available:
• Sound Settings : Displays the sound preferences screen.
2
Adjusting the Sound P. 143
• Save Preset : Stores the station into the preset memory.
• Screen Settings : Adjusts the screen’s preferences.
2
Changing the Screen Settings P. 82
• Scan : Scans for channels with a strong signal in the selected mode and plays a 10-
second sample. Select Cancel Scan to stop scanning and play the current
selection.
• XM tune mode : Sets the scan mode.
Channel : Scans to select a ll available channels.
Category : Scans to select a channel within a category (Jazz, Rock, Classic, etc.).
Touchscreen
Page 241 of 325
240
Text Message/E-mailHFL Menus
Bluetooth® HandsFreeLink®
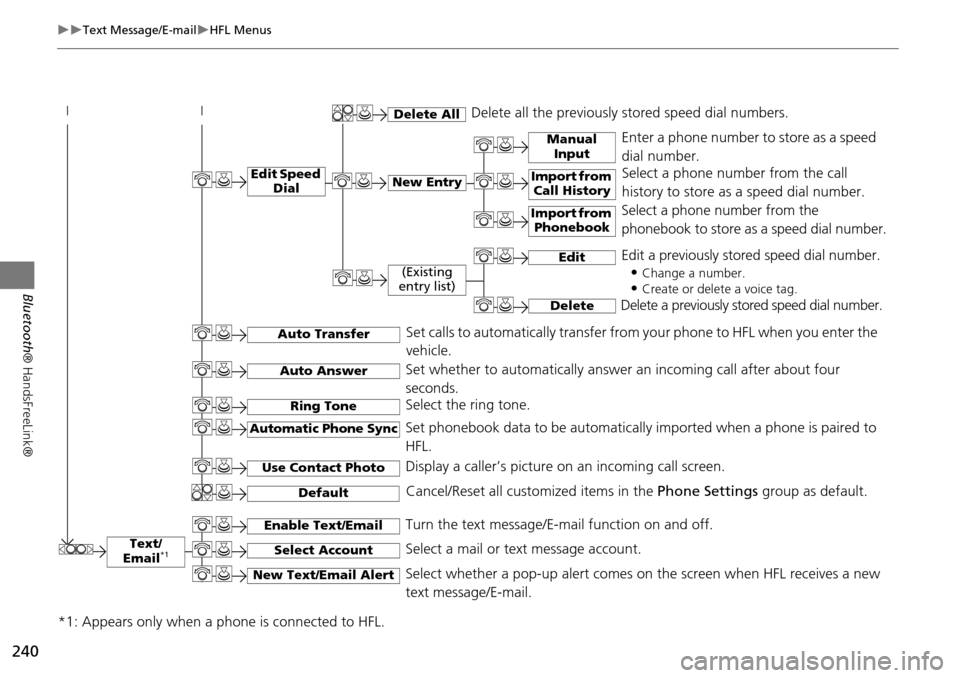
Text/
Email*1
Manual Input
Edit Speed DialNew Entry
Import from Call History
*1: Appears only when a phone is connected to HFL.
Import from Phonebook
Delete AllDelete all the previously stored speed dial numbers.
Select a phone number from the call
history to store as a speed dial number.
Select a phone number from the
phonebook to store as a speed dial number.
Enter a phone number to store as a speed
dial number.
Edit
Delete
(Existing
entry list)
Edit a previously stored speed dial number.
•
Change a number.
•Create or delete a voice tag.
Delete a previously st ored speed dial number.
Set calls to automatically transfer from your phone to HFL when you enter the
vehicle.Auto Transfer
Auto Answer
Ring Tone
Set whether to automatically answer an incoming call after about four
seconds.
Select the ring tone.
Use Contact Photo
Set phonebook data to be automatically imported when a phone is paired to
HFL.
Display a caller’s picture on an incoming call screen.Automatic Phone Sync
Select AccountSelect a mail or text message account.
Enable Text/EmailTurn the text message/E-mail function on and off.
New Text/Email AlertSelect whether a pop-up alert comes on the screen when HFL receives a new
text message/E-mail.
Cancel/Reset all customized items in the Phone Settings group as default.Default
Page 254 of 325
253
Rear Control Panel OperationScreen and Surround Settings
Rear Entertainment System
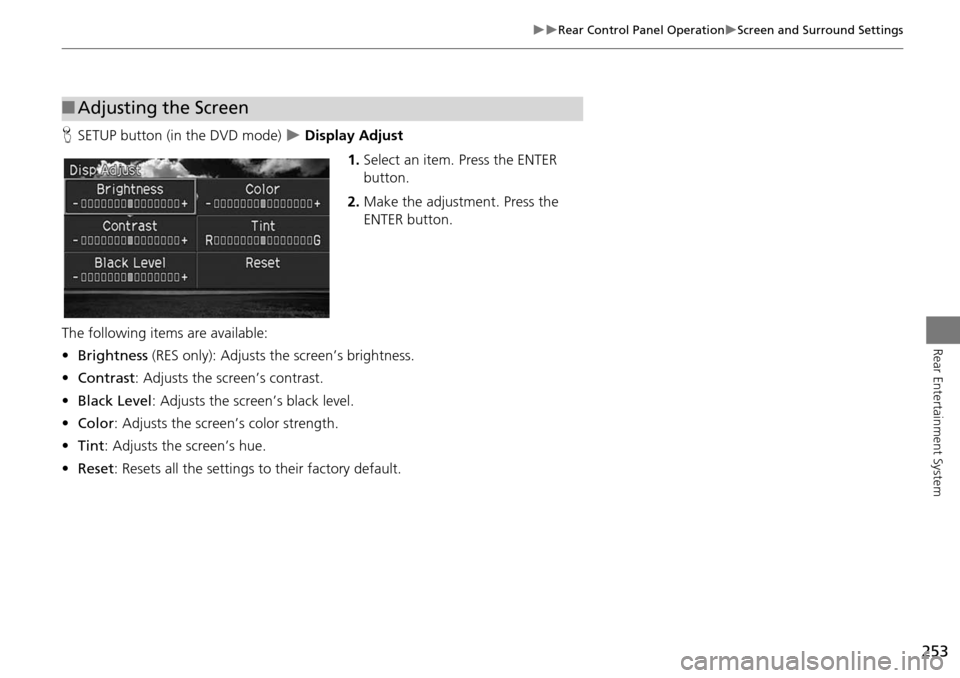
HSETUP button (in the DVD mode) Display Adjust
1.Select an item. Press the ENTER
button.
2. Make the adjustment. Press the
ENTER button.
The following items are available:
• Brightness (RES only): Adjusts the screen’s brightness.
• Contrast: Adjusts the screen’s contrast.
• Black Level : Adjusts the screen’s black level.
• Color : Adjusts the screen’s color strength.
• Tint : Adjusts the screen’s hue.
• Reset : Resets all the settings to their factory default.
■Adjusting the Screen