traction control HONDA ODYSSEY 2016 RC1-RC2 / 5.G Quick Guide
[x] Cancel search | Manufacturer: HONDA, Model Year: 2016, Model line: ODYSSEY, Model: HONDA ODYSSEY 2016 RC1-RC2 / 5.GPages: 80, PDF Size: 16.28 MB
Page 43 of 80
78 || 79
INDEX
VOICE COMMAND
INDEX
CUSTOMER
INFORMATION
SPECIFICATIONS
MAINTENANCE
HANDLING THE UNEXPECTED
DRIVING
NAVIGATION
TABLE OF CONTENTS
VISUAL INDEX
SAFETY
INFORMATION
INSTRUMENT PANEL
VEHICLE
CONTROLS
AUDIO AND
CONNECTIVITY
BLUETOOTH®
HANDSFREELINK®
HONDALINK®
Learn how to operate the vehicle’s hands-free calling system.
Basic HFL Operation
Make and receive phone calls using the vehicle’s audio system, without handling
your phone. Visit handsfreelink.honda.com (U.S.) or www.handsfreelink.ca (Canada)
to check phone compatibility.
HFL Controls
Use the controls to enter information and make selections.
BLUETOOTH® HANDSFREELINK® (HFL)
Talk Button TipsOn models with navigation, you can say voice commands to operate system
functions. Below are some helpful tips:
• When using the Talk button, wait for the beep before saying a command.
• To bypass the system prompts, simply press the Talk button again to say your
command.
• When the Talk button is pressed, all available voice commands are highlighted
in yellow.
• Speak in a clear, natural voice.
• Reduce all background noise.
• Adjust the dashboard and side vents away from the microphone in the ceil\
ing.
• Close the windows and moonroof.
To reduce the potential for driver distraction, certain manual functions \
may be
inoperable or grayed out while the vehicle is moving. Stop or pull over \
to perform
the function.
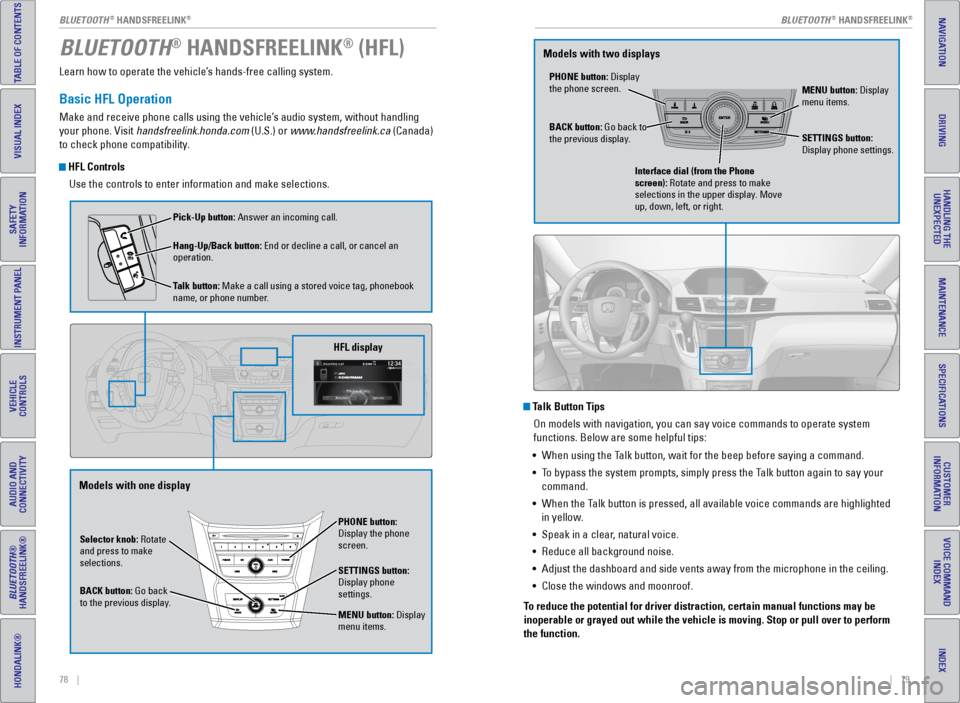
Selector knob: Rotate
and press to make
selections.
BACK button: Go back
to the previous display. PHONE button:
Display the phone
screen.
SETTINGS button:
Display phone
settings.
MENU button: Display
menu items.
HFL display
Pick-Up button: Answer an incoming call.
Hang-Up/Back button: End or decline a call, or cancel an
operation.
Talk button: Make a call using a stored voice tag, phonebook
name, or phone number.
Models with one display
PHONE button: Display
the phone screen.
MENU button: Display
menu items.
BACK button: Go back to
the previous display. SETTINGS button:
Display phone settings.
Interface dial (from the Phone
screen): Rotate and press to make
selections in the upper display. Move
up, down, left, or right.
Models with two displays
BLUETOOTH® HANDSFREELINK®BLUETOOTH® HANDSFREELINK®
Page 46 of 80
84 || 85
NAVIGATION
NAVIGATION
INDEX
VOICE COMMAND
INDEX
CUSTOMER
INFORMATION
SPECIFICATIONS
MAINTENANCE
HANDLING THE UNEXPECTED
DRIVING
NAVIGATION
TABLE OF CONTENTS
VISUAL INDEX
SAFETY
INFORMATION
INSTRUMENT PANEL
VEHICLE
CONTROLS
AUDIO AND
CONNECTIVITY
BLUETOOTH®
HANDSFREELINK®
HONDALINK®
Learn how to enter a destination and operate the navigation system.
Basic Navigation Operation
A real-time navigation system uses GPS and a map database to show your current
location and help guide you to a desired destination. You can operate the system
using voice commands or the system controls.
To reduce the potential for driver distraction, certain manual functions \
may be
inoperable or grayed out while the vehicle is moving. Voice commands are always
available.
Steering Wheel Controls
Use the steering wheel controls to give voice commands.
Talk Button Tips• When using the Talk button, wait for the beep before saying a command.
• To bypass the system prompts, simply press the Talk button again to say your
command.
• When the Talk button is pressed, all available voice commands are highlighted
in yellow.
• Speak in a clear, natural voice.
• Reduce all background noise.
• Adjust the dashboard and side vents away from the microphone in the ceil\
ing.
• Close the windows and moonroof.
Using the navigation system while driving can take your attention away f\
rom
the road, causing a crash in which you could be seriously injured or kil\
led.
Operate system controls only when the conditions permit you to safely do\
so.
WARNING
NAVIGATION*
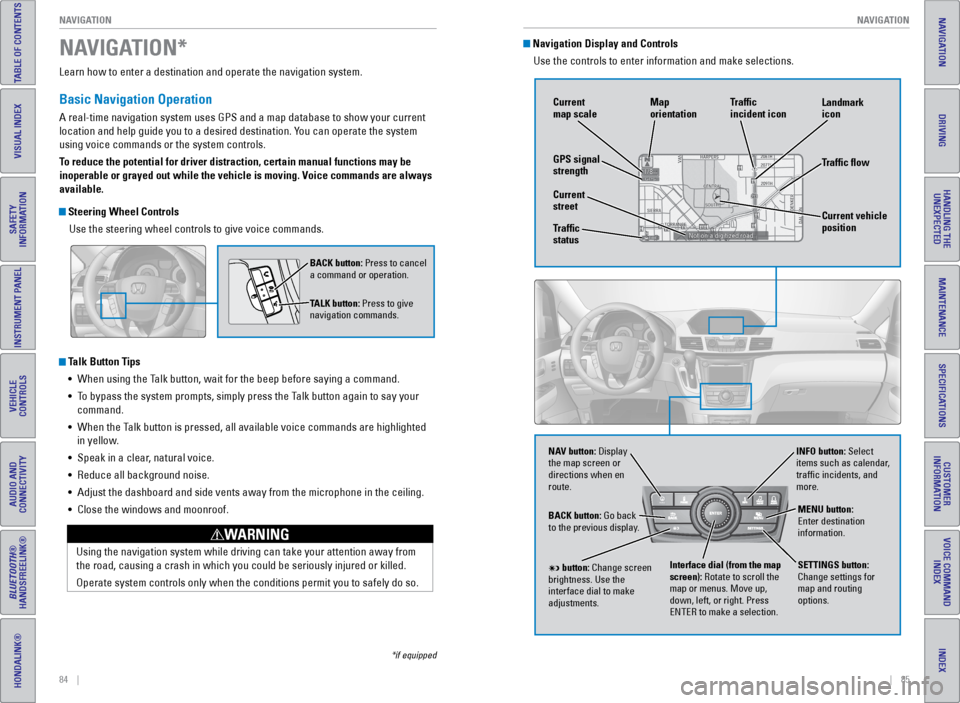
BACK button: Press to cancel
a command or operation.
TALK button: Press to give
navigation commands.
*if equipped
Navigation Display and Controls Use the controls to enter information and make selections.
NAV
NAV button: Display
the map screen or
directions when en
route. INFO button: Select
items such as calendar,
traffic incidents, and
more.
BACK button: Go back
to the previous display.
SETTINGS button:
Change settings for
map and routing
options.
MENU button:
Enter destination
information.
button: Change screen
brightness. Use the
interface dial to make
adjustments. Interface dial (from the map
screen): Rotate to scroll the
map or menus. Move up,
down, left, or right. Press
ENTER to make a selection.
GPS signal
strength Traffic
incident icon
Traffic flow
Current
map scale
Current vehicle
position
Map
orientation
Current
street
Traffic
status Landmark
icon
Page 50 of 80
92 || 93
DRIVING
DRIVING
INDEX
VOICE COMMAND
INDEX
CUSTOMER
INFORMATION
SPECIFICATIONS
MAINTENANCE
HANDLING THE UNEXPECTED
DRIVING
NAVIGATION
TABLE OF CONTENTS
VISUAL INDEX
SAFETY
INFORMATION
INSTRUMENT PANEL
VEHICLE
CONTROLS
AUDIO AND
CONNECTIVITY
BLUETOOTH®
HANDSFREELINK®
HONDALINK®
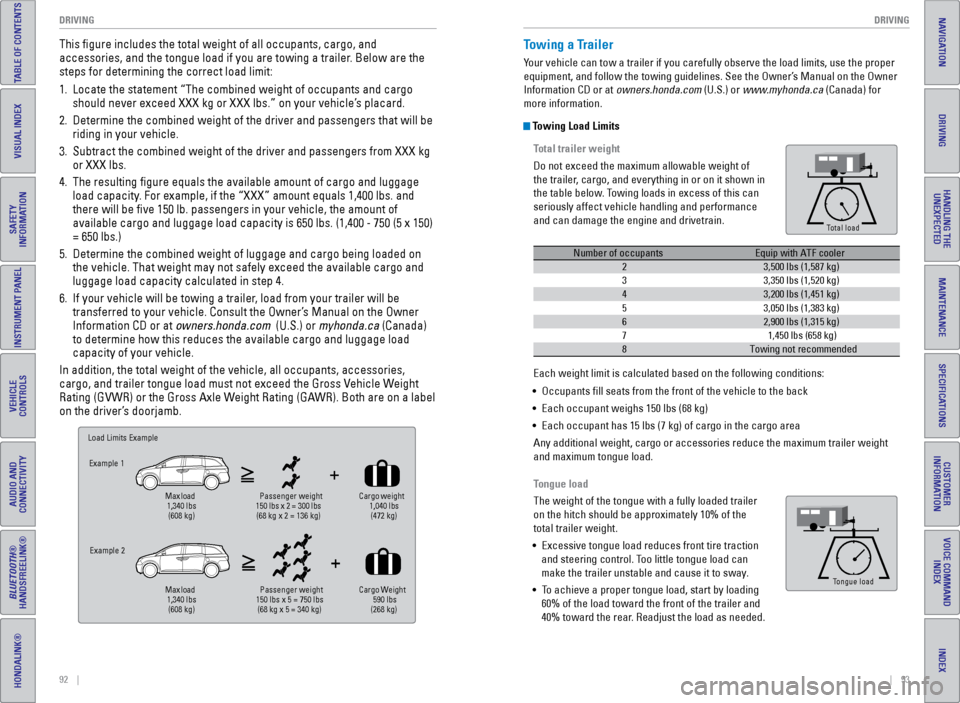
This figure includes the total weight of all occupants, cargo, and
accessories, and the tongue load if you are towing a trailer. Below are the
steps for determining the correct load limit:
1. Locate the statement “The combined weight of occupants and cargo
should never exceed XXX kg or XXX lbs.” on your vehicle’s placard.
2. Determine the combined weight of the driver and passengers that will be \
riding in your vehicle.
3. Subtract the combined weight of the driver and passengers from XXX kg
or XXX lbs.
4. The resulting figure equals the available amount of cargo and luggage \
load capacity. For example, if the “XXX” amount equals 1,400 lbs. and
there will be five 150 lb. passengers in your vehicle, the amount of
available cargo and luggage load capacity is 650 lbs. (1,400 - 750 (5 \
x 150)
= 650 lbs.)
5. Determine the combined weight of luggage and cargo being loaded on
the vehicle. That weight may not safely exceed the available cargo and
luggage load capacity calculated in step 4.
6. If your vehicle will be towing a trailer, load from your trailer will be
transferred to your vehicle. Consult the Owner’s Manual on the Owner
Information CD or at owners.honda.com (U.S.) or myhonda.ca (Canada)
to determine how this reduces the available cargo and luggage load
capacity of your vehicle.
In addition, the total weight of the vehicle, all occupants, accessories\
,
cargo, and trailer tongue load must not exceed the Gross Vehicle Weight
Rating (GVWR) or the Gross Axle Weight Rating (GAWR). Both are on a label
on the driver’s doorjamb.
Load Limits Example
Ex ample 1
Max load
1,340 lbs
(608 kg ) Passenger weight
150 lbs x 2 = 300 lbs
(68 kg x 2 = 136 kg )Cargo
weight
1, 040 lbs
(472 kg )
Example 2
Max load
1,340 lbs
(608 kg ) Passenger weight
150 lbs x 5 = 750 lbs
(68 kg x 5 = 340 kg) Cargo
Weight
590 lbs
(268 kg )
Towing a Trailer
Your vehicle can tow a trailer if you carefully observe the load limits, \
use the proper
equipment, and follow the towing guidelines. See the Owner’s Manual on the Owner
Information CD or at owners.honda.com (U.S.) or www.myhonda.ca (Canada) for
more information.
Towing Load Limits
Total trailer weight
Do not exceed the maximum allowable weight of
the trailer, cargo, and everything in or on it shown in
the table below. Towing loads in excess of this can
seriously affect vehicle handling and performance
and can damage the engine and drivetrain.
Tongue load
The weight of the tongue with a fully loaded trailer
on the hitch should be approximately 10% of the
total trailer weight.
• Excessive tongue load reduces front tire traction
and steering control. Too little tongue load can
make the trailer unstable and cause it to sway.
• To achieve a proper tongue load, start by loading
60% of the load toward the front of the trailer and
40% toward the rear. Readjust the load as needed.
Each weight limit is calculated based on the following conditions:
• Occupants fill seats from the front of the vehicle to the back
• Each occupant weighs 150 lbs (68 kg)
• Each occupant has 15 lbs (7 kg) of cargo in the cargo area
Any additional weight, cargo or accessories reduce the maximum trailer weight
and maximum tongue load.
To ng ue Loa d
Total load
Number of occupantsEquip with ATF cooler
23,500 lbs (1,587 kg )
33,350 lbs (1,520 kg)
43,200 lbs (1,451 kg)
53,050 lbs (1,383 kg)
62,900 lbs (1,315 kg)
71,450 lbs (658 kg)
8Towing not recommended
Tong ue Loa dTongue load
Page 52 of 80
96 || 97
DRIVING
DRIVING
INDEX
VOICE COMMAND
INDEX
CUSTOMER
INFORMATION
SPECIFICATIONS
MAINTENANCE
HANDLING THE UNEXPECTED
DRIVING
NAVIGATION
TABLE OF CONTENTS
VISUAL INDEX
SAFETY
INFORMATION
INSTRUMENT PANEL
VEHICLE
CONTROLS
AUDIO AND
CONNECTIVITY
BLUETOOTH®
HANDSFREELINK®
HONDALINK®
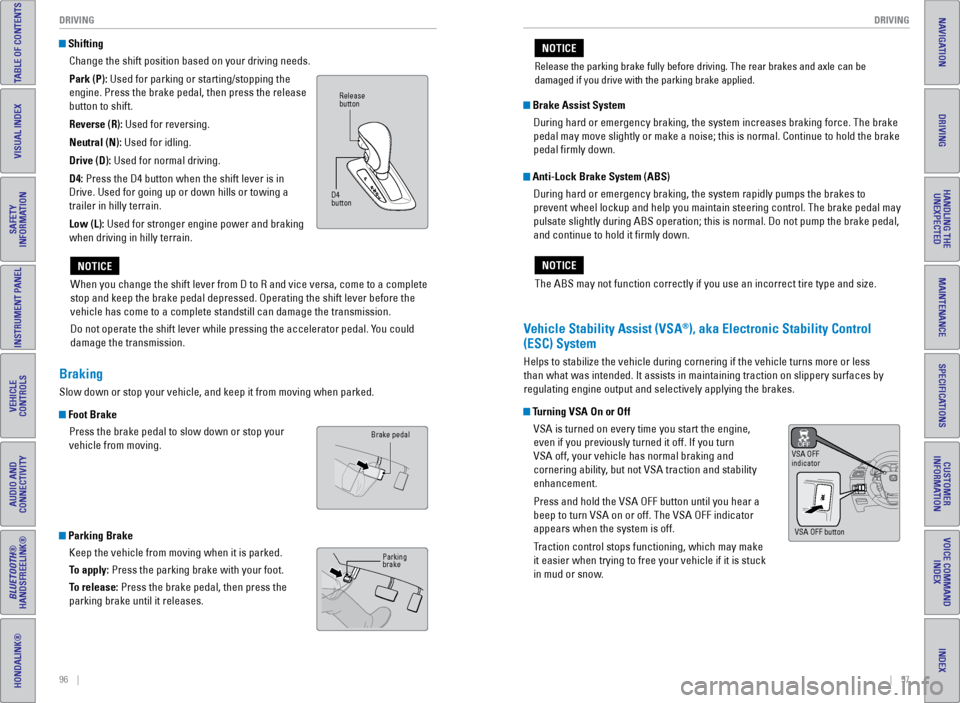
Shifting
Change the shift position based on your driving needs.
Park (P): Used for parking or starting/stopping the
engine. Press the brake pedal, then press the release
button to shift.
Reverse (R): Used for reversing.
Neutral (N): Used for idling.
Drive (D): Used for normal driving.
D4: Press the D4 button when the shift lever is in
Drive. Used for going up or down hills or towing a
trailer in hilly terrain.
Low (L): Used for stronger engine power and braking
when driving in hilly terrain.
When you change the shift lever from D to R and vice versa, come to a co\
mplete
stop and keep the brake pedal depressed. Operating the shift lever befor\
e the
vehicle has come to a complete standstill can damage the transmission.
Do not operate the shift lever while pressing the accelerator pedal. You could
damage the transmission.
NOTICE
Release
button
D4
button
Braking
Slow down or stop your vehicle, and keep it from moving when parked.
Foot Brake Press the brake pedal to slow down or stop your
vehicle from moving.
Parking BrakeKeep the vehicle from moving when it is parked.
To apply: Press the parking brake with your foot.
To release: Press the brake pedal, then press the
parking brake until it releases.
Brake pedal
Parking
brake
The ABS may not function correctly if you use an incorrect tire type and\
size.
NOTICE
Brake Assist System During hard or emergency braking, the system increases braking force. The brake
pedal may move slightly or make a noise; this is normal. Continue to hol\
d the brake
pedal firmly down.
Anti-Lock Brake System (ABS) During hard or emergency braking, the system rapidly pumps the brakes to
prevent wheel lockup and help you maintain steering control. The brake p\
edal may
pulsate slightly during ABS operation; this is normal. Do not pump the b\
rake pedal,
and continue to hold it firmly down.
Vehicle Stability Assist (VSA®), aka Electronic Stability Control
(ESC) System
Helps to stabilize the vehicle during cornering if the vehicle turns mor\
e or less
than what was intended. It assists in maintaining traction on slippery s\
urfaces by
regulating engine output and selectively applying the brakes.
Turning VSA On or Off
VSA is turned on every time you start the engine,
even if you previously turned it off. If you turn
VSA off, your vehicle has normal braking and
cornering ability, but not VSA traction and stability
enhancement.
Press and hold the VSA OFF button until you hear a
beep to turn VSA on or off. The VSA OFF indicator
appears when the system is off.
Traction control stops functioning, which may make
it easier when trying to free your vehicle if it is stuck
in mud or snow.
VSA OFF
indicator
VSA OFF button
Release the parking brake fully before driving. The rear brakes and axle\
can be
damaged if you drive with the parking brake applied.
NOTICE
Page 69 of 80
130 || 131
MAINTENANCE
MAINTENANCE
INDEX
VOICE COMMAND
INDEX
CUSTOMER
INFORMATION
SPECIFICATIONS
MAINTENANCE
HANDLING THE UNEXPECTED
DRIVING
NAVIGATION
TABLE OF CONTENTS
VISUAL INDEX
SAFETY
INFORMATION
INSTRUMENT PANEL
VEHICLE
CONTROLS
AUDIO AND
CONNECTIVITY
BLUETOOTH®
HANDSFREELINK®
HONDALINK®
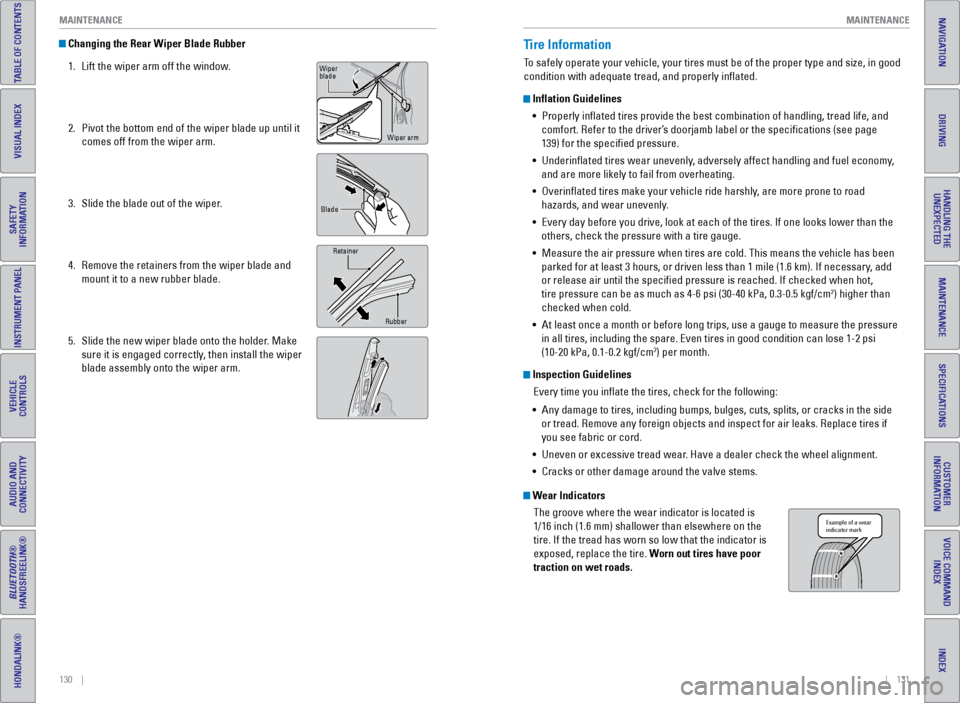
Changing the Rear Wiper Blade Rubber
1. Lift the wiper arm off the window.
2. Pivot the bottom end of the wiper blade up until it
comes off from the wiper arm.
3. Slide the blade out of the wiper.
4. Remove the retainers from the wiper blade and
mount it to a new rubber blade.
5. Slide the new wiper blade onto the holder. Make
sure it is engaged correctly, then install the wiper
blade assembly onto the wiper arm.
Wiper
blade
Wiper arm
Blade
Retainer
Rubber
Tire Information
To safely operate your vehicle, your tires must be of the proper type and\
size, in good
condition with adequate tread, and properly inflated.
Inflation Guidelines• Properly inflated tires provide the best combination of handling, trea\
d life, and
comfort. Refer to the driver’s doorjamb label or the specifications (see page
139) for the specified pressure.
• Underinflated tires wear unevenly, adversely affect handling and fuel economy,
and are more likely to fail from overheating.
• Overinflated tires make your vehicle ride harshly, are more prone to road
hazards, and wear unevenly.
• Every day before you drive, look at each of the tires. If one looks lowe\
r than the
others, check the pressure with a tire gauge.
• Measure the air pressure when tires are cold. This means the vehicle has been
parked for at least 3 hours, or driven less than 1 mile (1.6 km). If n\
ecessary, add
or release air until the specified pressure is reached. If checked whe\
n hot,
tire pressure can be as much as 4-6 psi (30-40 kPa, 0.3-0.5 kgf/cm
2) higher than
checked when cold.
• At least once a month or before long trips, use a gauge to measure the p\
ressure
in all tires, including the spare. Even tires in good condition can lose\
1-2 psi
(10-20 kPa, 0.1-0.2 kgf/cm
2) per month.
Inspection Guidelines
Every time you inflate the tires, check for the following:
• Any damage to tires, including bumps, bulges, cuts, splits, or cracks in\
the side
or tread. Remove any foreign objects and inspect for air leaks. Replace \
tires if
you see fabric or cord.
• Uneven or excessive tread wear. Have a dealer check the wheel alignment.
• Cracks or other damage around the valve stems.
Wear Indicators
The groove where the wear indicator is located is
1/16 inch (1.6 mm) shallower than elsewhere on the
tire. If the tread has worn so low that the indicator is
exposed, replace the tire. Worn out tires have poor
traction on wet roads.
Example of a wear
indicator mark
Page 70 of 80
132 || 133
MAINTENANCE
MAINTENANCE
INDEX
VOICE COMMAND
INDEX
CUSTOMER
INFORMATION
SPECIFICATIONS
MAINTENANCE
HANDLING THE UNEXPECTED
DRIVING
NAVIGATION
TABLE OF CONTENTS
VISUAL INDEX
SAFETY
INFORMATION
INSTRUMENT PANEL
VEHICLE
CONTROLS
AUDIO AND
CONNECTIVITY
BLUETOOTH®
HANDSFREELINK®
HONDALINK®
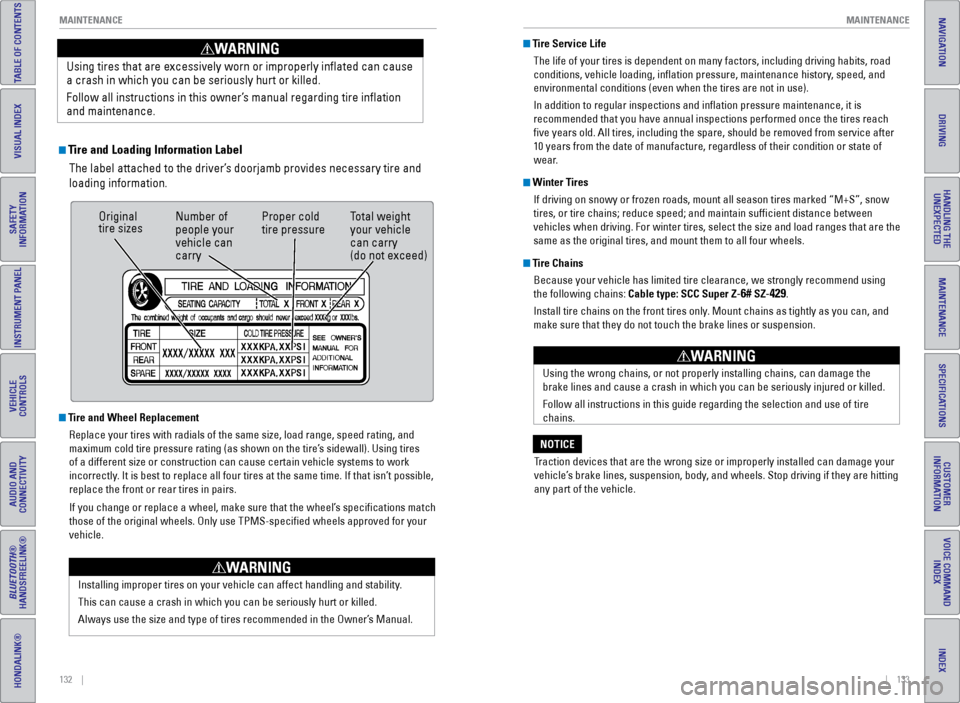
Tire and Loading Information Label
The label attached to the driver’s doorjamb provides necessary tire and
loading information.
Using tires that are excessively worn or improperly inflated can cause\
a crash in which you can be seriously hurt or killed.
Follow all instructions in this owner’s manual regarding tire inflation
and maintenance
.
WARNING
Original
tire sizes
Number of
people your
vehicle can
carry Proper cold
tire pressure
Total weight
your vehicle
can carry
(do not exceed)
Tire and Wheel Replacement
Replace your tires with radials of the same size, load range, speed rati\
ng, and
maximum cold tire pressure rating (as shown on the tire’s sidewall). Using tires
of a different size or construction can cause certain vehicle systems to\
work
incorrectly. It is best to replace all four tires at the same time. If that isn’\
t possible,
replace the front or rear tires in pairs.
If you change or replace a wheel, make sure that the wheel’s specifications match
those of the original wheels. Only use TPMS-specified wheels approved \
for your
vehicle.
Installing improper tires on your vehicle can affect handling and stabil\
ity.
This can cause a crash in which you can be seriously hurt or killed.
Always use the size and type of tires recommended in the Owner’s Manual.
WARNING
Tire Service LifeThe life of your tires is dependent on many factors, including driving h\
abits, road
conditions, vehicle loading, inflation pressure, maintenance history, speed, and
environmental conditions (even when the tires are not in use).
In addition to regular inspections and inflation pressure maintenance,\
it is
recommended that you have annual inspections performed once the tires re\
ach
five years old. All tires, including the spare, should be removed from\
service after
10 years from the date of manufacture, regardless of their condition or \
state of
wear.
Winter TiresIf driving on snowy or frozen roads, mount all season tires marked “M\
+S”, snow
tires, or tire chains; reduce speed; and maintain sufficient distance \
between
vehicles when driving. For winter tires, select the size and load ranges\
that are the
same as the original tires, and mount them to all four wheels.
Tire ChainsBecause your vehicle has limited tire clearance, we strongly recommend u\
sing
the following chains: Cable type: SCC Super Z-
6# SZ-429.
Install tire chains on the front tires only. Mount chains as tightly as you can, and
make sure that they do not touch the brake lines or suspension.
Using the wrong chains, or not properly installing chains, can damage th\
e
brake lines and cause a crash in which you can be seriously injured or k\
illed.
Follow all instructions in this guide regarding the selection and use of\
tire
chains.
WARNING
Traction devices that are the wrong size or improperly installed can dama\
ge your
vehicle’s brake lines, suspension, body, and wheels. Stop driving if they are hitting
any part of the vehicle.
NOTICE
Page 71 of 80
134 || 135
MAINTENANCE
MAINTENANCE
INDEX
VOICE COMMAND
INDEX
CUSTOMER
INFORMATION
SPECIFICATIONS
MAINTENANCE
HANDLING THE UNEXPECTED
DRIVING
NAVIGATION
TABLE OF CONTENTS
VISUAL INDEX
SAFETY
INFORMATION
INSTRUMENT PANEL
VEHICLE
CONTROLS
AUDIO AND
CONNECTIVITY
BLUETOOTH®
HANDSFREELINK®
HONDALINK®
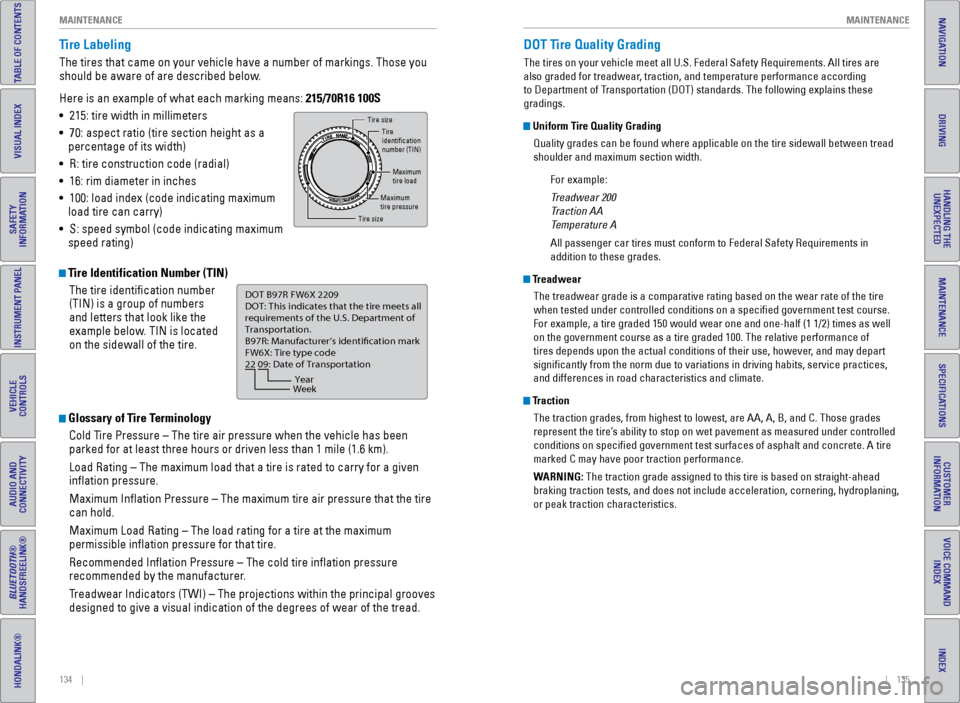
Tire Labeling
The tires that came on your vehicle have a number of markings. Those you\
should be aware of are described below.
Here is an example of what each marking means: 215/70R16 100S
• 215: tire width in millimeters
• 70: aspect ratio (tire section height as a
percentage of its width)
• R: tire construction code (radial)
• 16: rim diameter in inches
• 100: load index (code indicating maximum
load tire can carry)
• S: speed symbol (code indicating maximum
speed rating)
Tire Identification Number (TIN)
The tire identification number
(TIN) is a group of numbers
and letters that look like the
example below. TIN is located
on the sidewall of the tire.
Glossary of Tire TerminologyCold Tire Pressure – The tire air pressure when the vehicle has been
parked for at least three hours or driven less than 1 mile (1.6 km).
Load Rating – The maximum load that a tire is rated to carry for a gi\
ven
inflation pressure.
Maximum Inflation Pressure – The maximum tire air pressure that the\
tire
can hold.
Maximum Load Rating – The load rating for a tire at the maximum
permissible inflation pressure for that tire.
Recommended Inflation Pressure – The cold tire inflation pressure\
recommended by the manufacturer.
Treadwear Indicators (TWI) – The projections within the principal gr\
ooves
designed to give a visual indication of the degrees of wear of the tread\
.
Tire size
Tire
identi�cation
number (TIN)
Maximum
tire load
Maximum
tire pressure
Tire size
DOT B97R FW6X 2209\n
DOT: This in\ficat\bs t\nhat th\b tir\b m\b\bts all
r\bquir\bm\bnts of th\b U.S\n. D\bpartm\bnt of
Transportation.
B97R: Manufactur\br’s \ni\f\bntifcation mark
FW6X: Tir\b typ\b co\f\b
22 09: Dat\b of Transp\nortation
Year
Week
DOT Tire Quality Grading
The tires on your vehicle meet all U.S. Federal Safety Requirements. All\
tires are
also graded for treadwear, traction, and temperature performance according
to Department of Transportation (DOT) standards. The following explains these
gradings.
Uniform Tire Quality Grading
Quality grades can be found where applicable on the tire sidewall betwee\
n tread
shoulder and maximum section width.
For example:
Treadwear 200
Traction AA
Temperature A
All passenger car tires must conform to Federal Safety Requirements in
addition to these grades.
TreadwearThe treadwear grade is a comparative rating based on the wear rate of th\
e tire
when tested under controlled conditions on a specified government test\
course.
For example, a tire graded 150 would wear one and one-half (1 1/2) tim\
es as well
on the government course as a tire graded 100. The relative performance \
of
tires depends upon the actual conditions of their use, however, and may depart
significantly from the norm due to variations in driving habits, servi\
ce practices,
and differences in road characteristics and climate.
TractionThe traction grades, from highest to lowest, are AA, A, B, and C. Those \
grades
represent the tire’s ability to stop on wet pavement as measured under controlled
conditions on specified government test surfaces of asphalt and concre\
te. A tire
marked C may have poor traction performance.
WARNING: The traction grade assigned to this tire is based on straight-ahead
braking traction tests, and does not include acceleration, cornering, hy\
droplaning,
or peak traction characteristics.
Page 74 of 80
140 || 141
CUSTOMER INFORMATION
CUSTOMER INFORMATION
INDEX
VOICE COMMAND
INDEX
CUSTOMER
INFORMATION
SPECIFICATIONS
MAINTENANCE
HANDLING THE UNEXPECTED
DRIVING
NAVIGATION
TABLE OF CONTENTS
VISUAL INDEX
SAFETY
INFORMATION
INSTRUMENT PANEL
VEHICLE
CONTROLS
AUDIO AND
CONNECTIVITY
BLUETOOTH®
HANDSFREELINK®
HONDALINK®
Learn about information specific to you as a Honda customer and how to\
get help.
Frequently Asked Questions/Troubleshooting
Below are some frequently asked questions and troubleshooting items that\
you may
have about the vehicle.
Q: How do I set the vehicle clock?
A: For vehicles without navigation, see page 55. For vehicles with navigati\
on, the
time is automatically set using GPS signals.
Q: Why doesn’t the vehicle start when I press the ENGINE START/STOP button?
A: The brake pedal must be pressed to start the engine.
Q: What is the AUTO setting on my headlight lever?
A: When in the AUTO position, the vehicle’s exterior lights will automatically turn
on or off depending on the ambient lighting.
Q: Why won’t the driver’s door unlock when I grab the door handle, even though
the keyless access remote is within range?
A: If you pull the handle too quickly, the system may not have time to confirm the
door is unlocked. Wait to hear a beep to confirm the door is unlocked. If you are
wearing gloves, the system may be slow to respond.
Q: After my battery was disconnected or went dead, the audio system is aski\
ng for
a code. Where do I find this?
A: In most cases, you do not need to enter a code. Turn on the vehicle and the
audio system, and press and hold the power button until the system react\
ivates.
Q: Why can’t I operate Pandora
® through the audio system?
A: Audio may be streaming through Bluetooth® Audio. Make sure Pandora mode
is selected and the phone cable is properly connected to the USB adapter\
.
Some phones may prompt you to “Allow” a connection.
Q: Is my phone compatible with Bluetooth features?
A: Visit handsfreelink.honda.com (U.S.) or www.handsfreelink.ca (Canada) to
check phone compatibility for Bluetooth
® Audio, Bluetooth® HandsFreeLink®,
and SMS text messaging.
Q: Every time I press the Talk button, the system gives me voice prompts. Can I turn
these off?*
A: Press the SETTINGS button. Use the interface dial to select System Setti\
ngs
then Voice Rec. For the Voice Prompt option, select Off.
CUSTOMER INFORMATION
*if equipped
Contact Us
Honda dealer personnel are trained professionals. They should be able to\
answer
all your questions. If you encounter a problem that your dealership does\
not solve
to your satisfaction, please discuss it with the dealership’s service manager or
general manager. If you are dissatisfied with the decision made by the dealership’\
s
management, contact Honda Automobile Customer Service.
U.S. owners
American Honda Motor Co., Inc.
Honda Automobile Customer Service
1919 Torrance Blvd.
Mail Stop 500-2N-7A
Torrance, CA 90501-2746
Tel: (800) 999-1009
In Puerto Rico and
the U.S. Virgin Islands
Bella International
P.O. Box 190816
San Juan, PR 00919-0816
Tel: (787) 620-7546
When you call or write, please give us the following information:
• Vehicle identification number
• Date of purchase
• Odometer reading of your vehicle
• Your name, address, and telephone number
• A detailed description of the problem
• Name of the dealer who sold the vehicle to you Canadian owners
Honda Canada, Inc.
Customer Relations
180 Honda Blvd.
Markham, ON
L6C 0H9
Tel: (888) 946-6329
Fax: (877) 939-0909
e-mail: [email protected]
Q:
Why can’t I select an item using the interface dial?*
A: To prevent driver distraction, certain items are limited or inoperable wh\
ile the
vehicle is moving. Use voice commands or pull over to select the items.
Q: Where can I find the vehicle identification number (VIN)?
A: Check the label on the driver’s doorjamb.
*if equipped
Page 76 of 80
144 || 145
VOICE COMMAND INDEX
VOICE COMMAND INDEX
INDEX
VOICE COMMAND
INDEX
CUSTOMER
INFORMATION
SPECIFICATIONS
MAINTENANCE
HANDLING THE UNEXPECTED
DRIVING
NAVIGATION
TABLE OF CONTENTS
VISUAL INDEX
SAFETY
INFORMATION
INSTRUMENT PANEL
VEHICLE
CONTROLS
AUDIO AND
CONNECTIVITY
BLUETOOTH®
HANDSFREELINK®
HONDALINK®
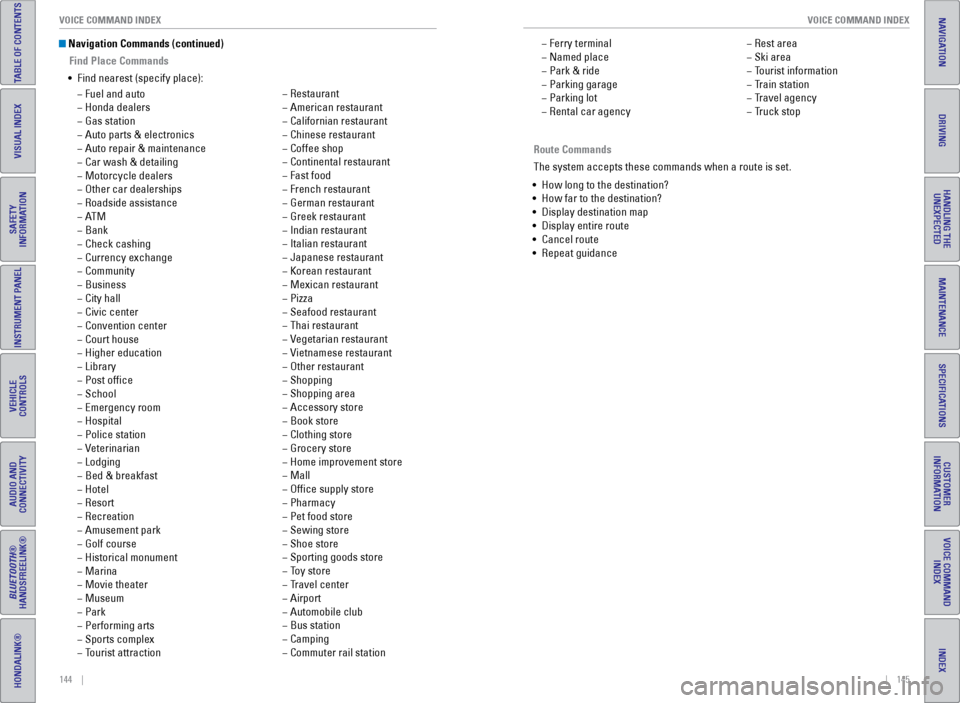
Navigation Commands (continued)
Find Place Commands
• Find nearest (specify place):
− Fuel and auto
− Honda dealers
− Gas station
− Auto parts & electronics
− Auto repair & maintenance
− Car wash & detailing
− Motorcycle dealers
− Other car dealerships
− Roadside assistance
− AT M
− Bank
− Check cashing
− Currency exchange
− Community
− Business
− City hall
− Civic center
− Convention center
− Court house
− Higher education
− Library
− Post office
− School
− Emergency room
− Hospital
− Police station
− Veterinarian
− Lodging
− Bed & breakfast
− Hotel
− Resort
− Recreation
− Amusement park
− Golf course
− Historical monument
− Marina
− Movie theater
− Museum
− Park
− Performing arts
− Sports complex
− Tourist attraction
− Restaurant
− American restaurant
− Californian restaurant
− Chinese restaurant
− Coffee shop
− Continental restaurant
− Fast food
− French restaurant
− German restaurant
− Greek restaurant
− Indian restaurant
− Italian restaurant
− Japanese restaurant
− Korean restaurant
− Mexican restaurant
− Pizza
− Seafood restaurant
− Thai restaurant
− Vegetarian restaurant
− Vietnamese restaurant
− Other restaurant
− Shopping
− Shopping area
− Accessory store
− Book store
− Clothing store
− Grocery store
− Home improvement store
− Mall
− Office supply store
− Pharmacy
− Pet food store
− Sewing store
− Shoe store
− Sporting goods store
− Toy store
− Travel center
− Airport
− Automobile club
− Bus station
− Camping
− Commuter rail station Route Commands
The system accepts these commands when a route is set.
• How long to the destination?
• How far to the destination?
• Display destination map
• Display entire route
• Cancel route
• Repeat guidance
− Ferry terminal
− Named place
− Park & ride
− Parking garage
− Parking lot
− Rental car agency
− Rest area
− Ski area
− Tourist information
− Train station
− Travel agency
− Truck stop