Accessory mode HONDA ODYSSEY 2018 (in English) User Guide
[x] Cancel search | Manufacturer: HONDA, Model Year: 2018, Model line: ODYSSEY, Model: HONDA ODYSSEY 2018Pages: 763, PDF Size: 47.02 MB
Page 227 of 763
225Continued
Controls
Interior Lights/Interior Convenience Items
Interior Lights
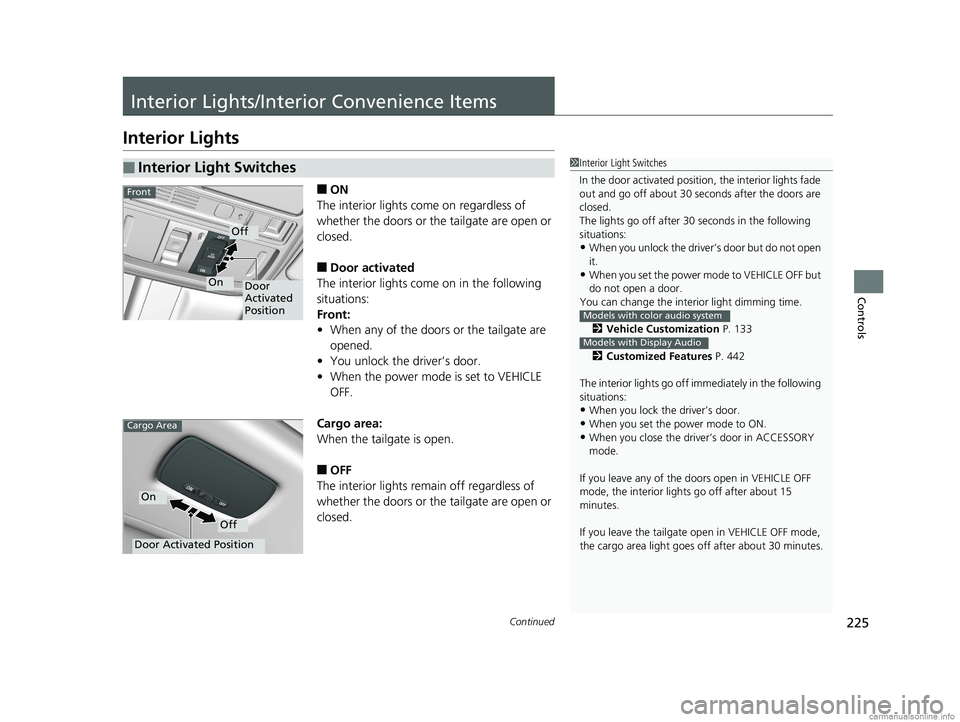
■ON
The interior lights come on regardless of
whether the doors or the tailgate are open or
closed.
■Door activated
The interior lights come on in the following
situations:
Front:
• When any of the doors or the tailgate are
opened.
• You unlock the driver’s door.
• When the power mode is set to VEHICLE
OFF.
Cargo area:
When the tailgate is open.
■OFF
The interior lights remain off regardless of
whether the doors or the tailgate are open or
closed.
■Interior Light Switches1 Interior Light Switches
In the door activated position, the interior lights fade
out and go off about 30 se conds after the doors are
closed.
The lights go off after 30 seconds in the following
situations:
•When you unlock the driver’s door but do not open
it.
•When you set the power mode to VEHICLE OFF but
do not open a door.
You can change the inte rior light dimming time.
2 Vehicle Customization P. 133
2 Customized Features P. 442
The interior lights go off i mmediately in the following
situations:
•When you lock the driver’s door.
•When you set the power mode to ON.
•When you close the driver’s door in ACCESSORY
mode.
If you leave any of the doors open in VEHICLE OFF
mode, the interior light s go off after about 15
minutes.
If you leave the tailgate open in VEHICLE OFF mode,
the cargo area light goes of f after about 30 minutes.
Models with color audio system
Models with Display Audio
Door
Activated
Position
Off
On
Front
Door Activated Position
Off
On
Cargo Area
18 US ODYSSEY-31THR6010.book 225 ページ 2018年12月6日 木曜日 午後4時18分
Page 235 of 763
Continued233
uuInterior Lights/Interior Convenience Items uInterior Convenience Items
Controls
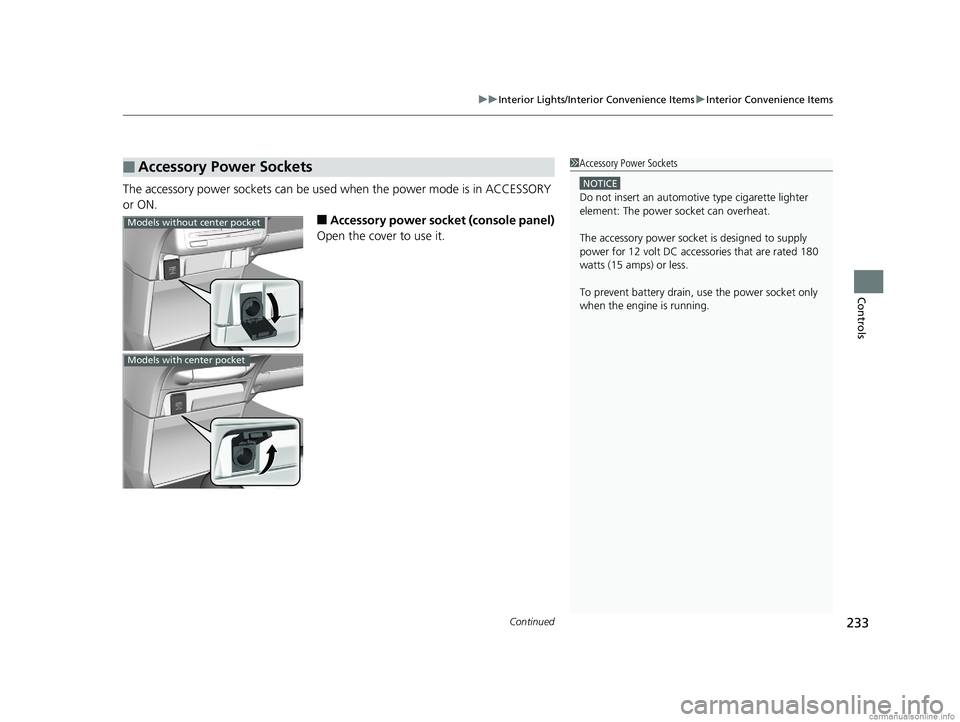
The accessory power sockets can be used when the power mode is in ACCESSORY
or ON.
■Accessory power socket (console panel)
Open the cover to use it.
■Accessory Power Sockets1 Accessory Power Sockets
NOTICE
Do not insert an automotive type cigarette lighter
element: The power socket can overheat.
The accessory power socket is designed to supply
power for 12 volt DC access ories that are rated 180
watts (15 amps) or less.
To prevent battery drain, use the power socket only
when the engine is running.
Models without center pocket
Models with center pocket
18 US ODYSSEY-31THR6010.book 233 ページ 2018年12月6日 木曜日 午後4時18分
Page 236 of 763
234
uuInterior Lights/Interior Convenience Items uInterior Convenience Items
Controls
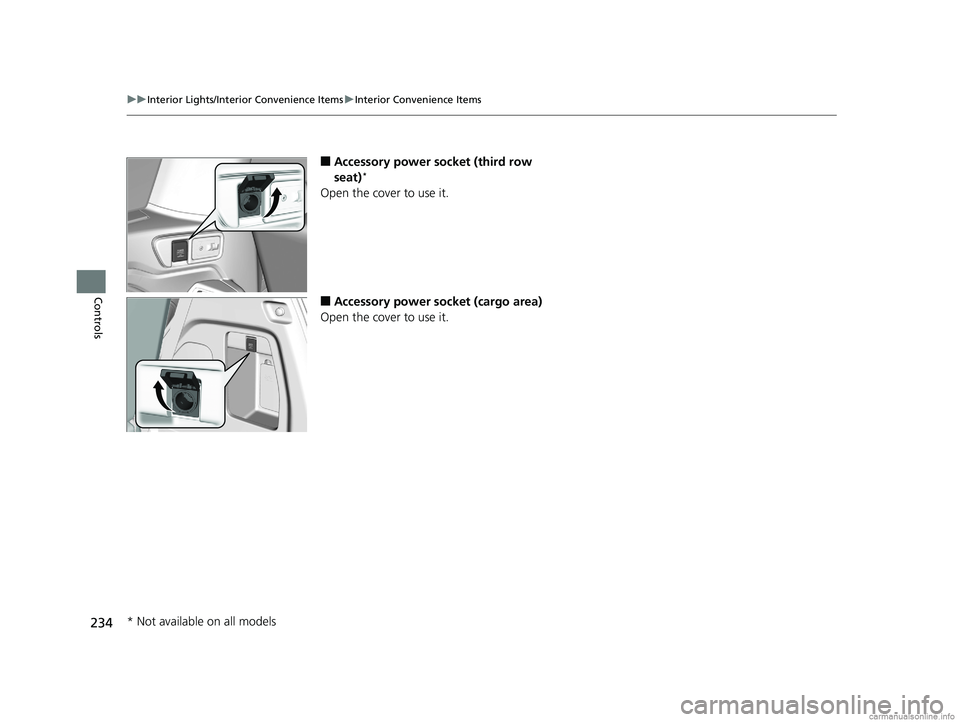
■Accessory power socket (third row
seat)*
Open the cover to use it.
■Accessory power socket (cargo area)
Open the cover to use it.
* Not available on all models
18 US ODYSSEY-31THR6010.book 234 ページ 2018年12月6日 木曜日 午後4時18分
Page 238 of 763
uuInterior Lights/Interior Convenience Items uInterior Convenience Items
236
Controls
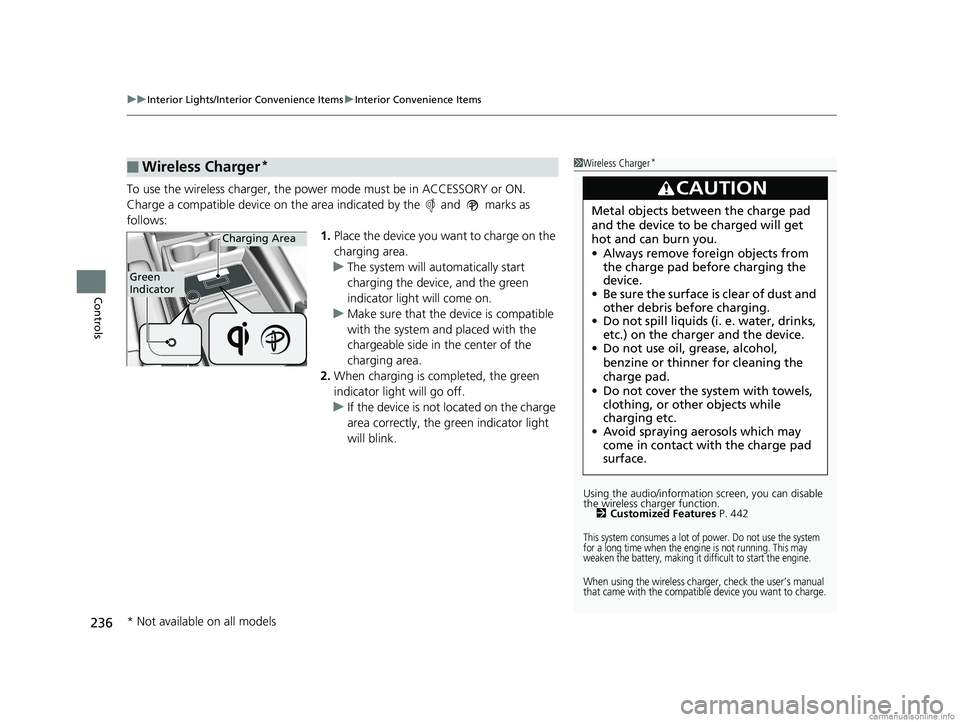
To use the wireless charger, the power mode must be in ACCESSORY or ON.
Charge a compatible device on the ar ea indicated by the and marks as
follows: 1.Place the device you want to charge on the
charging area.
u The system will automatically start
charging the device, and the green
indicator light will come on.
u Make sure that the device is compatible
with the system and placed with the
chargeable side in the center of the
charging area.
2. When charging is completed, the green
indicator light will go off.
u If the device is not located on the charge
area correctly, the green indicator light
will blink.
■Wireless Charger*1Wireless Charger*
Using the audio/informati on screen, you can disable
the wireless ch arger function.
2 Customized Features P. 442
This system consumes a lot of power. Do not use the system
for a long time when the engine is not running. This may
weaken the battery, making it difficult to start the engine.
When using the wireless charger, check the user’s manual
that came with the compatible device you want to charge.
3CAUTION
Metal objects between the charge pad
and the device to be charged will get
hot and can burn you.
•Always remove foreign objects from
the charge pad before charging the
device.
• Be sure the surface is clear of dust and
other debris before charging.
• Do not spill liquids (i. e. water, drinks,
etc.) on the charger and the device.
• Do not use oil, grease, alcohol,
benzine or thinner for cleaning the
charge pad.
• Do not cover the system with towels,
clothing, or other objects while
charging etc.
• Avoid spraying aerosols which may
come in contact with the charge pad
surface.
Green
Indicator
Charging Area
* Not available on all models
18 US ODYSSEY-31THR6010.book 236 ページ 2018年12月6日 木曜日 午後4時18分
Page 248 of 763
uuInterior Lights/Interior Convenience Items uInterior Convenience Items
246
Controls
■To operate:
1. Set the parking brake.
2. Set the power mode to ACCESSORY.
2. Start the engine.
3. Press the button to turn on the system.1To operate:
The vacuum automatica lly shuts off and the PWR
SAVE indicator comes on if the system detects that
running the vacuum is over discharging the battery.
After seven minutes of operation:
The beeper sounds intermittently.
When eight minutes elapse:
The beeper sounds once and the PWR SAVE
indicator comes on. The va cuum automatically shuts
off.
To continue vacuumin g, start the engine.
Operate the engine only when there is sufficient
ventilation.
Without engine running
With engine running
Without engine running
With engine running
18 US ODYSSEY-31THR6010.book 246 ページ 2018年12月6日 木曜日 午後4時18分
Page 263 of 763
261
uuAudio System uUSB Ports
Features
USB Ports
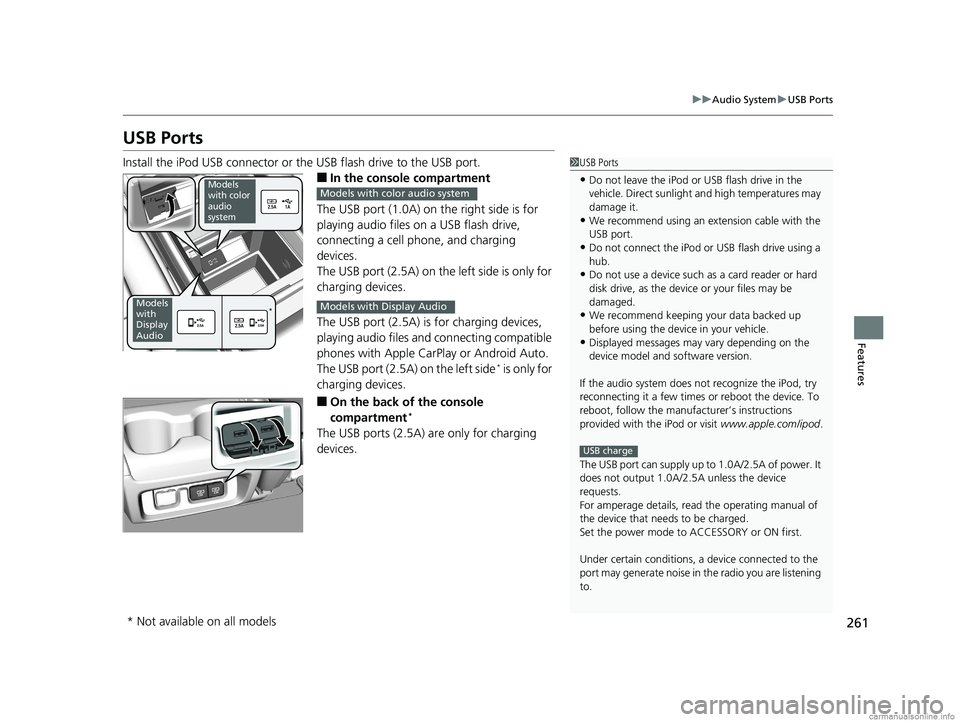
Install the iPod USB connector or the USB flash drive to the USB port.
■In the consol e compartment
The USB port (1.0A) on the right side is for
playing audio files on a USB flash drive,
connecting a cell phone, and charging
devices.
The USB port (2.5A) on the left side is only for
charging devices.
The USB port (2.5A) is for charging devices,
playing audio files and connecting compatible
phones with Apple CarPlay or Android Auto.
The USB port (2.5A) on the left side
* is only for
charging devices.
■On the back of the console
compartment*
The USB ports (2.5A) are only for charging
devices.
1 USB Ports
•Do not leave the iPod or USB flash drive in the
vehicle. Direct sunlight and high temperatures may
damage it.
•We recommend using an ex tension cable with the
USB port.
•Do not connect the iPod or USB flash drive using a
hub.
•Do not use a device such as a card reader or hard
disk drive, as the device or your files may be
damaged.
•We recommend keeping y our data backed up
before using the device in your vehicle.
•Displayed messages may vary depending on the
device model and software version.
If the audio system does not recognize the iPod, try
reconnecting it a few times or reboot the device. To
reboot, follow the manufac turer’s instructions
provided with the iPod or visit www.apple.com/ipod.
The USB port can supply up to 1.0A/2.5A of power. It
does not output 1.0A/2.5A unless the device
requests.
For amperage details, read the operating manual of
the device that ne eds to be charged.
Set the power mode to ACCESSORY or ON first.
Under certain condi tions, a device connected to the
port may generate noise in the radio you are listening
to.
USB charge
Models
with color
audio
system
Models
with
Display
Audio*
Models with color audio system
Models with Display Audio
* Not available on all models
18 US ODYSSEY-31THR6010.book 261 ページ 2018年12月6日 木曜日 午後4時18分
Page 269 of 763
267
Features
Audio System Basic Operation
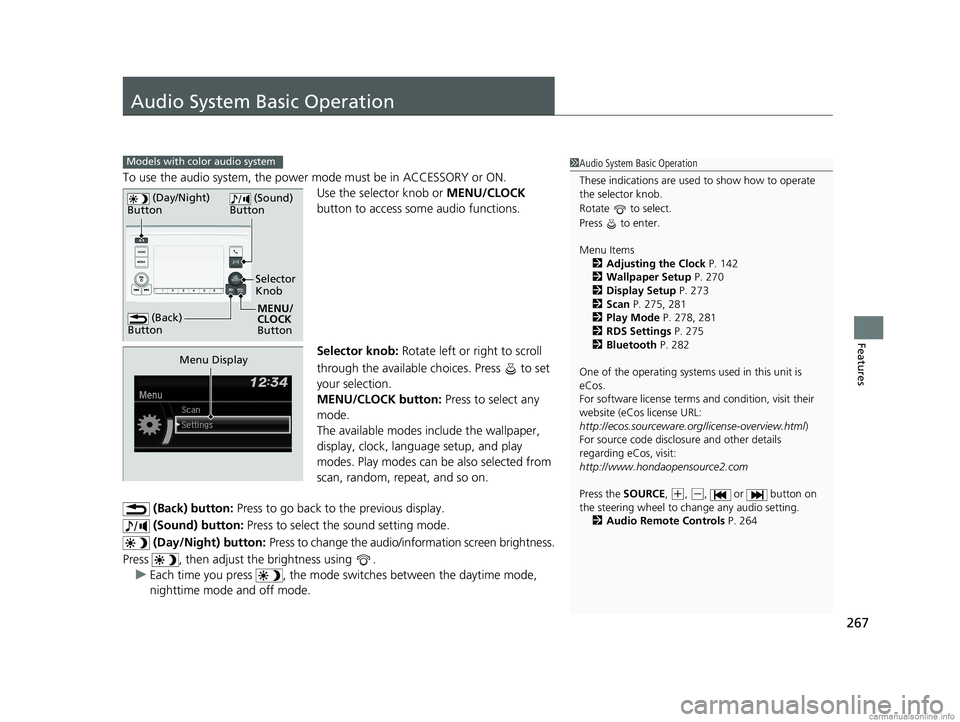
To use the audio system, the power mode must be in ACCESSORY or ON.Use the selector knob or MENU/CLOCK
button to access some audio functions.
Selector knob: Rotate left or right to scroll
through the available ch oices. Press to set
your selection.
MENU/CLOCK button: Press to select any
mode.
The available modes in clude the wallpaper,
display, clock, language setup, and play
modes. Play modes can be also selected from
scan, random, repeat, and so on.
(Back) button: Press to go back to the previous display.
(Sound) button: Press to select the sound setting mode.
(Day/Night) button: Press to change the audio/information screen brightness.
Press , then adjust the brightness using . u Each time you press , the mode sw itches between the daytime mode,
nighttime mode and off mode.
Models with color audio system1 Audio System Basic Operation
These indications are used to show how to operate
the selector knob.
Rotate to select.
Press to enter.
Menu Items
2 Adjusting the Clock P. 142
2 Wallpaper Setup P. 270
2 Display Setup P. 273
2 Scan P. 275, 281
2 Play Mode P. 278, 281
2 RDS Settings P. 275
2 Bluetooth P. 282
One of the operating system s used in this unit is
eCos.
For software license terms and condition, visit their
website (eCos license URL:
http://ecos.sourceware.org/license-overview.html )
For source code disclo sure and other details
regarding eCos, visit:
http://www.hondaopensource2.com
Press the SOURCE ,
(+, (-, or button on
the steering wheel to change any audio setting.
2 Audio Remote Controls P. 264
(Back)
Button
Selector
Knob
MENU/
CLOCK
Button
(Day/Night)
Button
(Sound)
Button
Menu Display
18 US ODYSSEY-31THR6010.book 267 ページ 2018年12月6日 木曜日 午後4時18分
Page 287 of 763
285
Features
Audio System Basic Operation
To use the audio system function, the power mode must be in ACCESSORY or ON.
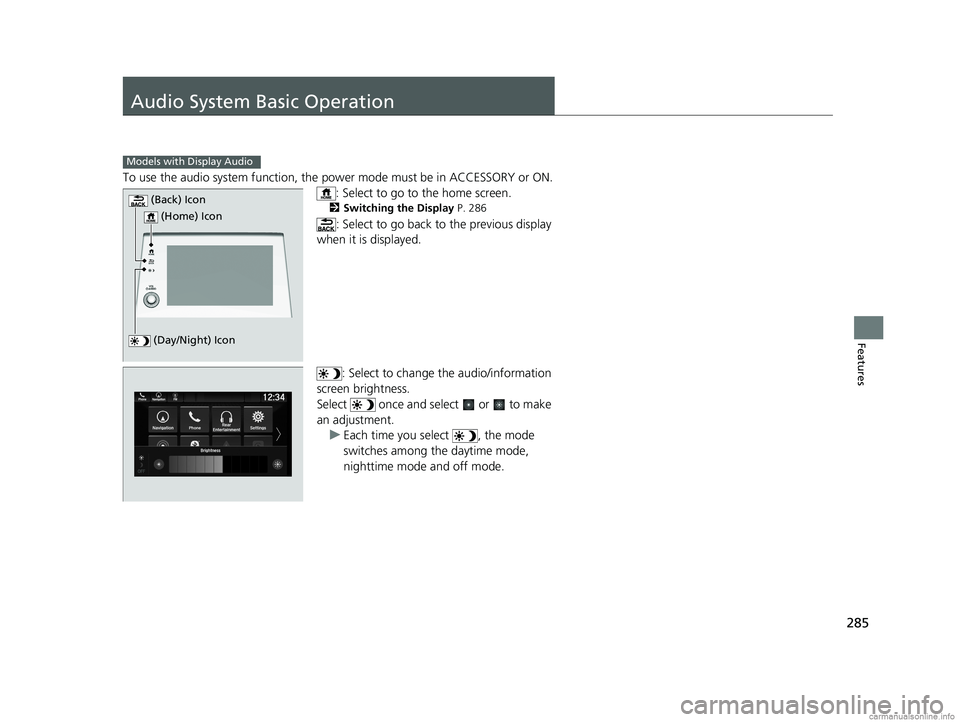
: Select to go to the home screen.
2 Switching the Display P. 286
: Select to go back to the previous display
when it is displayed.
: Select to change the audio/information
screen brightness.
Select once and select or to make
an adjustment. u Each time you select , the mode
switches among the daytime mode,
nighttime mode and off mode.
Models with Display Audio
(Day/Night) Icon
(Home) Icon
(Back) Icon
18 US ODYSSEY-31THR6010.book 285 ページ 2018年12月6日 木曜日 午後4時18分
Page 402 of 763
400
uuBlu-ray/DVD Rear Entertainment System*uOperating the System
Features
Operating the System
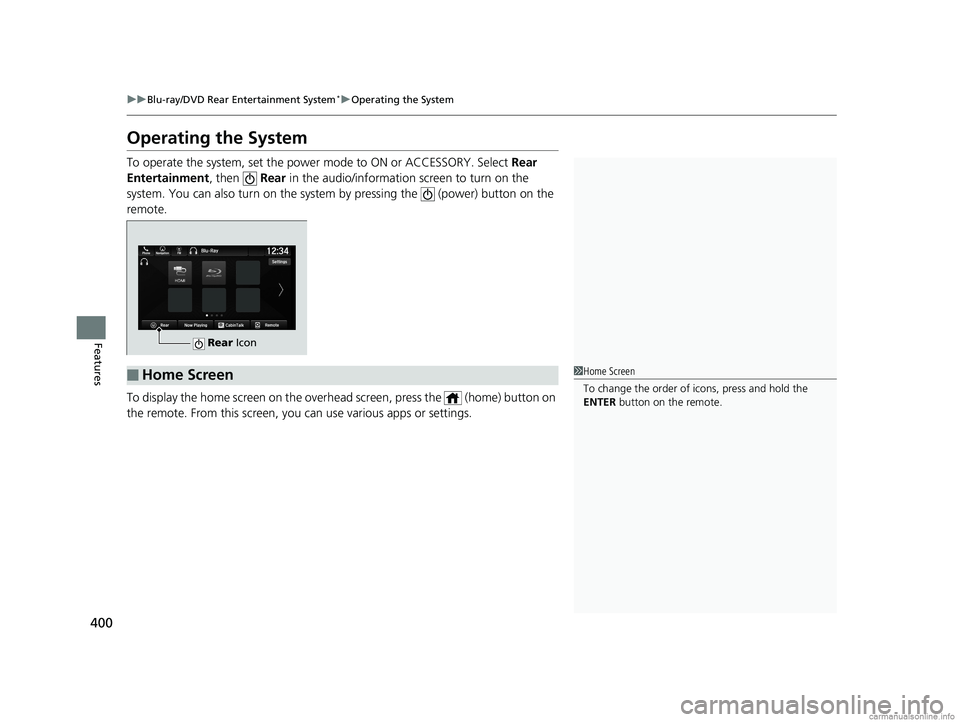
To operate the system, set the power mode to ON or ACCESSORY. Select Rear
Entertainment , then Rear in the audio/information screen to turn on the
system. You can also turn on the system by pressing the (power) button on the
remote.
To display the home screen on the overh ead screen, press the (home) button on
the remote. From this screen, you can use various apps or settings.
Rear Icon
■Home Screen1Home Screen
To change the order of icons, press and hold the
ENTER button on the remote.
18 US ODYSSEY-31THR6010.book 400 ページ 2018年12月6日 木曜日 午後4時18分
Page 474 of 763
472
uuBluetooth ® HandsFreeLink ®u HFL Menus
Features
HFL Menus
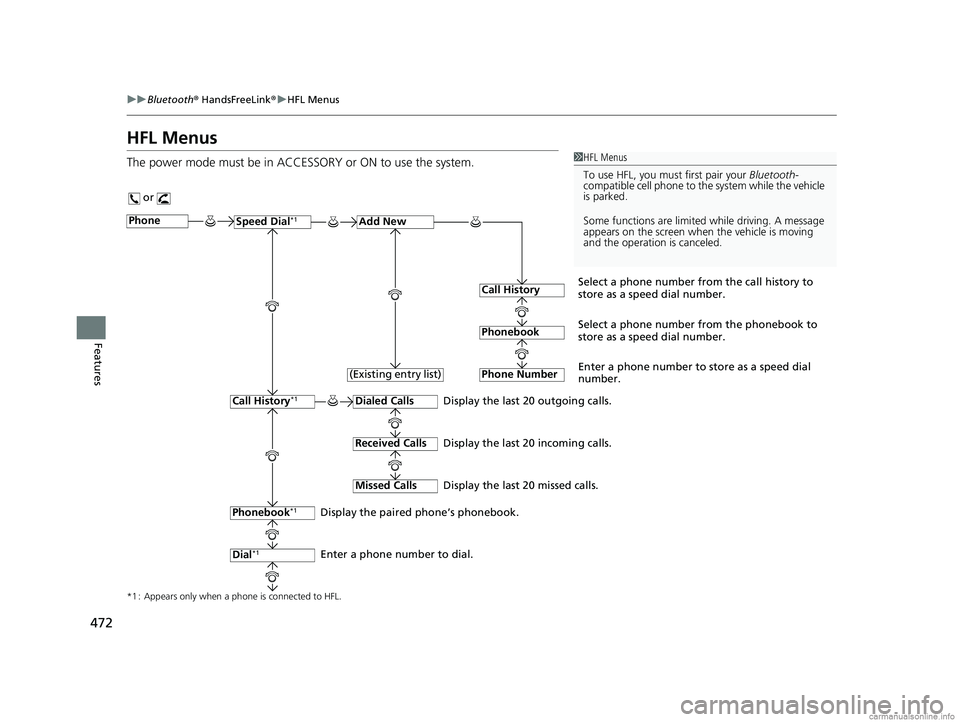
The power mode must be in ACCESSORY or ON to use the system.1HFL Menus
To use HFL, you must first pair your Bluetooth-
compatible cell phone to th e system while the vehicle
is parked.
Some functions are limited while driving. A message
appears on the screen when the vehicle is moving
and the operation is canceled.
or
Display the last 20 outgoing calls.
Display the last 20 incoming calls.
Display the last 20 missed calls.
*1 : Appears only when a phone is connected to HFL.
PhoneSpeed Dial*1Add New
Select a phone number from the call history to
store as a speed dial number.
Call History
PhonebookSelect a phone number from the phonebook to
store as a speed dial number.
Phone Number
Enter a phone number to store as a speed dial
number.
Dialed Calls
Received Calls
Missed Calls
Phonebook*1
Dial*1
Call History*1
Display the paired phone’s phonebook.
Enter a phone number to dial. (Existing entry list)
18 US ODYSSEY-31THR6010.book 472 ページ 2018年12月6日 木曜日 午後4時18分