flat tire HONDA ODYSSEY 2020 (in English) Owner's Guide
[x] Cancel search | Manufacturer: HONDA, Model Year: 2020, Model line: ODYSSEY, Model: HONDA ODYSSEY 2020Pages: 767, PDF Size: 43.89 MB
Page 708 of 767
706
uuIf a Tire Goes Flat uChanging a Flat Tire
Handling the Unexpected
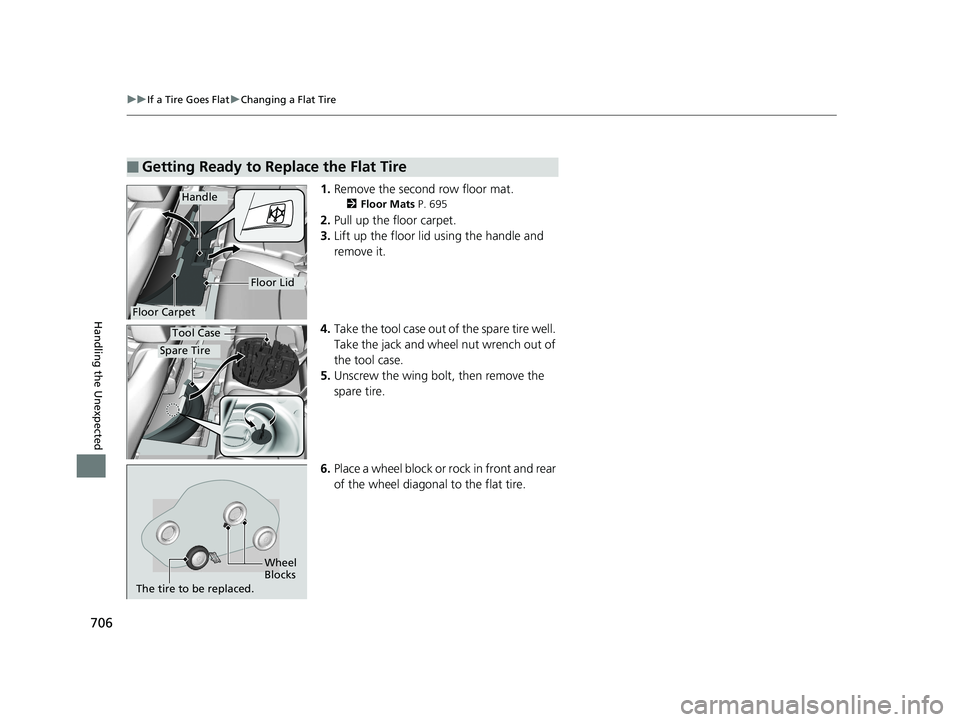
1. Remove the second row floor mat.
2 Floor Mats P. 695
2.Pull up the floor carpet.
3. Lift up the floor lid using the handle and
remove it.
4. Take the tool case out of the spare tire well.
Take the jack and wheel nut wrench out of
the tool case.
5. Unscrew the wing bolt, then remove the
spare tire.
6. Place a wheel block or ro ck in front and rear
of the wheel diagonal to the flat tire.
■Getting Ready to Replace the Flat Tire
Floor Carpet
Handle
Floor Lid
Spare Tire
Tool Case
Wheel
Blocks
The tire to be replaced.
20 US ODYSSEY-31THR6210.book 706 ページ 2020年2月28日 金曜日 午前7時26分
Page 709 of 767
707
uuIf a Tire Goes Flat uChanging a Flat Tire
Continued
Handling the Unexpected
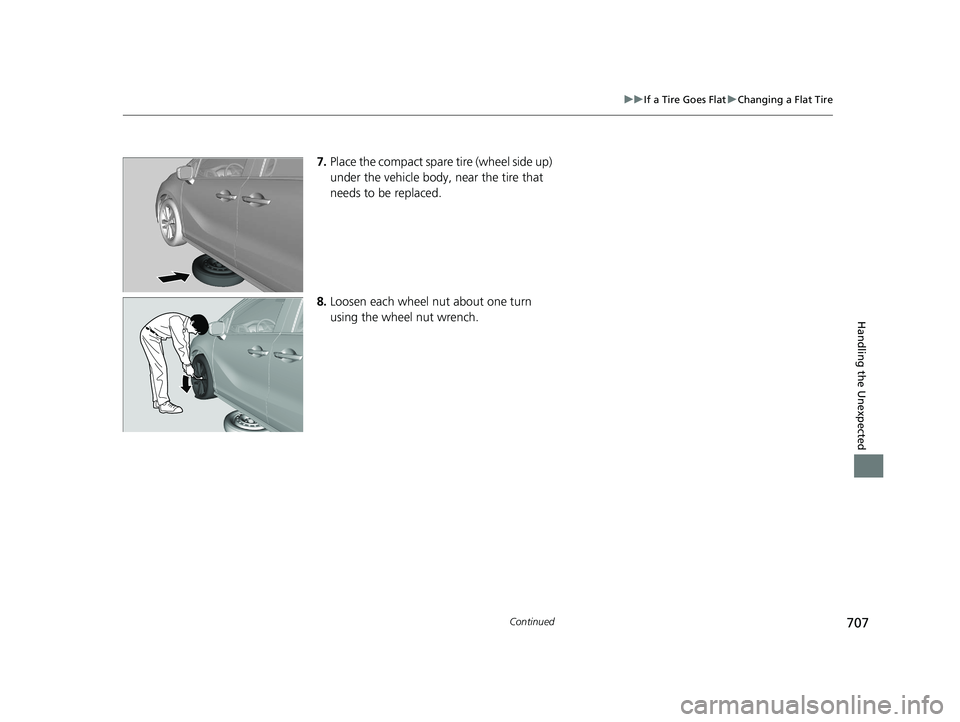
7. Place the compact spare tire (wheel side up)
under the vehicle body, near the tire that
needs to be replaced.
8. Loosen each wheel nut about one turn
using the wheel nut wrench.
20 US ODYSSEY-31THR6210.book 707 ページ 2020年2月28日 金曜日 午前7時26分
Page 710 of 767
uuIf a Tire Goes Flat uChanging a Flat Tire
708
Handling the Unexpected
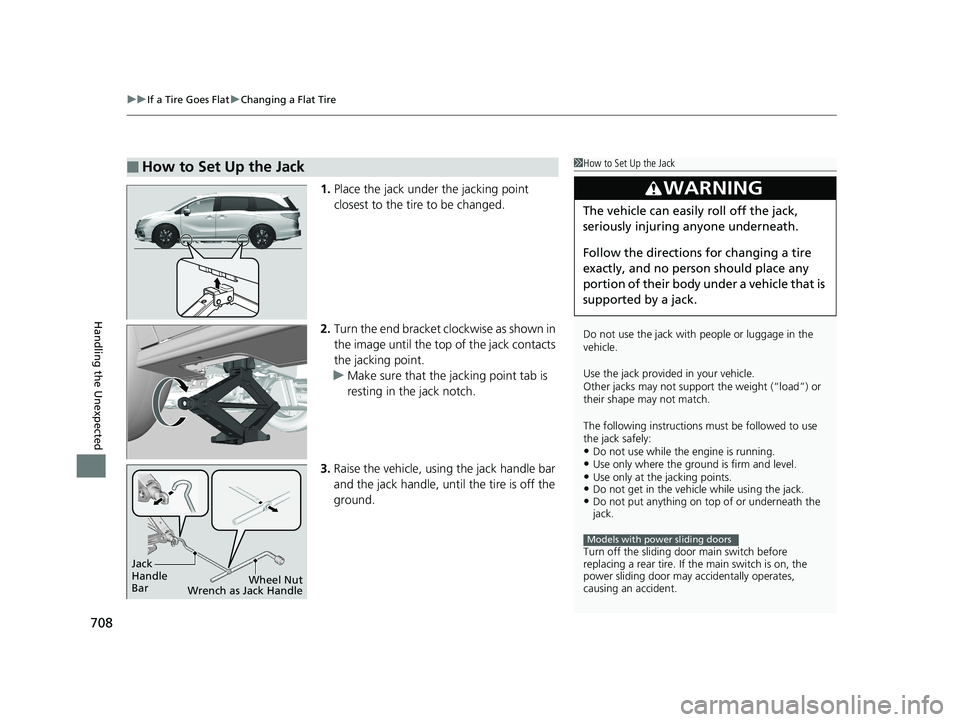
1. Place the jack under the jacking point
closest to the tire to be changed.
2. Turn the end bracket cl ockwise as shown in
the image until the top of the jack contacts
the jacking point.
u Make sure that the jacking point tab is
resting in the jack notch.
3. Raise the vehicle, using the jack handle bar
and the jack handle, until the tire is off the
ground.
■How to Set Up the Jack1How to Set Up the Jack
Do not use the jack with people or luggage in the
vehicle.
Use the jack provided in your vehicle.
Other jacks may not support the weight (“load”) or
their shape may not match.
The following instructions must be followed to use
the jack safely:
•Do not use while the engine is running.•Use only where the ground is firm and level.•Use only at the jacking points.•Do not get in the vehicl e while using the jack.•Do not put anything on top of or underneath the
jack.
Turn off the sliding door main switch before
replacing a rear tire. If the main switch is on, the
power sliding door may a ccidentally operates,
causing an accident.
3WARNING
The vehicle can easily roll off the jack,
seriously injuring anyone underneath.
Follow the directions for changing a tire
exactly, and no person should place any
portion of their body under a vehicle that is
supported by a jack.
Models with power sliding doors
Jack
Handle
Bar Wheel Nut
Wrench as Jack Handle
20 US ODYSSEY-31THR6210.book 708 ページ 2020年2月28日 金曜日 午前7時26分
Page 711 of 767
Continued709
uuIf a Tire Goes Flat uChanging a Flat Tire
Handling the Unexpected
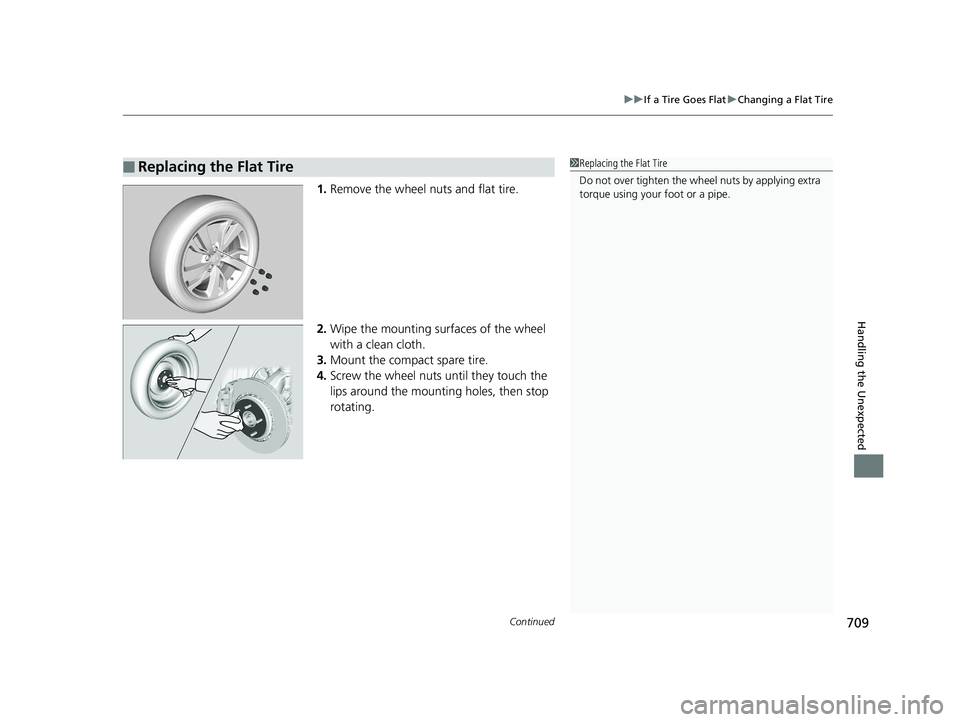
1. Remove the wheel nuts and flat tire.
2. Wipe the mounting surfaces of the wheel
with a clean cloth.
3. Mount the compact spare tire.
4. Screw the wheel nuts until they touch the
lips around the mounti ng holes, then stop
rotating.
■Replacing the Flat Tire1 Replacing the Flat Tire
Do not over tighten the wheel nuts by applying extra
torque using your foot or a pipe.
20 US ODYSSEY-31THR6210.book 709 ページ 2020年2月28日 金曜日 午前7時26分
Page 712 of 767
uuIf a Tire Goes Flat uChanging a Flat Tire
710
Handling the Unexpected
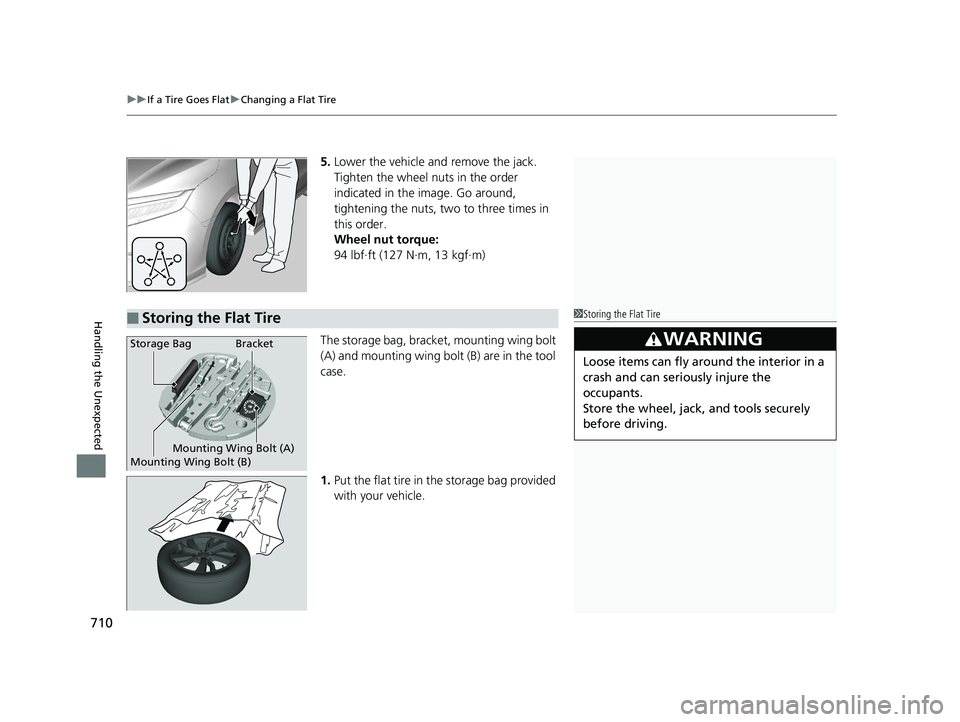
5. Lower the vehicle and remove the jack.
Tighten the wheel nuts in the order
indicated in the image. Go around,
tightening the nuts, two to three times in
this order.
Wheel nut torque:
94 lbf∙ft (127 N∙m, 13 kgf∙m)
The storage bag, bracket, mounting wing bolt
(A) and mounting wing bo lt (B) are in the tool
case.
1. Put the flat tire in the storage bag provided
with your vehicle.
■Storing the Flat Tire1Storing the Flat Tire
3WARNING
Loose items can fly around the interior in a
crash and can seriously injure the
occupants.
Store the wheel, jack, and tools securely
before driving.
Bracket
Mounting Wing Bolt (A)
Mounting Wing Bolt (B)Storage Bag
20 US ODYSSEY-31THR6210.book 710 ページ 2020年2月28日 金曜日 午前7時26分
Page 713 of 767
711
uuIf a Tire Goes Flat uChanging a Flat Tire
Continued
Handling the Unexpected
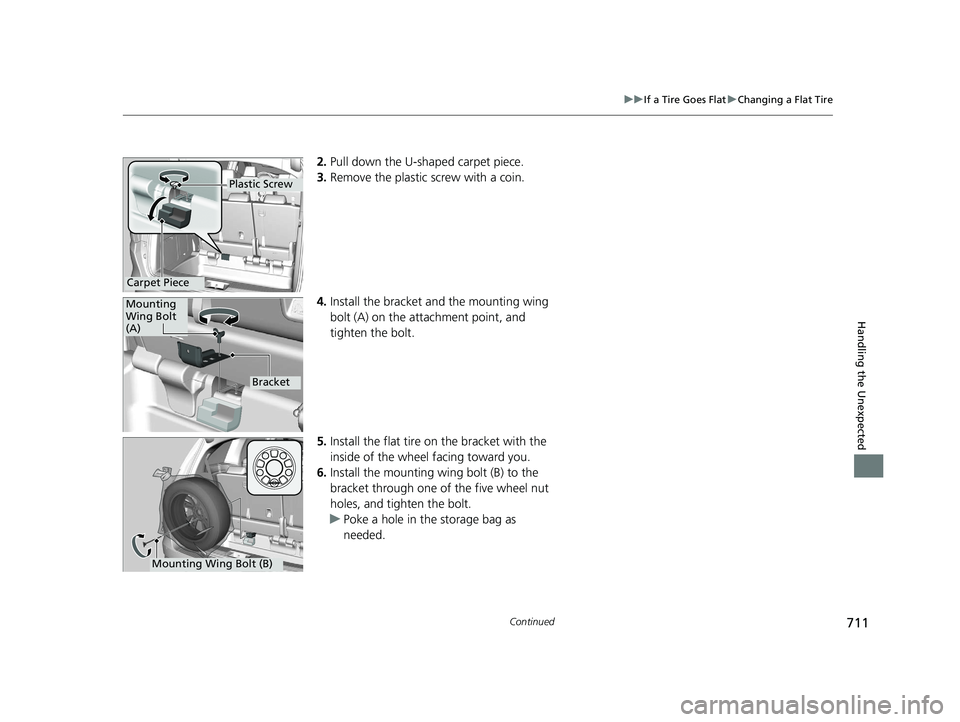
2. Pull down the U-sh aped carpet piece.
3. Remove the plastic screw with a coin.
4. Install the bracket an d the mounting wing
bolt (A) on the attachment point, and
tighten the bolt.
5. Install the flat tire on the bracket with the
inside of the wheel facing toward you.
6. Install the mounting wing bolt (B) to the
bracket through one of the five wheel nut
holes, and tighten the bolt.
u Poke a hole in the storage bag as
needed.
Plastic Screw
Carpet Piece
Mounting
Wing Bolt
(A)
Bracket
Mounting Wing Bolt (B)
20 US ODYSSEY-31THR6210.book 711 ページ 2020年2月28日 金曜日 午前7時26分
Page 714 of 767
712
uuIf a Tire Goes Flat uChanging a Flat Tire
Handling the Unexpected
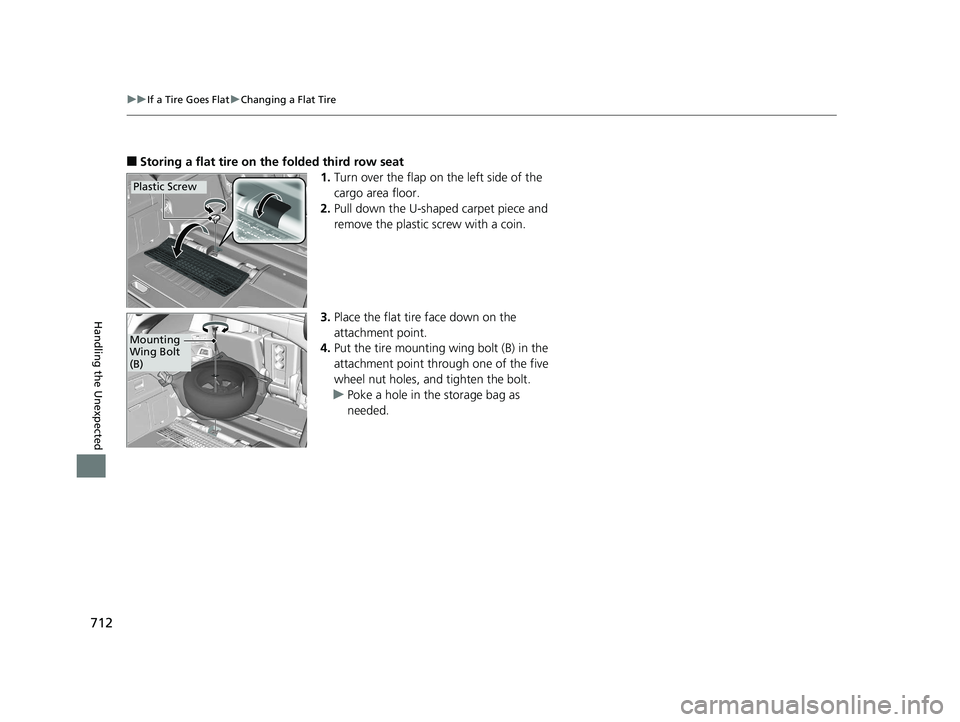
■Storing a flat tire on the folded third row seat
1.Turn over the flap on the left side of the
cargo area floor.
2. Pull down the U-shaped carpet piece and
remove the plastic screw with a coin.
3. Place the flat tire face down on the
attachment point.
4. Put the tire mounting wing bolt (B) in the
attachment point through one of the five
wheel nut holes, and tighten the bolt.
u Poke a hole in the storage bag as
needed.
Plastic Screw
Mounting
Wing Bolt
(B)
20 US ODYSSEY-31THR6210.book 712 ページ 2020年2月28日 金曜日 午前7時26分
Page 715 of 767
713
uuIf a Tire Goes Flat uChanging a Flat Tire
Handling the Unexpected
If you replace a flat tire with the spare tire, the low tire pressure/TPMS indicator
comes on while you are driving. After driving for a few miles (kilometers), Tire
Pressure Monitor Problem will appear on the driver information interface and the
indicator will start blinking fo r a short time and then stay on; however, this is normal
and is no cause for concern.
If you replace the tire with a full-size tire, the warning message on the driver
information interface and the low tire pres sure/TPMS indicator will go off after a few
miles (kilometers).
■TPMS with Tire Fill Assist and the Compact Spare Tire1 TPMS with Tire Fill Assist and the Compact Spare Tire
The system cannot monitor the pressure of the spare
tire. Manually check the spare tire pressure to be sure
that it is correct.
Use the TPMS specific wheels. Each is equipped with
a tire pressure se nsor mounted inside the tire behind
the valve stem.
20 US ODYSSEY-31THR6210.book 713 ページ 2020年2月28日 金曜日 午前7時26分
Page 728 of 767
726
uuIndicator, Coming On/Blinking uIf the Electric Power Steering (EPS) System Indicator Comes On
Handling the Unexpected
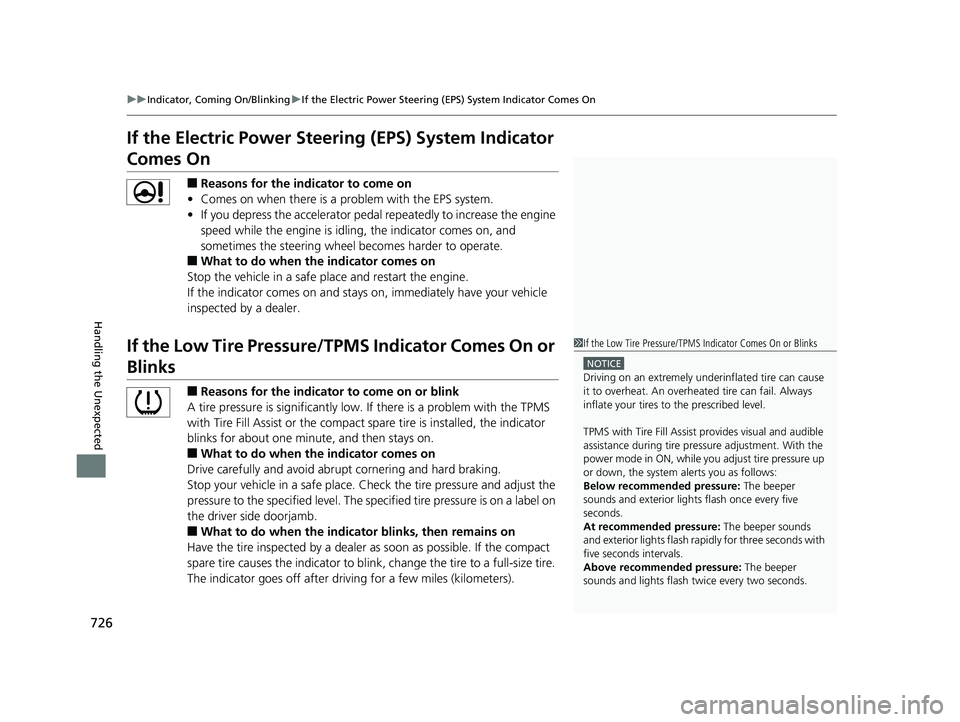
If the Electric Power Steeri ng (EPS) System Indicator
Comes On
■Reasons for the indicator to come on
• Comes on when there is a problem with the EPS system.
• If you depress the accelerator pedal repeatedly to increase the engine
speed while the engine is idling, the indicator comes on, and
sometimes the steering wheel becomes harder to operate.
■What to do when the indicator comes on
Stop the vehicle in a safe place and restart the engine.
If the indicator comes on and stays on, immediately have your vehicle
inspected by a dealer.
If the Low Tire Pressure/TPMS Indicator Comes On or
Blinks
■Reasons for the indicator to come on or blink
A tire pressure is significantly low. If there is a problem with the TPMS
with Tire Fill Assist or the compact spare tire is installed, the indicator
blinks for about one mi nute, and then stays on.
■What to do when the indicator comes on
Drive carefully and avoid abrupt cornering and hard braking.
Stop your vehicle in a safe place. Ch eck the tire pressure and adjust the
pressure to the specified level. The sp ecified tire pressure is on a label on
the driver side doorjamb.
■What to do when the indicator blinks, then remains on
Have the tire inspected by a dealer as soon as possible. If the compact
spare tire causes the indicator to blink, change the tire to a full-size tire.
The indicator goes off after driv ing for a few miles (kilometers).
1If the Low Tire Pressure/TPMS Indicator Comes On or Blinks
NOTICE
Driving on an extremely unde rinflated tire can cause
it to overheat. An overheated tire can fail. Always
inflate your tires to the prescribed level.
TPMS with Tire Fill Assist provides visual and audible
assistance during tire pre ssure adjustment. With the
power mode in ON, while y ou adjust tire pressure up
or down, the system alerts you as follows:
Below recommended pressure: The beeper
sounds and exterior lights flash once every five
seconds.
At recommended pressure: The beeper sounds
and exterior lights flash rapi dly for three seconds with
five seconds intervals.
Above recommended pressure: The beeper
sounds and lights flash tw ice every two seconds.
20 US ODYSSEY-31THR6210.book 726 ページ 2020年2月28日 金曜日 午前7時26分
Page 760 of 767
758
Index
Driving....................................................... 529
Automatic Transmission ........................... 549
Braking .................................................... 607
Cruise Control ......................................... 566
Shifting Gear ........................................... 550
Starting the Engine .................................. 542
Driving Position Memory System ............. 206
Dust and Pollen Filter ............................... 693
E
Eco Assist® System ....................................... 11
Econ Mode
Indicator .................................................... 94
Electric Power Steering (EPS) System Indicator ............................................ 91, 726
Electronic Stability Control (ESC) ............. 596
Emergency ................................................. 735
Emergency Engine Stop ........................... 716
Emissions Testing (Readiness Codes) ....... 749
Engine ....................................................... 746
Coolant ................................................... 659
Jump Starting .......................................... 717
Oil ........................................................... 654
Starting ................................................... 542
Engine Coolant ......................................... 659
Adding to the Radiator ............................ 660
Adding to the Reserve Tank ..................... 659
Overheating............................................. 719
Temperature Gauge................................. 119 Engine Oil
................................................. 654
Adding .................................................... 656
Checking................................................. 655
Displaying Maintenance Minder Information ........................................... 646
Low Oil Pressure Symbol.......................... 722
Recommended Engine Oil ....................... 654
ENGINE START/STOP Button .................... 188
Exhaust Gas Hazard (Carbon Monoxide) .. 80
Exterior Care (Cleaning) ........................... 697
Exterior Mirrors ........................................ 210
F
Features.................................................... 263
File Manager ............................................. 310
Filters Dust and Pollen ....................................... 693
Oil ........................................................... 657
Flat Tire ..................................................... 705
Floor Mats ................................................. 695
Fluids Automatic Transmission .......................... 661
Brake ...................................................... 662
Engine Coolant ....................................... 659
Windshield Washer ................................. 663
FM/AM Radio .................................... 278, 322
Fog Light Indicator ..................................... 93
Folding Down the Rear Seats .................. 221
Foot Brake ................................................ 610 Front Airbags (SRS)
.................................... 50
Front Knee Airbags .................................... 54
Front Seat Heaters ................................... 245
Front Seat Heaters and Seat Ventilation .............................................. 246
Front Seats ................................................ 212
Adjusting ................................................ 212
Fuel ..................................................... 26, 637
Economy................................................. 640
Gauge .................................................... 119
Instant Fuel Economy .............................. 125
Low Fuel Indicator..................................... 89
Range ..................................................... 125
Recommendation.................................... 637
Refueling ................................................ 637
Fuel Economy ........................................... 640
Fuel Fill Door ...................................... 26, 638
Fuses ......................................................... 728
Inspecting and Changing ........................ 734
Locations ................................ 728, 730, 733
G
Gasoline (Fuel)
Economy................................................. 640
Gauge .................................................... 119
Information............................................. 637
Instant Fuel Economy .............................. 125
Low Fuel Indicator..................................... 89
Refueling ................................................ 637
20 US ODYSSEY-31THR6210.book 758 ページ 2020年2月28日 金曜日 午前7時26分