clock setting HONDA ODYSSEY 2020 Owner's Manual (in English)
[x] Cancel search | Manufacturer: HONDA, Model Year: 2020, Model line: ODYSSEY, Model: HONDA ODYSSEY 2020Pages: 767, PDF Size: 43.89 MB
Page 16 of 767
14
Quick Reference Guide
Controls (P143)
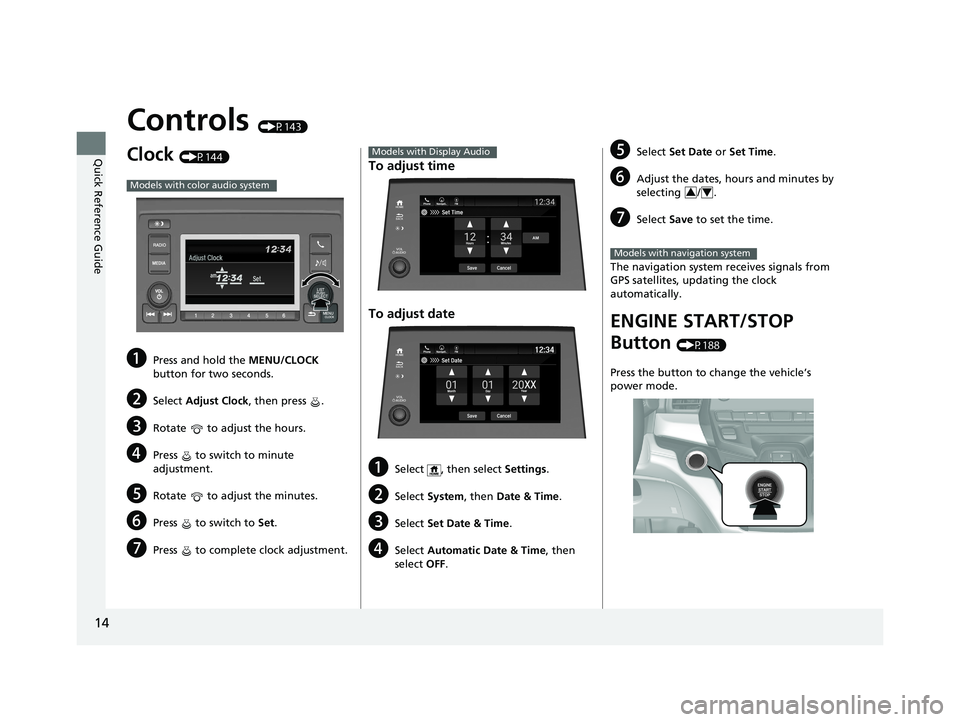
Clock (P144)
aPress and hold the MENU/CLOCK
button for two seconds.
bSelect Adjust Clock, then press .
cRotate to adjust the hours.
dPress to switch to minute
adjustment.
eRotate to adjust the minutes.
fPress to switch to Set.
gPress to complete clock adjustment.
Models with color audio system
To adjust time
To adjust date
aSelect , then select Settings .
bSelect System , then Date & Time .
cSelect Set Date & Time .
dSelect Automatic Date & Time , then
select OFF.
Models with Display Audio
Set DateBlu-Ray
Save
Month DayYearXX
Cancel
Phone Navigati.. FM12:34
eSelect
Set Date or Set Time .
fAdjust the dates, hours and minutes by
selecting / .
gSelect Save to set the time.
The navigation system receives signals from
GPS satellites, updating the clock
automatically.
ENGINE START/STOP
Button
(P188)
Press the button to change the vehicle’s
power mode.
34
Models with navigation system
20 US ODYSSEY-31THR6210.book 14 ページ 2020年2月28日 金曜日 午前7時26分
Page 146 of 767
144
Controls
Clock
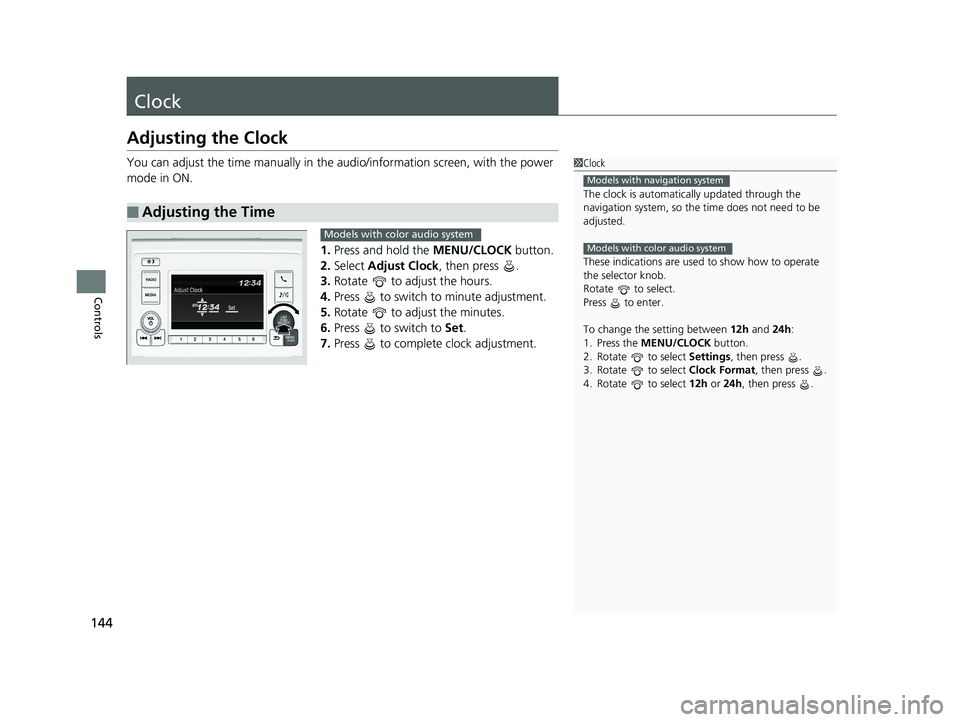
Adjusting the Clock
You can adjust the time manually in the audio/information screen, with the power
mode in ON.
1.Press and hold the MENU/CLOCK button.
2. Select Adjust Clock , then press .
3. Rotate to adjust the hours.
4. Press to switch to minute adjustment.
5. Rotate to adjust the minutes.
6. Press to switch to Set.
7. Press to complete clock adjustment.
■Adjusting the Time
1Clock
The clock is automatica lly updated through the
navigation system, so the ti me does not need to be
adjusted.
These indications are used to show how to operate
the selector knob.
Rotate to select.
Press to enter.
To change the setting between 12h and 24h:
1. Press the MENU/CLOCK button.
2. Rotate to select Settings, then press .
3. Rotate to select Clock Format, then press .
4. Rotate to select 12h or 24h , then press .
Models with navigation system
Models with color audio systemModels with color audio system
20 US ODYSSEY-31THR6210.book 144 ページ 2020年2月28日 金曜日 午前7時26分
Page 147 of 767
145
uuClock uAdjusting the Clock
Controls
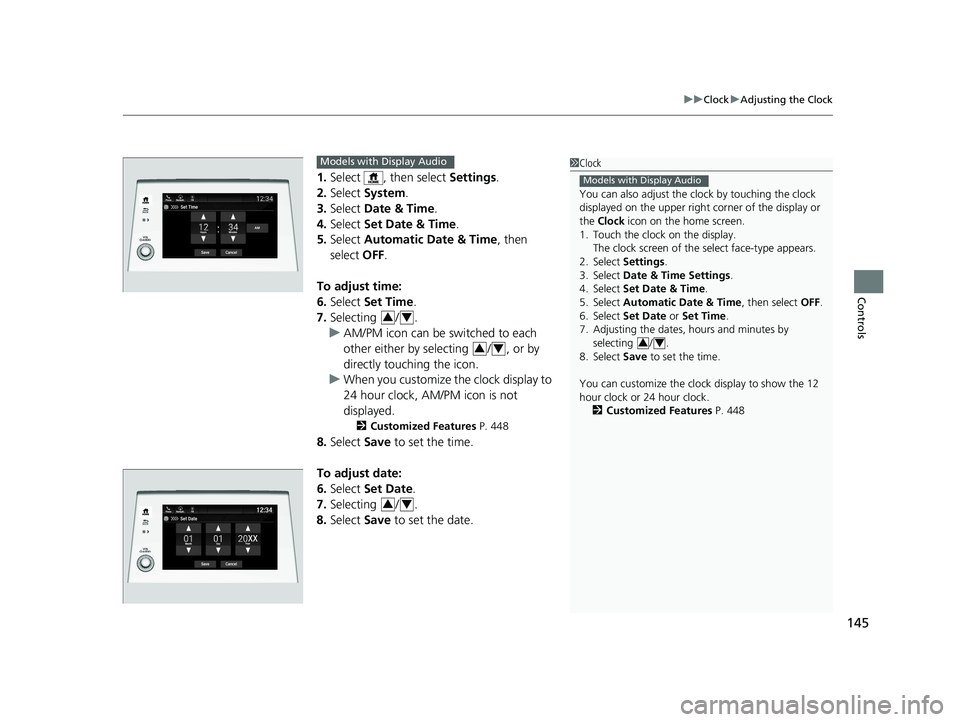
1. Select , then select Settings.
2. Select System.
3. Select Date & Time .
4. Select Set Date & Time .
5. Select Automatic Date & Time , then
select OFF.
To adjust time:
6. Select Set Time.
7. Selecting / .
u AM/PM icon can be switched to each
other either by selecting / , or by
directly touching the icon.
u When you customize the clock display to
24 hour clock, AM/PM icon is not
displayed.
2 Customized Features P. 448
8.Select Save to set the time.
To adjust date:
6. Select Set Date.
7. Selecting / .
8. Select Save to set the date.
1Clock
You can also adjust the clock by touching the clock
displayed on the upper right corner of the display or
the Clock icon on the home screen.
1. Touch the clock on the display.
The clock screen of the select face-type appears.
2. Select Settings .
3. Select Date & Time Settings .
4. Select Set Date & Time .
5. Select Automatic Date & Time , then select OFF.
6. Select Set Date or Set Time.
7. Adjusting the dates, hours and minutes by selecting / .
8. Select Save to set the time.
You can customize the clock display to show the 12
hour clock or 24 hour clock. 2 Customized Features P. 448
Models with Display Audio
34
Set Time
Save
Hours MinutesAM
Cancel
Phone Navigati.. FM
Models with Display Audio
34
34
34
20 US ODYSSEY-31THR6210.book 145 ページ 2020年2月28日 金曜日 午前7時26分
Page 273 of 767
271
Features
Audio System Basic Operation
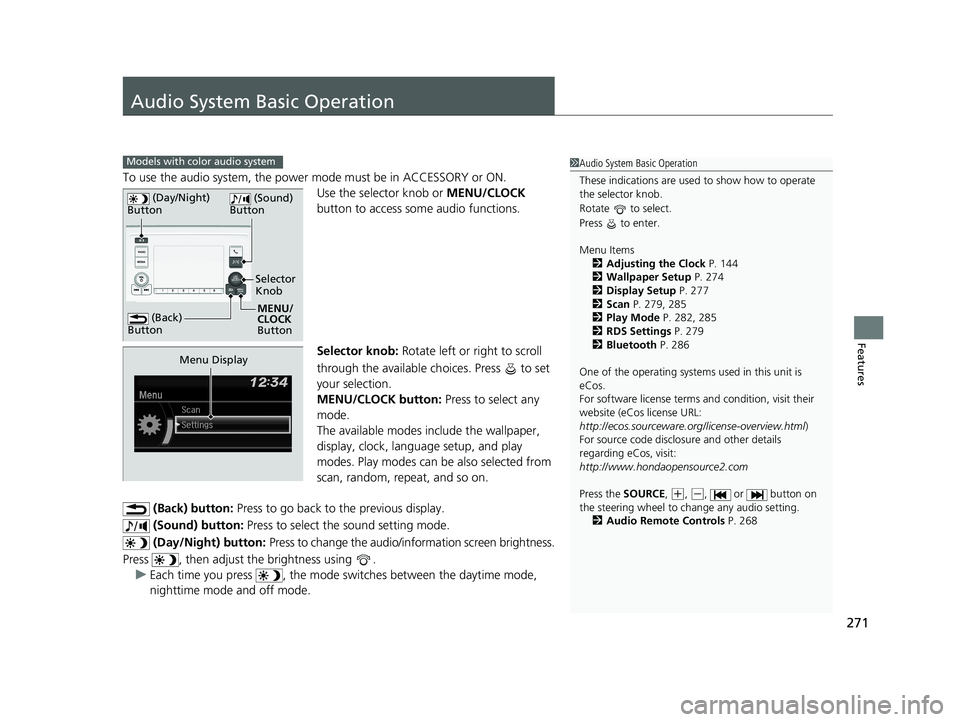
To use the audio system, the power mode must be in ACCESSORY or ON.Use the selector knob or MENU/CLOCK
button to access some audio functions.
Selector knob: Rotate left or right to scroll
through the available ch oices. Press to set
your selection.
MENU/CLOCK button: Press to select any
mode.
The available modes in clude the wallpaper,
display, clock, language setup, and play
modes. Play modes can be also selected from
scan, random, repeat, and so on.
(Back) button: Press to go back to the previous display.
(Sound) button: Press to select the sound setting mode.
(Day/Night) button: Press to change the audio/information screen brightness.
Press , then adjust the brightness using . u Each time you press , the mode sw itches between the daytime mode,
nighttime mode and off mode.
Models with color audio system1 Audio System Basic Operation
These indications are used to show how to operate
the selector knob.
Rotate to select.
Press to enter.
Menu Items
2 Adjusting the Clock P. 144
2 Wallpaper Setup P. 274
2 Display Setup P. 277
2 Scan P. 279, 285
2 Play Mode P. 282, 285
2 RDS Settings P. 279
2 Bluetooth P. 286
One of the operating system s used in this unit is
eCos.
For software license terms and condition, visit their
website (eCos license URL:
http://ecos.sourceware.org/license-overview.html )
For source code disclo sure and other details
regarding eCos, visit:
http://www.hondaopensource2.com
Press the SOURCE ,
(+, (-, or button on
the steering wheel to change any audio setting.
2 Audio Remote Controls P. 268
(Back)
Button
Selector
Knob
MENU/
CLOCK
Button
(Day/Night)
Button
(Sound)
Button
Menu Display
20 US ODYSSEY-31THR6210.book 271 ページ 2020年2月28日 金曜日 午前7時26分
Page 275 of 767
273
uuAudio System Basic Operation uAudio/Information Screen
Continued
Features
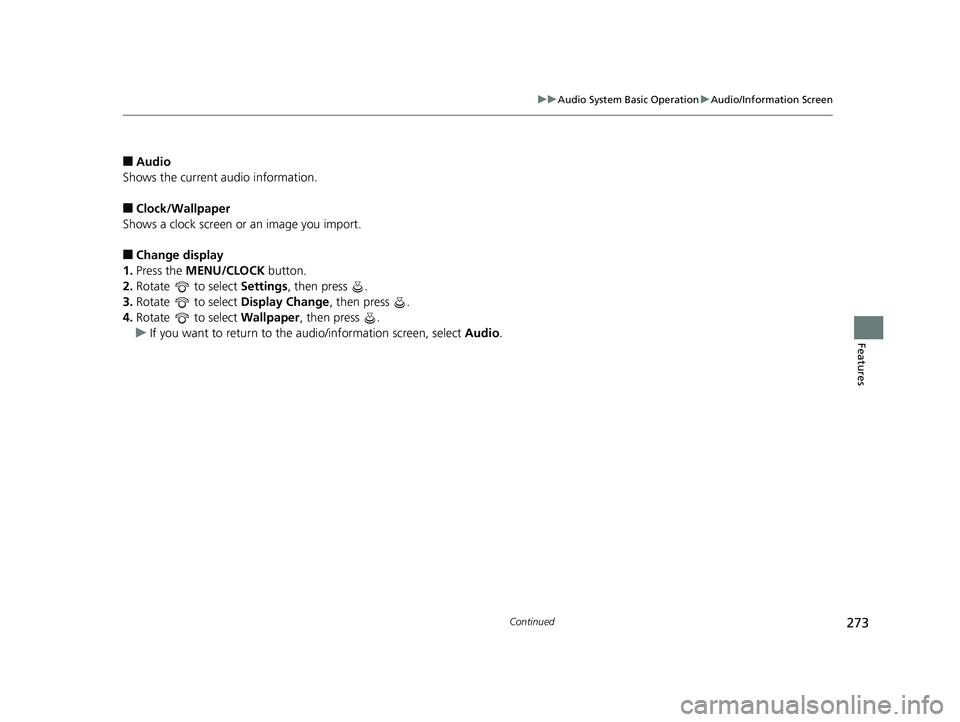
■Audio
Shows the current audio information.
■Clock/Wallpaper
Shows a clock screen or an image you import.
■Change display
1. Press the MENU/CLOCK button.
2. Rotate to select Settings, then press .
3. Rotate to select Display Change, then press .
4. Rotate to select Wallpaper, then press .
u If you want to return to the audio/information screen, select Audio.
20 US ODYSSEY-31THR6210.book 273 ページ 2020年2月28日 金曜日 午前7時26分
Page 276 of 767
uuAudio System Basic Operation uAudio/Information Screen
274
Features
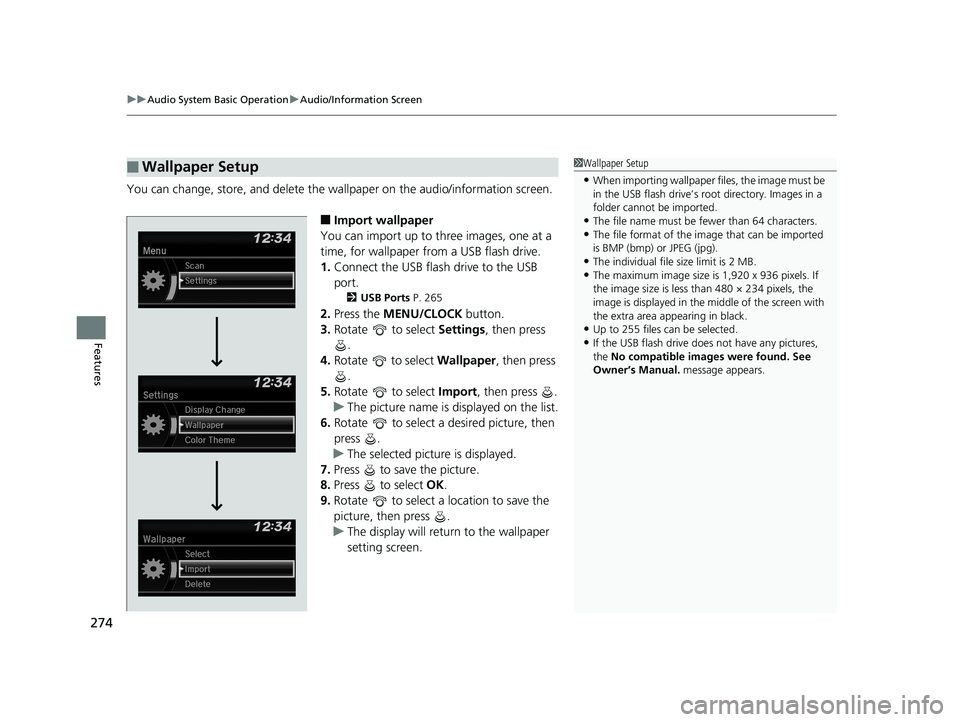
You can change, store, and delete the wa llpaper on the audio/information screen.
■Import wallpaper
You can import up to three images, one at a
time, for wallpaper from a USB flash drive.
1. Connect the USB flash drive to the USB
port.
2 USB Ports P. 265
2.Press the MENU/CLOCK button.
3. Rotate to select Settings, then press
.
4. Rotate to select Wallpaper , then press
.
5. Rotate to select Import, then press .
u The picture name is displayed on the list.
6. Rotate to select a desired picture, then
press .
u The selected picture is displayed.
7. Press to save the picture.
8. Press to select OK.
9. Rotate to select a location to save the
picture, then press .
u The display will return to the wallpaper
setting screen.
■Wallpaper Setup1Wallpaper Setup
•When importing wallpaper files, the image must be
in the USB flash drive’s root directory. Images in a
folder cannot be imported.
•The file name must be fewer than 64 characters.•The file format of the im age that can be imported
is BMP (bmp) or JPEG (jpg).
•The individual file size limit is 2 MB.•The maximum image size is 1,920 x 936 pixels. If
the image size is less than 480 × 234 pixels, the
image is displayed in the middle of the screen with
the extra area appearing in black.
•Up to 255 files can be selected.
•If the USB flash drive doe s not have any pictures,
the No compatible images were found. See
Owner’s Manual. message appears.
20 US ODYSSEY-31THR6210.book 274 ページ 2020年2月28日 金曜日 午前7時26分
Page 277 of 767
275
uuAudio System Basic Operation uAudio/Information Screen
Features
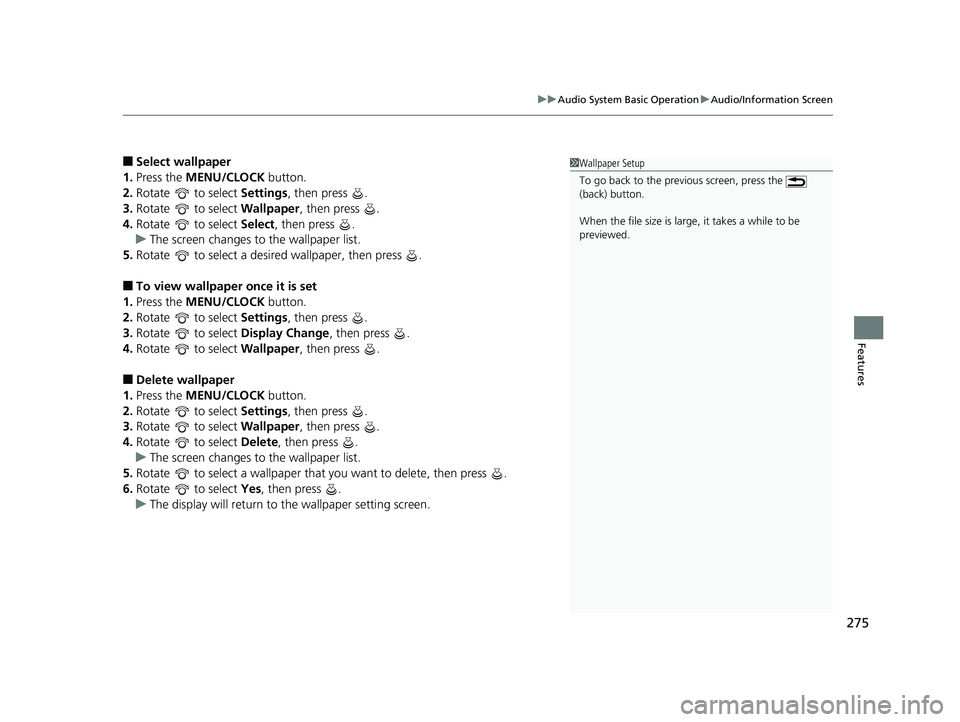
■Select wallpaper
1. Press the MENU/CLOCK button.
2. Rotate to select Settings, then press .
3. Rotate to select Wallpaper, then press .
4. Rotate to select Select, then press .
u The screen changes to the wallpaper list.
5. Rotate to select a desired wallpaper, then press .
■To view wallpaper once it is set
1. Press the MENU/CLOCK button.
2. Rotate to select Settings, then press .
3. Rotate to select Display Change, then press .
4. Rotate to select Wallpaper, then press .
■Delete wallpaper
1. Press the MENU/CLOCK button.
2. Rotate to select Settings, then press .
3. Rotate to select Wallpaper, then press .
4. Rotate to select Delete, then press .
u The screen changes to the wallpaper list.
5. Rotate to select a wallpaper that you want to delete, then press .
6. Rotate to select Yes, then press .
u The display will return to the wallpaper setting screen.
1Wallpaper Setup
To go back to the previous screen, press the
(back) button.
When the file size is large, it takes a while to be
previewed.
20 US ODYSSEY-31THR6210.book 275 ページ 2020年2月28日 金曜日 午前7時26分
Page 279 of 767
277
uuAudio System Basic Operation uDisplay Setup
Features
Display Setup
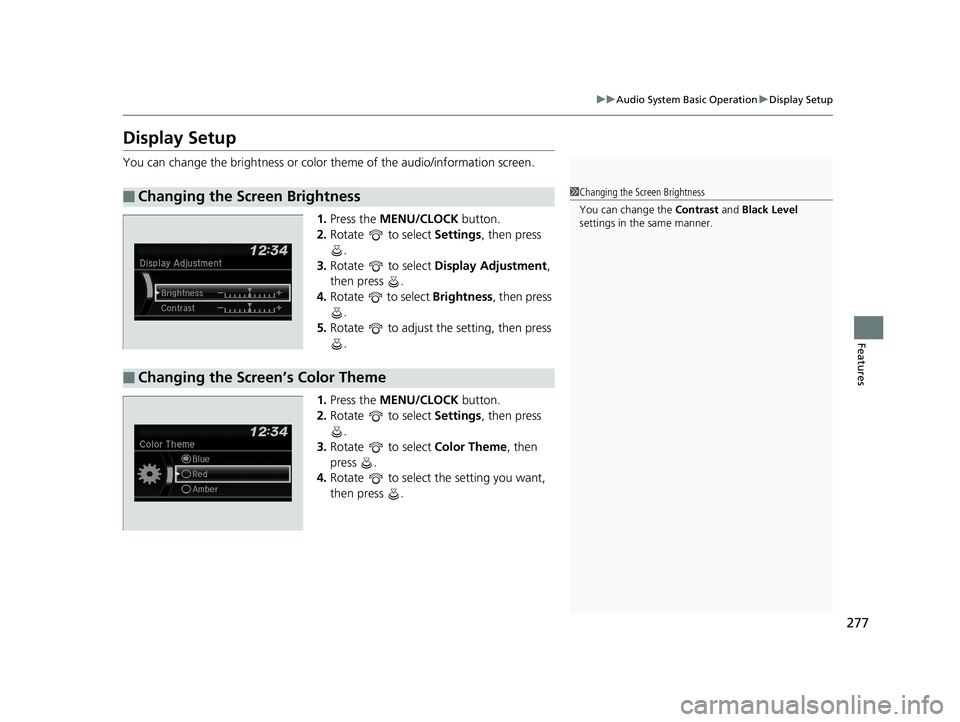
You can change the brightness or color theme of the audio/information screen.
1. Press the MENU/CLOCK button.
2. Rotate to select Settings, then press
.
3. Rotate to select Display Adjustment ,
then press .
4. Rotate to select Brightness, then press
.
5. Rotate to adjust th e setting, then press
.
1. Press the MENU/CLOCK button.
2. Rotate to select Settings, then press
.
3. Rotate to select Color Theme, then
press .
4. Rotate to select the setting you want,
then press .
■Changing the Screen Brightness1Changing the Screen Brightness
You can change the Contrast and Black Level
settings in the same manner.
■Changing the Screen’s Color Theme
20 US ODYSSEY-31THR6210.book 277 ページ 2020年2月28日 金曜日 午前7時26分
Page 280 of 767
278
uuAudio System Basic Operation uPlaying AM/FM Radio
Features
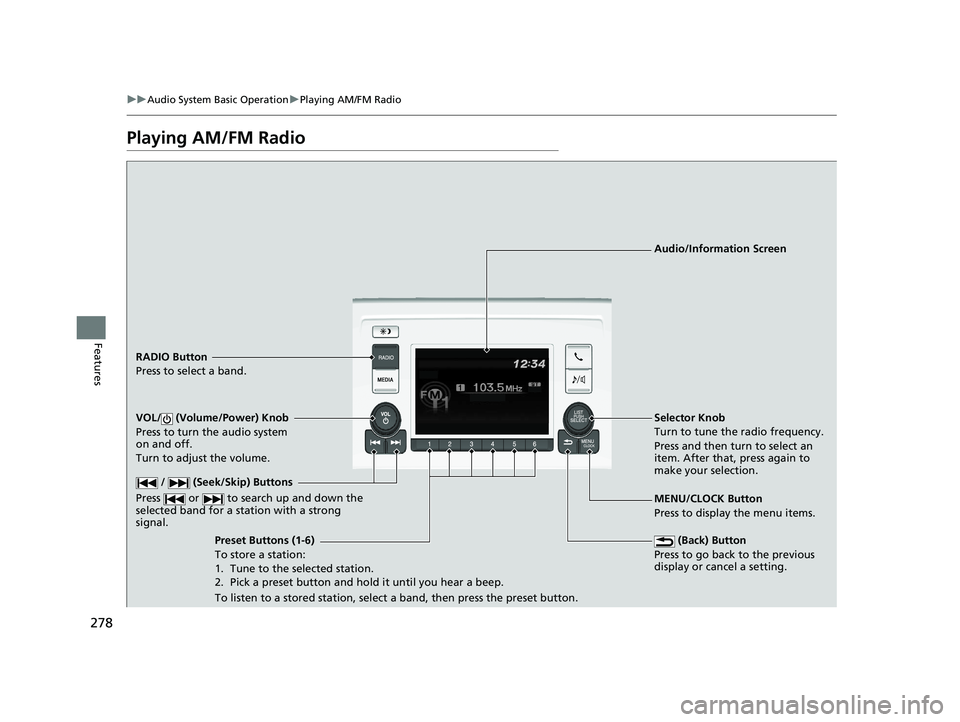
Playing AM/FM Radio
RADIO Button
Press to select a band.
(Back) Button
Press to go back to the previous
display or cancel a setting.
/ (Seek/Skip) Buttons
Press or to search up and down the
selected band for a st ation with a strong
signal.
VOL/ (Volume/Power) Knob
Press to turn the audio system
on and off.
Turn to adjust the volume.
Preset Buttons (1-6)
To store a station:
1. Tune to the selected station.
2. Pick a preset button and hold it until you hear a beep.
To listen to a stored station, select a band, then press the preset button. Selector Knob
Turn to tune the radio frequency.
Press and then turn to select an
item. After that, press again to
make your selection.
MENU/CLOCK Button
Press to display the menu items. Audio/Information Screen
20 US ODYSSEY-31THR6210.book 278 ページ 2020年2月28日 金曜日 午前7時26分
Page 281 of 767
279
uuAudio System Basic Operation uPlaying AM/FM Radio
Features
Provides text data information related to your selected RDS capable FM station.
■To find an RDS station from Station List
1. Press while listening to an FM station.
2. Rotate to select the station, then press .
■Update List
Updates your available st ation list at any time.
1. Press while listening to an FM station.
2. Rotate to select Update List, then press .
■Radio text
Displays the radio text informat ion of the selected RDS station.
1. Press the MENU/CLOCK button.
2. Rotate to select Settings, then press .
3. Rotate to select RDS Settings, then press .
4. Rotate to select Radio Text, then press .
■Scan
Samples each of the strongest stations on the selected band for 10 seconds.
1. Press the MENU/CLOCK button.
2. Rotate to select Scan, then press .
To turn off scan, press .
■Radio Data System (RDS)1 Playing AM/FM Radio
The ST indicator appears on the display indicating
stereo FM broadcasts.
Stereo reproduction in AM is not available.
You can store 6 AM stations and 12 FM stations into
reset button memory. FM1 and FM2 let you store 6
stations each.
Switching the Audio Mode
Press the SOURCE button on the steering wheel.
2 Audio Remote Controls P. 268
1Radio Data System (RDS)
When you select an RDS-capable FM station, the RDS
automatically turns on, and the frequency display
changes to the station name. However, when the
signals of that station become weak, the display
changes from the statio n name to the frequency.
20 US ODYSSEY-31THR6210.book 279 ページ 2020年2月28日 金曜日 午前7時26分