light HONDA PASSPORT 2021 Navigation Manual (in English)
[x] Cancel search | Manufacturer: HONDA, Model Year: 2021, Model line: PASSPORT, Model: HONDA PASSPORT 2021Pages: 607, PDF Size: 36.04 MB
Page 499 of 607
 497
Maintenance
This chapter discusses basic maintenance.
Before Performing MaintenanceInspection and Maintenance ............ 498
Safety When Performing Maintenance..... 499Parts and Fluids Used in M")
497
Maintenance
This chapter discusses basic maintenance.
Before Performing MaintenanceInspection and Maintenance ............ 498
Safety When Performing Maintenance..... 499Parts and Fluids Used in Maintenance Service ........................................... 500
Maintenance Minder
TM..................... 501
Maintenance Under the Hood
Maintenance Items Under the Hood ..... 507Opening the Hood ........................... 508
Engine Compartment Cover ............. 509
Recommended Engine Oil ................ 510
Oil Check ......................................... 511
Adding Engine Oil ............................ 512
Changing the Engine Oil and Oil Filter ..... 513Engine Coolant ................................ 515
Transmission Fluid ............................ 517
Brake Fluid ....................................... 518
Refilling Window Wa sher Fluid......... 518
Replacing Light Bulbs ....................... 519
Checking and Maintaining Wiper
Blades .......................................... 524
Checking and Maintaining Tires
Checking Tires ................................. 528
Tire and Loading Information Label .. 529
Tire Labeling .................................... 529
DOT Tire Quality Grading (U.S. Vehicles) .. 531
Wear Indicators ............................... 533
Tire Service Life ................................ 533
Tire and Wheel Replacement ........... 534
Tire Rotation .................................... 535
Winter Tires ..................................... 536
Battery ............................................... 537
Remote Transmitter Care ................. 539
Climate Control System Maintenance..... 540Cleaning
Interior Care .................................... 542
Exterior Care.................................... 544
Accessories and Modifications ........ 547
21 PASSPORT-31TGS6200.book 497 ページ 2020年9月4日 金曜日 午後2時35分
Page 500 of 607
 498
Maintenance
Before Performing Maintenance
Inspection and Maintenance
For your safety, perform all listed inspections and maintenance to keep your vehicle
in good condition. If you become aware of")
498
Maintenance
Before Performing Maintenance
Inspection and Maintenance
For your safety, perform all listed inspections and maintenance to keep your vehicle
in good condition. If you become aware of an y abnormality (noise, smell, insufficient
brake fluid, oil residue on the ground, etc.), have your vehicle inspected by a dealer.
(Note, however, that service at a dealer is not mandatory to keep your warranties in
effect.)
■Daily inspections
Perform inspections before long distance tri ps, when washing the vehicle, or when
refueling.
2 Maintenance P. 26
■Periodic inspections
• Check the brake fluid level monthly.
2 Checking the Brake Fluid P. 518
•Check the tire pressure monthly. Examin e the tread for wear and foreign objects.
2Checking and Maintaining Tires P. 528
•Check the operation of the exterior lights monthly.
2 Replacing Light Bulbs P. 519
•Check the condition of the wiper bl ades at least every six months.
2Checking and Maintaining Wiper Blades P. 524
■Types of Inspection and Maintenance
1Inspection and Maintenance
Maintenance, replacement, or repair of
emissions control devices and systems may be
done by any automotive repair establishment or
individuals using parts that are “certified” to
EPA standards.
According to state and fede ral regulations, failure to
perform maintenance on the maintenance main
items marked with # will not void your emissions
warranties. However, all ma intenance services should
be performed in accordan ce with the intervals
indicated by the driver information interface.
2 Maintenance Service Items P. 504
If you want to perform complex maintenance tasks
that require more skills a nd tools, you can purchase a
subscription to the Service Express website at
www.techinfo.honda.com .
2 Authorized Manuals P. 592
If you want to perform ma intenance yourself, make
sure that you have the necessary tools and skills first.
After performing maintenanc e, update the records in
the separate maintenance booklet.
U.S. models
21 PASSPORT-31TGS6200.book 498 ページ 2020年9月4日 金曜日 午後2時35分
Page 510 of 607
508
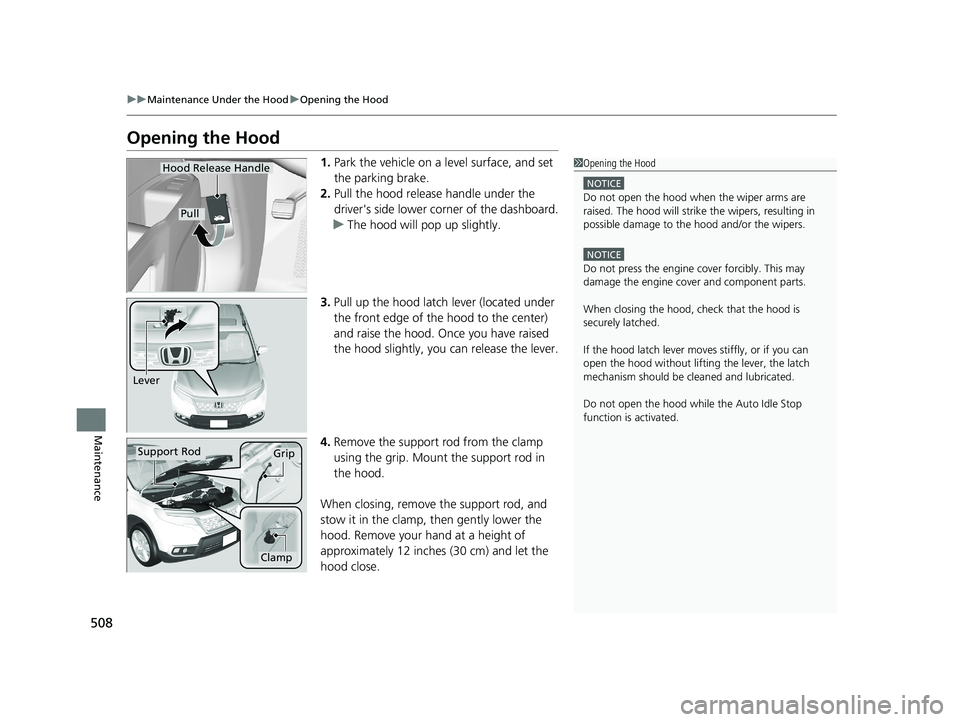
uuMaintenance Under the Hood uOpening the Hood
Maintenance
Opening the Hood
1. Park the vehicle on a level surface, and set
the parking brake.
2. Pull the hood release handle under the
driver's side lower corner of the dashboard.
u The hood will pop up slightly.
3. Pull up the hood latch lever (located under
the front edge of the hood to the center)
and raise the hood. Once you have raised
the hood slightly, you can release the lever.
4. Remove the support rod from the clamp
using the grip. Mount the support rod in
the hood.
When closing, remove the support rod, and
stow it in the clamp, then gently lower the
hood. Remove your hand at a height of
approximately 12 inches (30 cm) and let the
hood close.1 Opening the Hood
NOTICE
Do not open the hood when the wiper arms are
raised. The hood will strike the wipers, resulting in
possible damage to the hood and/or the wipers.
NOTICE
Do not press the engine cover forcibly. This may
damage the engine cover and component parts.
When closing the hood, check that the hood is
securely latched.
If the hood latch lever moves stiffly, or if you can
open the hood without lifti ng the lever, the latch
mechanism should be cl eaned and lubricated.
Do not open the hood while the Auto Idle Stop
function is activated.
Hood Release Handle
Pull
Lever
Support RodGrip
Clamp
21 PASSPORT-31TGS6200.book 508 ページ 2020年9月4日 金曜日 午後2時35分
Page 516 of 607
 uuMaintenance Under the Hood uChanging the Engine Oil and Oil Filter
514
Maintenance
4. Remove the oil filter and dispose of the
remaining oil.
5. Check that the filter ga sket is not stuck to
the e")
uuMaintenance Under the Hood uChanging the Engine Oil and Oil Filter
514
Maintenance
4. Remove the oil filter and dispose of the
remaining oil.
5. Check that the filter ga sket is not stuck to
the engine contact surface.
u If it is stuck, you must detach it.
6. Wipe away dirt and dust adhering to the
contact surface of the oil filter base, and
install a new oil filter.
u Apply a light coat of new engine oil to
the oil filter rubber seal.
7. Put a new washer on the drain bolt, then
reinstall the drain bolt.
u Tightening torque:
29 lbf∙ft (39 N∙m, 4.0 kgf∙m)
8. Pour the recommended engine oil into the
engine.
u Engine oil change capacity (including
filter):
5.7 US qt (5.4 L)
9. Reinstall the engine oi l fill cap securely and
start the engine.
10. Run the engine for a few minutes, and
then check that there is no leak from the
drain bolt or oil filter.
11. Stop the engine, wait for three minutes,
and then check the oil level on the
dipstick.
u If necessary, add more engine oil.1Changing the Engine Oil and Oil Filter
You will need a special wrench to replace the oil
filter. You can buy this wrench from a dealer.
When installing the new oil filter, follow the
instructions supplied with the oil filter.
Reinstall the engine oil fill cap. Start the engine. The
low oil pressure indicator should go off within five
seconds. If it does not, turn off the engine, and check
your work.
Oil Filter
21 PASSPORT-31TGS6200.book 514 ページ 2020年9月4日 金曜日 午後2時35分
Page 521 of 607
 519Continued
Maintenance
Replacing Light Bulbs
Headlight Bulbs
When replacing, use the following bulbs.1.Remove the engine compartment cover.
2 Engine Compartment Cover P. 509
2. Remove the clips.
3.")
519Continued
Maintenance
Replacing Light Bulbs
Headlight Bulbs
When replacing, use the following bulbs.1.Remove the engine compartment cover.
2 Engine Compartment Cover P. 509
2. Remove the clips.
3. Remove the air intake duct.
High beam headlight:LED type*
60 W (HB3 for halogen bulb type)*
Low beam headlight:LED type
■High Beam Headlights
1Headlight Bulbs
NOTICE
Halogen bulbs get very hot when lit.
Oil, perspiration, or a scratch on the glass can cause
the bulb to overhe at and shatter.
The headlight aim is set by the factory, and does not
need to be adjusted. Howeve r, if you regularly carry
heavy items in the cargo area or tow a trailer, have
the aiming readjusted at a dealer or by a qualified
technician.
Low beam headlights are LED type. Have an
authorized Honda d ealer inspect and replace the light
assembly.
High beam headlights ar e LED type. Have an
authorized Honda d ealer inspect and replace the light
assembly.
When replacing a halogen bu lb, handle it by its base,
and protect the glass from c ontact with your skin or
hard objects. If you touch the glass, clean it with
denatured alcohol and a clean cloth.
Models with LED high beam headlights
Models with halogen high beam headlights
Models with halogen headlights
Clips
Air Intake Duct
Driver side
* Not available on all models
21 PASSPORT-31TGS6200.book 519 ページ 2020年9月4日 金曜日 午後2時35分
Page 522 of 607
 uuReplacing Light Bulbs uDaytime Running Lights and Parking Lights
520
Maintenance
4. Push the tab to remove the coupler.
5. Rotate the old bulb counter-clockwise to
remove.
6. Insert a new bulb into")
uuReplacing Light Bulbs uDaytime Running Lights and Parking Lights
520
Maintenance
4. Push the tab to remove the coupler.
5. Rotate the old bulb counter-clockwise to
remove.
6. Insert a new bulb into the headlight
assembly and turn it clockwise.
7. Insert the coupler into the connector of the
bulb.
Daytime Running Lights and Parking Lights
Daytime running lights and parking lights are LED type. Have an authorized Honda
dealer inspect and replace the light assembly.
Front Side Marker Lights
Front side marker lights are LED type. Have an authorized Honda dealer inspect and
replace the light assembly.
1Headlight Bulbs
Remove the clip using a Phillips-head screwdriver.
Insert the clip with the center pin raised, and push
until it is flat.
Center pin
Push until the
pin is flat.
TabCoupler
Bulb
Both sides
21 PASSPORT-31TGS6200.book 520 ページ 2020年9月4日 金曜日 午後2時35分
Page 523 of 607
 521
uuReplacing Light Bulbs uFront Turn Signal Light Bulbs
Maintenance
Front Turn Signal Light Bulbs
When replacing, use the following bulbs.
1.Remove the screws, pull the inner fender
back.
2. Turn")
521
uuReplacing Light Bulbs uFront Turn Signal Light Bulbs
Maintenance
Front Turn Signal Light Bulbs
When replacing, use the following bulbs.
1.Remove the screws, pull the inner fender
back.
2. Turn the socket counter-clockwise and
remove it.
3. Remove the old bulb and insert a new bulb.
Fog Lights
Fog lights are LED type. Have an authoriz ed Honda dealer inspect and replace the
light assembly.
Front Turn Signal Light: 28/8W (Amber)
Screws
Socket
Bulb
21 PASSPORT-31TGS6200.book 521 ページ 2020年9月4日 金曜日 午後2時35分
Page 524 of 607
 522
uuReplacing Light Bulbs uSide Turn Signal/Emergency Indicator Lights*
Maintenance
Side Turn Signal/Emergency Indicator Lights*
Side turn lights are LED type. Have an au thorized Honda dealer inspe")
522
uuReplacing Light Bulbs uSide Turn Signal/Emergency Indicator Lights*
Maintenance
Side Turn Signal/Emergency Indicator Lights*
Side turn lights are LED type. Have an au thorized Honda dealer inspect and replace
the light assembly.
Brake/Taillight, Rear Side Marker Light, and Rear
Turn Signal Light Bulbs
When replacing, use the following bulbs.
1.Use a Phillips-head screwdriver to remove
the bolts.
2. Pull the light assembly out of the rear pillar.
3. Turn the socket counter-clockwise and
remove it. Remove the old bulb.
4. Insert a new bulb and turn clockwise.
5. Slide the light assembly onto the guide on
the body.
6. Align the pins with the body grommets,
then push in unt il they fully seat.
Brake/Taillight: LED
Rear Side Marker Light: LED
Rear Turn Signal Light: 21W (Amber)
1Brake/Taillight, Rear Side Marker Light, and Rear Turn Signal
Light Bulbs
Brake/taillights and rear side marker lights are LED
type. Have an authorized Honda dealer inspect and
replace the light assembly.
Bolts
Bulb Socket
* Not available on all models
21 PASSPORT-31TGS6200.book 522 ページ 2020年9月4日 金曜日 午後2時35分
Page 525 of 607
 523
uuReplacing Light Bulbs uBack-Up Lights
Maintenance
Back-Up Lights
When replacing, use the following bulbs.
1.Turn the socket counter-clockwise and
remove it. Remove the old bulb.
2. Insert a new")
523
uuReplacing Light Bulbs uBack-Up Lights
Maintenance
Back-Up Lights
When replacing, use the following bulbs.
1.Turn the socket counter-clockwise and
remove it. Remove the old bulb.
2. Insert a new bulb and turn clockwise.
Rear License Plate Lights
Rear license plate lights are LED type. Have an authorized Honda dealer inspect and
replace the light assembly.
High-Mount Brake Light
High-mount brake light is LED type. Have an authorized Honda dealer inspect and
replace the light assembly.
Back-Up Lights: 21 W
Socket
Bulb
21 PASSPORT-31TGS6200.book 523 ページ 2020年9月4日 金曜日 午後2時35分
Page 539 of 607
 537
Maintenance
Battery
Checking the Battery
The condition of the battery is monitored by a
sensor located on the negative terminal of the
battery. If there is a problem with this sensor,
the drive")
537
Maintenance
Battery
Checking the Battery
The condition of the battery is monitored by a
sensor located on the negative terminal of the
battery. If there is a problem with this sensor,
the driver information interface will display a
warning message. If this happens, have your
vehicle inspected by a dealer.
Check the battery termina ls for corrosion monthly.
To access the battery terminals:
1. Remove the engine compartment cover.
2 Engine Compartment Cover P. 509
2.Remove the clips using a Ph illips-head screwdriver, then remove the air intake
duct.
2 High Beam Headlights P. 519
If your vehicle’s battery is disconnected or goes dead:
•The audio system is disabled.
2 Audio System Theft Protection P. 221
•The clock resets*.
2 Clock P. 122
1Battery
WARNING: Battery post, terminals,
and related accessories contain lead
and lead compounds.
Wash your hands after handling.
When you find corrosion, cl ean the battery terminals
by applying a baking powder and water solution.
Clean the terminals with a damp towel. Cloth/towel
dry the battery. Coat the terminals with grease to
help prevent future corrosion.
When replacing the battery, the replacement must be
of the same specifications.
Consult a dealer for more information.
3WARNING
The battery gives off explosive hydrogen
gas during normal operation.
A spark or flame can cause the battery to
explode with enough force to kill or
seriously hurt you.
When conducting any battery
maintenance, wear prot ective clothing and
a face shield, or have a skilled technician do
it.
* Not available on all models
21 PASSPORT-31TGS6200.book 537 ページ 2020年9月4日 金曜日 午後2時35分