light HONDA PASSPORT 2023 Owners Manual
[x] Cancel search | Manufacturer: HONDA, Model Year: 2023, Model line: PASSPORT, Model: HONDA PASSPORT 2023Pages: 610, PDF Size: 20.93 MB
Page 511 of 610
510
uuMaintenance Under the Hood uOpening the Hood
Maintenance
Opening the Hood
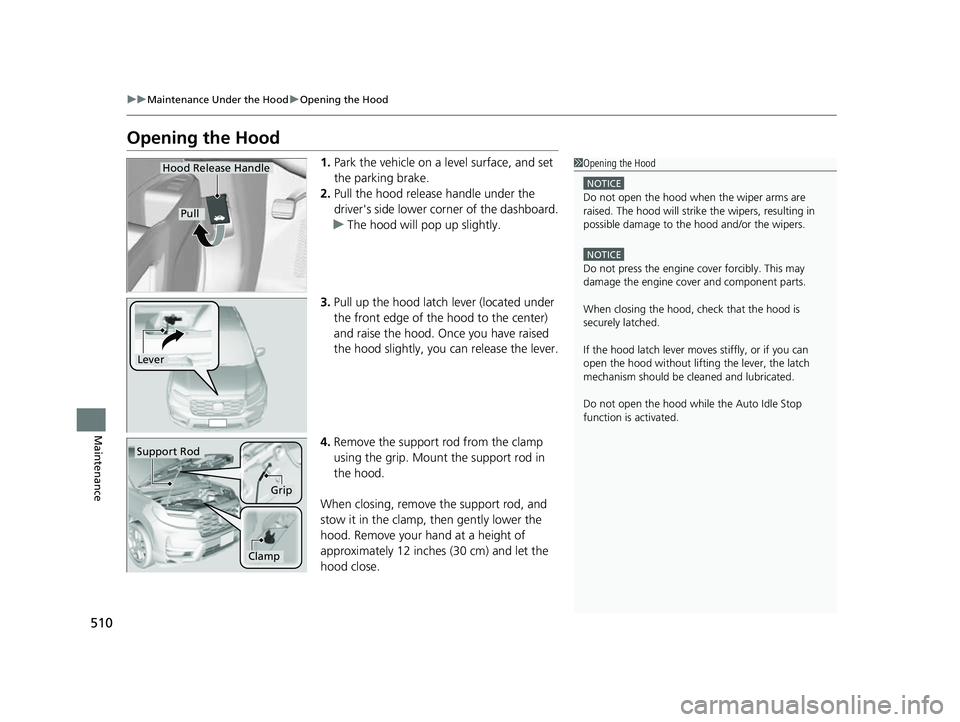
1. Park the vehicle on a level surface, and set
the parking brake.
2. Pull the hood release handle under the
driver's side lower co rner of the dashboard.
u The hood will pop up slightly.
3. Pull up the hood latch lever (located under
the front edge of the hood to the center)
and raise the hood. On ce you have raised
the hood slightly, you can release the lever.
4. Remove the support rod from the clamp
using the grip. Mount the support rod in
the hood.
When closing, remove the support rod, and
stow it in the clamp, then gently lower the
hood. Remove your hand at a height of
approximately 12 inches (30 cm) and let the
hood close.1 Opening the Hood
NOTICE
Do not open the hood when the wiper arms are
raised. The hood will strike the wipers, resulting in
possible damage to the hood and/or the wipers.
NOTICE
Do not press the engine cover forcibly. This may
damage the engine cover and component parts.
When closing the hood, check that the hood is
securely latched.
If the hood latch lever moves stiffly, or if you can
open the hood without lifti ng the lever, the latch
mechanism should be cl eaned and lubricated.
Do not open the hood while the Auto Idle Stop
function is activated.
Hood Release Handle
Pull
Lever
Support Rod
Grip
Clamp
23 PASSPORT-31TGS6400.book 510 ページ 2022年8月5日 金曜日 午後9時2分
Page 517 of 610

uuMaintenance Under the Hood uChanging the Engine Oil and Oil Filter
516
Maintenance
4. Remove the oil filter and dispose of the
remaining oil.
5. Check that the filter ga sket is not stuck to
the engine contact surface.
u If it is stuck, you must detach it.
6. Wipe away dirt and dust adhering to the
contact surface of the oil filter base, and
install a new oil filter.
u Apply a light coat of new engine oil to
the oil filter rubber seal.
7. Put a new washer on the drain bolt, then
reinstall the drain bolt.
u Tightening torque:
29 lbf∙ft (39 N∙m, 4.0 kgf∙m)
8. Pour the recommended engine oil into the
engine.
u Engine oil change capacity (including
filter):
5.7 US qt (5.4 L)
9. Reinstall the engine oi l fill cap securely and
start the engine.
10. Run the engine for a few minutes, and
then check that there is no leak from the
drain bolt or oil filter.
11. Stop the engine, wait for three minutes,
and then check the oil level on the
dipstick.
u If necessary, add more engine oil.1Changing the Engine Oil and Oil Filter
You will need a special wrench to replace the oil
filter. You can buy this wrench from a dealer.
When installing the new oil filter, follow the
instructions supplied with the oil filter.
Reinstall the engine oil fill cap. Start the engine. The
low oil pressure indicator should go off within five
seconds. If it does not, turn off the engine, and check
your work.
Oil Filter
23 PASSPORT-31TGS6400.book 516 ページ 2022年8月5日 金曜日 午後9時2分
Page 522 of 610

521Continued
Maintenance
Replacing Light Bulbs
Headlight Bulbs
When replacing, use the following bulbs.1.Remove the engine compartment cover.
2 Engine Compartment Cover P. 511
2. Remove the clips.
3. Remove the air intake duct.
High beam headlight:60 W (HB3 for halogen bulb type)
Low beam headlight:LED type
■High Beam Headlights
1Headlight Bulbs
NOTICE
Halogen bulbs get very hot when lit.
Oil, perspiration, or a scratch on the glass can cause
the bulb to overhe at and shatter.
The headlight aim is set by the factory, and does not
need to be adjusted. Howeve r, if you regularly carry
heavy items in the cargo area or tow a trailer, have
the aiming readjusted at a dealer or by a qualified
technician.
Low beam headlights are LED type. Have an
authorized Honda d ealer inspect and replace the light
assembly.
When replacing a halogen bu lb, handle it by its base,
and protect the glass from c ontact with your skin or
hard objects. If you touch the glass, clean it with
denatured alcohol and a clean cloth.
Clips
Air Intake Duct
Driver side
23 PASSPORT-31TGS6400.book 521 ページ 2022年8月5日 金曜日 午後9時2分
Page 523 of 610

uuReplacing Light Bulbs uDaytime Running Lights and Parking Lights
522
Maintenance
4. Push the tab to remove the coupler.
5. Rotate the old bulb counter-clockwise to
remove.
6. Insert a new bulb into the headlight
assembly and turn it clockwise.
7. Insert the coupler into the connector of the
bulb.
Daytime Running Lights and Parking Lights
Daytime running lights and parking lights are LED type. Have an authorized Honda
dealer inspect and replace the light assembly.
Front Side Marker Lights
Front side marker lights are LED type. Have an authorized Honda dealer inspect and
replace the light assembly.
1Headlight Bulbs
Remove the clip using a Phillips-head screwdriver.
Insert the clip with the center pin raised, and push
until it is flat.
Center pin
Push until the
pin is flat.
TabCoupler
Bulb
Both sides
23 PASSPORT-31TGS6400.book 522 ページ 2022年8月5日 金曜日 午後9時2分
Page 524 of 610

523
uuReplacing Light Bulbs uFront Turn Signal Light Bulbs
Maintenance
Front Turn Signal Light Bulbs
When replacing, use the following bulbs.
1.Remove the screws, pull the inner fender
back.
2. Turn the socket counter-clockwise and
remove it.
3. Remove the old bulb and insert a new bulb.
Fog Lights*
Fog lights are LED type. Have an authoriz ed Honda dealer inspect and replace the
light assembly.
Front Turn Signal Light: 28/8W (Amber)
Screws
Socket
Bulb
* Not available on all models
23 PASSPORT-31TGS6400.book 523 ページ 2022年8月5日 金曜日 午後9時2分
Page 525 of 610

524
uuReplacing Light Bulbs uSide Turn Signal/Emergency Indicator Lights*
Maintenance
Side Turn Signal/Emergency Indicator Lights*
Side turn lights are LED type. Have an au thorized Honda dealer inspect and replace
the light assembly.
Brake/Taillight, Rear Side Marker Light, and Rear
Turn Signal Light Bulbs
When replacing, use the following bulbs.
1.Use a Phillips-head screwdriver to remove
the bolts.
2. Pull the light assembly out of the rear pillar.
3. Turn the socket counter-clockwise and
remove it. Remove the old bulb.
4. Insert a new bulb and turn clockwise.
5. Slide the light assembly onto the guide on
the body.
6. Align the pins with the body grommets,
then push in unt il they fully seat.
Brake/Taillight: LED
Rear Side Marker Light: LED
Rear Turn Signal Light: 21W (Amber)
1Brake/Taillight, Rear Side Marker Light, and Rear Turn Signal
Light Bulbs
Brake/taillights and rear side marker lights are LED
type. Have an authorized Honda dealer inspect and
replace the light assembly.
Bolts
Bulb Socket
* Not available on all models
23 PASSPORT-31TGS6400.book 524 ページ 2022年8月5日 金曜日 午後9時2分
Page 526 of 610

525
uuReplacing Light Bulbs uBack-Up Lights
Maintenance
Back-Up Lights
When replacing, use the following bulbs.
1.Turn the socket counter-clockwise and
remove it. Remove the old bulb.
2. Insert a new bulb and turn clockwise.
Rear License Plate Lights
Rear license plate lights are LED type. Have an authorized Honda dealer inspect and
replace the light assembly.
High-Mount Brake Light
High-mount brake light is LED type. Have an authorized Honda dealer inspect and
replace the light assembly.
Back-Up Lights: 21 W
Socket
Bulb
23 PASSPORT-31TGS6400.book 525 ページ 2022年8月5日 金曜日 午後9時2分
Page 540 of 610

539
Maintenance
Battery
Checking the Battery
The condition of the battery is monitored by a
sensor located on the negative terminal of the
battery. If there is a problem with this sensor,
the driver information interface will display a
warning message. If this happens, have your
vehicle inspected by a dealer.
Check the battery termin als for corrosion monthly.
To access the battery terminals:
1. Remove the engine compartment cover.
2 Engine Compartment Cover P. 511
2.Remove the clips using a Ph illips-head screwdriver, then remove the air intake
duct.
2 High Beam Headlights P. 521
If your vehicle’s battery is disconnected or goes dead:
•The audio system is disabled.
2 Audio System Theft Protection P. 227
•The clock resets*.
2 Clock P. 126
1Battery
WARNING: Battery post, terminals,
and related accessories contain lead
and lead compounds.
Wash your hands after handling.
When you find corrosion, cl ean the battery terminals
by applying a baking powder and water solution.
Clean the terminals with a damp towel. Cloth/towel
dry the battery. Coat the terminals with grease to
help prevent future corrosion.
When replacing the battery, the replacement must be
of the same specifications.
Consult a dealer for more information.
3WARNING
The battery gives off explosive hydrogen
gas during normal operation.
A spark or flame can cause the battery to
explode with enough force to kill or
seriously hurt you.
When conducting any battery
maintenance, wear prot ective clothing and
a face shield, or have a skilled technician do
it.
* Not available on all models
23 PASSPORT-31TGS6400.book 539 ページ 2022年8月5日 金曜日 午後9時2分
Page 545 of 610

544
Maintenance
Cleaning
Interior Care
Use a damp cloth with a mixture of mild detergent and warm water to remove dirt.
Use a clean cloth to remove detergent residue.
Use a soft brush with a mixture of mild soap and warm water to clean the seat belts.
Let the belts air dry. Wipe the loops of the seat belt anchors using a clean cloth.
Wipe using a glass cleaner.
■Cleaning Seat Belts
1 Interior Care
Do not spill liquids inside the vehicle.
Electrical devices and systems may malfunction if
liquids are splashed on them.
Do not use silicone based sprays on electrical devices
such as audio devices and switches.
Doing so may cause the items to malfunction or
cause a fire inside the vehicle.
If a silicone based spray is inadvertently used on
electrical devices, consult a dealer.
Depending on their compos ition, chemicals and
liquid aromatics may cause discoloration, wrinkles,
and cracking to resin-ba sed parts and textiles.
Do not use alkali solvents or organic solvents such as
benzene or gasoline.
After using chemicals, make su re to gently wipe them
away using a dry cloth.
Do not place used cloths on top of resin based parts
or textiles for long periods of time without washing.
Loop
■Cleaning the Window1Cleaning the Window
Wires are mounted to the in side of the rear window.
Wipe along the same direct ion as the wires with a
soft cloth so as not to damage them.
Be careful not to spill flui ds, such as water or glass
cleaner, on or around the co ver of both the front
sensor camera and the rainfall/light sensor
*.
* Not available on all models
23 PASSPORT-31TGS6400.book 544 ページ 2022年8月5日 金曜日 午後9時2分
Page 549 of 610
 may fog temporarily
if you have driven in the rain, or after the vehicle has been run")
548
uuCleaning uExterior Care
Maintenance
The inside lenses of exterior lights (headli ghts, brake lights, etc.) may fog temporarily
if you have driven in the rain, or after the vehicle has been run through a car wash.
Dew condensation also may build up inside the lenses when there is a significant
enough difference between the ambient and inside lens temperatures (similar to
vehicle windows fogging up in rainy conditions). These conditions are natural
processes, not structural design problems in the exterior lights.
Lens design characteristics may result in mo isture developing on the light lens frame
surfaces. This also is not a malfunction.
However, if you see large amounts of wa ter accumulation, or large water drops
building up inside the lenses, have your vehicle inspected by a dealer.
■Fogged Exterior Light Lenses
23 PASSPORT-31TGS6400.book 548 ページ 2022年8月5日 金曜日 午後9時2分