fuel pump HONDA PILOT 2013 2.G Owners Manual
[x] Cancel search | Manufacturer: HONDA, Model Year: 2013, Model line: PILOT, Model: HONDA PILOT 2013 2.GPages: 488, PDF Size: 10.18 MB
Page 16 of 488
15
Quick Reference Guide
VSA® OFF Button (P353)
●The vehicle stability assist (VSA®) system
helps stabilize the vehicle during cornering, and helps maintain traction
while accelerating on loose or slippery
road surfaces.●VSA® comes on automatically every time
you start the engine.
●To turn VSA® on or off, press and hold the button until you hear a beep.
Cruise Control (P348)
●Cruise control allows you to maintain a
set speed without keeping your foot on the accelerator pedal.
●To use cruise control, press the CRUISE
button, then press DECEL/SET button
once you have achieved the desired speed (above 25 mph or 40 km/h).
Tire Pressure Monitoring
System (TPMS) (P355)
●TPMS monitors tire pressure.●TPMS is turned on automatically every
time you start the engine.
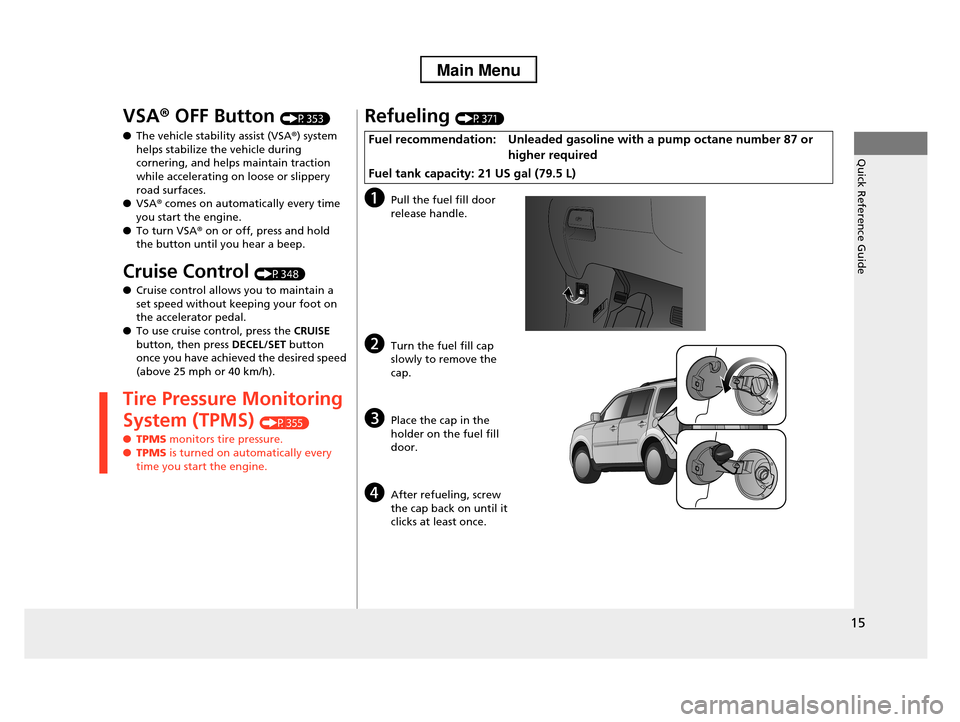
Refueling (P371)
aPull the fuel fill door
release handle.
bTurn the fuel fill cap slowly to remove the
cap.
cPlace the cap in the
holder on the fuel fill
door.
dAfter refueling, screw
the cap back on until it clicks at least once.
Fuel recommendation: Unleaded gasoline with a pump octane number 87 or
higher required
Fuel tank capacity: 21 US gal (79.5 L)
Page 372 of 488
371Continued
Driving
Refueling
Fuel Information
■Fuel recommendation
Use of lower octane gasoline can cause a persistent, heavy metallic knocking noise
that can lead to engine damage.
■Top tier detergent gasoline
Because the level of detergency and additives in gasoline vary in the market, Honda
endorses the use of “TOP TIER Detergent Gasoline” where available to help
maintain the performance and reliability of your vehicle. TOP TIER Detergent
Gasoline meets a new gasoline standard jointly established by leading automotive
manufacturers to meet the needs of today’s advanced engines.
Qualifying gasoline retailers will, in most cases, identify their gasoline as having met
“TOP TIER Detergent Gasoline” standards at the retail location. This fuel is
guaranteed to contain the proper level of detergent additives and be free of metallic
additives. The proper level of detergent additives, and absence of harmful metallic
additives in gasoline, help avoid build-up of deposits in your engine and emission
control system.
For further important fuel-related information for your vehicle, or on information on
gasoline that does not contain MMT, visit www.hondacars.com. In Canada, visit
www.honda.ca for additional information on gasoline. For more information on top
tier gasoline, visit www.toptiergas.com.
Unleaded gasoline, pump octane number 87 or higher
1Fuel Information
NOTICE
We recommend quality gasoline containing
detergent additives that help prevent fuel system and
engine deposits. In addition, in order to maintain good performance, fuel economy, and emissions
control, we strongly recommend the use of gasoline
that does NOT contain harmful manganese-based fuel additives such as MMT, if such gasoline is
available.
Use of gasoline with these additives may adversely
affect performance, and cause the malfunction
indicator lamp on your instrument panel to come on. If this happens, contact a dealer for service.
Page 373 of 488
uuRefuelinguHow to Refuel
372
Driving
■Gasoline containing ethanol
Some gasoline today is blended with oxygenates such as ethanol. Your vehicle is
designed to operate on oxygenated gasoline containing up to 10% ethanol by
volume. Do not use gasoline containing methanol. If you notice any undesirable
operating symptoms, try another service station or switch to another brand of
gasoline.
■Fuel tank capacity: 21.0 US gal (79.5 liters)
How to Refuel
1.Stop your vehicle with the service station
pump on the left side of the vehicle in the
rear.
2.Turn off the engine.
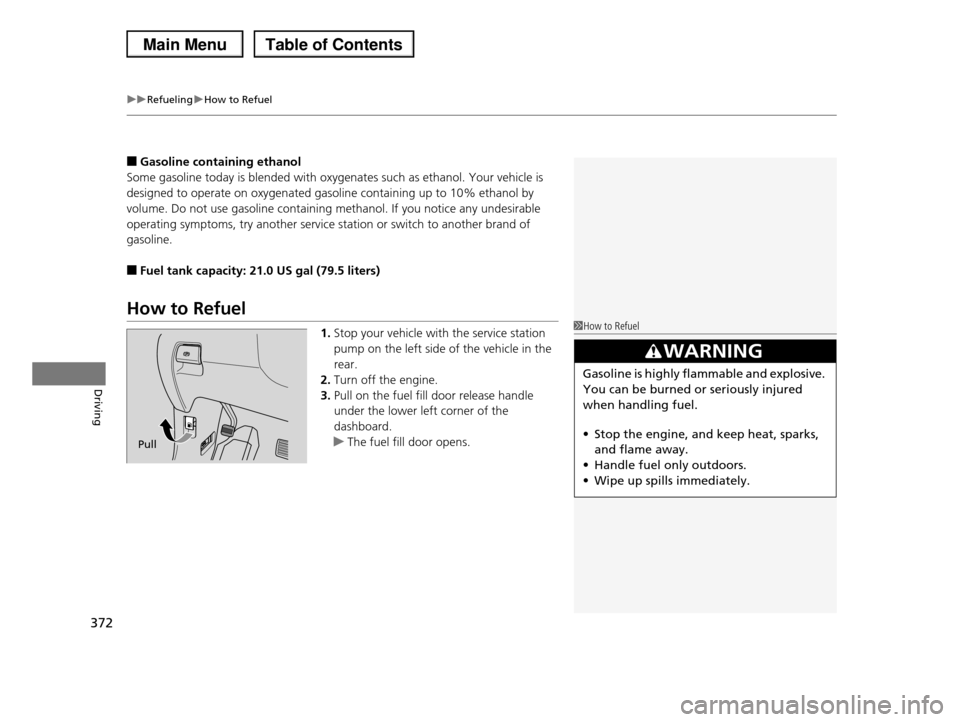
3.Pull on the fuel fill door release handle
under the lower left corner of the
dashboard.
uThe fuel fill door opens.
1How to Refuel
3WARNING
Gasoline is highly flammable and explosive.
You can be burned or seriously injured
when handling fuel.
•Stop the engine, and keep heat, sparks,
and flame away.
•Handle fuel only outdoors.
•Wipe up spills immediately.
Pull
Page 374 of 488
373
uuRefuelinguHow to Refuel
Driving
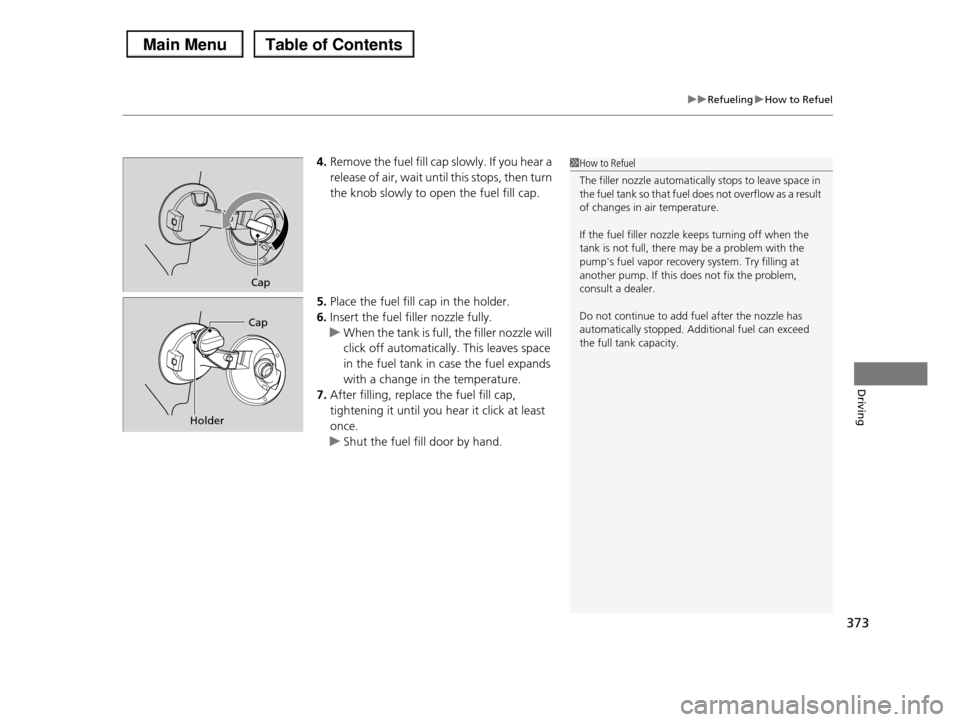
4.Remove the fuel fill cap slowly. If you hear a
release of air, wait until this stops, then turn
the knob slowly to open the fuel fill cap.
5.Place the fuel fill cap in the holder.
6.Insert the fuel filler nozzle fully.
uWhen the tank is full, the filler nozzle will
click off automatically. This leaves space
in the fuel tank in case the fuel expands
with a change in the temperature.
7.After filling, replace the fuel fill cap,
tightening it until you hear it click at least
once.
uShut the fuel fill door by hand.
1How to Refuel
The filler nozzle automatically stops to leave space in the fuel tank so that fuel does not overflow as a result
of changes in air temperature.
If the fuel filler nozzle keeps turning off when the
tank is not full, there may be a problem with the
pump's fuel vapor recovery system. Try filling at another pump. If this does not fix the problem,
consult a dealer.
Do not continue to add fuel after the nozzle has
automatically stopped. Additional fuel can exceed
the full tank capacity.
Cap
Cap
Holder
Page 384 of 488
383
uuMaintenance Minder™uTo Use Maintenance MinderTM
Continued
Maintenance
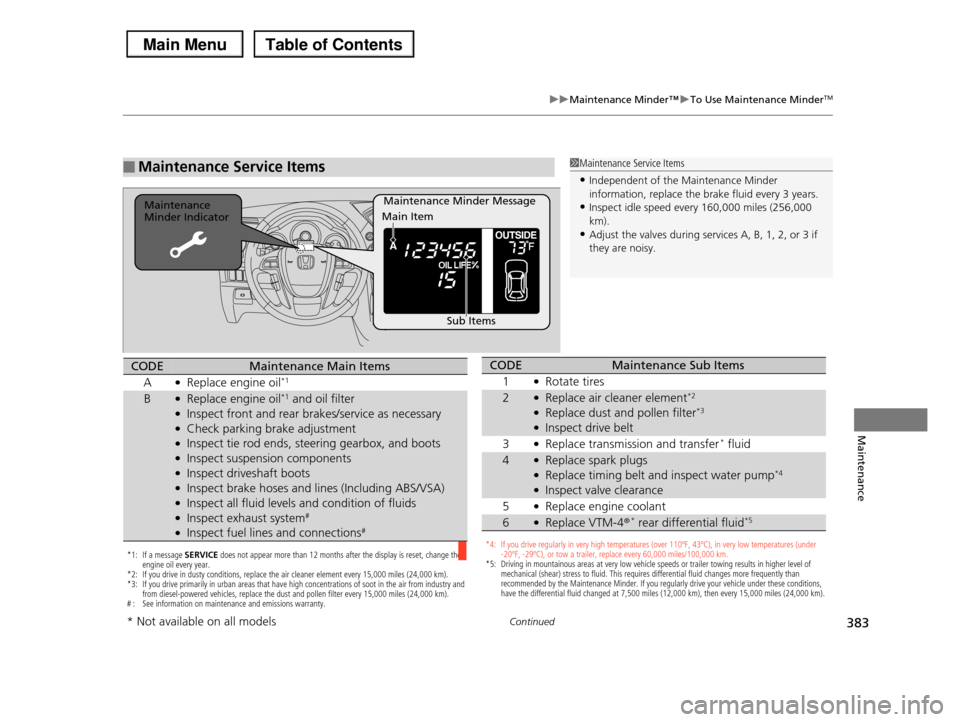
■Maintenance Service Items1Maintenance Service Items
•Independent of the Maintenance Minder information, replace the brake fluid every 3 years.
•Inspect idle speed every 160,000 miles (256,000
km).•Adjust the valves during services A, B, 1, 2, or 3 if
they are noisy.
Maintenance Minder MessageMaintenance Minder Indicator
Sub Items
Main Item
*1: If a message SERVICE does not appear more than 12 months after the display is reset, change the engine oil every year.*2: If you drive in dusty conditions, replace the air cleaner element every 15,000 miles (24,000 km). *3: If you drive primarily in urban areas that have high concentrations of soot in the air from industry and from diesel-powered vehicles, replace the dust and pollen filter every 15,000 miles (24,000 km).# : See information on maintenance and emissions warranty.
CODEMaintenance Main Items
A●Replace engine oil*1
B●Replace engine oil*1 and oil filter●Inspect front and rear brakes/service as necessary●Check parking brake adjustment●Inspect tie rod ends, steering gearbox, and boots●Inspect suspension components●Inspect driveshaft boots●Inspect brake hoses and lines (Including ABS/VSA)●Inspect all fluid levels and condition of fluids●Inspect exhaust system#
●Inspect fuel lines and connections#
*4: If you drive regularly in very high temperatures (over 110ºF, 43ºC), in very low temperatures (under -20ºF, -29ºC), or tow a trailer, replace every 60,000 miles/100,000 km.*5: Driving in mountainous areas at very low vehicle speeds or trailer towing results in higher level of mechanical (shear) stress to fluid. This requires differential fluid changes more frequently than recommended by the Maintenance Minder. If you regularly drive your vehicle under these conditions, have the differential fluid changed at 7,500 miles (12,000 km), then every 15,000 miles (24,000 km).
CODEMaintenance Sub Items
1●Rotate tires
2●Replace air cleaner element*2
●Replace dust and pollen filter*3
●Inspect drive belt
3●Replace transmission and transfer* fluid
4●Replace spark plugs●Replace timing belt and inspect water pump*4
●Inspect valve clearance
5●Replace engine coolant
6●Replace VTM-4r* rear differential fluid*5
* Not available on all models
Page 388 of 488
387
uuMaintenance Minder™uTo Use Maintenance MinderTM
Continued
Maintenance
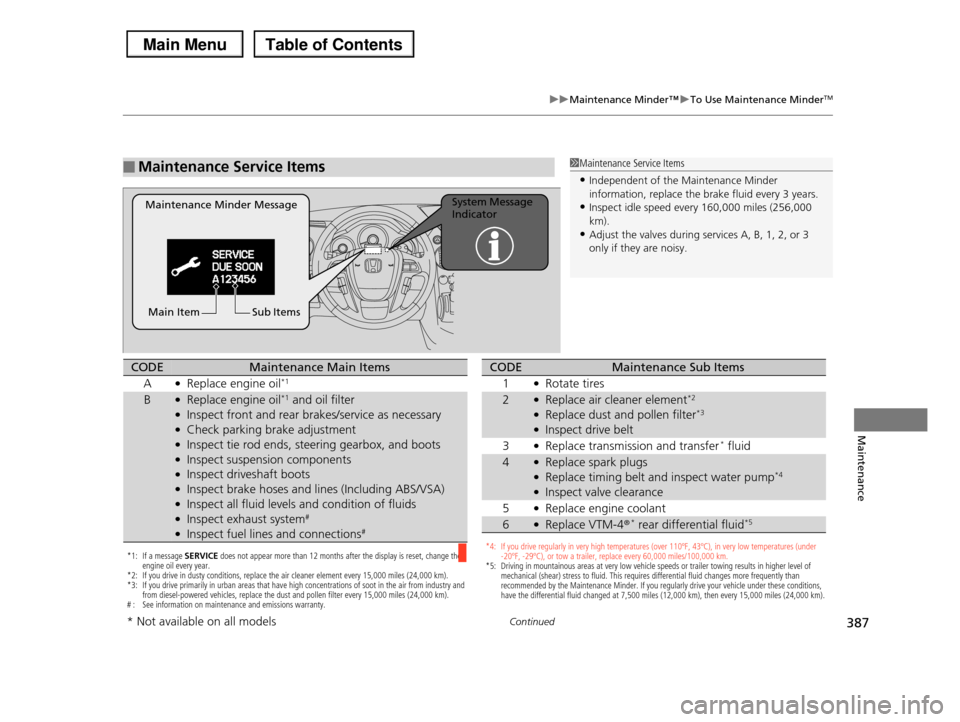
■Maintenance Service Items1Maintenance Service Items
•Independent of the Maintenance Minder information, replace the brake fluid every 3 years.
•Inspect idle speed every 160,000 miles (256,000
km).•Adjust the valves during services A, B, 1, 2, or 3
only if they are noisy.
Maintenance Minder MessageSystem Message Indicator
Sub ItemsMain Item
*1: If a message SERVICE does not appear more than 12 months after the display is reset, change the engine oil every year.*2: If you drive in dusty conditions, replace the air cleaner element every 15,000 miles (24,000 km). *3: If you drive primarily in urban areas that have high concentrations of soot in the air from industry and from diesel-powered vehicles, replace the dust and pollen filter every 15,000 miles (24,000 km).# : See information on maintenance and emissions warranty.
CODEMaintenance Main Items
A●Replace engine oil*1
B●Replace engine oil*1 and oil filter●Inspect front and rear brakes/service as necessary●Check parking brake adjustment●Inspect tie rod ends, steering gearbox, and boots●Inspect suspension components●Inspect driveshaft boots●Inspect brake hoses and lines (Including ABS/VSA)●Inspect all fluid levels and condition of fluids●Inspect exhaust system#
●Inspect fuel lines and connections#
*4: If you drive regularly in very high temperatures (over 110ºF, 43ºC), in very low temperatures (under -20ºF, -29ºC), or tow a trailer, replace every 60,000 miles/100,000 km.*5: Driving in mountainous areas at very low vehicle speeds or trailer towing results in higher level of mechanical (shear) stress to fluid. This requires differential fluid changes more frequently than recommended by the Maintenance Minder. If you regularly drive your vehicle under these conditions, have the differential fluid changed at 7,500 miles (12,000 km), then every 15,000 miles (24,000 km).
CODEMaintenance Sub Items
1●Rotate tires
2●Replace air cleaner element*2
●Replace dust and pollen filter*3
●Inspect drive belt
3●Replace transmission and transfer* fluid
4●Replace spark plugs●Replace timing belt and inspect water pump*4
●Inspect valve clearance
5●Replace engine coolant
6●Replace VTM-4r* rear differential fluid*5
* Not available on all models
Page 401 of 488
400
uuMaintenance Under the HooduBrake Fluid
Maintenance
Brake Fluid
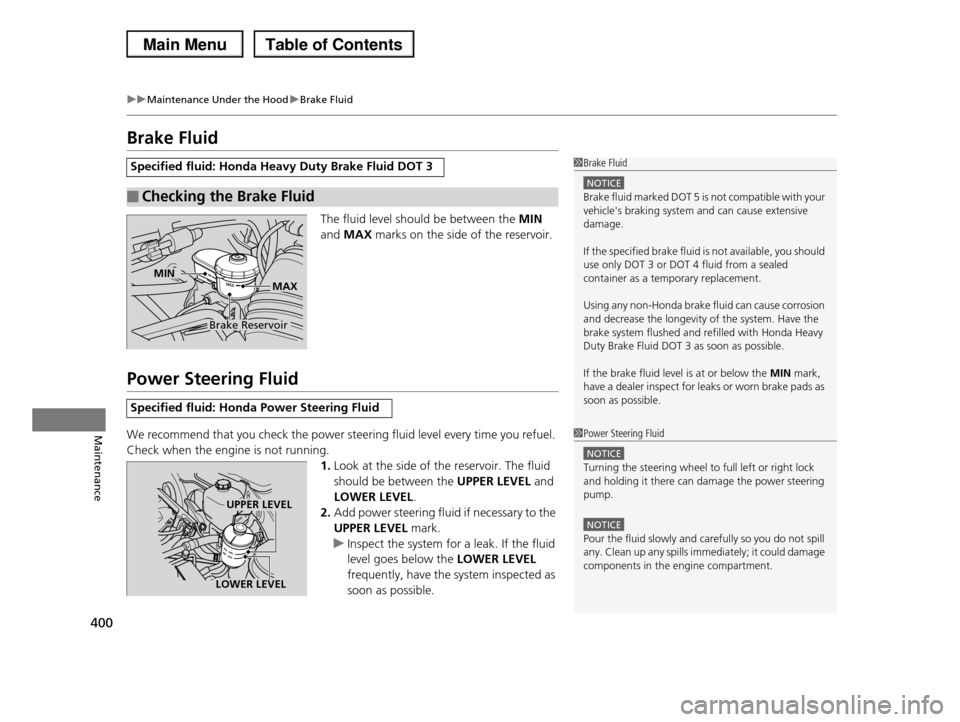
The fluid level should be between the MIN
and MAX marks on the side of the reservoir.
Power Steering Fluid
We recommend that you check the power steering fluid level every time you refuel.
Check when the engine is not running.
1.Look at the side of the reservoir. The fluid
should be between the UPPER LEVEL and
LOWER LEVEL.
2.Add power steering fluid if necessary to the
UPPER LEVEL mark.
uInspect the system for a leak. If the fluid
level goes below the LOWER LEVEL
frequently, have the system inspected as
soon as possible.
Specified fluid: Honda Heavy Duty Brake Fluid DOT 3
■Checking the Brake Fluid
1Brake Fluid
NOTICE
Brake fluid marked DOT 5 is not compatible with your
vehicle's braking system and can cause extensive damage.
If the specified brake fluid is not available, you should use only DOT 3 or DOT 4 fluid from a sealed
container as a temporary replacement.
Using any non-Honda brake fluid can cause corrosion and decrease the longevity of the system. Have the
brake system flushed and refilled with Honda Heavy
Duty Brake Fluid DOT 3 as soon as possible.
If the brake fluid level is at or below the MIN mark,
have a dealer inspect for leaks or worn brake pads as soon as possible.
Brake Reservoir
MINMAX
Specified fluid: Honda Power Steering Fluid
1Power Steering Fluid
NOTICE
Turning the steering wheel to full left or right lock and holding it there can damage the power steering
pump.
NOTICE
Pour the fluid slowly and carefully so you do not spill
any. Clean up any spills immediately; it could damage components in the engine compartment.
UPPER LEVEL
LOWER LEVEL
Page 457 of 488
456
uuFusesuFuse Locations
Handling the Unexpected
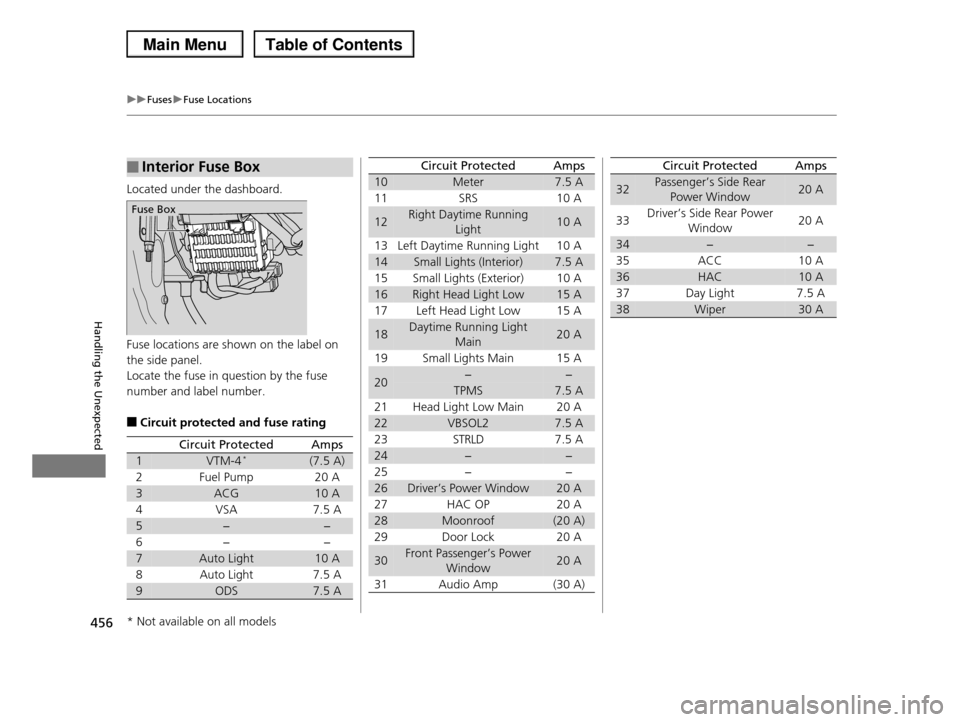
Located under the dashboard.
Fuse locations are shown on the label on
the side panel.
Locate the fuse in question by the fuse
number and label number.
■Circuit protected and fuse rating
■Interior Fuse Box
Fuse Box
Circuit ProtectedAmps
1VTM-4*(7.5 A)
2Fuel Pump20 A
3ACG10 A
4VSA7.5 A
5−−
6−−
7Auto Light10 A
8Auto Light7.5 A
9ODS7.5 A
10Meter7.5 A
11 SRS 10 A
12Right Daytime Running
Light10 A
13 Left Daytime Running Light 10 A
14Small Lights (Interior)7.5 A
15 Small Lights (Exterior) 10 A
16Right Head Light Low15 A
17 Left Head Light Low 15 A
18Daytime Running Light
Main20 A
19 Small Lights Main 15 A
20−−
TPMS7.5 A
21 Head Light Low Main 20 A
22VBSOL27.5 A
23 STRLD 7.5 A
24−−
25 − −
26Driver’s Power Window20 A
27 HAC OP 20 A
28Moonroof(20 A)
29 Door Lock 20 A
30Front Passenger’s Power
Window20 A
31 Audio Amp (30 A)
Circuit ProtectedAmps
32Passenger’s Side Rear
Power Window20 A
33Driver’s Side Rear Power
Window20 A
34−−
35 ACC 10 A
36HAC10 A
37 Day Light 7.5 A
38Wiper30 A
Circuit ProtectedAmps
* Not available on all models
Page 465 of 488
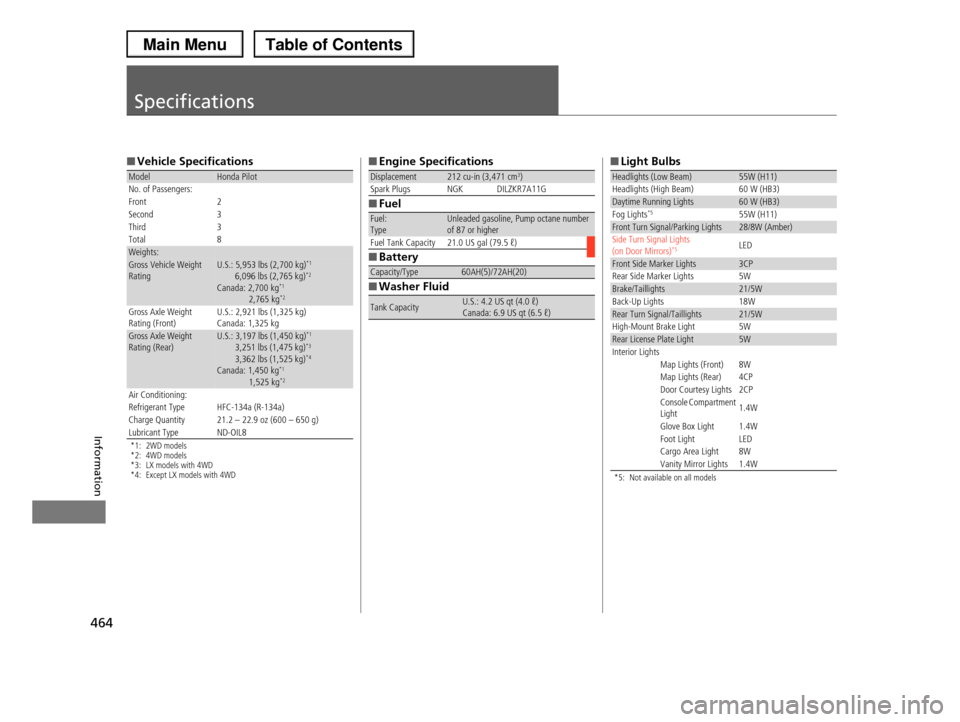
464
Information
Specifications
■Vehicle Specifications
*1: 2WD models *2: 4WD models*3: LX models with 4WD*4: Except LX models with 4WD
ModelHonda PilotNo. of Passengers: Front 2Second 3Third 3Total 8Weights:Gross Vehicle Weight Rating U.S.: 5,953 lbs (2,700 kg)*1
6,096 lbs (2,765 kg)*2
Canada: 2,700 kg*1
2,765 kg*2
Gross Axle Weight Rating (Front)U.S.: 2,921 lbs (1,325 kg)Canada: 1,325 kgGross Axle Weight Rating (Rear)U.S.: 3,197 lbs (1,450 kg)*1
3,251 lbs (1,475 kg)*3
3,362 lbs (1,525 kg)*4
Canada: 1,450 kg*1
1,525 kg*2
Air Conditioning:Refrigerant Type HFC-134a (R-134a)Charge Quantity21.2 – 22.9 oz (600 – 650 g)Lubricant TypeND-OIL8
■Engine Specifications
■Fuel
■Battery
■Washer Fluid
Displacement212 cu-in (3,471 cm3)Spark Plugs NGK DILZKR7A11G
Fuel:TypeUnleaded gasoline, Pump octane number of 87 or higherFuel Tank Capacity 21.0 US gal (79.5 ℓ)
Capacity/Type60AH(5)/72AH(20)
Tank CapacityU.S.: 4.2 US qt (4.0 ℓ)Canada: 6.9 US qt (6.5 ℓ)
■Light Bulbs
*5: Not available on all models
Headlights (Low Beam)55W (H11)Headlights (High Beam) 60 W (HB3)Daytime Running Lights60 W (HB3)Fog Lights*555W (H11)Front Turn Signal/Parking Lights28/8W (Amber)Side Turn Signal Lights (on Door Mirrors)*5 LED
Front Side Marker Lights3CPRear Side Marker Lights 5WBrake/Taillights21/5WBack-Up Lights 18WRear Turn Signal/Taillights21/5WHigh-Mount Brake Light 5WRear License Plate Light5WInterior LightsMap Lights (Front) 8W Map Lights (Rear) 4CPDoor Courtesy Lights 2CPConsole Compartment Light1.4W
Glove Box Light 1.4W Foot Light LEDCargo Area Light 8WVanity Mirror Lights 1.4W