key HONDA PILOT 2014 2.G Owner's Manual
[x] Cancel search | Manufacturer: HONDA, Model Year: 2014, Model line: PILOT, Model: HONDA PILOT 2014 2.GPages: 488, PDF Size: 12.11 MB
Page 151 of 488
150
Controls
Interior Lights/Interior Convenience Items
Interior Lights
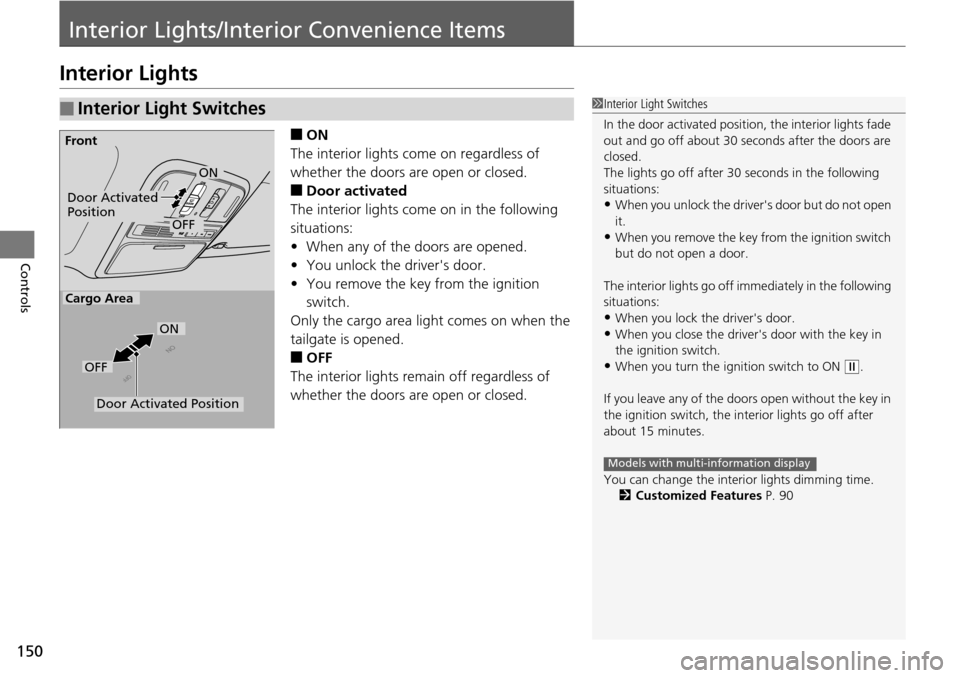
■ON
The interior lights come on regardless of
whet
her the doors are open or closed.
■Door activated
The interior lights come on in the following
situ
ations:
• W
hen any of the doors are opened.
•You un
lock the driver's door.
•You remove the k
ey from the ignition
switch.
Only the cargo area light comes on when the
tailgate is ope
ned.
■OFF
The interior lights remain off regardless of
whet
her the doors are open or closed.
■Interior Light Switches1Interior Light Switches
In the door activated position, the interior lights fade
out and go off about 30 se conds after the doors are
closed.
The lights go off after 30 seconds in the following
situations:
•When you unlock the driver's door but do not open
it.
•When you remove the key from the ignition switch
but do not open a door.
The interior lights go off i mmediately in the following
situations:
•When you lock the driver's door.
•When you close the driver's door with the key in
the ignition switch.
•When you turn the ignition switch to ON (
w
.
If you leave any of the doors open without the key in
the ignition switch, the interior lights go off after
about 15 minutes.
You can change the interi or lights dimming time.
2 Customized Features P. 90
Models with multi-information display
Door Activated
Position
OFF
Front
Door Activated Position
ON
OFF
Cargo Area
ON
Page 153 of 488
152
uu Interior Lights/Interior Convenience Items u Interior Convenience Items
Controls
Interior Convenience Items
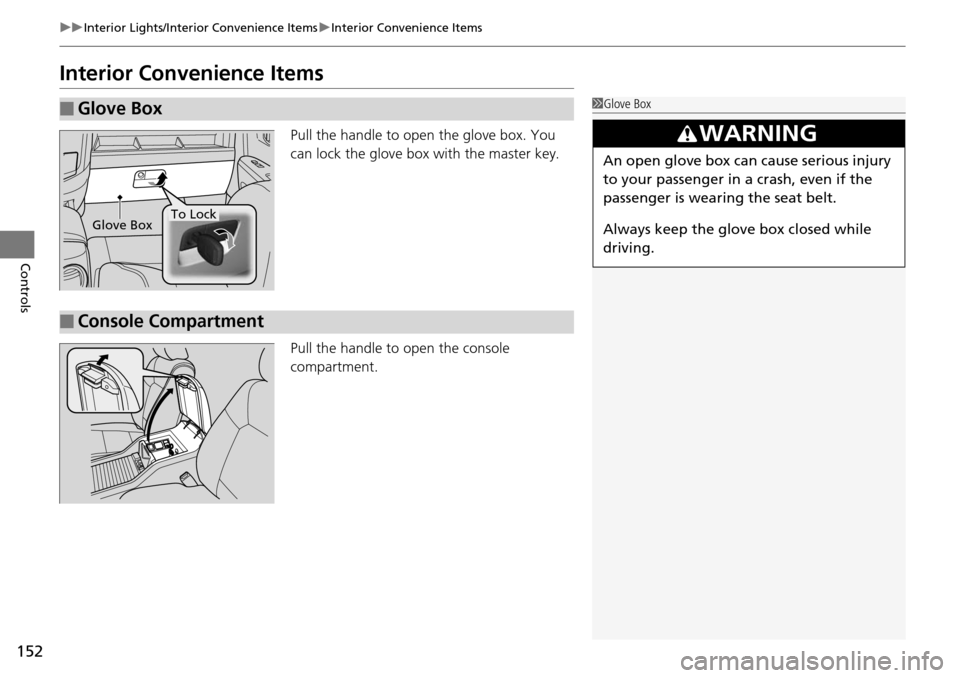
Pull the handle to open the glove box. You
can lock the glove box with the master key.
Pull the handle to open
the console
compartment.
■Glove Box1 Glove Box
3 WARNING
An open glove box can cause serious injury
to your passenger in a crash, even if the
passenger is wearing the seat belt.
Always keep the glove box closed while
driving.
Glove BoxTo Lock
■Console Compartment
Page 304 of 488
303
uu Bluetooth ® HandsFreeLink ® u HFL Menus
Continued
Features
HFL Menus
The ignition switch mu st be in ACCESSORY (q
or ON (w
to use HFL.
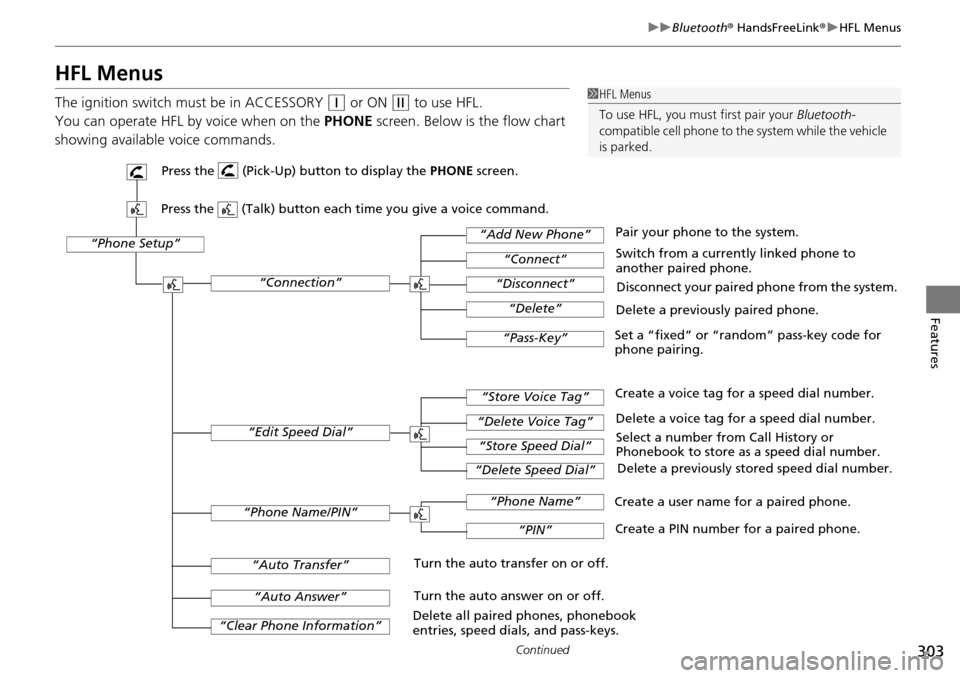
You can operate HFL by voice when on
the PHONE screen. Below is the flow chart
showing available voice commands.
1 HFL Menus
To use HFL, you must first pair your Bluetooth-
compatible cell phone to th e system while the vehicle
is parked.
“Phone Setup”
Delete a previously paired phone.
Switch from a currently linked phone to
another paired phone.
Pair your phone to the system.
Disconnect your paired phone from the system.
Set a “fixed” or “random” pass-key code for
phone pairing.
“Connection”
“Add New Phone”
“Connect”
“Disconnect”
“Delete”
“Pass-Key”
Delete a voice tag for a speed dial number.
Create a voice tag for a speed dial number.
Select a number from Call History or
Phonebook to store as a speed dial number. Delete a previously stored speed dial number.
“Edit Speed Dial”
“Store Voice Tag”
“Delete Voice Tag”
“Store Speed Dial”
“Delete Speed Dial”
Create a PIN number for a paired phone.
Create a user name for a paired phone.
“Phone Name/PIN”
“Phone Name”
“PIN”
“Clear Phone Information”
“Auto Answer”
“Auto Transfer”Turn the auto transfer on or off.
Turn the auto answer on or off.
Delete all paired phones, phonebook
entries, speed dials, and pass-keys.
Press the (Pick-Up) button to display the PHONE screen.
Press the (Talk) button each time you give a voice command.
Page 306 of 488
Continued305
uu Bluetooth ® HandsFreeLink ® u HFL Menus
Features
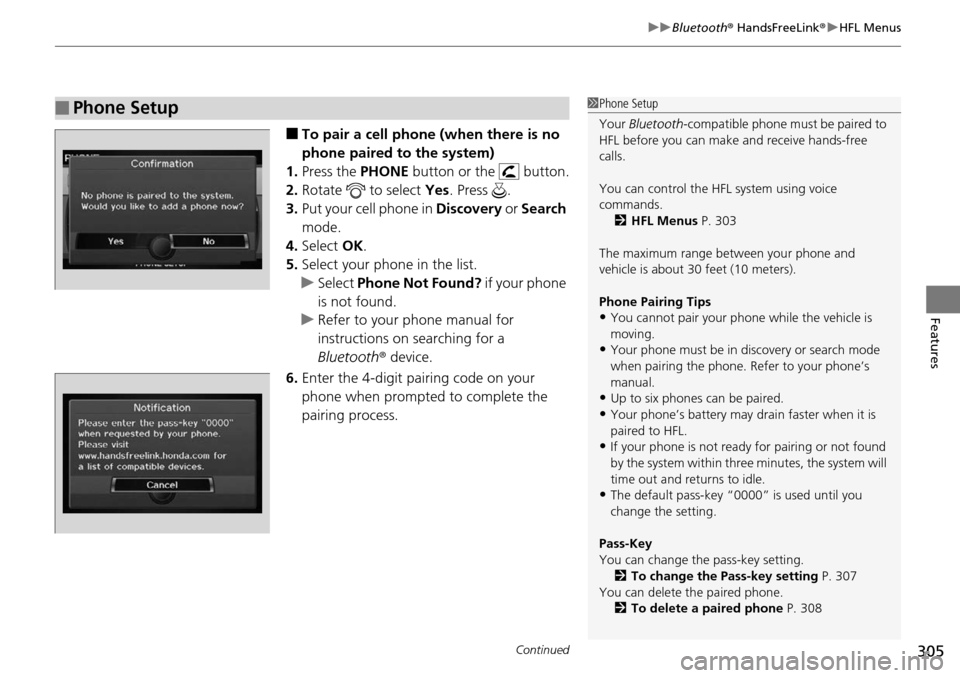
■To pair a cell phone (when there is no
phone paired to the system)
1. Press the PHONE b
utton or the button.
2. Ro
tate to select Yes. Press .
3. Put y
our cell phone in Discovery or Search
mode.
4. Select OK.
5. Select
your phone in the list.
u Select Ph
one Not Found? if your phone
is not found.
u R
efer to your phone manual for
instructions on searching for a
Bluetooth r device.
6. Enter th
e 4-digit pairing code on your
phone when prompted to complete the
pairing process.
■Phone Setup1Phone Setup
Your Bluetooth -compatible phone must be paired to
HFL before you can make and receive hands-free
calls.
You can control the HFL system using voice
commands. 2 HFL Menus P. 303
The maximum range be tween your phone and
vehicle is about 30 feet (10 meters).
Phone Pairing Tips
•You cannot pair your phone while the vehicle is
moving.
•Your phone must be in discovery or search mode
when pairing the phone. Refer to your phone’s
manual.
•Up to six phones can be paired.
•Your phone’s battery may dr ain faster when it is
paired to HFL.
•If your phone is not ready for pairing or not found
by the system within three minutes, the system will
time out and returns to idle.
•The default pass-key “0000” is used until you
change the setting.
Pass-Key
You can change the pass-key setting. 2 To change the Pass-key setting P. 307
You can delete the paired phone.
2 To delete a paired phone P. 308
Page 308 of 488
307
uu Bluetooth ® HandsFreeLink ® u HFL Menus
Continued
Features
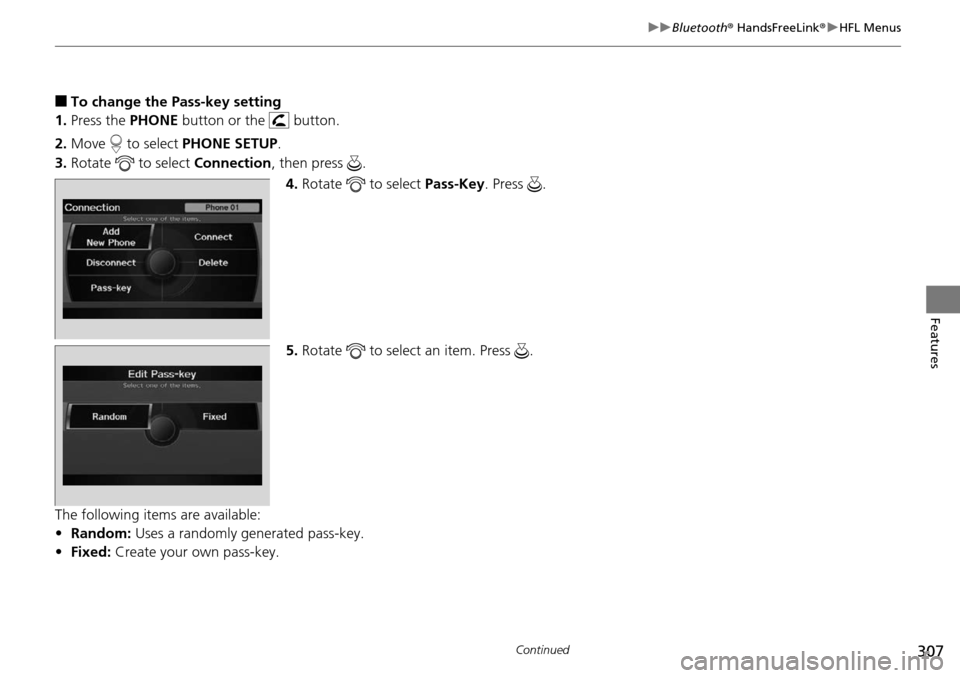
■To change the Pass-key setting
1. Press the PHONE button
or the button.
2. Mo
ve to select PH ONE SETUP.
3. Rota
te to select Co nnection, then press .
4. Ro
tate to select Pa ss-Key. Press .
5. Ro
tate to select an item. Press .
The following items are available:
• R
andom: Uses a randomly generated pass-key.
• Fixed: Create your own pass-key.
Page 309 of 488
308
uu Bluetooth ® HandsFreeLink ® u HFL Menus
Features
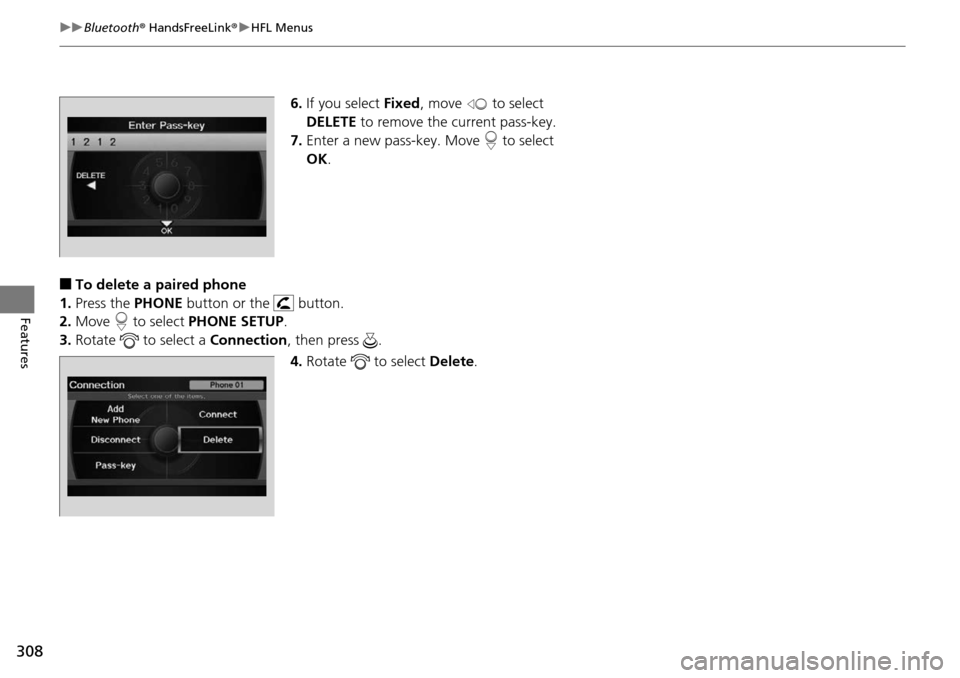
6. If you select Fixed, move to select
DELETE to rem
ove the current pass-key.
7. Enter a
new pass-key. Move to select
OK .
■To delete a paired phone
1. Press the PHONE bu
tton or the button.
2. Mo
ve to select PH ONE SETUP.
3. Rotate
to select a Co nnection, then press .
4. Ro
tate to select De lete.
Page 313 of 488
uu Bluetooth ® HandsFreeLink ® u HFL Menus
312
Features
All paired phones, phonebook entries, sp eed dials, and pass-keys are erased.
1.Press the PHONE button or the button.
2. Mo
ve to select PH ONE SETUP.
3. Rotate
to select Cle ar Phone Information , then press .
u I
f more than one phone is paired to the system, select the phone you want to
clear. The Bluetooth icon indicates the currently linked phone. Move to
select OK.
4. Rotate
to select Yes, then pr ess .
5. You will receive
a notification message on the screen. Rotate to select Ye s,
then press .
6. You will receive
a notification message on the screen. Rotate to finish.
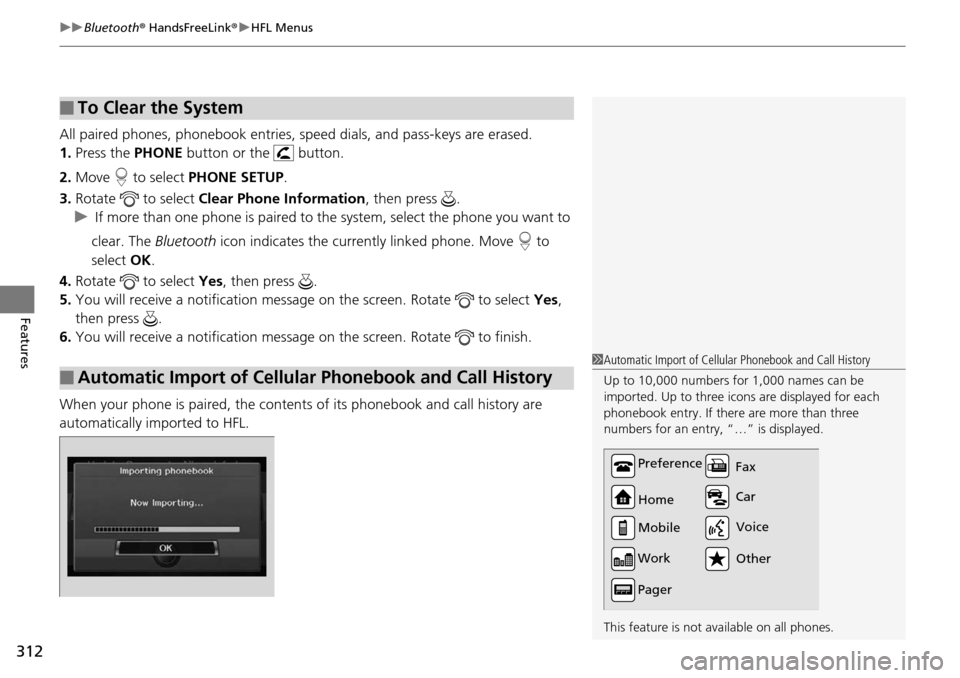
When your phone is paired, the contents of its phonebook and call history are
automatically importe
d to HFL.
■To Clear the System
■Automatic Import of Cellular Phonebook and Call History
1Automatic Import of Cellular Phonebook and Call History
Up to 10,000 numbers for 1,000 names can be
imported. Up to three icons are displayed for each
phonebook entry. If there are more than three
numbers for an entry, “…” is displayed.
This feature is not available on all phones.
Preference
Home
Mobile
Work
Pager Car Fax
Other Voice
Page 325 of 488
324
Driving
Before Driving
Driving Preparation
Check the following items before you start driving.
• Make sure there
are no obstructions on the windows, door mirrors, exterior
lights, or other parts of the vehicle.
u Remove
any frost, snow, or ice.
uRemove any sno
w on the roof, as this can slip down and obstruct your field of
vision while driving. If frozen solid , remove ice once it has softened.
u When r
emoving ice from around the wheels, be sure not to damage the wheel
or wheel components.
• Make sure the hood
is securely closed.
u If
the hood opens while driving, your front view will be blocked.
• Make sure the t
ires are in good condition.
u Check air
pressures, and check for damage and excessive wear.
2Checking and Maintaining Tires P. 414
• Make sure there are no people or ob jects behind or around the vehicle.
u There are blind
spots from the inside.
■Exterior Checks1Exterior Checks
NOTICE
When doors are frozen s hut, use warm water around
the door edges to melt any ice. Do not try to force
them open, as this can damage the rubber trim
around the doors. When done, wipe dry to avoid
further freezing.
Do not pour warm water into the key cylinder.
You will be unable to insert key if the water freezes in
the hole.
Heat from the engine and exhaust can ignite
flammable material s left under the hood, causing a
fire. If you've parked y our vehicle for an extended
period, inspect and remove any debris that may have
collected, such as dried grass and leaves that have
fallen or have been carried in for use as a nest by a
small animal. Also check under the hood for leftover
flammable materials after you or someone else has
performed maintenance on your vehicle.
Page 343 of 488
342
Driving
When Driving
Starting the Engine
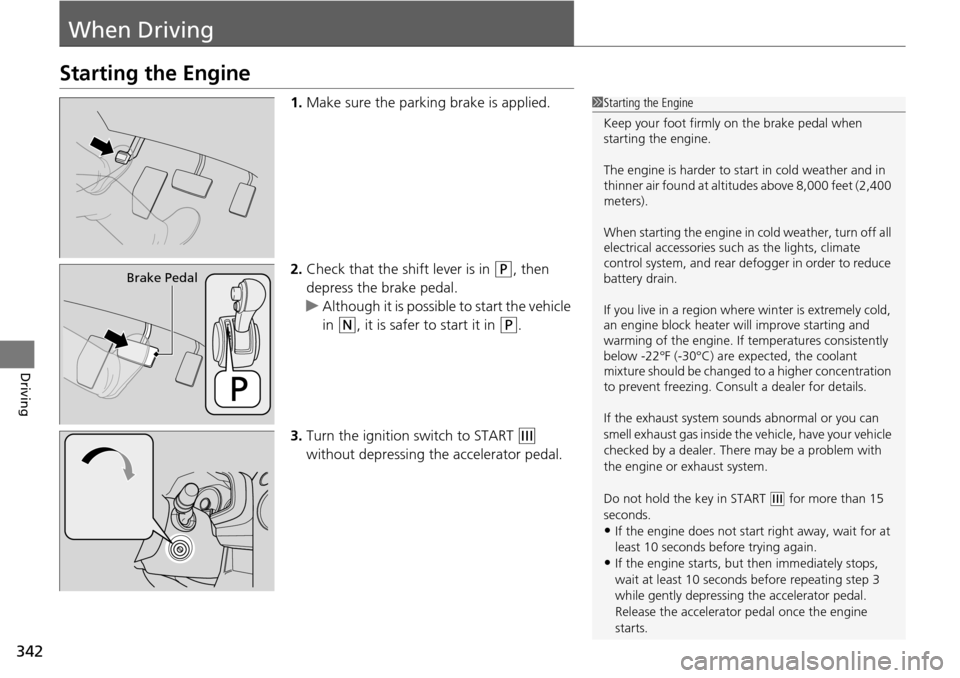
1.Make sure the parking brake is applied.
2. Check
that the shift lever is in (P
, then
depress the brake pedal.
u Althou
gh it is possible to start the vehicle
in
(N
, it is safer to start it in (P
.
3. Turn
the ignition switch to START (e
without depressing the accelerator pedal.
1 Starting the Engine
Keep your foot firmly on the brake pedal when
starting the engine.
The engine is harder to st art in cold weather and in
thinner air found at altitudes above 8,000 feet (2,400
meters).
When starting the engine in cold weather, turn off all
electrical accessories such as the lights, climate
control system, and rear de fogger in order to reduce
battery drain.
If you live in a region where winter is extremely cold,
an engine block heater will improve starting and
warming of the engine. If temperatures consistently
below -22°F (-30°C) are expected, the coolant
mixture should be changed to a higher concentration
to prevent freezing. Cons ult a dealer for details.
If the exhaust system sounds abnormal or you can
smell exhaust gas inside the vehicle, have your vehicle
checked by a dealer. There may be a problem with
the engine or exhaust system.
Do not hold the key in START
(
e
for more than 15
seconds.
•If the engine does not start right away, wait for at
least 10 seconds before trying again.
•If the engine starts, but then immediately stops,
wait at least 10 seconds before repeating step 3
while gently depressing the accelerator pedal.
Release the accelerator pedal once the engine
starts.
Brake Pedal
Page 344 of 488
343
uu When Driving u Starting the Engine
Driving
1. Keeping your right foot on the brake pedal, release the parking brake. Check that
the parking brake indicator has gone off.
2 Parking Brake P. 360
2. Put the shift lever in (D
. Select (R
when reversing.
3. Gradua
lly release the brake pedal and gently depress the accelerator pedal to pull
away.
■Hill start assist system
Hill start assist keeps the brake engaged br iefly to
help prevent the vehicle from
rolling on inclines as you move your foot from the brake pedal to the accelerator.
Move the shift lever to
(D
or (d
when facing uphill, or (R
when facing downhill,
then release the brake pedal.
■Starting to Drive1 Starting the Engine
The immobilizer system pr otects your vehicle from
theft. If an improperly code d key (or other device) is
used, the engine's fuel system is disabled.
2 Immobilizer System P. 118
1Hill start assist system
Hill start assist may not prevent the vehicle from
rolling downhill on a very st eep or slippery slope, and
does not operate on small inclines.
Hill start assist is not a replacement for the parking
brake.
Hill start assist will operate even when VSA ® is
switched off.