tow HONDA PILOT 2014 2.G Owner's Manual
[x] Cancel search | Manufacturer: HONDA, Model Year: 2014, Model line: PILOT, Model: HONDA PILOT 2014 2.GPages: 488, PDF Size: 12.11 MB
Page 338 of 488
337
uu Towing a Trailer u Towing Preparation
Driving
■Safety chains
Always use safety chains when you tow a
trailer. Leave enough slack to allow the
trailer to turn corners easily, but do not allow the chains to drag on the ground.
■Sway control
Recommended to use if your trailer tends to sway. Consult the t
railer maker for
what kind of sway control you need and how to install it.
■Automatic transm ission cooler
Install an additional ATF (automatic transmi ssio
n fluid) cooler to help prevent the
transmission from overheating, and damaging. You can get the additional ATF
cooler at a dealer.
■Trailer mirrors
Many states, provinces and territories requir e special exter
ior mirrors when towing a
trailer. Install special mirrors whenever you cannot clearly see behind you, or if the
trailer creates a blind spot.
2WD models
Page 339 of 488
338
uu Towing a Trailer u Driving Safely with a Trailer
Driving
Driving Safely with a Trailer
• Have the trailer properly serviced and keep it in good condition.
• Make sure that
all the weights and load in the vehicle and trailer are within limits.
2Towing Load Limits P. 329
• When towing more than 3,500lbs (1,590 kg), use of gasoline with a pump octane
number of 91 or higher is recommended.
u Towi
ng performance can be affected by high altitude, high temperature, or
steep uphill.
• Securely attach the hitch,
safety chains, and other necessary parts to the trailer.
• Securely stor
e all the items in and on the tr ailer so that they do not shift while
driving.
• Che
ck if the lights and brakes on the trailer are working properly.
• Che
ck the pressures of the traile r tires, including the spare.
• Drive slower than norm
al.
• Obey poste
d speed limits for vehicles with trailers.
• Use the
(D
position when towing a trailer on level roads.
• Turn
more slowly and with a wider turning arc than normal.
•Allow more
time and distance for braking.
• Do
not brake or turn suddenly.
■Things You Need To Know Before Towing a Trailer
■Towing Speeds and Gears
■Turning and Braking
1Driving Safely with a Trailer
Parking
In addition to the normal precautions, place wheel
chocks at each of the trailer's tires.
Page 340 of 488

339
uu Towing a Trailer u Towing Your Vehicle
Driving
• Monitor your temperature gauge. If it nears the red (Hot) mark, turn off the
climate control system and redu ce speed. Pull to the side of the road safely to cool
down the engine if necessary.
• Shift to the (d
position if the transmiss ion shifts frequently.
If the tires slip when retrieving a boat from the
water, shift to (1
, and turn on VTM-
4 r lock. Disengage VTM-4 r lock as soon as the boat is out of the water to prevent
damage to the VTM-4 r system.
Towing Your Vehicle
Your vehicle is not designed to be towed behind a motor home. If your vehicle needs
to be towed in an emergency, refer to the emergency towing information.
2Emergency Towing P. 459
■Driving in Hilly Terrain
■Retrieving a Boat
Page 342 of 488
341
uu Off-Highway Driving Guidelines u Avoiding Trouble
Driving
Avoiding Trouble
• Check Out Your Vehicle before you leave the pavement and make sure that all
scheduled maintenance has been completed. Pay special attention to the
condition of the tires, and check the tire pressures.
• Remember the route
you choose presents limits (too steep or bumpy), you have
limits (driving skill and comfort), and your vehicle has limits (traction, stability, and
power). Failing to recognize these limits will likely put you and your passengers in
a hazardous situation.
• Ac
celerating and Braking should be done slowly and gradually. Trying to start
or stop too fast can cause a loss of traction and you could lose control.
• Av
oiding Obstacles and Debris in the road reduces the likelihood of a rollover
or damage to your suspension or other components.
• Dri
ving on Slopes increasing your risk of a rollove r, particularly if you attempt to
drive across a slope that is too steep. Going straight or down a slope is usually the
safest. If you can’t clearly see all conditions or obstacles on a slope, walk it before
you drive it. If there is any doubt whether you can safely pass, don’t try it. Find
another route. If you get stuck when climbing, do not try to turn around. Back
down slowly following the same route you took up the hill.
• Cros
sing a Stream - Avoid driving through deep water. If you encounter water
in your route (a small stream or large pu ddle, for example), evaluate it carefully
before going ahead. Make sure it is shallow, flowing slowly, and has firm ground
underneath. If you are not sure of the depth or the ground, turn around and find
another route. Driving through deep water can also damage your vehicle. The
water can get into the transmission and di fferential, diluting the lubricant and
causing an eventual failure. It can also wash the grease out of the wheel bearings.
• If Yo
u Get Stuck , carefully go in the direction that you think will get you
unstuck. Do not spin the tires as this will only make things worse and could
damage the transmission. If you are unable to free yourself, your vehicle will need
to be towed. Front and rear tow ho oks are provided for this purpose.
Page 347 of 488
346
uu When Driving u Shifting
Driving
Shifting
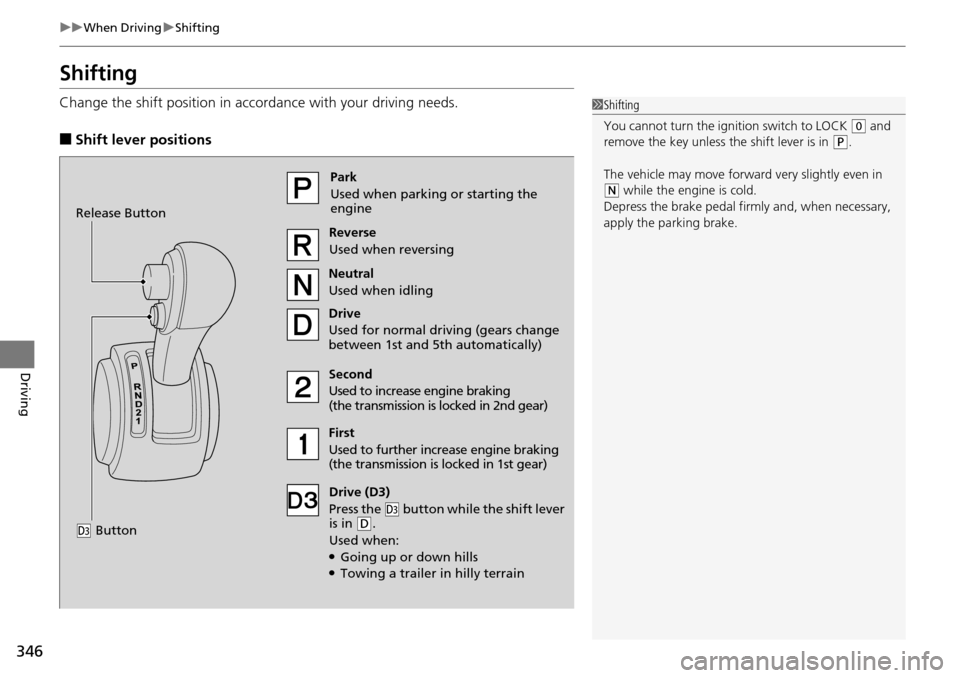
Change the shift positi on in accordance with your driving needs.
■Shift lever positions
1Shifting
You cannot turn the ignition switch to LOCK
(
0
and
remove the key unless the shift lever is in
(
P
.
The vehicle may move forward very slightly even in
(
N
while the engine is cold.
Depress the brake pe dal firmly and, when necessary,
apply the parking brake.Park
Used when parking or starting the
engine
Reverse
Used when reversing
Neutral
Used when idling
Drive
Used for normal driving (gears change
between 1st and 5th automatically)
Drive (D3)
Press the
(
d
button while the shift lever
is in (
D
.
Used when:
●Going up or down hills●Towing a trailer in hilly terrain
Second
Used to increase engine braking
(the transmission is locked in 2nd gear)
First
Used to further increase engine braking
(the transmission is locked in 1st gear)
Release Button
(
d
Button
Page 384 of 488
383
uu Maintenance Minder™ u To Use Maintenance MinderTM
Continued
Maintenance
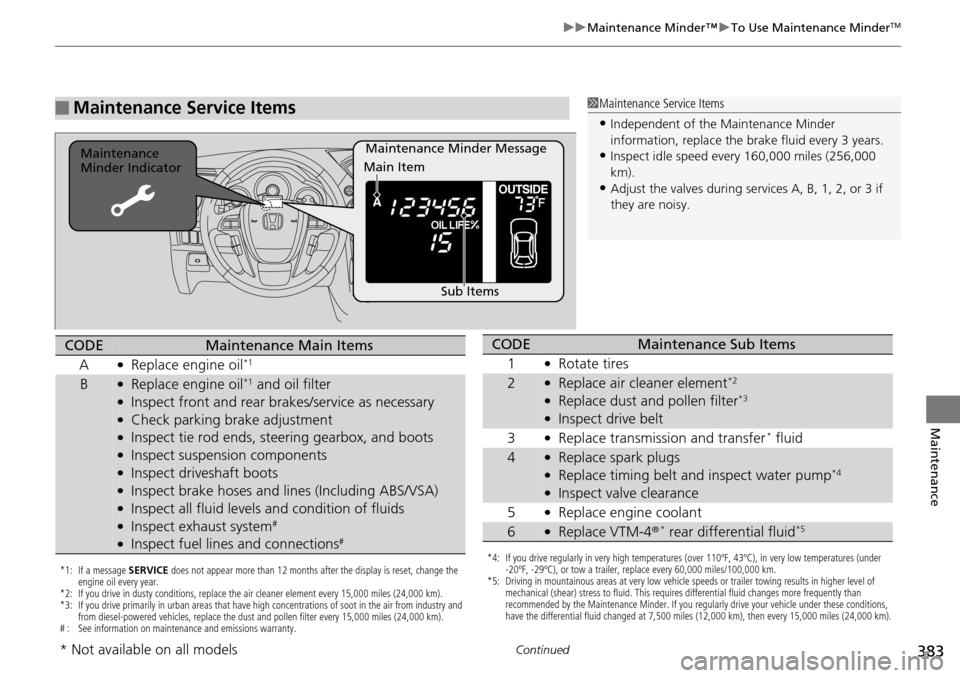
■Maintenance Service Items1Maintenance Service Items
•Independent of the Maintenance Minder
information, replace the brake fluid every 3 years.
•Inspect idle speed every 160,000 miles (256,000
km).
•Adjust the valves during services A, B, 1, 2, or 3 if
they are noisy.
Maintenance Minder Message
Maintenance
Minder Indicator
Sub Items
Main Item
*1: If a message
SERVICE does not appear more than 12 months after the display is reset, change the
engine oil every year.
*2: If you drive in dusty conditions, replace the air cleaner element every 15,000 miles (24,000 km).
*3: If you drive primarily in urban areas that have high concentrations of soot in the air from industry and from diesel-powered vehicles, replace the dust and pollen filter every 15,000 miles (24,000 km).
# : See information on maintenance and emissions warranty.
CODEMaintenance Main Items
A
●Replace engine oil*1
B●Replace engine oil*1 and oil filter●Inspect front and rear bra kes/service as necessary●Check parking brake adjustment●Inspect tie rod ends, steering gearbox, and boots●Inspect suspension components●Inspect driveshaft boots●Inspect brake hoses and li nes (Including ABS/VSA)●Inspect all fluid levels and condition of fluids●Inspect exhaust system#
●Inspect fuel lines and connections#
*4: If you drive regularly in very high temperatures (over 110ºF, 43ºC), in very low temperatures (under
-20ºF, -29ºC), or tow a trailer, replace every 60,000 miles/100,000 km.
*5: Driving in mountainous areas at very low vehicle speeds or trailer towing results in higher level of mechanical (shear) stress to fluid. This requires differential fluid changes more frequently than
recommended by the Maintenance Minder. If you regularly drive your vehicle under these conditions,
have the differential fluid changed at 7,500 miles (12,000 km), then every 15,000 miles (24,000 km).
CODEMaintenance Sub Items
1
●Rotate tires
2●Replace air cleaner element*2
●Replace dust and pollen filter*3
●Inspect drive belt
3
●Replace transmission and transfer * fluid
4●Replace spark plugs●Replace timing belt and inspect water pump*4
●Inspect valve clearance
5
●Replace engine coolant
6●Replace VTM-4 r * rear differential fluid*5
* Not available on all models
Page 388 of 488
387
uu Maintenance Minder™ u To Use Maintenance MinderTM
Continued
Maintenance
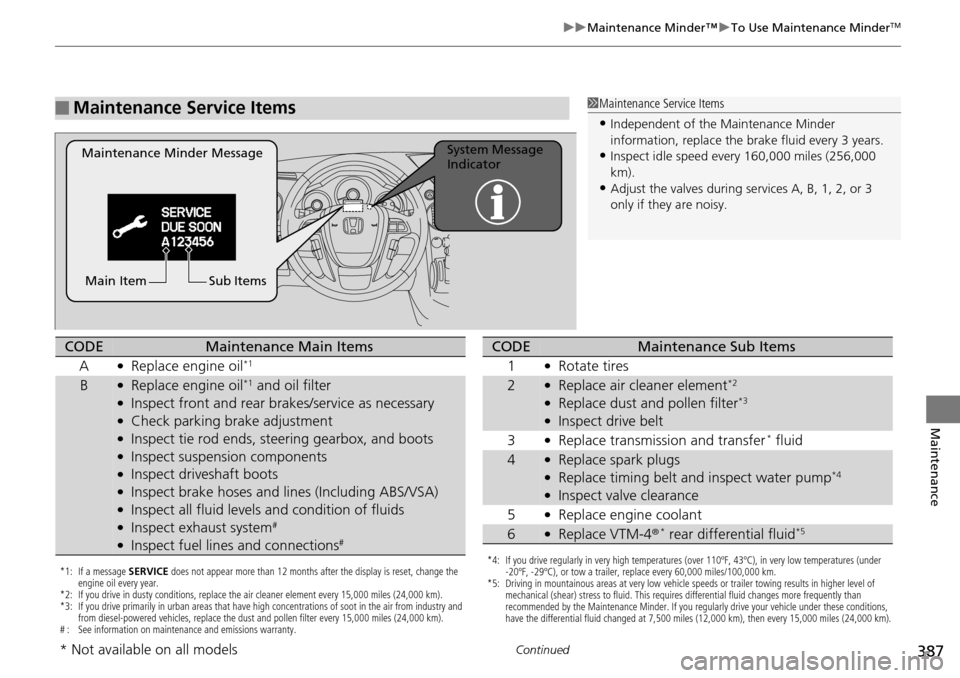
■Maintenance Service Items1Maintenance Service Items
•Independent of the Maintenance Minder
information, replace the brake fluid every 3 years.
•Inspect idle speed every 160,000 miles (256,000
km).
•Adjust the valves during services A, B, 1, 2, or 3
only if they are noisy.
Maintenance Minder Message System Message
Indicator
Sub Items
Main Item
*1: If a message SERVICE does not appear more than 12 months after the display is reset, change the
engine oil every year.
*2: If you drive in dusty conditions, replace the air cleaner element every 15,000 miles (24,000 km).
*3: If you drive primarily in urban areas that have high concentrations of soot in the air from industry and from diesel-powered vehicles, replace the dust and pollen filter every 15,000 miles (24,000 km).
# : See information on maintenance and emissions warranty.
CODEMaintenance Main Items
A
●Replace engine oil*1
B●Replace engine oil*1 and oil filter●Inspect front and rear bra kes/service as necessary●Check parking brake adjustment●Inspect tie rod ends, steering gearbox, and boots●Inspect suspension components●Inspect driveshaft boots●Inspect brake hoses and li nes (Including ABS/VSA)●Inspect all fluid levels and condition of fluids●Inspect exhaust system#
●Inspect fuel lines and connections#
*4: If you drive regularly in very high temperatures (over 110ºF, 43ºC), in very low temperatures (under
-20ºF, -29ºC), or tow a trailer, replace every 60,000 miles/100,000 km.
*5: Driving in mountainous areas at very low vehicle speeds or trailer towing results in higher level of mechanical (shear) stress to fluid. This requires differential fluid changes more frequently than
recommended by the Maintenance Minder. If you regularly drive your vehicle under these conditions,
have the differential fluid changed at 7,500 miles (12,000 km), then every 15,000 miles (24,000 km).
CODEMaintenance Sub Items
1
●Rotate tires
2●Replace air cleaner element*2
●Replace dust and pollen filter*3
●Inspect drive belt
3
●Replace transmission and transfer * fluid
4●Replace spark plugs●Replace timing belt and inspect water pump*4
●Inspect valve clearance
5
●Replace engine coolant
6●Replace VTM-4 r * rear differential fluid*5
* Not available on all models
Page 391 of 488

390
uu Maintenance Under the Hood u Opening the Hood
Maintenance
Opening the Hood
1. Park the vehicle on a level surface, and set
the parking brake.
2. Pul
l the hood release handle under the
lower left corner of the dashboard.
u Th
e hood will pop up slightly.
3. Pus
h up the hood latch lever in the center
of the hood to release the lock mechanism,
and open the hood.
4. R
emove the support rod from the clamp
using the grip. Mount the support rod in
the hood.
When closing, remove the support rod,
and
stow it in the clamp, then gently lower the
hood. Remove your hand at a height of
approximately 12 inches (30 cm) and let the
hood close.
1 Opening the Hood
NOTICE
Do not open the hood when the wiper arms are
raised.
The hood will strike the wipers, and may damage
either the hood or the wipers.
When closing the hood, check that the hood is
securely latched.
If the hood latch lever moves stiffly, or if you can
open the hood without lifti ng the lever, the latch
mechanism should be cl eaned and lubricated.
Hood Release Handle
Pull
Lever
Support Rod
Grip
Clamp
Page 394 of 488
393
uu Maintenance Under the Hood u Oil Check
Maintenance
Oil Check
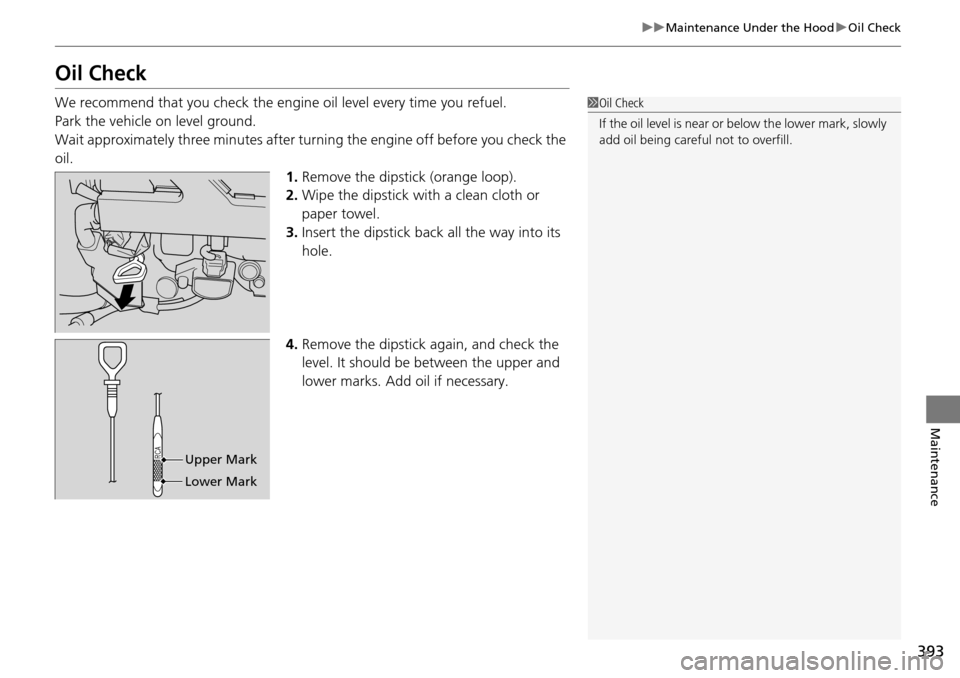
We recommend that you check the engine oil level every time you refuel.
Park the vehicle on level ground.
Wait approximately three minutes after turn ing the e
ngine off before you check the
oil. 1.Remov
e the dipstick (orange loop).
2.Wi
pe the dipstick with a clean cloth or
paper towel.
3. Insert
the dipstick back all the way into its
hole.
4. Remove the
dipstick again, and check the
level. It should be between the upper and
lower marks. Add oil if necessary.
1 Oil Check
If the oil level is near or below the lower mark, slowly
add oil being careful not to overfill.
Upper Mark
Lower Mark
Page 403 of 488
402
Maintenance
Replacing Light Bulbs
Headlight Bulbs
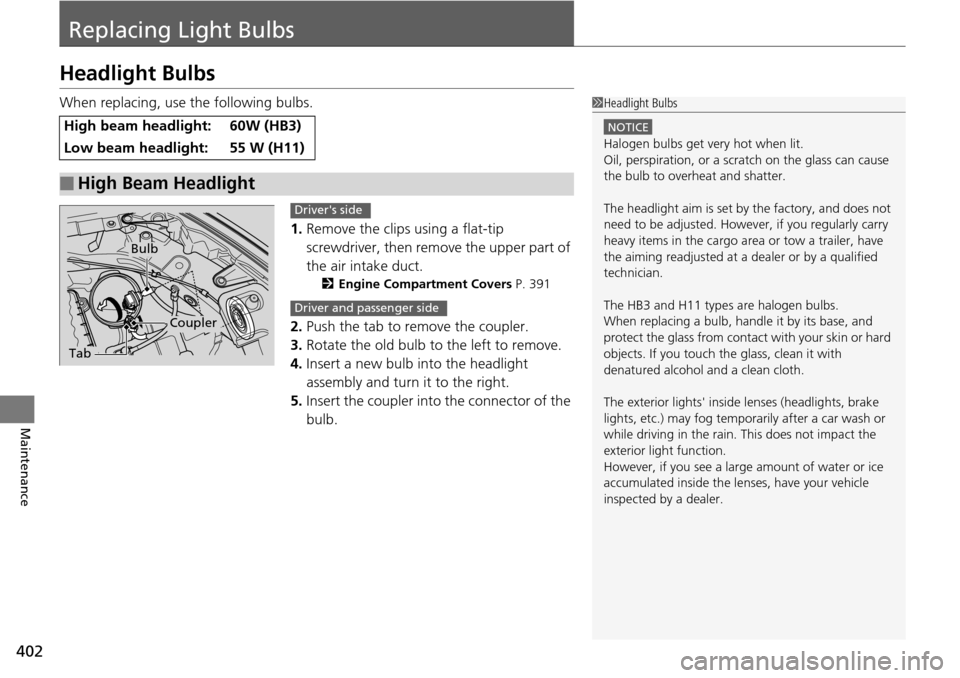
When replacing, use the following bulbs.1.Re
move the clips using a flat-tip
screwdriver, then remove the upper part of
the air intake duct.
2 Engine Compartment Covers P. 391
2.Push the tab to remove the coupler.
3. Rotat
e the old bulb to the left to remove.
4.In
sert a new bulb into the headlight
assembly and turn it to the right.
5. Insert
the coupler into the connector of the
bulb.
High beam headlight:60W (HB3)
Low beam headlight:55 W (H11)
■High Beam Headlight
1Headlight Bulbs
NOTICE
Halogen bulbs get very hot when lit.
Oil, perspiration, or a scratch on the glass can cause
the bulb to overhe at and shatter.
The headlight aim is set by the factory, and does not
need to be adjusted. Howeve r, if you regularly carry
heavy items in the cargo area or tow a trailer, have
the aiming readjusted at a dealer or by a qualified
technician.
The HB3 and H11 types are halogen bulbs.
When replacing a bulb, ha ndle it by its base, and
protect the glass from contact with your skin or hard
objects. If you touch the glass, clean it with
denatured alcohol and a clean cloth.
The exterior lights' inside lenses (headlights, brake
lights, etc.) may fog temporarily after a car wash or
while driving in the rain. This does not impact the
exterior light function.
However, if you see a larg e amount of water or ice
accumulated inside the le nses, have your vehicle
inspected by a dealer.
Tab
Coupler
Bulb
Driver's side
Driver and passenger side