ad blue HONDA PILOT 2015 2.G Workshop Manual
[x] Cancel search | Manufacturer: HONDA, Model Year: 2015, Model line: PILOT, Model: HONDA PILOT 2015 2.GPages: 488, PDF Size: 11.34 MB
Page 314 of 488
Continued313
uuBluetooth ® HandsFreeLink ®u HFL Menus
Features
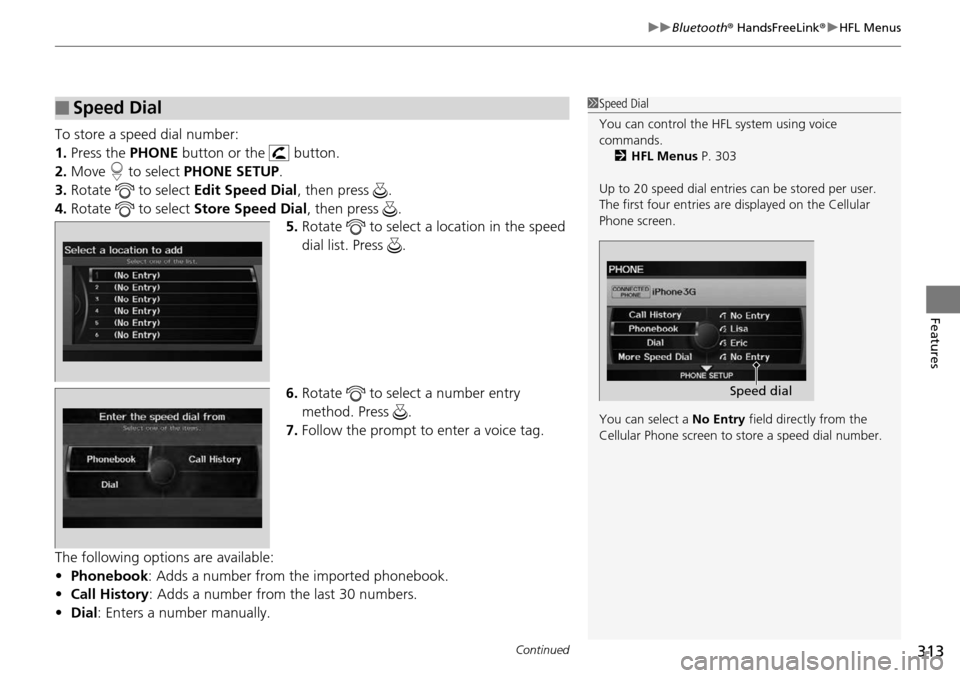
To store a speed dial number:
1. Press the PHONE button or the button.
2. Move to select PHONE SETUP.
3. Rotate to select Edit Speed Dial, then press .
4. Rotate to select Store Speed Dial, then press .
5. Rotate to select a location in the speed
dial list. Press .
6. Rotate to select a number entry
method. Press .
7. Follow the prompt to enter a voice tag.
The following options are available:
• Phonebook: Adds a number from the imported phonebook.
• Call History : Adds a number from the last 30 numbers.
• Dial : Enters a number manually.
■Speed Dial1Speed Dial
You can control the HFL system using voice
commands.
2 HFL Menus P. 303
Up to 20 speed dial entries can be stored per user.
The first four entries are displayed on the Cellular
Phone screen.
You can select a No Entry field directly from the
Cellular Phone screen to store a speed dial number.
Speed dial
Page 315 of 488
uuBluetooth ® HandsFreeLink ®u HFL Menus
314
Features
■To add a voice tag to a stored speed dial number
1. Press the PHONE button or the button.
2. Move to select PHONE SETUP.
3. Rotate to select Edit Speed Dial, then press .
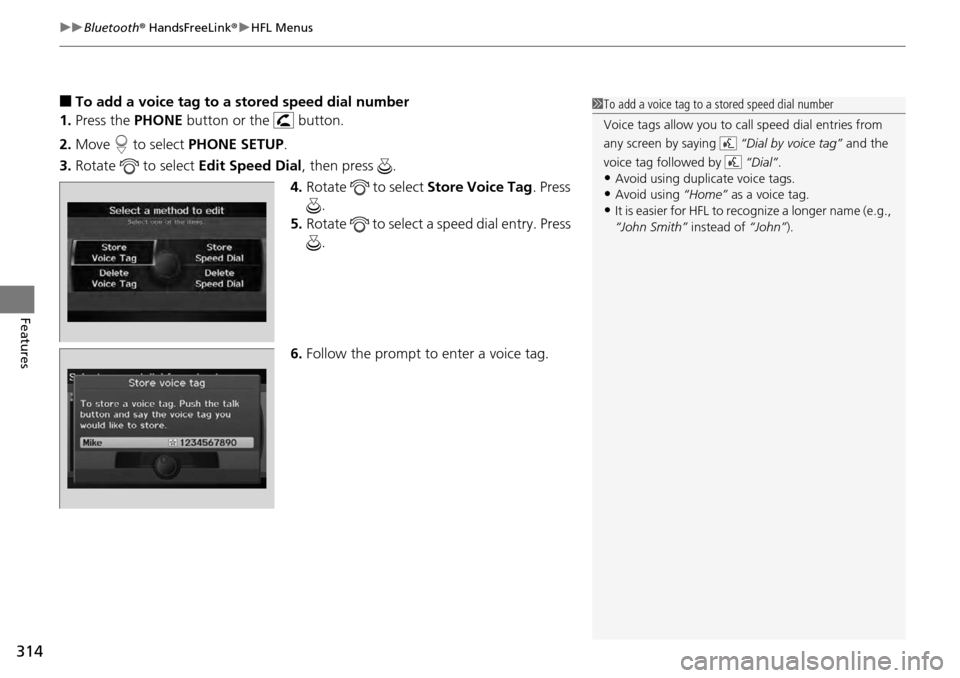
4. Rotate to select Store Voice Tag. Press
.
5. Rotate to select a speed dial entry. Press
.
6. Follow the prompt to enter a voice tag.1To add a voice tag to a stored speed dial number
Voice tags allow you to call speed dial entries from
any screen by saying “Dial by voice tag” and the
voice tag followed by “Dial”.
•Avoid using duplicate voice tags.•Avoid using “Home” as a voice tag.
•It is easier for HFL to recognize a longer name (e.g.,
“John Smith” instead of “John”).
Page 316 of 488
315
uuBluetooth ® HandsFreeLink ®u HFL Menus
Continued
Features
■To delete a voice tag
1. Press the PHONE button or the button.
2. Move to select PHONE SETUP.
3. Rotate to select Edit Speed Dial, then press .
4. Rotate to select Delete Voice Tag. Press .
5. Rotate to select the number you want to delete the voice tag for. Move to
select OK.
■To delete a speed dial number
1. Press the PHONE button or the button.
2. Move to select PHONE SETUP.
3. Rotate to select Edit Speed Dial, then press .
4. Rotate to select Delete Speed Dial. Press .
5. Rotate to select the entry you want to delete. Move to select OK.
Page 317 of 488
uuBluetooth ® HandsFreeLink ®u HFL Menus
316
Features
You can make calls by inpu tting any phone number, or by using the imported
phonebook, call history, or speed dial entries.
■Making a Call1 Making a Call
You can control the HFL system using voice
commands.
2 HFL Menus P. 303
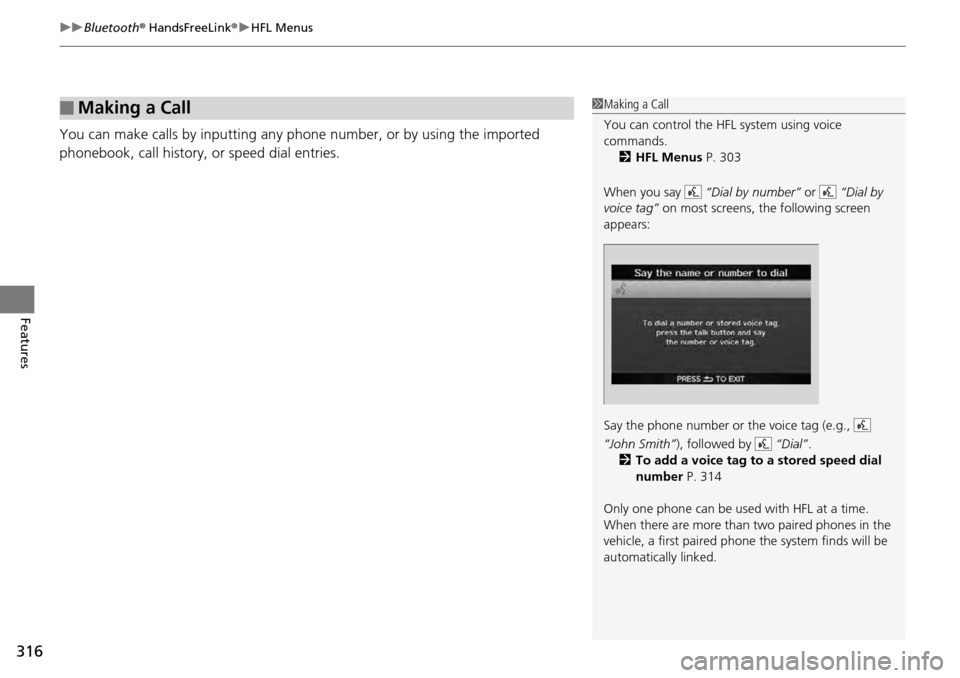
When you say “Dial by number” or “Dial by
voice tag” on most screens, the following screen
appears:
Say the phone number or the voice tag (e.g.,
“John Smith” ), followed by “Dial”.
2 To add a voice tag to a stored speed dial
number P. 314
Only one phone can be used with HFL at a time.
When there are more than two paired phones in the
vehicle, a first paired phone the system finds will be
automatically linked.
Page 318 of 488
Continued317
uuBluetooth ® HandsFreeLink ®u HFL Menus
Features
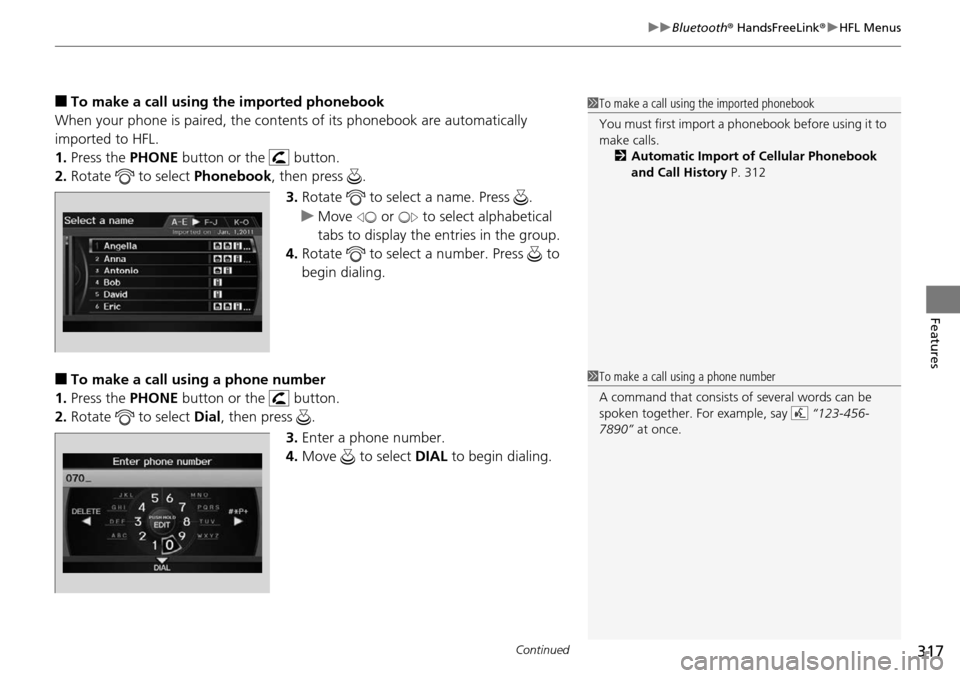
■To make a call using the imported phonebook
When your phone is paired, the conten ts of its phonebook are automatically
imported to HFL.
1. Press the PHONE button or the button.
2. Rotate to select Phonebook, then press .
3. Rotate to select a name. Press .
u Move or to select alphabetical
tabs to display the entries in the group.
4. Rotate to select a number. Press to
begin dialing.
■To make a call using a phone number
1. Press the PHONE button or the button.
2. Rotate to select Dial, then press .
3.Enter a phone number.
4. Move to select DIAL to begin dialing.
1To make a call using the imported phonebook
You must first import a phonebook before using it to
make calls.
2 Automatic Import of Cellular Phonebook
and Call History P. 312
1To make a call using a phone number
A command that consists of several words can be
spoken together. For example, say “123-456-
7890” at once.
Page 319 of 488
uuBluetooth ® HandsFreeLink ®u HFL Menus
318
Features
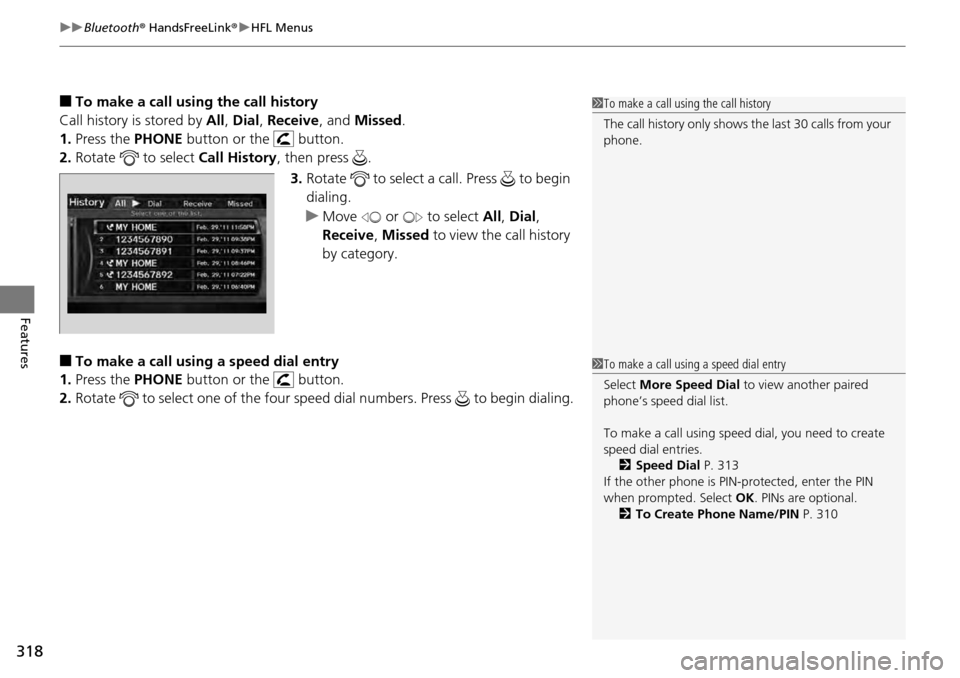
■To make a call usin g the call history
Call history is stored by All, Dial , Receive , and Missed .
1. Press the PHONE button or the button.
2. Rotate to select Call History, then press .
3. Rotate to select a call. Press to begin
dialing.
u Move or to select All, Dial ,
Receive , Missed to view the call history
by category.
■To make a call using a speed dial entry
1. Press the PHONE button or the button.
2. Rotate to select one of the four speed dial numbers. Press to begin dialing.
1To make a call using the call history
The call history only shows th e last 30 calls from your
phone.
1 To make a call using a speed dial entry
Select More Speed Dial to view another paired
phone’s speed dial list.
To make a call using speed dial, you need to create
speed dial entries. 2 Speed Dial P. 313
If the other phone is PIN- protected, enter the PIN
when prompted. Select OK. PINs are optional.
2 To Create Phone Name/PIN P. 310
Page 320 of 488
319
uuBluetooth ® HandsFreeLink ®u HFL Menus
Features
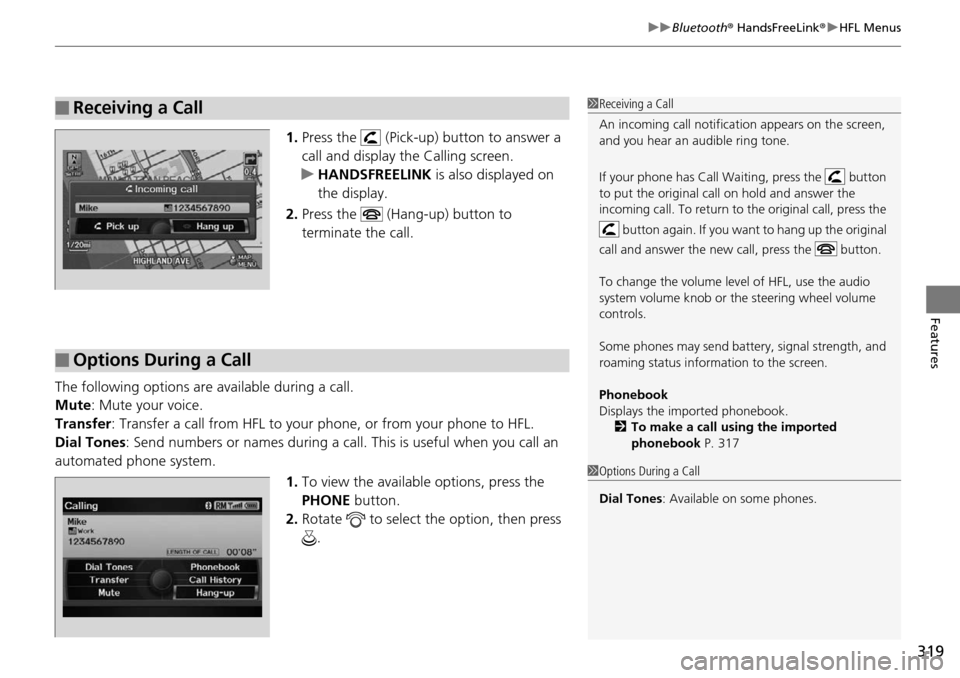
1. Press the (Pick-up) button to answer a
call and display the Calling screen.
u HANDSFREELINK is also displayed on
the display.
2. Press the (Hang-up) button to
terminate the call.
The following options are available during a call.
Mute : Mute your voice.
Transfer: Transfer a call from HFL to your phone, or from your phone to HFL.
Dial Tones : Send numbers or names during a call. This is useful when you call an
automated phone system.
1.To view the availabl e options, press the
PHONE button.
2. Rotate to select the option, then press
.
■Receiving a Call1Receiving a Call
An incoming call notificat ion appears on the screen,
and you hear an audible ring tone.
If your phone has Call Wa iting, press the button
to put the original call on hold and answer the
incoming call. To return to the original call, press the
button again. If you want to hang up the original
call and answer the new call, press the button.
To change the volume level of HFL, use the audio
system volume knob or the steering wheel volume
controls.
Some phones may send batter y, signal strength, and
roaming status information to the screen.
Phonebook
Displays the imported phonebook. 2 To make a call using the imported
phonebook P. 317
■Options During a Call
1Options During a Call
Dial Tones : Available on some phones.
Page 335 of 488
uuTowing a Trailer uTowing Preparation
334
Driving
■Trailer brakes
Recommended for any trailer with a total weight of 1,000 lbs (450 kg) or more:
There are two common types of trailer brake s: surge and electric. Surge brakes are
common for boat trailers, since the brakes will get wet.
If you choose electric brakes, be sure th ey are electronically actuated. Do not
attempt to attach trailer brakes to your ve hicle's hydraulic system, as it will lower
braking effectiveness and create a potential hazard.
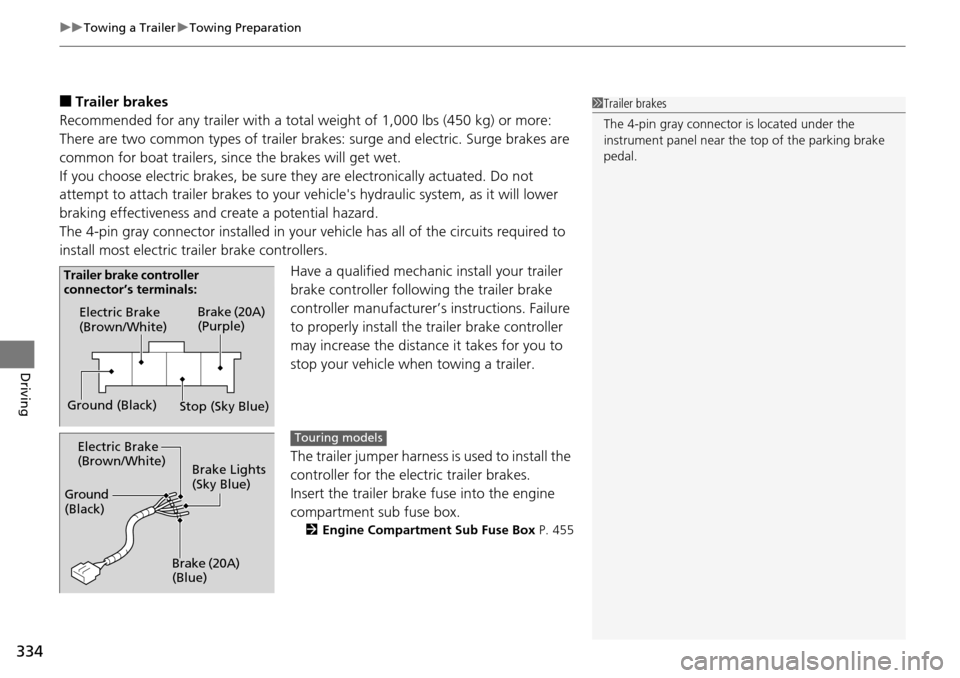
The 4-pin gray connector installed in your ve hicle has all of the circuits required to
install most electric trailer brake controllers.
Have a qualified mechanic install your trailer
brake controller following the trailer brake
controller manufacturer’ s instructions. Failure
to properly install the trailer brake controller
may increase the distance it takes for you to
stop your vehicle when towing a trailer.
The trailer jumper harness is used to install the
controller for the electric trailer brakes.
Insert the trailer brake fuse into the engine
compartment sub fuse box.
2 Engine Compartment Sub Fuse Box P. 455
1Trailer brakes
The 4-pin gray connector is located under the
instrument panel near the top of the parking brake
pedal.
Electric Brake
(Brown/White)
Ground (Black) Brake (20A)
(Purple)
Stop (Sky Blue)
Trailer brake controller
connector’s terminals:
Electric Brake
(Brown/White)
Ground
(Black)
Brake (20A)
(Blue)Brake Lights
(Sky Blue)Touring models
Page 336 of 488
Continued335
uuTowing a Trailer uTowing Preparation
Driving
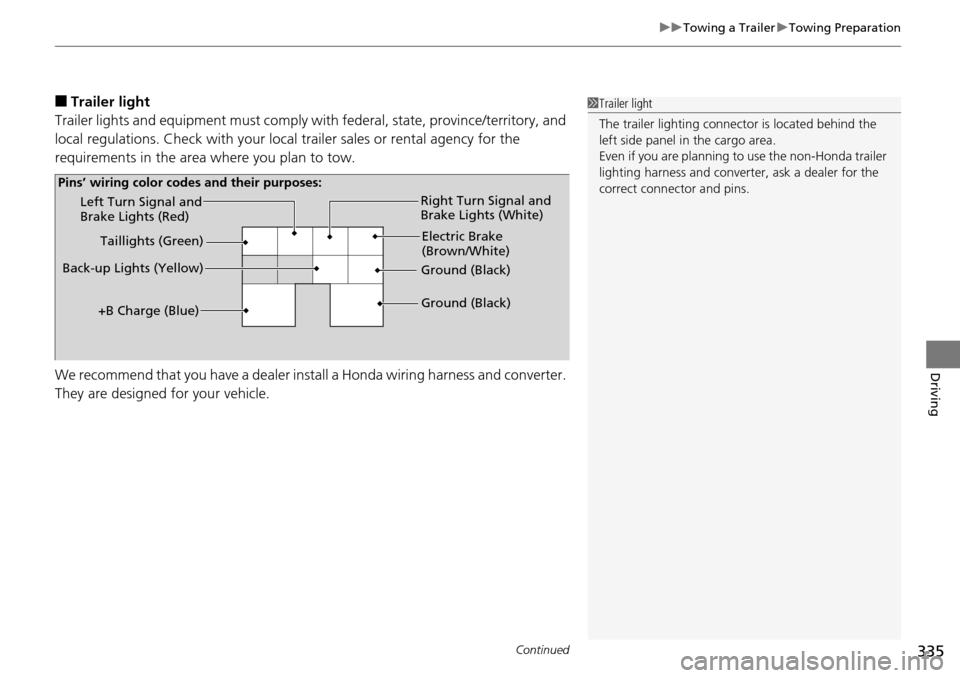
■Trailer light
Trailer lights and equipment must comply with federal, state, province/territory, and
local regulations. Check with your local trailer sales or rental agency for the
requirements in the area where you plan to tow.
We recommend that you have a dealer install a Honda wiring harness and converter.
They are designed for your vehicle.1 Trailer light
The trailer lighting connect or is located behind the
left side panel in the cargo area.
Even if you are planning to use the non-Honda trailer
lighting harness and converte r, ask a dealer for the
correct connector and pins.
Left Turn Signal and
Brake Lights (Red)
Back-up Lights (Yellow) Electric Brake
(Brown/White)
Right Turn Signal and
Brake Lights (White)
Ground (Black)
Ground (Black)
Taillights (Green)
+B Charge (Blue)
Pins’ wiring color code s and their purposes:
Page 337 of 488
336
uuTowing a Trailer uTowing Preparation
Driving
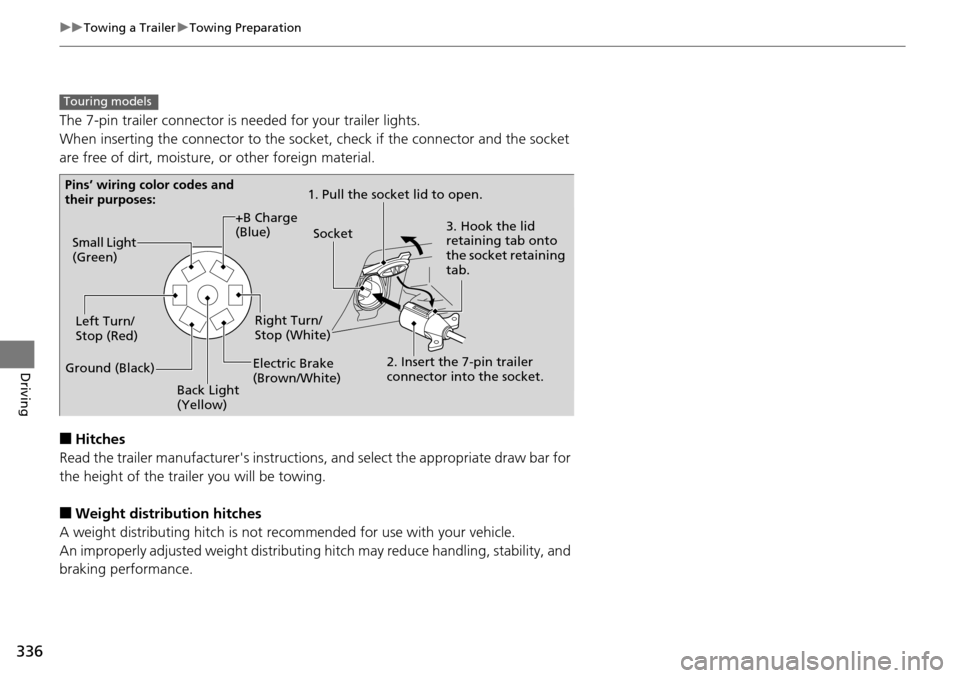
The 7-pin trailer connector is needed for your trailer lights.
When inserting the connector to the socket, check if the connector and the socket
are free of dirt, moisture, or other foreign material.
■Hitches
Read the trailer manufacturer's instructions , and select the appropriate draw bar for
the height of the trailer you will be towing.
■Weight distribution hitches
A weight distributing hitch is not recommended for use with your vehicle.
An improperly adjusted weight distributing hitch may reduce handling, stability, and
braking performance.
Touring models
Pins’ wiring color codes and
their purposes: 1. Pull the socket lid to open.
3. Hook the lid
retaining tab onto
the socket retaining
tab.
2. Insert the 7-pin trailer
connector into the socket.
Socket
Back Light
(Yellow)
Left Turn/
Stop (Red)
Electric Brake
(Brown/White)Right Turn/
Stop (White)
Ground (Black) Small Light
(Green)
+B Charge
(Blue)