language HONDA PILOT 2015 2.G Owners Manual
[x] Cancel search | Manufacturer: HONDA, Model Year: 2015, Model line: PILOT, Model: HONDA PILOT 2015 2.GPages: 488, PDF Size: 11.34 MB
Page 92 of 488
91
uuGauges and Displays uMulti-Information Display*
Continued
Instrument Panel
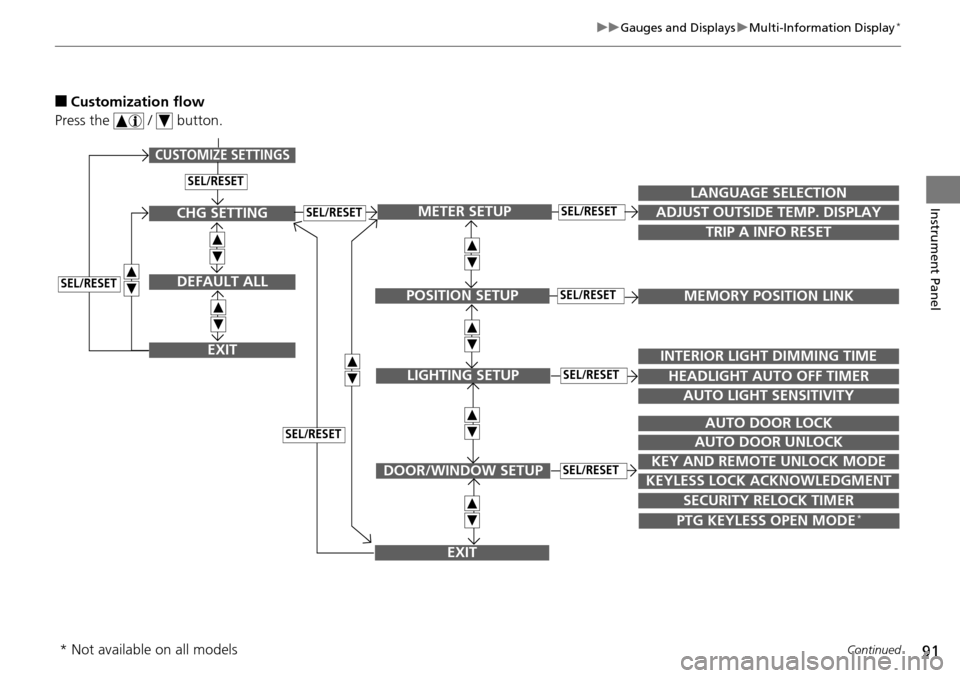
■Customization flow
Press the / button.
SEL/RESET
CUSTOMIZE SETTINGS
SECURITY RELOCK TIMER
TRIP A INFO RESET
LANGUAGE SELECTION
ADJUST OUTSIDE TEMP. DISPLAY
MEMORY POSITION LINK
INTERIOR LIGHT DIMMING TIME
HEADLIGHT AUTO OFF TIMER
AUTO LIGHT SENSITIVITY
AUTO DOOR LOCK
AUTO DOOR UNLOCK
KEY AND REMOTE UNLOCK MODE
KEYLESS LOCK ACKNOWLEDGMENT
METER SETUP
POSITION SETUP
LIGHTING SETUP
DOOR/WINDOW SETUP
SEL/RESET
SEL/RESET
SEL/RESET
SEL/RESET
PTG KEYLESS OPEN MODE*
EXIT
CHG SETTING
DEFAULT ALL
EXIT
SEL/RESET
SEL/RESET
SEL/RESET
* Not available on all models
Page 93 of 488
92
uuGauges and Displays uMulti-Information Display*
Instrument Panel
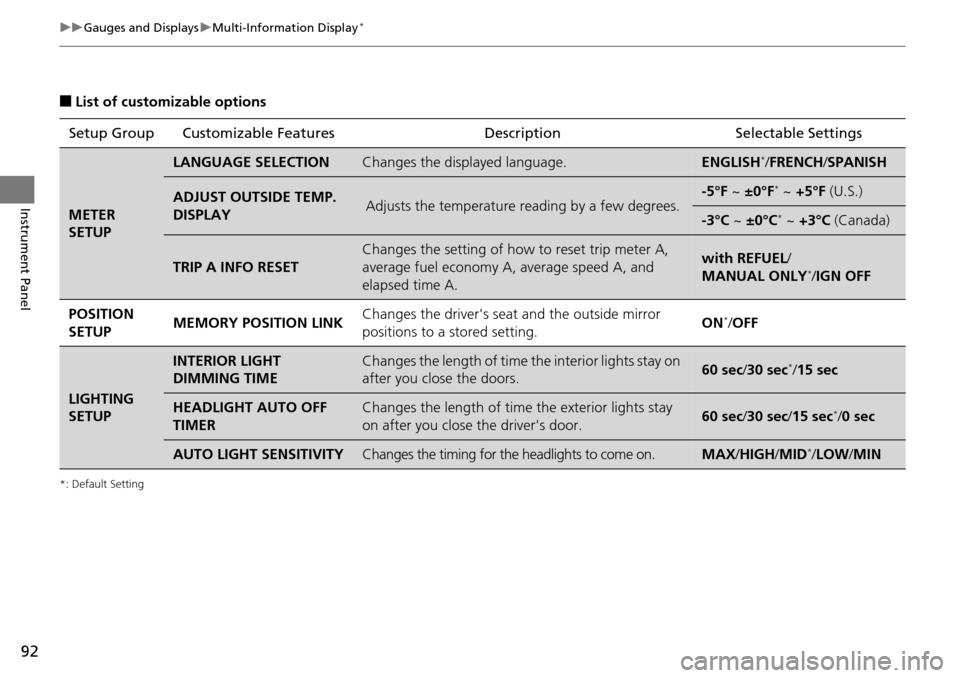
■List of customizable options
*: Default Setting
Setup Group Customizable Features DescriptionSelectable Settings
METER
SETUP
LANGUAGE SELECTIONChanges the displayed language.ENGLISH*/FRENCH /SPANISH
ADJUST OUTSIDE TEMP.
DISPLAYAdjusts the temperature reading by a few degrees.-5°F ~ ±0°F* ~ +5°F (U.S.)
-3°C ~ ±0°C* ~ +3°C (Canada)
TRIP A INFO RESET
Changes the setting of how to reset trip meter A,
average fuel economy A, average speed A, and
elapsed time A.with REFUEL /
MANUAL ONLY*/ IGN OFF
POSITION
SETUP MEMORY POSITION LINK
Changes the driver's seat
and the outside mirror
positions to a stored setting. ON
*/
OFF
LIGHTING
SETUP
INTERIOR LIGHT
DIMMING TIMEChanges the length of time the interior lights stay on
after you close the doors.60 sec/ 30 sec*/15 sec
HEADLIGHT AUTO OFF
TIMERChanges the length of time the exterior lights stay
on after you close the driver's door.60 sec/ 30 sec/15 sec*/0 sec
AUTO LIGHT SENSITIVITYChanges the timing for the headlights to come on.MAX /HIGH /MID*/ LOW /MIN
Page 95 of 488
94
uuGauges and Displays uMulti-Information Display*
Instrument Panel
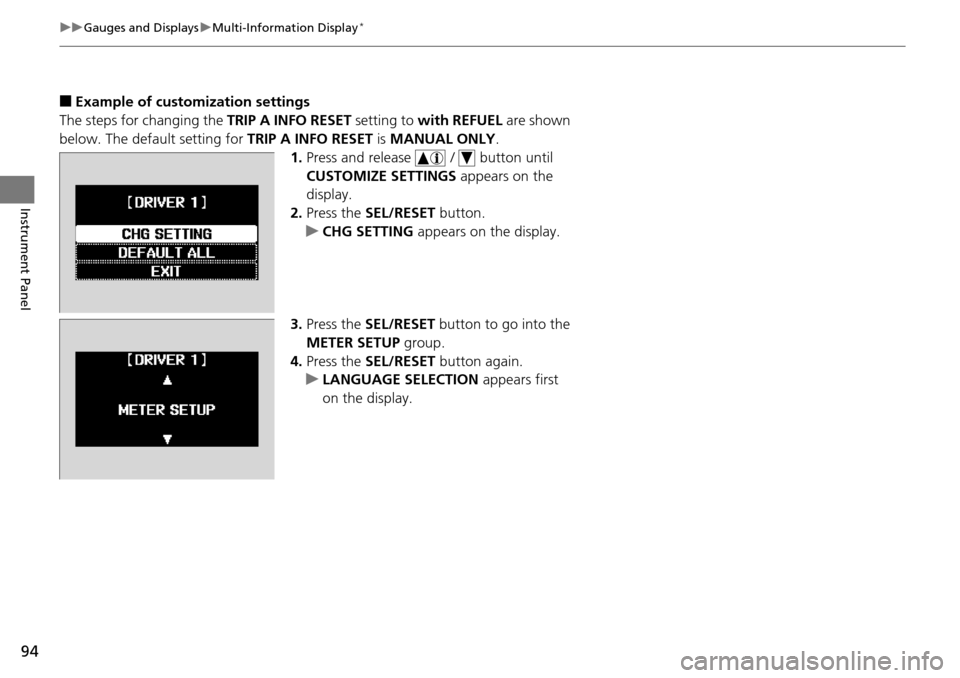
■Example of customization settings
The steps for changing the TRIP A INFO RESET setting to with REFUEL are shown
below. The default setting for TRIP A INFO RESET is MANUAL ONLY .
1. Press and release / button until
CUSTOMIZE SETTINGS appears on the
display.
2. Press the SEL/RESET button.
u CHG SETTING appears on the display.
3. Press the SEL/RESET button to go into the
METER SETUP group.
4. Press the SEL/RESET button again.
u LANGUAGE SELECTION appears first
on the display.
Page 184 of 488
183
uuAudio System Basic Operation uAudio/Information Screen*
Features
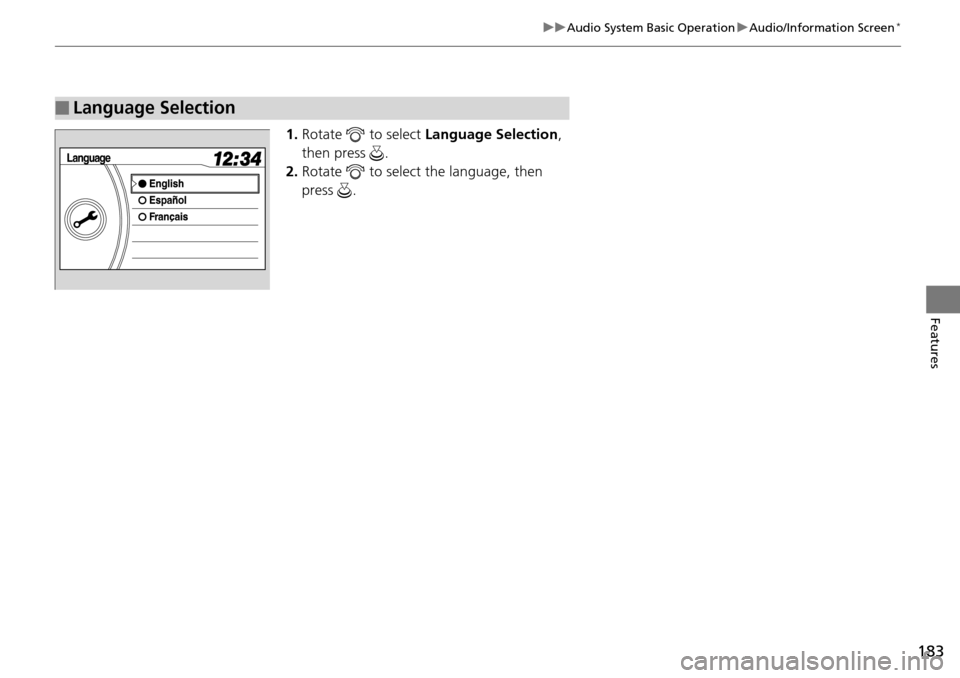
1. Rotate to select Language Selection ,
then press .
2. Rotate to select the language, then
press .
■Language Selection
Page 254 of 488
253
uuRear Entertainment System*uOperating the System
Continued
Features
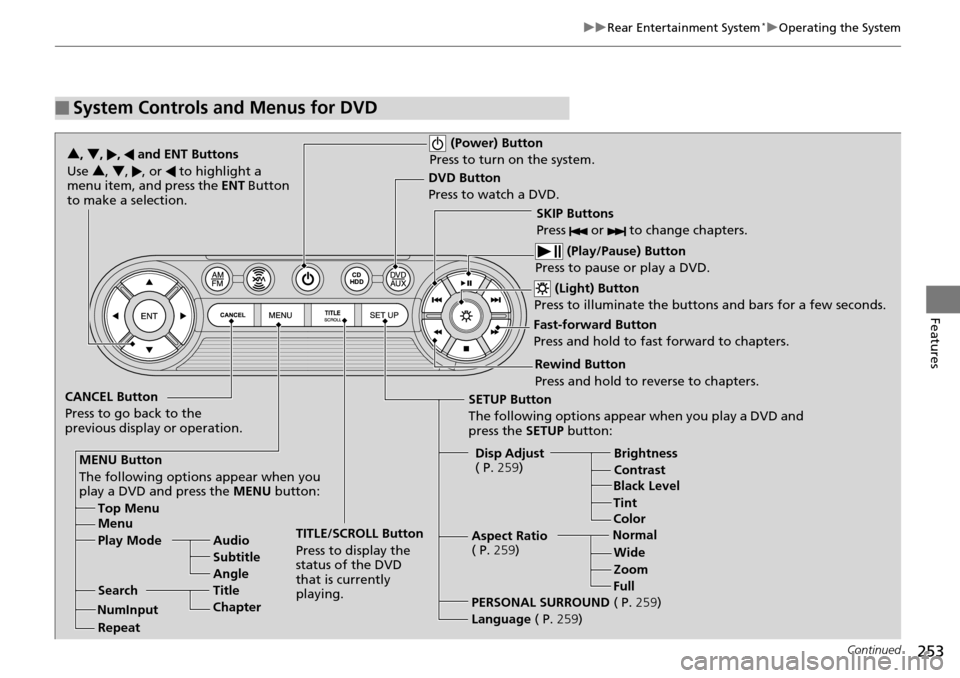
■System Controls and Menus for DVD
(Power) Button
Press to turn on the system.
DVD Button
Press to watch a DVD.
(Light) Button
Press to illuminate the buttons and bars for a few seconds.
SKIP Buttons
Press or to change chapters.
(Play/Pause) Button
Press to pause or play a DVD.
TITLE/SCROLL Button
Press to display the
status of the DVD
that is currently
playing.
MENU Button
The following options appear when you
play a DVD and press the MENU button:
Top Menu
Menu
Play Mode Audio Subtitle
Angle
Search Title
Chapter
Repeat SETUP Button
The following options appear when you play a DVD and
press the
SETUP button:
Disp Adjust
( P. 259) Brightness
Contrast
Black Level
Color
CANCEL Button
Press to go back to the
previous display or operation. 3
, 4 , , and ENT Buttons
Use 3 , 4, , or to highlight a
menu item, and press the ENT Button
to make a selection.
Tint
Normal WideZoom
Full
Aspect Ratio
( P.
259)
PERSONAL SURROUND ( P.259)
Language ( P.259)
Rewind Button
Press and hold to reverse to chapters.
Fast-forward Button
Press and hold to fast forward to chapters.
NumInput
Page 255 of 488
uuRear Entertainment System*uOperating the System
254
Features
■Playing a DVD
• Insert a DVD into the lower slot of the front audio unit.
u The system automatically starts the DVD.
• To fast forward, press and hold the (S KIP) bar, and to reverse, press and hold
the bar on the front panel.
• To go to the next chapter, press the bar, and to go to the beginning of the
current chapter, press the bar on th e front panel. Quickly press the bar
twice to go to the previous chapter.
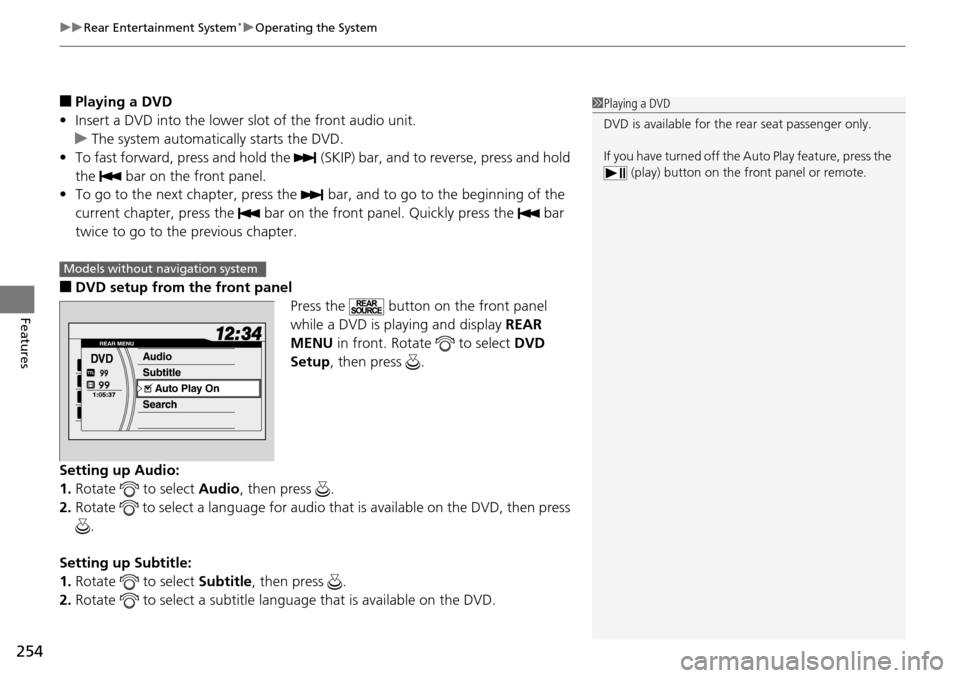
■DVD setup from the front panel Press the button on the front panel
while a DVD is playing and display REAR
MENU in front. Rotate to select DVD
Setup , then press .
Setting up Audio:
1. Rotate to select Audio, then press .
2. Rotate to select a language for audio th at is available on the DVD, then press
.
Setting up Subtitle:
1. Rotate to select Subtitle, then press .
2. Rotate to select a subtitle langu age that is available on the DVD.
1Playing a DVD
DVD is available for the rear seat passenger only.
If you have turned off the Auto Play feature, press the (play) button on the fr ont panel or remote.
Models without navigation system
Page 256 of 488
255
uuRear Entertainment System*uOperating the System
Continued
Features
Auto Play On:
1. Rotate to select Auto Play On, then press .
2. The check mark disappears, and th e auto play feature turns off.
u With this feature off, the DVD does no t automatically start playing when the
disc is inserted. Pres s button to play.
Title/Chapter Search:
1. Rotate to select Title Search or Chapter Search , then press .
2. Rotate to select a title or chapter number, then press .
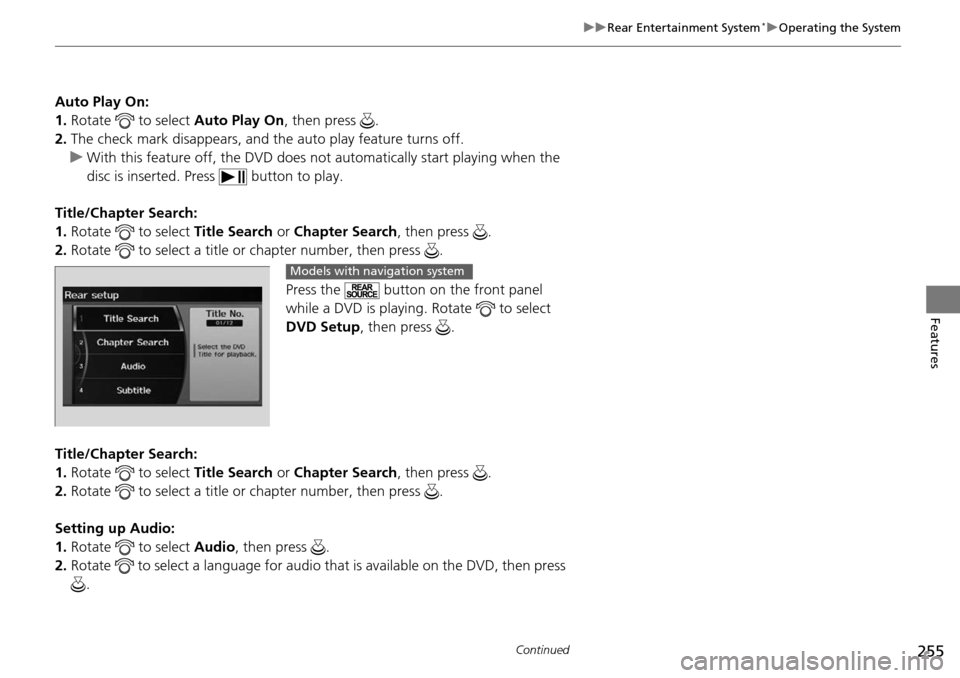
Press the button on the front panel
while a DVD is playing. Rotate to select
DVD Setup, then press .
Title/Chapter Search:
1. Rotate to select Title Search or Chapter Search , then press .
2. Rotate to select a title or chapter number, then press .
Setting up Audio:
1. Rotate to select Audio, then press .
2. Rotate to select a language for audio th at is available on the DVD, then press
.
Models with navigation system
Page 258 of 488
257
uuRear Entertainment System*uOperating the System
Continued
Features
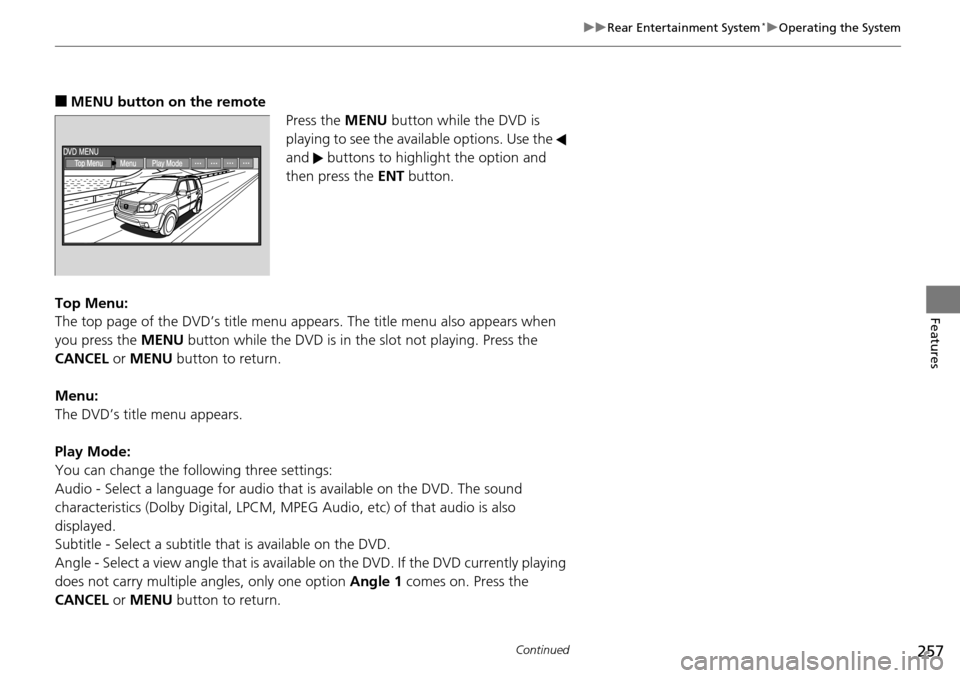
■MENU button on the remote
Press the MENU button while the DVD is
playing to see the availa ble options. Use the
and buttons to highlight the option and
then press the ENT button.
Top Menu:
The top page of the DVD’s title menu appears. The title menu also appears when
you press the MENU button while the DVD is in th e slot not playing. Press the
CANCEL or MENU button to return.
Menu:
The DVD’s title menu appears.
Play Mode:
You can change the following three settings:
Audio - Select a language for audio that is available on the DVD. The sound
characteristics (Dolby Digita l, LPCM, MPEG Audio, etc) of that audio is also
displayed.
Subtitle - Select a subtitle that is available on the DVD.
Angle - Select a view angle that is availabl e on the DVD. If the DVD currently playing
does not carry multiple angles, only one option Angle 1 comes on. Press the
CANCEL or MENU button to return.
Page 260 of 488
Continued259
uuRear Entertainment System*uOperating the System
Features
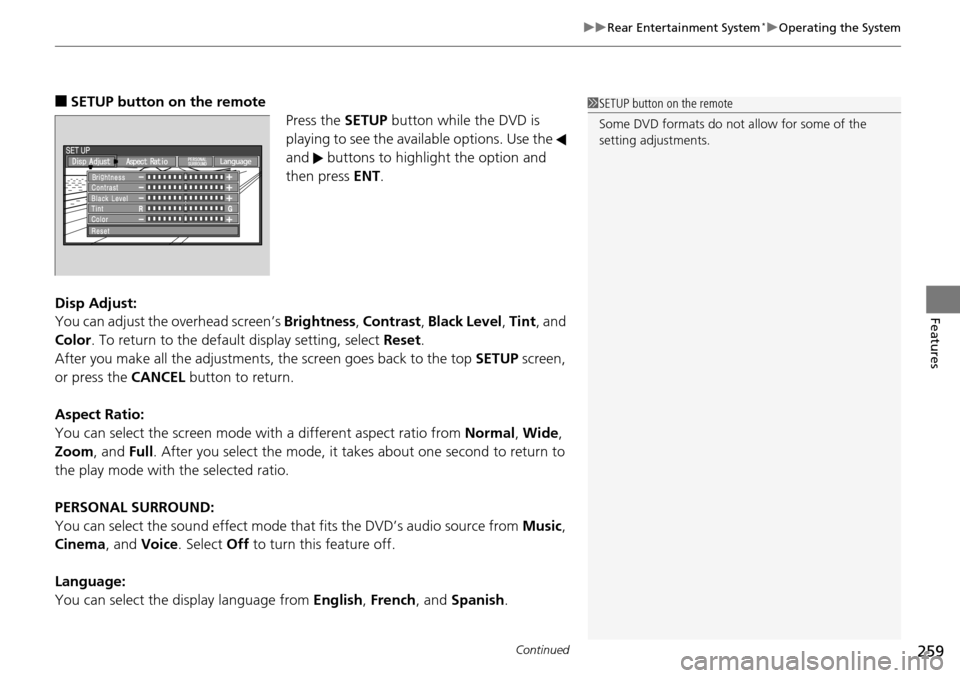
■SETUP button on the remote
Press the SETUP button while the DVD is
playing to see the availa ble options. Use the
and buttons to highlight the option and
then press ENT.
Disp Adjust:
You can adjust the overhead screen’s Brightness, Contrast , Black Level , Tint , and
Color . To return to the default display setting, select Reset.
After you make all the adjustments, the screen goes back to the top SETUP screen,
or press the CANCEL button to return.
Aspect Ratio:
You can select the screen mode wi th a different aspect ratio from Normal, Wide ,
Zoom , and Full. After you select the mode, it take s about one second to return to
the play mode with the selected ratio.
PERSONAL SURROUND:
You can select the sound effect mode th at fits the DVD’s audio source from Music,
Cinema , and Voice . Select Off to turn this feature off.
Language:
You can select the display language from English, French , and Spanish .1SETUP button on the remote
Some DVD formats do not allow for some of the
setting adjustments.
Page 261 of 488
uuRear Entertainment System*uOperating the System
260
Features
Initial Settings -
Press the SETUP button to configure the initial Language, Dynamic Range, and
Angle Mark settings before playing a DVD.
Language Settings:
Select the language for the DVD’s displayed menus ( Menu Language), the DVD’s
audio ( Audio Language ), and the DVD’s subtitle ( Subtitle Language).
1. Select the language setting.
2. Select the language from English, French, Spanish, Arabic, German, Italian,
Dutch, Chinese, Korean, Thai, Japanese, and other.
3. If you select other, you need to enter the four di git language code to configure
the language that is not listed. Select Yes to go to the numb er input screen.
u To return to the Language Settings screen, select No.
4. Press the ENT button each time you input a digit.
u If you want to delete a number, select DEL.
5. The cursor automatically goes to ENT after you input four digits. Press the ENT
button to command.
Dynamic Range:
This feature reduces the difference between the loud and quiet sound levels. Select
ON or OFF .
Angle Mark:
You can select whether to display the angle mark appearing in the upper right
corner of the screen when you change the view angle while the DVD is playing.
Select ON or OFF .
When the DVD is not playing1SETUP button on the remote
Initial Settings:
The prior language varies by disc. You may not be
able to configure your selected language setting.