spare wheel HONDA PILOT 2015 2.G Owners Manual
[x] Cancel search | Manufacturer: HONDA, Model Year: 2015, Model line: PILOT, Model: HONDA PILOT 2015 2.GPages: 488, PDF Size: 11.34 MB
Page 339 of 488
338
uuTowing a Trailer uDriving Safely with a Trailer
Driving
Driving Safely with a Trailer
• Have the trailer properly serviced and keep it in good condition.
• Make sure that all the weights and load in the vehicle and trailer are within limits.
2Towing Load Limits P. 329
•When towing more than 3,500lbs (1,590 kg), use of gasoline with a pump octane
number of 91 or higher is recommended.
u Towing performance can be affected by high altitude, high temperature, or
steep uphill.
• Securely attach the hitch, safety chains, and other necessary parts to the trailer.
• Securely store all the items in and on the tr ailer so that they do not shift while
driving.
• Check if the lights and brakes on the trailer are working properly.
• Check the pressures of the traile r tires, including the spare.
• Drive slower than normal.
• Obey posted speed limits for vehicles with trailers.
• Use the
(D position when towing a trailer on level roads.
• Turn more slowly and with a wider turning arc than normal.
• Allow more time and distance for braking.
• Do not brake or turn suddenly.
■Things You Need To Know Before Towing a Trailer
■Towing Speeds and Gears
■Turning and Braking
1Driving Safely with a Trailer
Parking
In addition to the normal precautions, place wheel
chocks at each of the trailer's tires.
Page 415 of 488
414
Maintenance
Checking and Maintaining Tires
Checking Tires
To safely operate your vehicle, your tires must be of the proper type and size, in
good condition with adequate tread, and properly inflated.
■Inflation guidelines
Properly inflated tires provide the best combination of handling, tread life, and comfort.
Refer to the driver’s doorjamb label or spec ification’s page for the specified pressure.
Underinflated tires wear unevenly, adversely affect handling and fuel economy, and
are more likely to fail from overheating.
Overinflated tires make your vehicle ride harshly, are more prone to road hazards,
and wear unevenly.
Every day before you drive, look at each of the tires. If one looks lower than the
others, check the pressure with a tire gauge.
At least once a month or before long trips, use a gauge to measure the pressure in
all tires, including the spare. Even tires in good condition can lose 1 to 2 psi (10 to
20 kPa, 0.1 to 0.2 kgf/cm
2) per month.
■Inspection guidelines
Every time you check inflation, also examine the tires and valve stems.
Look for:
• Bumps or bulges on the side or in the tread. Replace the tire if you find any cuts,
splits, or cracks in the si de of the tire. Replace it if you see fabric or cord.
• Remove any foreign objects and inspect for air leaks.
• Uneven tread wear. Have a deal er check the wheel alignment.
• Excessive tread wear.
2 Wear Indicators P. 419
•Cracks or other damage around valve stem.
1Checking Tires
Measure the air pressure when tires are cold. This
means the vehicle has been parked for at least three
hours, or driven less than 1 mile (1.6 km). If
necessary, add or releas e air until the specified
pressure is reached.
If checked when hot, tire pressure can be as much as
4–6 psi (30–40 kPa, 0.3–0.4 kgf/cm
2) higher than if
checked when cold.
Have a dealer check the tires if you feel a consistent
vibration while driving. Ne w tires and any that have
been removed and reinst alled should be properly
balanced.
3WARNING
Using tires that are excessively worn or
improperly inflated can cause a crash in
which you can be seriously hurt or killed.
Follow all instruction s in this owner’s
manual regarding ti re inflation and
maintenance.
Page 436 of 488
435Continued
Handling the Unexpected
If a Tire Goes Flat
Changing a Flat Tire
If a tire goes flat while driving, grasp the steering wheel firmly, and brake gradually
to reduce speed. Then, stop in a safe plac e. Replace the flat tire with a compact
spare tire. Go to a dealer as soon as possib le to have the full-size tire repaired or
replaced.
1. Park the vehicle on firm, level, and non-slippery surface and apply the parking
brake.
2. Move the shift lever to
(P.
3. Turn on the hazard warning lights an d turn the ignition switch to LOCK
(0.
1Changing a Flat Tire
Periodically check the tire pressure of the compact
spare. It should be set to the specified pressure.
Specified Pressure: 60 psi (420 kPa, 4.2 kgf/cm
2)
When driving with the compact spare tire, keep the
vehicle speed under 50 mph (80 km/h). Replace with
a full-size tire as soon as possible.
The compact spare tire and wheel in your vehicle are
specifically for this model.
Do not use them with another vehicle.
Do not use another type of compact spare tire or
wheel with your vehicle.
Do not mount tire chains on a compact spare tire.
If a chain-mounted front tire goes flat, remove one of
the full-size rear tires and replace it with the compact
spare tire. Remove the flat front tire and replace it
with the full-size tire that was removed from the rear.
Mount the tire chains on the front tire.
Do not use a puncture-repairi ng agent on a flat tire,
as it can damage the tire pressure sensor.
Page 437 of 488
436
uuIf a Tire Goes Flat uChanging a Flat Tire
Handling the Unexpected
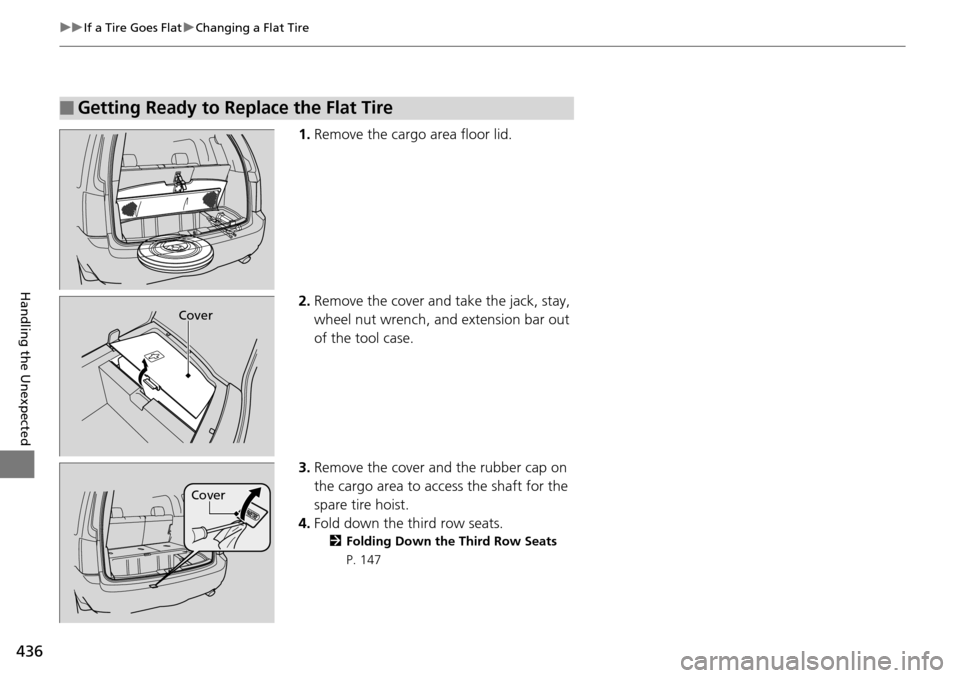
1. Remove the cargo area floor lid.
2. Remove the cover and take the jack, stay,
wheel nut wrench, and extension bar out
of the tool case.
3. Remove the cover and the rubber cap on
the cargo area to access the shaft for the
spare tire hoist.
4. Fold down the third row seats.
2 Folding Down the Third Row Seats
P. 147
■Getting Ready to Replace the Flat Tire
Cover
Cover
Page 438 of 488
437
uuIf a Tire Goes Flat uChanging a Flat Tire
Continued
Handling the Unexpected
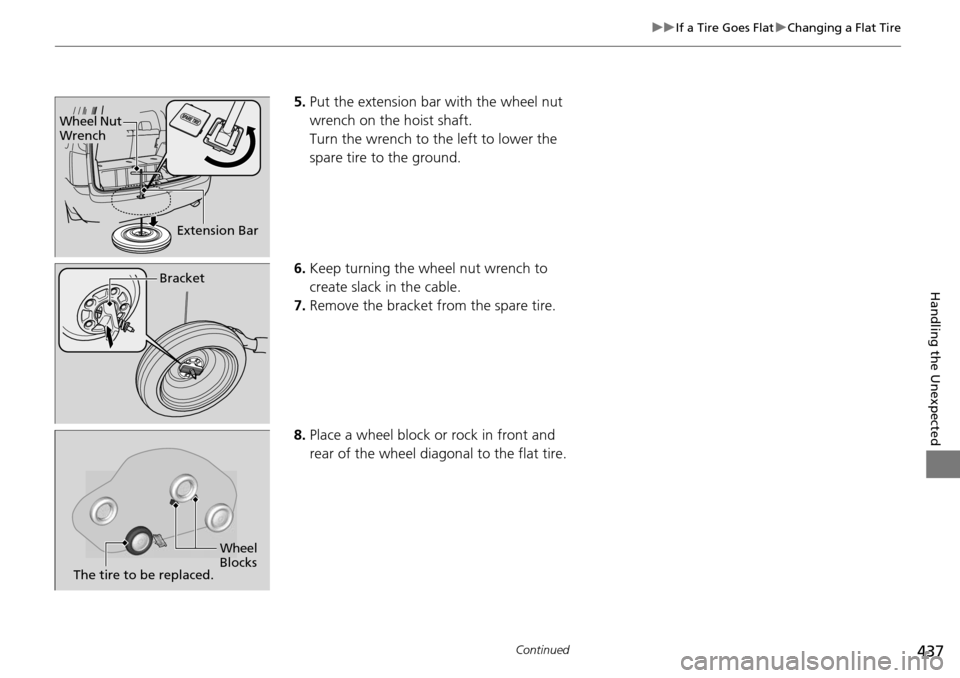
5. Put the extension bar with the wheel nut
wrench on the hoist shaft.
Turn the wrench to the left to lower the
spare tire to the ground.
6. Keep turning the wh eel nut wrench to
create slack in the cable.
7. Remove the bracket from the spare tire.
8. Place a wheel block or rock in front and
rear of the wheel diagonal to the flat tire.
Wheel Nut
Wrench
Extension Bar
Bracket
Wheel
Blocks
The tire to be replaced.
Page 439 of 488
438
uuIf a Tire Goes Flat uChanging a Flat Tire
Handling the Unexpected
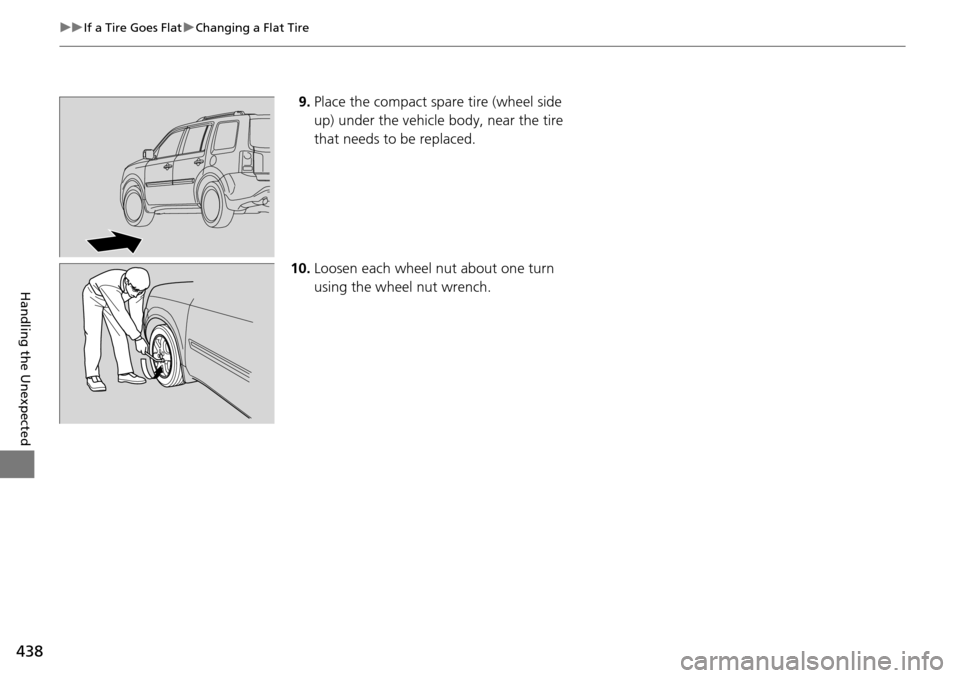
9. Place the compact spare tire (wheel side
up) under the vehicle body, near the tire
that needs to be replaced.
10. Loosen each wheel nut about one turn
using the wheel nut wrench.
Page 442 of 488
Continued441
uuIf a Tire Goes Flat uChanging a Flat Tire
Handling the Unexpected
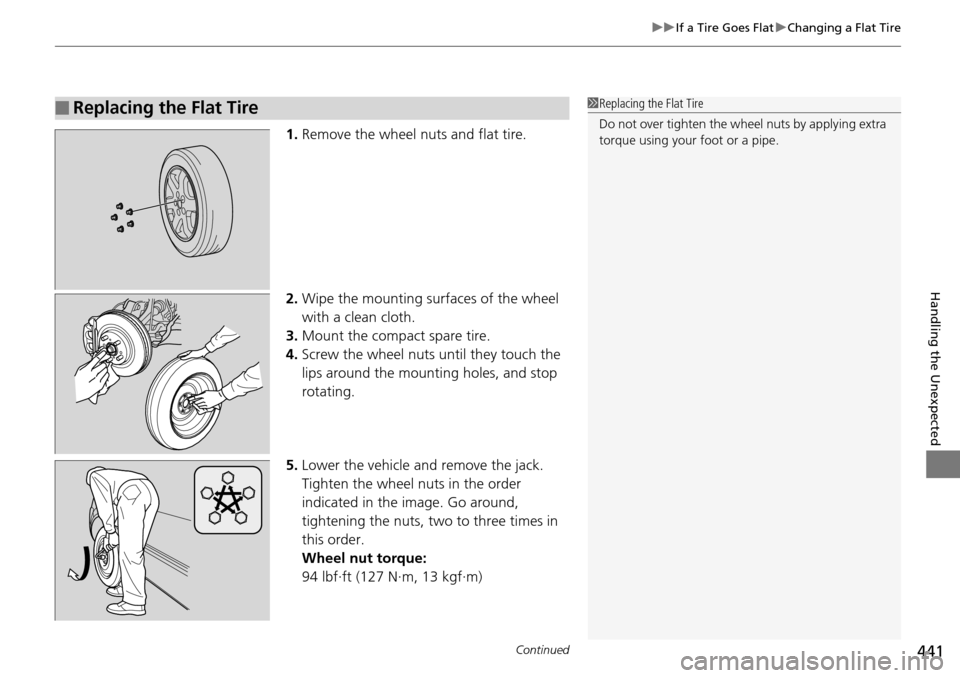
1. Remove the wheel nuts and flat tire.
2. Wipe the mounting surfaces of the wheel
with a clean cloth.
3. Mount the compact spare tire.
4. Screw the wheel nuts until they touch the
lips around the mounting holes, and stop
rotating.
5. Lower the vehicle and remove the jack.
Tighten the wheel nuts in the order
indicated in the image. Go around,
tightening the nuts, two to three times in
this order.
Wheel nut torque:
94 lbf∙ft (127 N∙m, 13 kgf∙m)
■Replacing the Flat Tire1Replacing the Flat Tire
Do not over tighten the wheel nuts by applying extra
torque using your foot or a pipe.
Page 443 of 488
uuIf a Tire Goes Flat uChanging a Flat Tire
442
Handling the Unexpected
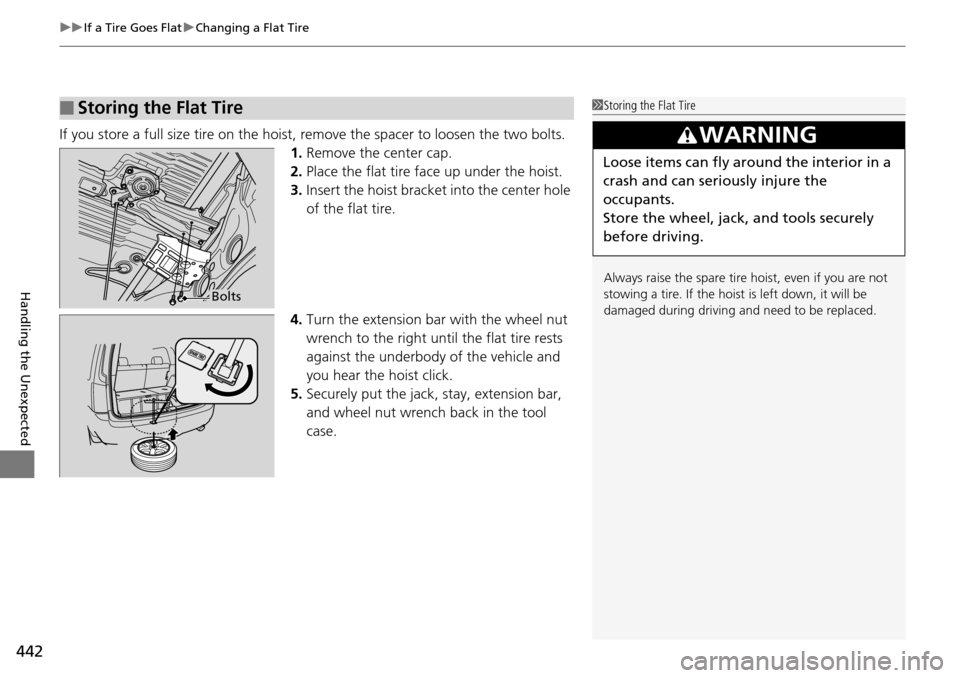
If you store a full size tire on the hoist, remove the spacer to loosen the two bolts.
1. Remove the center cap.
2. Place the flat tire fa ce up under the hoist.
3. Insert the hoist bracket into the center hole
of the flat tire.
4. Turn the extension ba r with the wheel nut
wrench to the right until the flat tire rests
against the underbody of the vehicle and
you hear the hoist click.
5. Securely put the jack, stay, extension bar,
and wheel nut wrench back in the tool
case.
■Storing the Flat Tire1 Storing the Flat Tire
Always raise the spare tire hoist, even if you are not
stowing a tire. If the hoist is left down, it will be
damaged during driving and need to be replaced.
3WARNING
Loose items can fly around the interior in a
crash and can seriously injure the
occupants.
Store the wheel, jack, and tools securely
before driving.
Bolts
Page 444 of 488
443
uuIf a Tire Goes Flat uChanging a Flat Tire
Handling the Unexpected
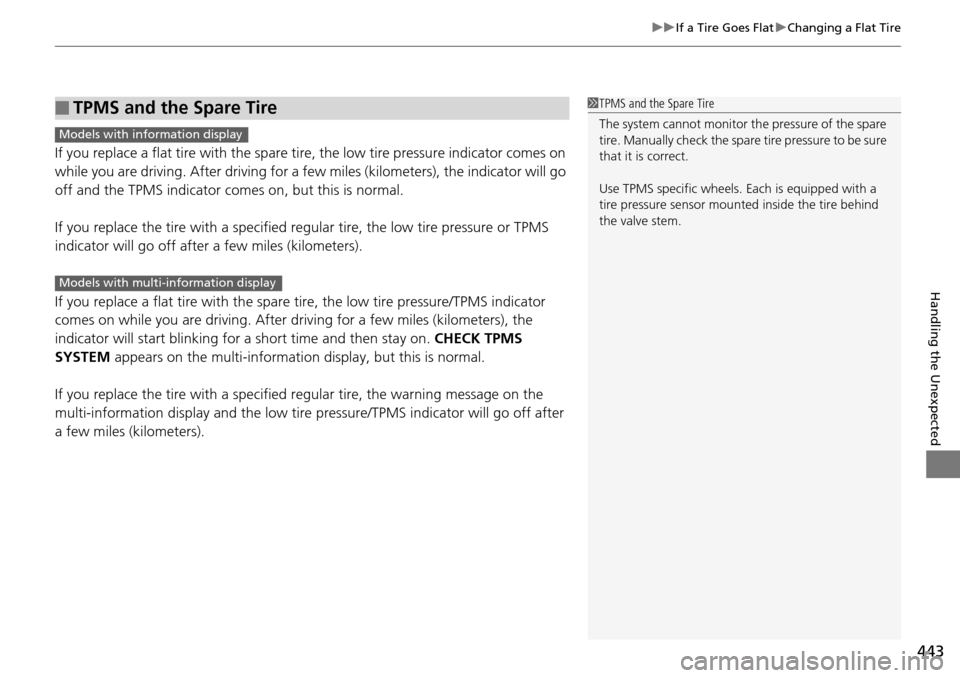
If you replace a flat tire with the spare ti re, the low tire pressure indicator comes on
while you are driving. After driving for a few miles (kilometers), the indicator will go
off and the TPMS indicator comes on, but this is normal.
If you replace the tire with a specified re gular tire, the low tire pressure or TPMS
indicator will go off after a few miles (kilometers).
If you replace a flat tire with the spare tire, the low tire pressure/TPMS indicator
comes on while you are driving. After dr iving for a few miles (kilometers), the
indicator will start blinking for a short time and then stay on. CHECK TPMS
SYSTEM appears on the multi-information display, but this is normal.
If you replace the tire with a specified regular tire, the warning message on the
multi-information display and the low tire pressure/TPMS indicator will go off after
a few miles (kilometers).
■TPMS and the Spare Tire1 TPMS and the Spare Tire
The system cannot monitor th e pressure of the spare
tire. Manually check the spare tire pressure to be sure
that it is correct.
Use TPMS specific wheels. Each is equipped with a
tire pressure sensor mounted inside the tire behind
the valve stem.
Models with info rmation display
Models with multi- information display
Page 466 of 488
465
uuSpecifications u
Information
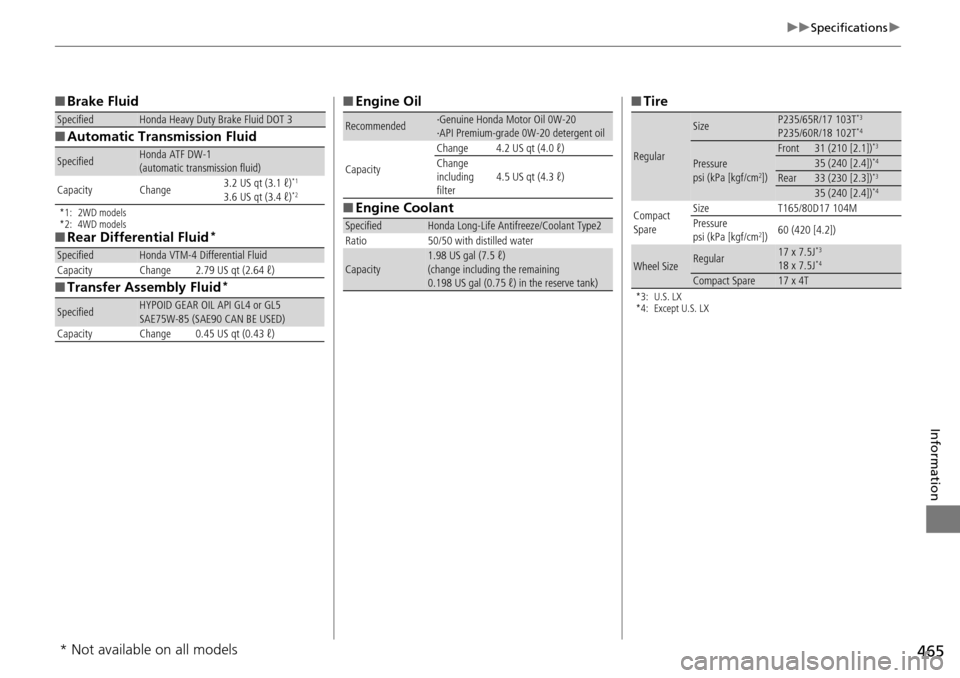
■Brake Fluid
■ Automatic Transmission Fluid
*1: 2WD models
*2: 4WD models
■Rear Differential Fluid*
■Transfer Assembly Fluid*
SpecifiedHonda Heavy Duty Brake Fluid DOT 3
SpecifiedHonda ATF DW-1
(automatic transmission fluid)
Capacity Change 3.2 US qt (3.1 ℓ)
*1
3.6 US qt (3.4 ℓ)*2
SpecifiedHonda VTM-4 Differential Fluid
Capacity Change 2.79 US qt (2.64 ℓ)
SpecifiedHYPOID GEAR OIL API GL4 or GL5
SAE75W-85 (SAE90 CAN BE USED)
Capacity Change 0.45 US qt (0.43 ℓ)
■ Engine Oil
■ Engine Coolant
Recommended·Genuine Honda Motor Oil 0W-20
·API Premium-grade 0W-20 detergent oil
Capacity Change 4.2 US qt (4.0 ℓ)
Change
including
filter
4.5 US qt (4.3 ℓ)
SpecifiedHonda Long-Life Antifreeze/Coolant Type2
Ratio 50/50 with distilled water
Capacity1.98 US gal (7.5 ℓ)
(change including the remaining
0.198 US gal (0.75 ℓ) in the reserve tank)
■ Tire
*3: U.S. LX
*4: Except U.S. LX
Regular
SizeP235/65R/17 103T*3
P235/60R/18 102T*4
Pressure
psi (kPa [kgf/cm2])
Front31 (210 [2.1])*3
35 (240 [2.4])*4
Rear33 (230 [2.3])*3
35 (240 [2.4])*4
Compact
Spare Size
T165/80D17 104M
Pressure
psi (kPa [kgf/cm
2]) 60 (420 [4.2])
Wheel SizeRegular17 x 7.5J*3
18 x 7.5J*4
Compact Spare17 x 4T
* Not available on all models