HONDA PILOT 2016 3.G Quick Guide
Manufacturer: HONDA, Model Year: 2016, Model line: PILOT, Model: HONDA PILOT 2016 3.GPages: 89, PDF Size: 5.82 MB
Page 31 of 89
54 || 55
VEHICLE CONTROLSVEHICLE CONTROLS
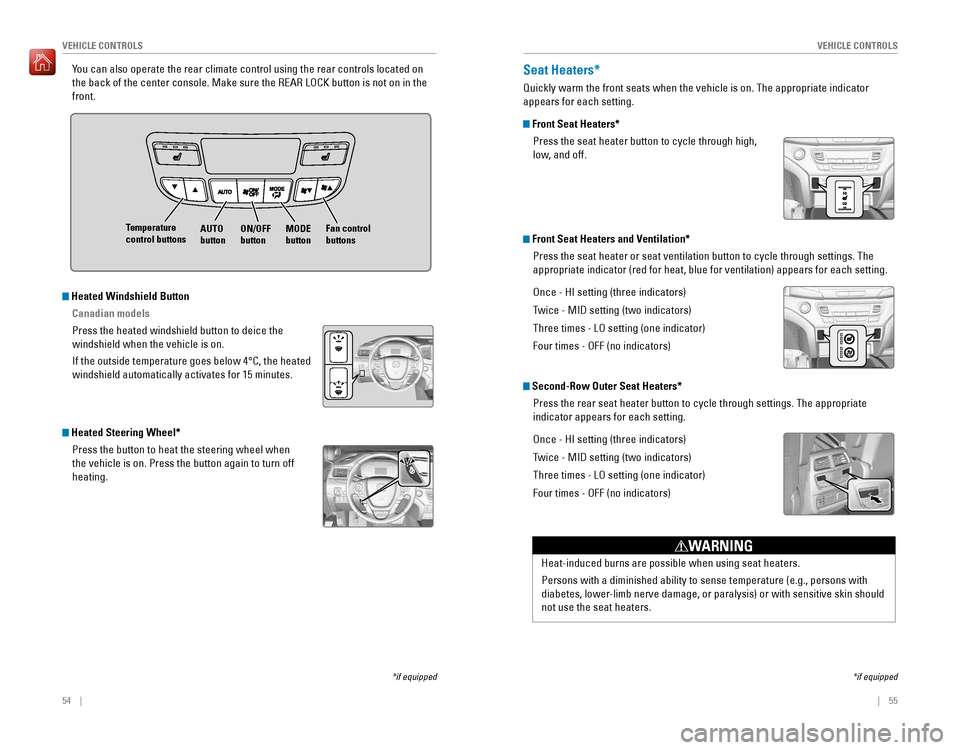
You can also operate the rear climate control using the rear controls loc\
ated on
the back of the center console. Make sure the REAR LOCK button is not on\
in the
front.
Fan control buttons
MODE
button
Temperature
control buttons
AUTO
buttonON/OFF
button
*if equipped
Heated Windshield Button
Canadian models
Press the heated windshield button to deice the
windshield when the vehicle is on.
If the outside temperature goes below 4°C, the heated
windshield automatically activates for 15 minutes.
Heated Steering Wheel*Press the button to heat the steering wheel when
the vehicle is on. Press the button again to turn off
heating.
Seat Heaters*
Quickly warm the front seats when the vehicle is on. The appropriate ind\
icator
appears for each setting.
Front Seat Heaters*Press the seat heater button to cycle through high,
low, and off.
Front Seat Heaters and Ventilation*Press the seat heater or seat ventilation button to cycle through settin\
gs. The
appropriate indicator (red for heat, blue for ventilation) appears for\
each setting.
Once - HI setting (three indicators)
Twice - MID setting (two indicators)
Three times - LO setting (one indicator)
Four times - OFF (no indicators)
Second-Row Outer Seat Heaters*Press the rear seat heater button to cycle through settings. The appropr\
iate
indicator appears for each setting.
Once - HI setting (three indicators)
Twice - MID setting (two indicators)
Three times - LO setting (one indicator)
Four times - OFF (no indicators)
Heat-induced burns are possible when using seat heaters.
Persons with a diminished ability to sense temperature (e.g., persons w\
ith
diabetes, lower-limb nerve damage, or paralysis) or with sensitive skin should
not use the seat heaters.
WARNING
*if equipped
Page 32 of 89
56 || 57
VEHICLE CONTROLSVEHICLE CONTROLS
Customized Features
Use the Settings menu to customize certain features when the vehicle is \
stopped.
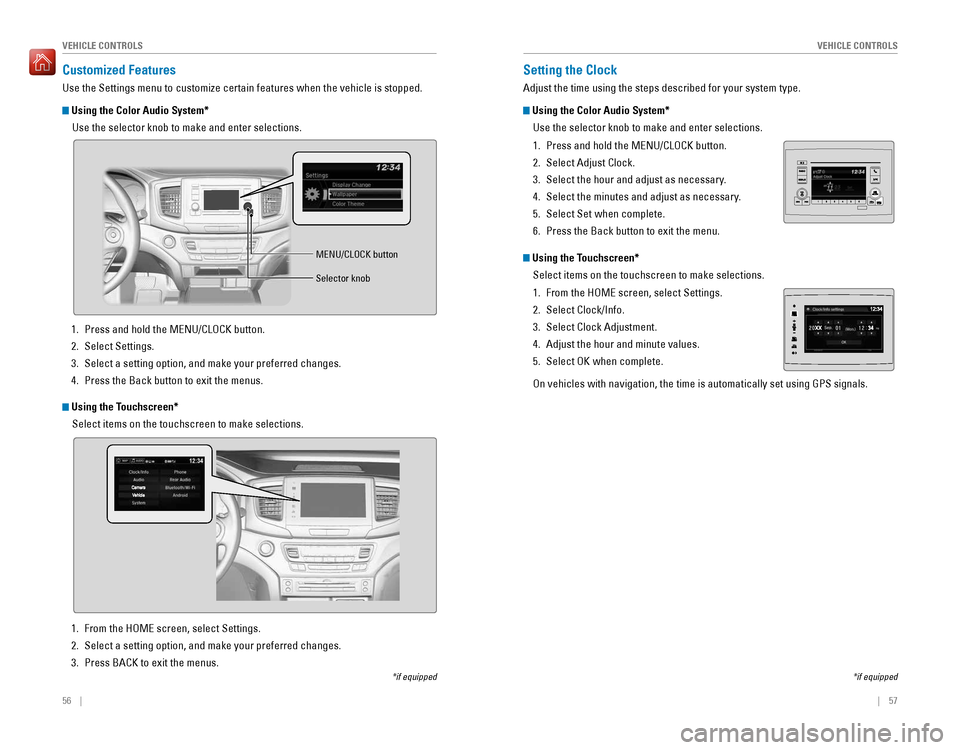
Using the Color Audio System*
Use the selector knob to make and enter selections.
*if equipped
Using the Touchscreen*Select items on the touchscreen to make selections.
1. Press and hold the MENU/CLOCK button.
2. Select Settings.
3. Select a setting option, and make your preferred changes.
4. Press the Back button to exit the menus.
MENU/CLOCK button
Selector knob
1. From the HOME screen, select Settings.
2. Select a setting option, and make your preferred changes.
3. Press BACK to exit the menus.
*if equipped
Setting the Clock
Adjust the time using the steps described for your system type.
Using the Color Audio System*Use the selector knob to make and enter selections.
1. Press and hold the MENU/CLOCK button.
2. Select Adjust Clock.
3. Select the hour and adjust as necessary.
4. Select the minutes and adjust as necessary.
5. Select Set when complete.
6. Press the Back button to exit the menu.
Using the Touchscreen*Select items on the touchscreen to make selections.
1. From the HOME screen, select Settings.
2. Select Clock/Info.
3. Select Clock Adjustment.
4. Adjust the hour and minute values.
5. Select OK when complete.
On vehicles with navigation, the time is automatically set using GPS sig\
nals.
Page 33 of 89
58 || 59
AUDIO AND CONNECTIVITY
AUDIO AND CONNECTIVITY
Basic Audio Operation
Connect audio devices and operate buttons and displays for the audio sys\
tem.
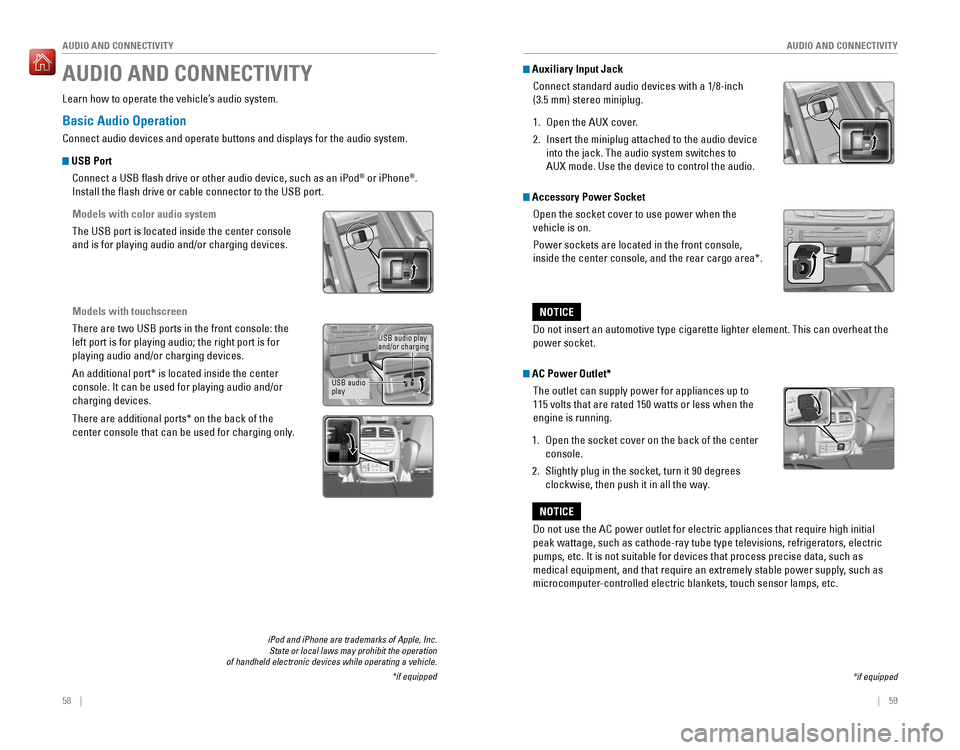
USB Port
Connect a USB flash drive or other audio device, such as an iPod
® or iPhone®.
Install the flash drive or cable connector to the USB port.
Models with color audio system
The USB port is located inside the center console
and is for playing audio and/or charging devices.
Models with touchscreen
There are two USB ports in the front console: the
left port is for playing audio; the right port is for
playing audio and/or charging devices.
An additional port* is located inside the center
console. It can be used for playing audio and/or
charging devices.
There are additional ports* on the back of the
center console that can be used for charging only.
iPod and iPhone are trademarks of Apple, Inc. State or local laws may prohibit the operation
of handheld electronic devices while operating a vehicle.
*if equipped
AUDIO AND CONNECTIVITY
Learn how to operate the vehicle’s audio system.
USB audio play
and/or charging
USB audio
play
*if equipped
Accessory Power Socket Open the socket cover to use power when the
vehicle is on.
Power sockets are located in the front console,
inside the center console, and the rear cargo area*.
Do not insert an automotive type cigarette lighter element. This can ove\
rheat the
power socket.
NOTICE
AC Power Outlet*The outlet can supply power for appliances up to
115 volts that are rated 150 watts or less when the
engine is running.
1. Open the socket cover on the back of the center
console.
2. Slightly plug in the socket, turn it 90 degrees
clockwise, then push it in all the way.
Do not use the AC power outlet for electric appliances that require high\
initial
peak wattage, such as cathode-ray tube type televisions, refrigerators, \
electric
pumps, etc. It is not suitable for devices that process precise data, su\
ch as
medical equipment, and that require an extremely stable power supply, such as
microcomputer-controlled electric blankets, touch sensor lamps, etc.
NOTICE
Auxiliary Input JackConnect standard audio devices with a 1/8-inch
(3.5 mm) stereo miniplug.
1. Open the AUX cover.
2. Insert the miniplug attached to the audio device
into the jack. The audio system switches to
AUX mode. Use the device to control the audio.
Page 34 of 89
60 || 61
AUDIO AND CONNECTIVITY
AUDIO AND CONNECTIVITY
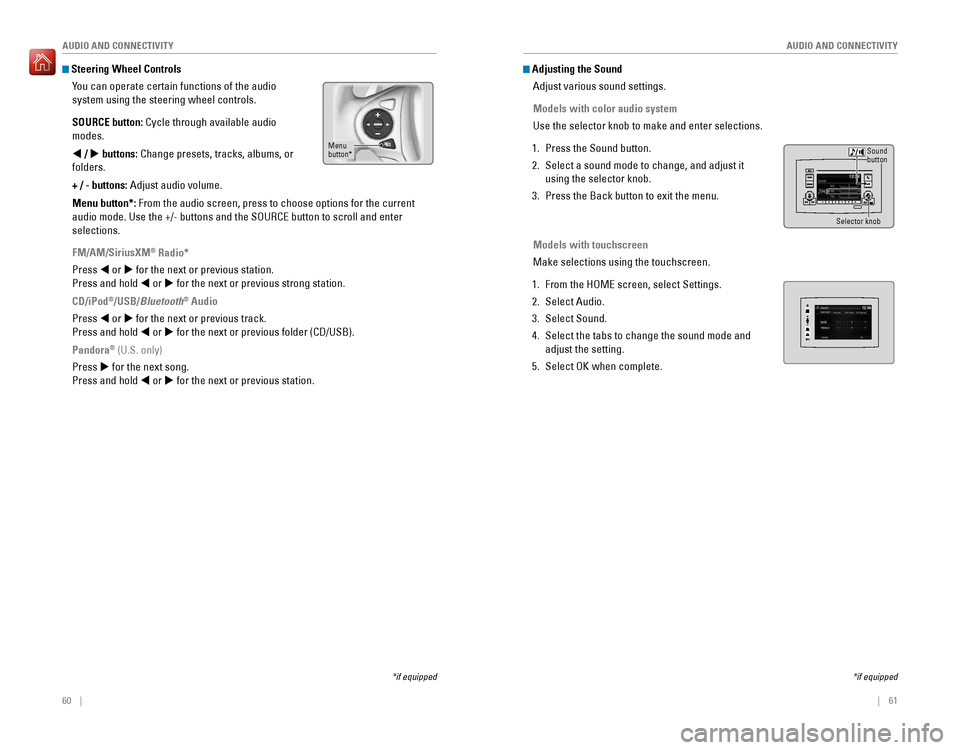
Steering Wheel Controls
You can operate certain functions of the audio
system using the steering wheel controls.
SOURCE button: Cycle through available audio
modes.
t / u buttons: Change presets, tracks, albums, or
folders.
+ / - buttons: Adjust audio volume.
Menu button*: From the audio screen, press to choose options for the current
audio mode. Use the +/- buttons and the SOURCE button to scroll and ente\
r
selections.
FM/AM/SiriusXM
® Radio*
Press t or u for the next or previous station.
Press and hold t or u for the next or previous strong station.
CD/iPod
®/USB/Bluetooth® Audio
Press t or u for the next or previous track.
Press and hold t or u for the next or previous folder (CD/USB).
Pandora
® (U.S. only)
Press u for the next song.
Press and hold t or u for the next or previous station.
*if equipped
Menu
button*
*if equipped
Adjusting the Sound Adjust various sound settings.
Models with color audio system
Use the selector knob to make and enter selections.
1. Press the Sound button.
2. Select a sound mode to change, and adjust it
using the selector knob.
3. Press the Back button to exit the menu.
Models with touchscreen
Make selections using the touchscreen.
1. From the HOME screen, select Settings.
2. Select Audio.
3. Select Sound.
4. Select the tabs to change the sound mode and
adjust the setting.
5. Select OK when complete.
Selector knob
Sound
button
Page 35 of 89
62 || 63
AUDIO AND CONNECTIVITY
AUDIO AND CONNECTIVITY
Models with color audio system
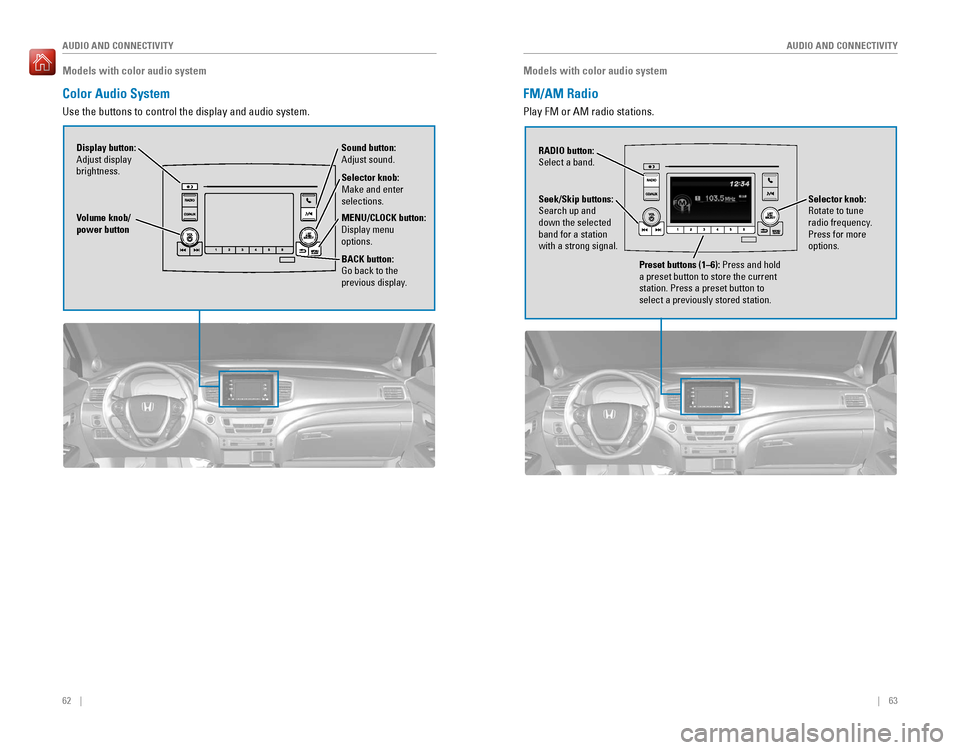
Color Audio System
Use the buttons to control the display and audio system.
Selector knob:
Make and enter
selections.
Volume knob/
power button
MENU/CLOCK button:
Display menu
options.
BACK button:
Go back to the
previous display.
Display button:
Adjust display
brightness. Sound button:
Adjust sound.
Models with color audio system
FM/AM Radio
Play FM or AM radio stations.
RADIO button:
Select a band.
Preset buttons (1–6): Press and hold
a preset button to store the current
station. Press a preset button to
select a previously stored station.
Seek/Skip buttons:
Search up and
down the selected
band for a station
with a strong signal.
Selector knob:
Rotate to tune
radio frequency.
Press for more
options.
Page 36 of 89
64 || 65
AUDIO AND CONNECTIVITY
AUDIO AND CONNECTIVITY
Models with color audio system
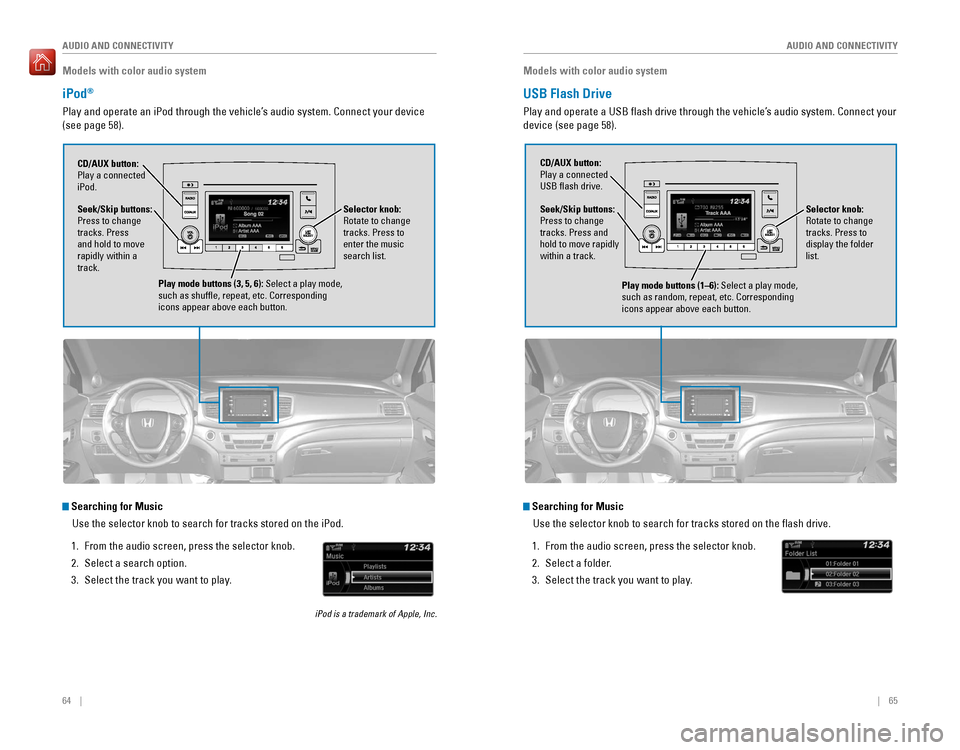
iPod®
Play and operate an iPod through the vehicle’s audio system. Connect your device
(see page 58).
Seek/Skip buttons:
Press to change
tracks. Press
and hold to move
rapidly within a
track. CD/AUX button:
Play a connected
iPod.
Selector knob:
Rotate to change
tracks. Press to
enter the music
search list.
Play mode buttons (3, 5, 6): Select a play mode,
such as shuffle, repeat, etc. Corresponding
icons appear above each button.
Searching for MusicUse the selector knob to search for tracks stored on the iPod.
1. From the audio screen, press the selector knob.
2. Select a search option.
3. Select the track you want to play.
iPod is a trademark of Apple, Inc.
Models with color audio system
USB Flash Drive
Play and operate a USB flash drive through the vehicle’s audio system. Connect your
device (see page 58).
Selector knob:
Rotate to change
tracks. Press to
display the folder
list.
CD/AUX button:
Play a connected
USB flash drive.
Seek/Skip buttons:
Press to change
tracks. Press and
hold to move rapidly
within a track.
Play mode buttons (1–6): Select a play mode,
such as random, repeat, etc. Corresponding
icons appear above each button.
Searching for MusicUse the selector knob to search for tracks stored on the flash drive.
1. From the audio screen, press the selector knob.
2. Select a folder.
3. Select the track you want to play.
Page 37 of 89
66 || 67
AUDIO AND CONNECTIVITY
AUDIO AND CONNECTIVITY
Models with color audio system
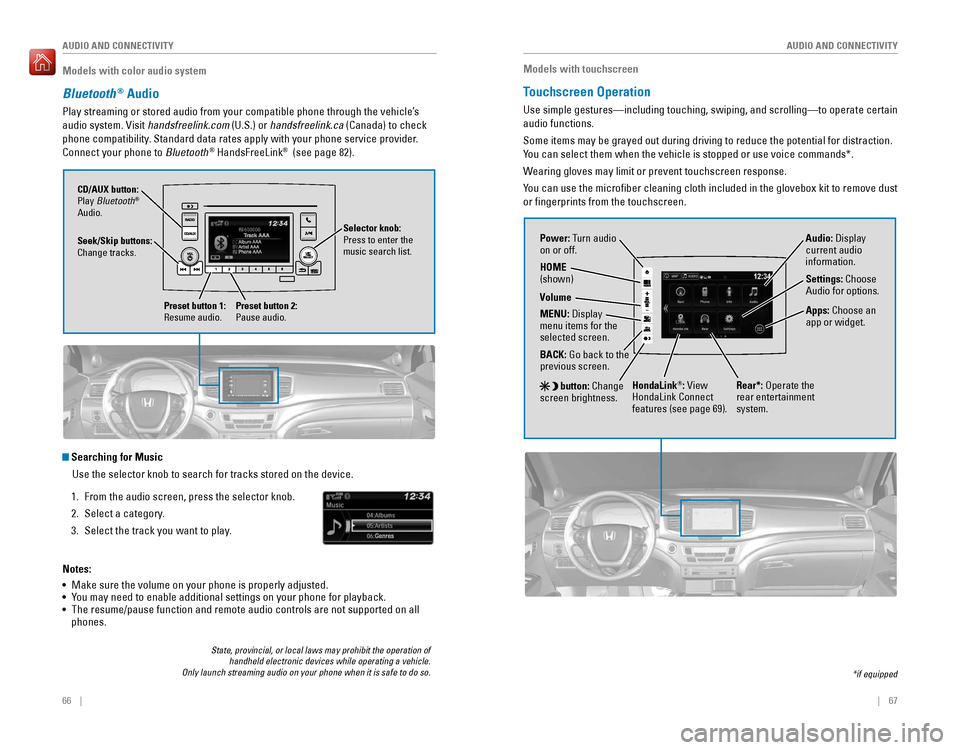
Bluetooth® Audio
Play streaming or stored audio from your compatible phone through the ve\
hicle’s
audio system. Visit handsfreelink.com (U.S.) or handsfreelink.ca (Canada) to check
phone compatibility. Standard data rates apply with your phone service provider.
Connect your phone to Bluetooth
® HandsFreeLink® (see page 82).
Seek/Skip buttons:
Change tracks. CD/AUX button:
Play Bluetooth
®
Audio.
Preset button 1:
Resume audio.
Preset button 2:
Pause audio.
State, provincial, or local laws may prohibit the operation of handheld electronic devices while operating a vehicle.
Only launch streaming audio on your phone when it is safe to do so.
Searching for Music
Use the selector knob to search for tracks stored on the device.
1. From the audio screen, press the selector knob.
2. Select a category.
3. Select the track you want to play.
Notes:
• Make sure the volume on your phone is properly adjusted.
• You may need to enable additional settings on your phone for playback.
• The resume/pause function and remote audio controls are not supported on\
all
phones.
Selector knob:
Press to enter the
music search list.
Models with touchscreen
Touchscreen Operation
Use simple gestures—including touching, swiping, and scrolling—to \
operate certain
audio functions.
Some items may be grayed out during driving to reduce the potential for \
distraction.
You can select them when the vehicle is stopped or use voice commands*.
Wearing gloves may limit or prevent touchscreen response.
You can use the microfiber cleaning cloth included in the glovebox kit \
to remove dust
or fingerprints from the touchscreen.
*if equipped
Power: Turn audio
on or off.
HOME
(shown)
MENU: Display
menu items for the
selected screen.
BACK: Go back to the
previous screen.
button: Change
screen brightness. Settings: Choose
Audio for options.
HondaLink®: View
HondaLink Connect
features (see page 69). Audio: Display
current audio
information.
Volume
Apps: Choose an
app or widget.
Rear*: Operate the
rear entertainment
system.
Page 38 of 89
68 || 69
AUDIO AND CONNECTIVITY
AUDIO AND CONNECTIVITY
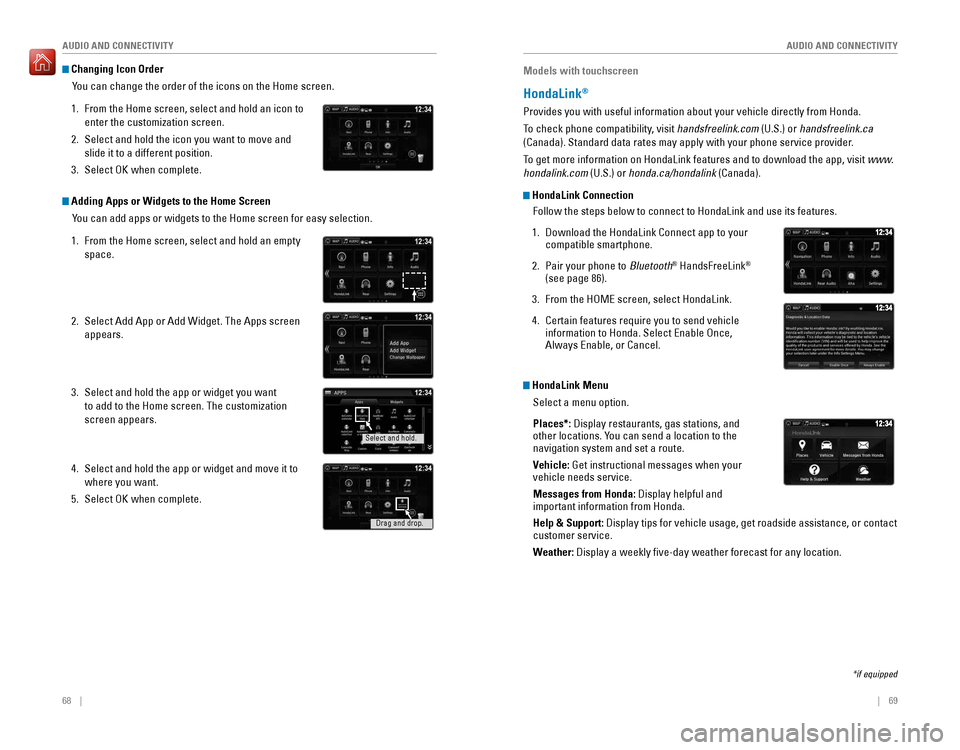
Changing Icon Order
You can change the order of the icons on the Home screen.
1. From the Home screen, select and hold an icon to
enter the customization screen.
2. Select and hold the icon you want to move and
slide it to a different position.
3. Select OK when complete.
Adding Apps or Widgets to the Home ScreenYou can add apps or widgets to the Home screen for easy selection.
1. From the Home screen, select and hold an empty
space.
2. Select Add App or Add Widget. The Apps screen
appears.
3. Select and hold the app or widget you want
to add to the Home screen. The customization
screen appears.
4. Select and hold the app or widget and move it to
where you want.
5. Select OK when complete.
Select and hold.
Drag and drop.
Models with touchscreen
HondaLink®
Provides you with useful information about your vehicle directly from Ho\
nda.
To check phone compatibility, visit handsfreelink.com (U.S.) or handsfreelink.ca
(Canada). Standard data rates may apply with your phone service provid\
er.
To get more information on HondaLink features and to download the app, vi\
sit www.
hondalink.com (U.S.) or honda.ca/hondalink (Canada).
HondaLink ConnectionFollow the steps below to connect to HondaLink and use its features.
1. Download the HondaLink Connect app to your
compatible smartphone.
2. Pair your phone to Bluetooth® HandsFreeLink®
(see page 86).
3. From the HOME screen, select HondaLink.
4. Certain features require you to send vehicle
information to Honda. Select Enable Once,
Always Enable, or Cancel.
HondaLink Menu
Select a menu option.
Places*: Display restaurants, gas stations, and
other locations. You can send a location to the
navigation system and set a route.
Vehicle: Get instructional messages when your
vehicle needs service.
Messages from Honda: Display helpful and
important information from Honda.
Help & Support: Display tips for vehicle usage, get roadside assistance, or contact
customer service.
Weather: Display a weekly five-day weather forecast for any location.
*if equipped
Page 39 of 89
70 || 71
AUDIO AND CONNECTIVITY
AUDIO AND CONNECTIVITY
Models with touchscreen
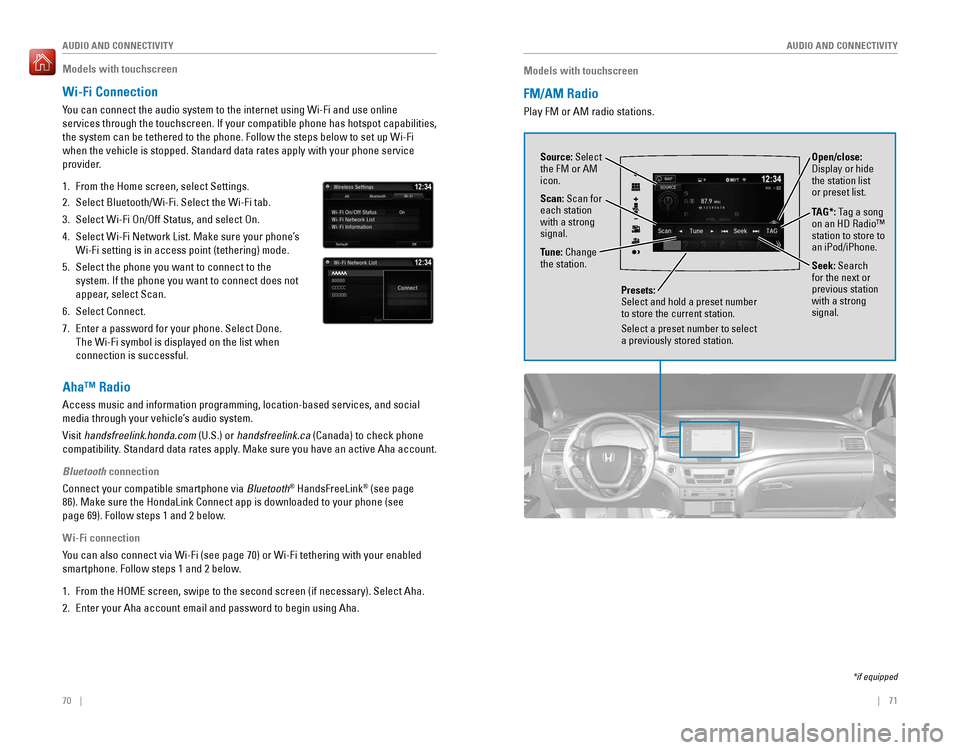
FM/AM Radio
Play FM or AM radio stations.
Source: Select
the FM or AM
icon.
Tune: Change
the station.
Seek: Search
for the next or
previous station
with a strong
signal. Open/close:
Display or hide
the station list
or preset list.
Scan: Scan for
each station
with a strong
signal.
Presets:
Select and hold a preset number
to store the current station.
Select a preset number to select
a previously stored station.
TAG*: Tag a song
on an HD Radio™
station to store to
an iPod/iPhone.
*if equipped
Models with touchscreen
Wi-Fi Connection
You can connect the audio system to the internet using Wi-Fi and use onli\
ne
services through the touchscreen. If your compatible phone has hotspot c\
apabilities,
the system can be tethered to the phone. Follow the steps below to set u\
p Wi-Fi
when the vehicle is stopped. Standard data rates apply with your phone s\
ervice
provider.
1. From the Home screen, select Settings.
2. Select Bluetooth/Wi-Fi. Select the Wi-Fi tab.
3. Select Wi-Fi On/Off Status, and select On.
4. Select Wi-Fi Network List. Make sure your phone’s
Wi-Fi setting is in access point (tethering) mode.
5. Select the phone you want to connect to the
system. If the phone you want to connect does not
appear, select Scan.
6. Select Connect.
7. Enter a password for your phone. Select Done.
The Wi-Fi symbol is displayed on the list when
connection is successful.
Aha™ Radio
Access music and information programming, location-based services, and social
media through your vehicle’s audio system.
Visit handsfreelink.honda.com (U.S.) or handsfreelink.ca (Canada) to check phone
compatibility. Standard data rates apply. Make sure you have an active Aha account.
Bluetooth connection
Connect your compatible smartphone via Bluetooth
® HandsFreeLink® (see page
86). Make sure the HondaLink Connect app is downloaded to your phone (\
see
page 69). Follow steps 1 and 2 below.
Wi-Fi connection
You can also connect via Wi-Fi (see page 70) or Wi-Fi tethering with yo\
ur enabled
smartphone. Follow steps 1 and 2 below.
1. From the HOME screen, swipe to the second screen (if necessary). Selec\
t Aha.
2. Enter your Aha account email and password to begin using Aha.
Page 40 of 89
72 || 73
AUDIO AND CONNECTIVITY
AUDIO AND CONNECTIVITY
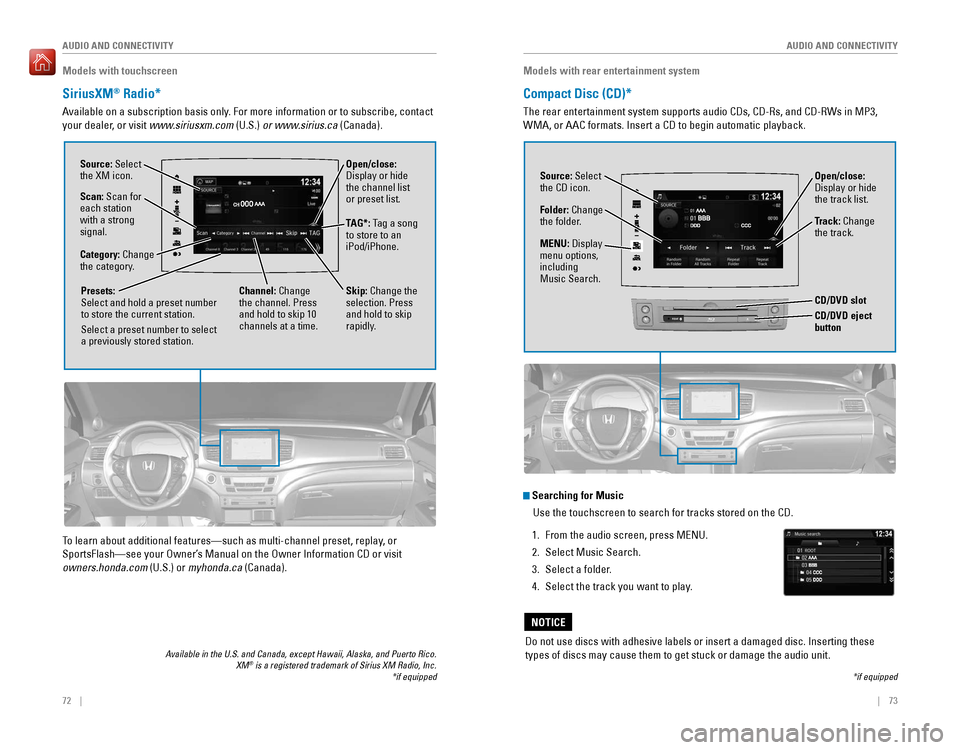
Open/close:
Display or hide
the channel list
or preset list.
Models with touchscreen
SiriusXM® Radio*
Available on a subscription basis only. For more information or to subscribe, contact
your dealer, or visit www.siriusxm.com (U.S.) or www.sirius.ca (Canada).
Available in the U.S. and Canada, except Hawaii, Alaska, and Puerto Rico.\
XM® is a registered trademark of Sirius XM Radio, Inc.
Source: Select
the XM icon.
Category: Change
the category.
Channel: Change
the channel. Press
and hold to skip 10
channels at a time.
Scan: Scan for
each station
with a strong
signal.
Presets:
Select and hold a preset number
to store the current station.
Select a preset number to select
a previously stored station.
*if equipped
TAG*: Tag a song
to store to an
iPod/iPhone.
Skip: Change the
selection. Press
and hold to skip
rapidly.
To learn about additional features—such as multi-channel preset, repla\
y, or
SportsFlash—see your Owner’s Manual on the Owner Information CD or visit
owners.honda.com (U.S.) or myhonda.ca (Canada).
Models with rear entertainment system
Compact Disc (CD)*
The rear entertainment system supports audio CDs, CD-Rs, and CD-RWs in M\
P3,
WMA, or AAC formats. Insert a CD to begin automatic playback.
Do not use discs with adhesive labels or insert a damaged disc. Insertin\
g these
types of discs may cause them to get stuck or damage the audio unit.
NOTICE
Source: Select
the CD icon.
Folder: Change
the folder. Open/close:
Display or hide
the track list.
Track: Change
the track.
*if equipped
Searching for Music
Use the touchscreen to search for tracks stored on the CD.
1. From the audio screen, press MENU.
2. Select Music Search.
3. Select a folder.
4. Select the track you want to play.
MENU: Display
menu options,
including
Music Search.
REARCD/DVD eject button
CD/DVD slot