display HONDA PILOT 2019 (in English) Workshop Manual
[x] Cancel search | Manufacturer: HONDA, Model Year: 2019, Model line: PILOT, Model: HONDA PILOT 2019Pages: 747, PDF Size: 45.81 MB
Page 248 of 747
uuAudio System uAuxiliary Input Jack
246
Features
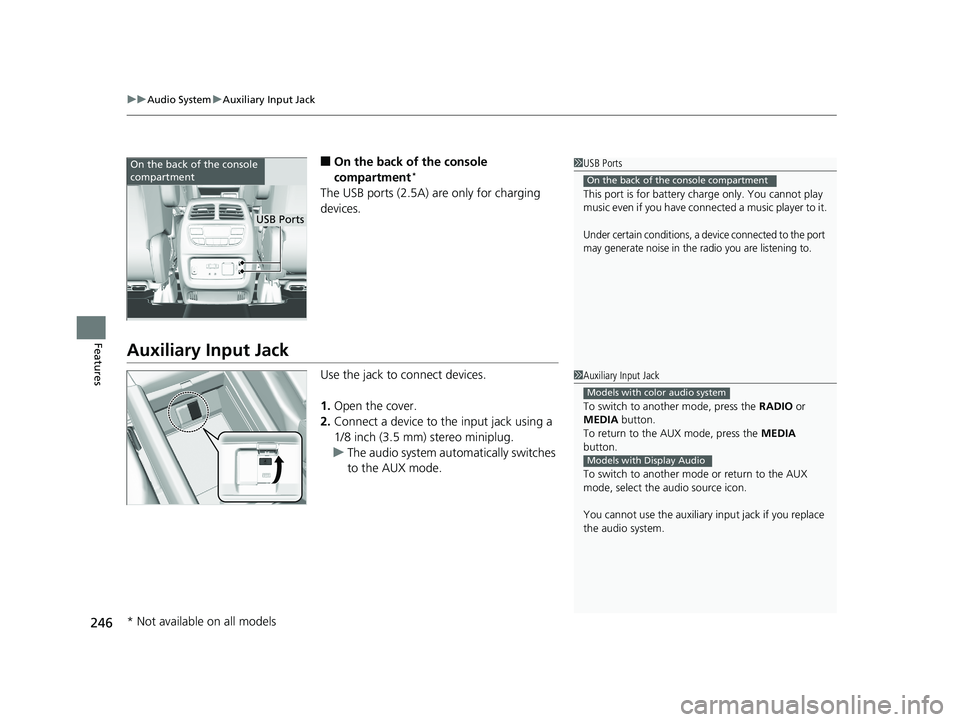
■On the back of the console
compartment*
The USB ports (2.5A) are only for charging
devices.
Auxiliary Input Jack
Use the jack to connect devices.
1. Open the cover.
2. Connect a device to the input jack using a
1/8 inch (3.5 mm) stereo miniplug.
u The audio system automatically switches
to the AUX mode.
1USB Ports
This port is for battery charge only. You cannot play
music even if you have conne cted a music player to it.
Under certain conditions, a device connected to the port
may generate noise in the radio you are listening to.
On the back of the console compartment
On the back of the console
compartment
USB Ports
1Auxiliary Input Jack
To switch to another mode, press the RADIO or
MEDIA button.
To return to the AUX mode, press the MEDIA
button.
To switch to another mode or return to the AUX
mode, select the audio source icon.
You cannot use the auxiliary input jack if you replace
the audio system.
Models with color audio system
Models with Display Audio
* Not available on all models
19 PILOT HMA ELP-31TG76310.book 246 ページ 2019年3月15日 金曜日 午後6時8分
Page 249 of 747
247
uuAudio System uAudio System Theft Protection
Features
Audio System Theft Protection
The audio system is disabled when it is disconnected from the power source, such as
when the battery is disconnected or goes dead. In certain conditions, the system
may display a code entry screen. If this occurs, reactivate the audio system.
■Reactivating the audio system
1. Set the power mode to ON.
2. Turn on the audio system.
3. Press and hold the audio system powe r button for more than two seconds.
u The audio system is reac tivated when the audio co ntrol unit establishes a
connection with the vehicl e control unit. If the control unit fails to recognize
the audio unit, you must go to a deal er and have the audio unit checked.
19 PILOT HMA ELP-31TG76310.book 247 ページ 2019年3月15日 金曜日 午後6時8分
Page 251 of 747
Continued249
uuAudio System uAudio Remote Controls
Features
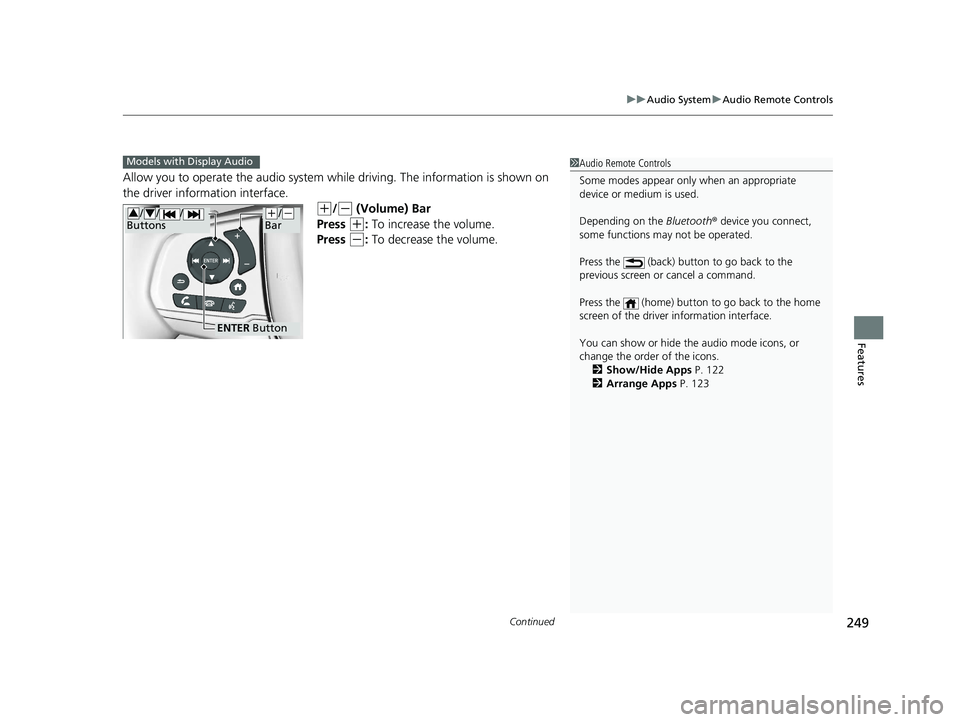
Allow you to operate the audio system whil e driving. The information is shown on
the driver information interface.
(+/(- (Volume) Bar
Press
(+: To increase the volume.
Press
(-: To decrease the volume.
1 Audio Remote Controls
Some modes appear only when an appropriate
device or medium is used.
Depending on the Bluetooth® device you connect,
some functions ma y not be operated.
Press the (back) button to go back to the
previous screen or cancel a command.
Press the (home) button to go back to the home
screen of the driver information interface.
You can show or hide the audio mode icons, or
change the order of the icons. 2 Show/Hide Apps P. 122
2 Arrange Apps P. 123Models with Display Audio
ENTER Button
(+/(-
Bar// /
Buttons34
19 PILOT HMA ELP-31TG76310.book 249 ページ 2019年3月15日 金曜日 午後6時8分
Page 253 of 747
251
Features
Audio System Basic Operation
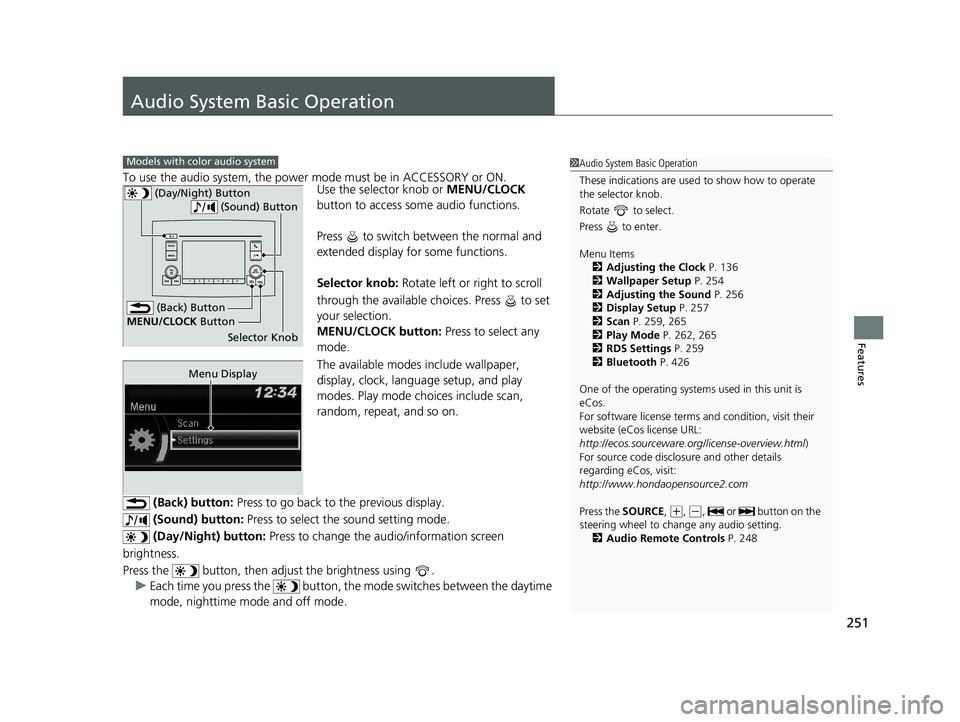
To use the audio system, the power mode must be in ACCESSORY or ON.Use the selector knob or MENU/CLOCK
button to access some audio functions.
Press to switch between the normal and
extended display fo r some functions.
Selector knob: Rotate left or right to scroll
through the available ch oices. Press to set
your selection.
MENU/CLOCK button: Press to select any
mode.
The available modes include wallpaper,
display, clock, language setup, and play
modes. Play mode choices include scan,
random, repeat, and so on.
(Back) button: Press to go back to the previous display.
(Sound) button: Press to select the sound setting mode.
(Day/Night) button: Press to change the audio/information screen
brightness.
Press the button, then adju st the brightness using .
u Each time you press the button, the mode switches between the daytime
mode, nighttime mode and off mode.
Models with color audio system1 Audio System Basic Operation
These indications are used to show how to operate
the selector knob.
Rotate to select.
Press to enter.
Menu Items 2 Adjusting the Clock P. 136
2 Wallpaper Setup P. 254
2 Adjusting the Sound P. 256
2 Display Setup P. 257
2 Scan P. 259, 265
2 Play Mode P. 262, 265
2 RDS Settings P. 259
2 Bluetooth P. 426
One of the operating system s used in this unit is
eCos.
For software license terms and condition, visit their
website (eCos license URL:
http://ecos.sourceware.org/license-overview.html )
For source code disclo sure and other details
regarding eCos, visit:
http://www.hondaopensource2.com
Press the SOURCE,
( +, (-, or button on the
steering wheel to cha nge any audio setting.
2 Audio Remote Controls P. 248
(Back) Button
Selector Knob
MENU/CLOCK
Button
(Day/Night) Button
(Sound) Button
Menu Display
19 PILOT HMA ELP-31TG76310.book 251 ページ 2019年3月15日 金曜日 午後6時8分
Page 254 of 747
252
uuAudio System Basic Operation uAudio/Information Screen
Features
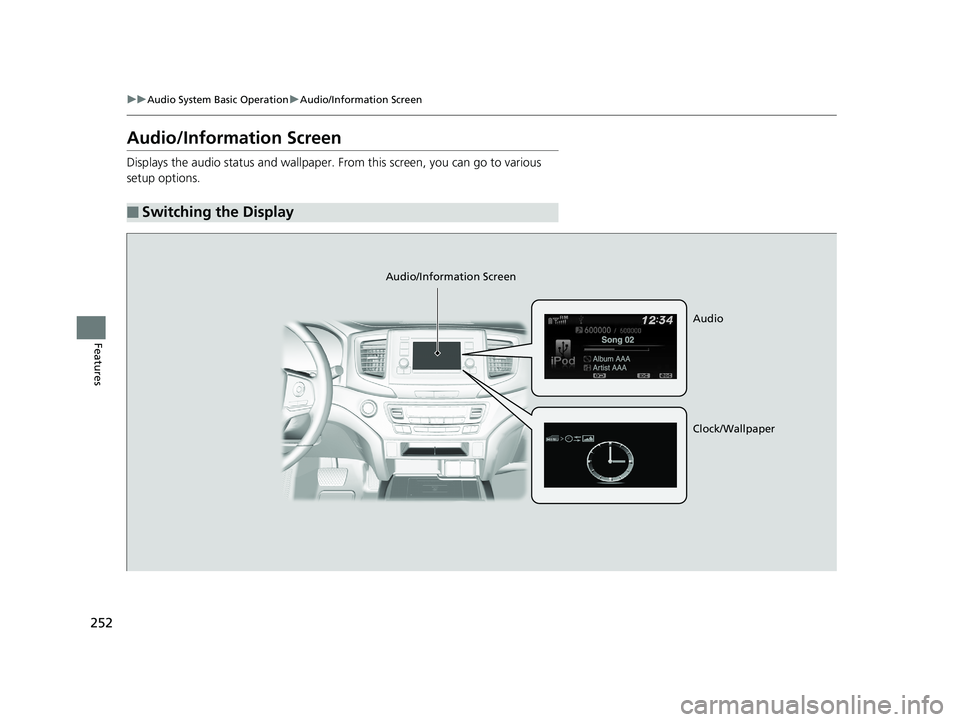
Audio/Information Screen
Displays the audio status and wallpaper. From this screen, you can go to various
setup options.
■Switching the Display
Audio/Information Screen
Audio
Clock/Wallpaper
19 PILOT HMA ELP-31TG76310.book 252 ページ 2019年3月15日 金曜日 午後6時8分
Page 255 of 747
253
uuAudio System Basic Operation uAudio/Information Screen
Continued
Features
■Audio
Shows the current audio information.
■Clock/Wallpaper
Shows a clock screen or an image you import.
■Change display
1. Press the MENU/CLOCK button.
2. Rotate to select Settings, then press .
3. Rotate to select Display Change, then press .
4. Rotate to select Wallpaper, then press .
u If you want to return to the audio/information screen, select Audio.
19 PILOT HMA ELP-31TG76310.book 253 ページ 2019年3月15日 金曜日 午後6時8分
Page 256 of 747
uuAudio System Basic Operation uAudio/Information Screen
254
Features
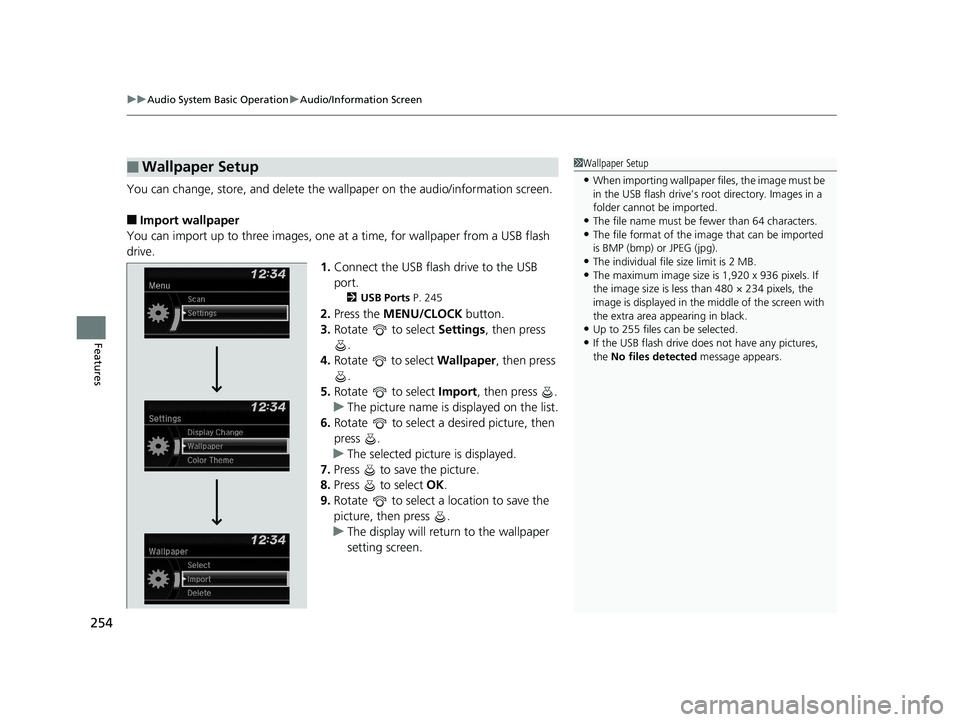
You can change, store, and delete the wa llpaper on the audio/information screen.
■Import wallpaper
You can import up to three images, one at a time, for wallpaper from a USB flash
drive.
1.Connect the USB flash drive to the USB
port.
2 USB Ports P. 245
2.Press the MENU/CLOCK button.
3. Rotate to select Settings, then press
.
4. Rotate to select Wallpaper , then press
.
5. Rotate to select Import, then press .
u The picture name is displayed on the list.
6. Rotate to select a desired picture, then
press .
u The selected picture is displayed.
7. Press to save the picture.
8. Press to select OK.
9. Rotate to select a location to save the
picture, then press .
u The display will return to the wallpaper
setting screen.
■Wallpaper Setup1Wallpaper Setup
•When importing wallpaper files, the image must be
in the USB flash drive’s root directory. Images in a
folder cannot be imported.
•The file name must be fewer than 64 characters.•The file format of the im age that can be imported
is BMP (bmp) or JPEG (jpg).
•The individual file size limit is 2 MB.•The maximum image size is 1,920 x 936 pixels. If
the image size is less than 480 × 234 pixels, the
image is displayed in the middle of the screen with
the extra area appearing in black.
•Up to 255 files can be selected.
•If the USB flash drive doe s not have any pictures,
the No files detected message appears.
19 PILOT HMA ELP-31TG76310.book 254 ページ 2019年3月15日 金曜日 午後6時8分
Page 257 of 747
255
uuAudio System Basic Operation uAudio/Information Screen
Features
■Select wallpaper
1. Press the MENU/CLOCK button.
2. Rotate to select Settings, then press .
3. Rotate to select Wallpaper, then press .
4. Rotate to select Select, then press .
u The screen changes to the wallpaper list.
5. Rotate to select a desired wallpaper, then press .
■To view wallpaper once it is set
1. Press the MENU/CLOCK button.
2. Rotate to select Settings, then press .
3. Rotate to select Display Change, then press .
4. Rotate to select Wallpaper, then press .
u The screen changes to the wallpaper list.
5. Rotate to select a wallpaper that you want to set, then press .
■Delete wallpaper
1. Press the MENU/CLOCK button.
2. Rotate to select Settings, then press .
3. Rotate to select Wallpaper, then press .
4. Rotate to select Delete, then press .
u The screen changes to the wallpaper list.
5. Rotate to select a wallpaper that you want to delete, then press .
6. Rotate to select Yes, then press .
u The display will return to the wallpaper setting screen.
1Wallpaper Setup
To go back to the previous screen, press the
(Back) button.
When the file size is large, it takes a while to be
previewed.
19 PILOT HMA ELP-31TG76310.book 255 ページ 2019年3月15日 金曜日 午後6時8分
Page 259 of 747
257
uuAudio System Basic Operation uDisplay Setup
Features
Display Setup
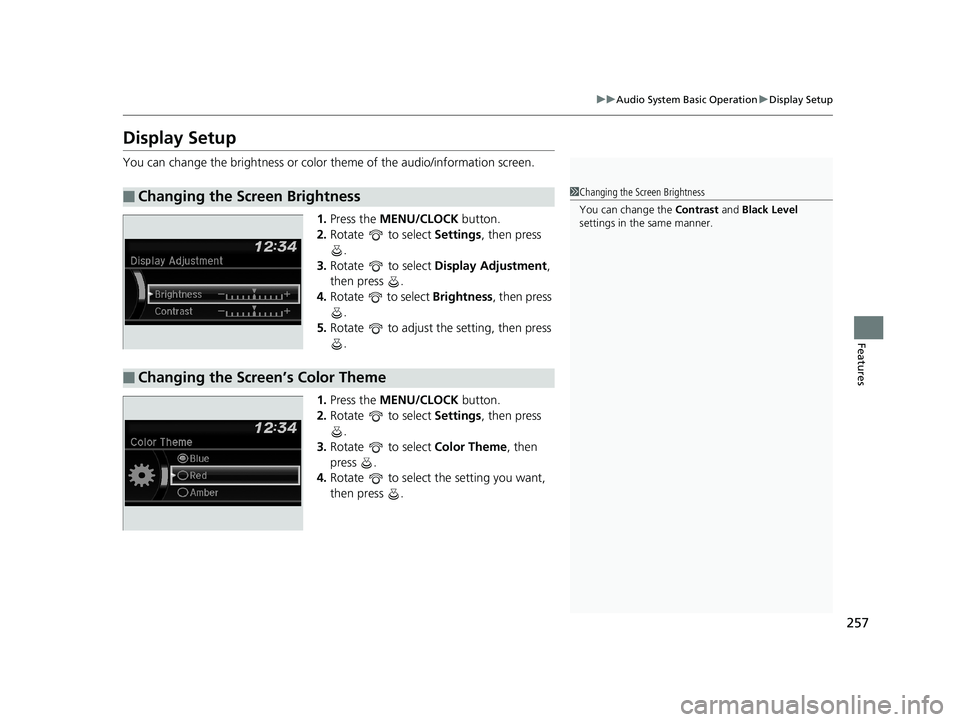
You can change the brightness or color theme of the audio/information screen.
1. Press the MENU/CLOCK button.
2. Rotate to select Settings, then press
.
3. Rotate to select Display Adjustment ,
then press .
4. Rotate to select Brightness, then press
.
5. Rotate to adjust th e setting, then press
.
1. Press the MENU/CLOCK button.
2. Rotate to select Settings, then press
.
3. Rotate to select Color Theme, then
press .
4. Rotate to select the setting you want,
then press .
■Changing the Screen Brightness1Changing the Screen Brightness
You can change the Contrast and Black Level
settings in the same manner.
■Changing the Screen’s Color Theme
19 PILOT HMA ELP-31TG76310.book 257 ページ 2019年3月15日 金曜日 午後6時8分
Page 260 of 747
258
uuAudio System Basic Operation uPlaying AM/FM Radio
Features
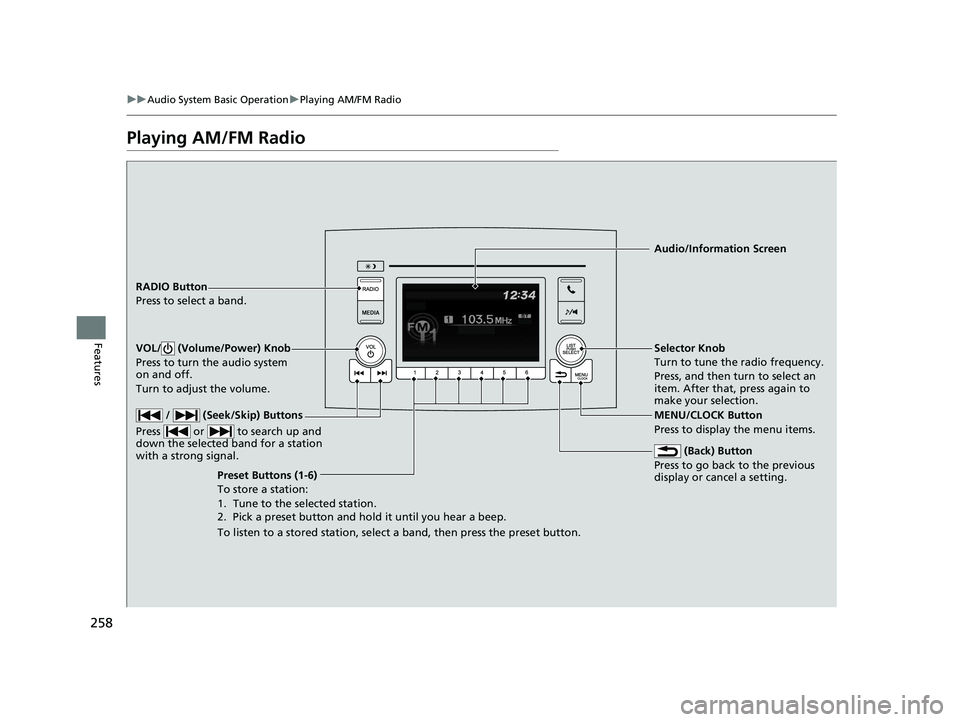
Playing AM/FM Radio
RADIO Button
Press to select a band.
(Back) Button
Press to go back to the previous
display or cancel a setting.
/ (Seek/Skip) Buttons
Press or to search up and
down the selected band for a station
with a strong signal.
VOL/ (Volume/Power) Knob
Press to turn the audio system
on and off.
Turn to adjust the volume.
Preset Buttons (1-6)
To store a station:
1. Tune to the selected station.
2. Pick a preset button and hold it until you hear a beep.
To listen to a stored station, select a band, then press the preset button. Selector Knob
Turn to tune the radio frequency.
Press, and then turn to select an
item. After that, press again to
make your selection.
MENU/CLOCK Button
Press to display the menu items. Audio/Information Screen
19 PILOT HMA ELP-31TG76310.book 258 ページ 2019年3月15日 金曜日 午後6時8分