lock HONDA PILOT 2021 (in English) Repair Manual
[x] Cancel search | Manufacturer: HONDA, Model Year: 2021, Model line: PILOT, Model: HONDA PILOT 2021Pages: 739, PDF Size: 44.86 MB
Page 177 of 739
175
uuOperating the Switches Around the Steering Wheel uLight Switches
Continued
Controls
Light Switches
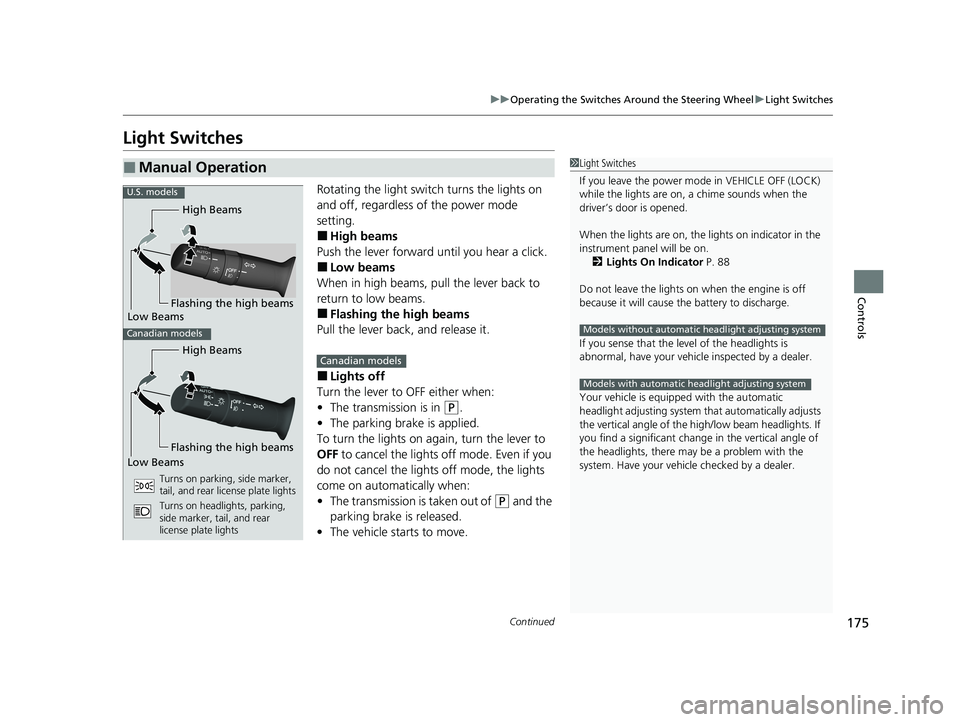
Rotating the light switch turns the lights on
and off, regardless of the power mode
setting.
■High beams
Push the lever forward until you hear a click.
■Low beams
When in high beams, pull the lever back to
return to low beams.
■Flashing the high beams
Pull the lever back, and release it.
■Lights off
Turn the lever to OFF either when:
• The transmission is in
(P.
• The parking brake is applied.
To turn the light s on again, turn the lever to
OFF to cancel the lights off mode. Even if you
do not cancel the lights off mode, the lights
come on automatically when:
• The transmission is taken out of
(P and the
parking brake is released.
• The vehicle starts to move.
■Manual Operation1Light Switches
If you leave the power mode in VEHICLE OFF (LOCK)
while the lights are on, a chime sounds when the
driver’s door is opened.
When the lights are on, the lights on indicator in the
instrument pane l will be on.
2 Lights On Indicator P. 88
Do not leave the lights on when the engine is off
because it will cause the battery to discharge.
If you sense that the le vel of the headlights is
abnormal, have your vehicle inspected by a dealer.
Your vehicle is equipped with the automatic
headlight adjusting system that automatically adjusts
the vertical angle of the high/low beam headlights. If
you find a significant change in the vertical angle of
the headlights, there may be a problem with the
system. Have your vehicle checked by a dealer.
Models without automatic headlight adjusting system
Models with automatic headlight adjusting system
High Beams
Flashing the high beams
Low Beams
Turns on parking, side marker,
tail, and rear license plate lights
Turns on headlights, parking,
side marker, tail, and rear
license plate lights
U.S. models
Canadian models
High Beams
Flashing the high beams
Low BeamsCanadian models
21 PILOT-31TG76500.book 175 ページ 2020年3月18日 水曜日 午後4時38分
Page 178 of 739
uuOperating the Switches Around the Steering Wheel uLight Switches
176
Controls
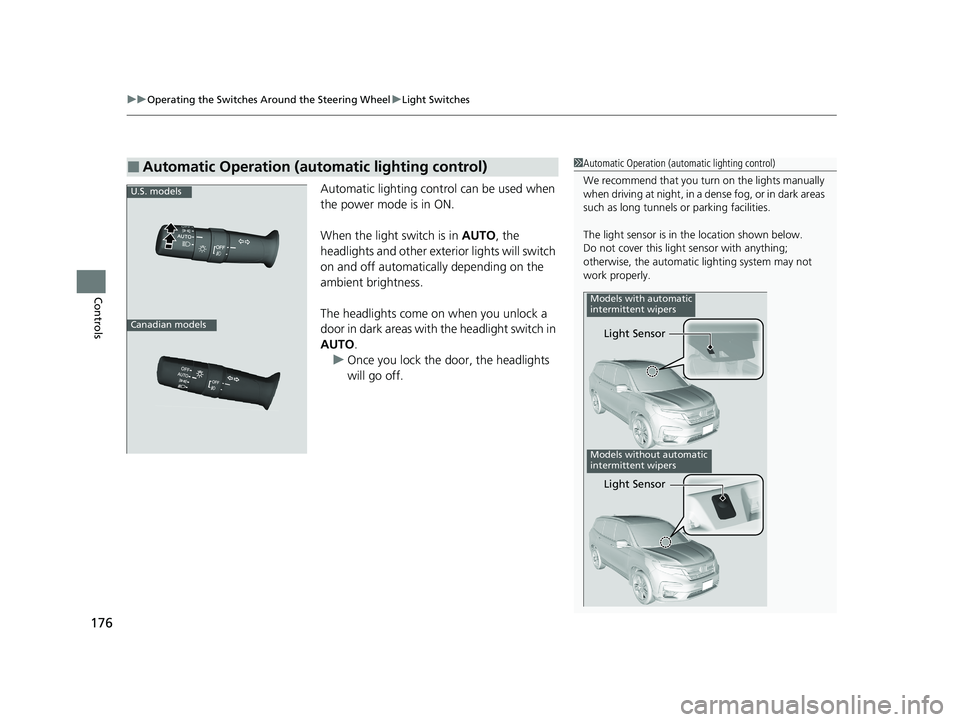
Automatic lighting control can be used when
the power mode is in ON.
When the light switch is in AUTO, the
headlights and other exterior lights will switch
on and off automatically depending on the
ambient brightness.
The headlights come on when you unlock a
door in dark areas with the headlight switch in
AUTO .
u Once you lock the door, the headlights
will go off.
■Automatic Operation (automatic lighting control)1Automatic Operation (aut omatic lighting control)
We recommend that you tu rn on the lights manually
when driving at night, in a de nse fog, or in dark areas
such as long tunnels or parking facilities.
The light sensor is in the location shown below.
Do not cover this light sensor with anything;
otherwise, the automatic lighting system may not
work properly.
Light Sensor
Models with automatic
intermittent wipers
Models without automatic
intermittent wipers
Light Sensor
Canadian models
U.S. models
21 PILOT-31TG76500.book 176 ページ 2020年3月18日 水曜日 午後4時38分
Page 179 of 739
177
uuOperating the Switches Around the Steering Wheel uLight Switches
Controls
The headlights automatically come on when th e wipers are used several times within
a certain number of intervals with the headlight switch in AUTO.
The headlights automatically go off a few mi nutes later if the wipers are stopped.
The headlights, all other exterior lights, and the instrument panel lights turn off 15
seconds after you set the power mode to VEHICLE OFF (LOCK), take the remote with
you, and close the driver’s door.
If you set the power mode to VEHICLE OFF (LOCK) with the headlight switch on, but
do not open the door, the lights turn off after 10 minutes (three minutes, if the
switch is in the AUTO position).
The lights turn on again when you unlock or open the driver’s door. If you unlock
the door, but do not open it within 15 seconds, the lights go off. If you open the
driver’s door, you will hear a reminder chime alerting you that the lights are on.
■Headlight Integration with Wipers
■Automatic Lighting Off Feature
1 Automatic Operation (aut omatic lighting control)
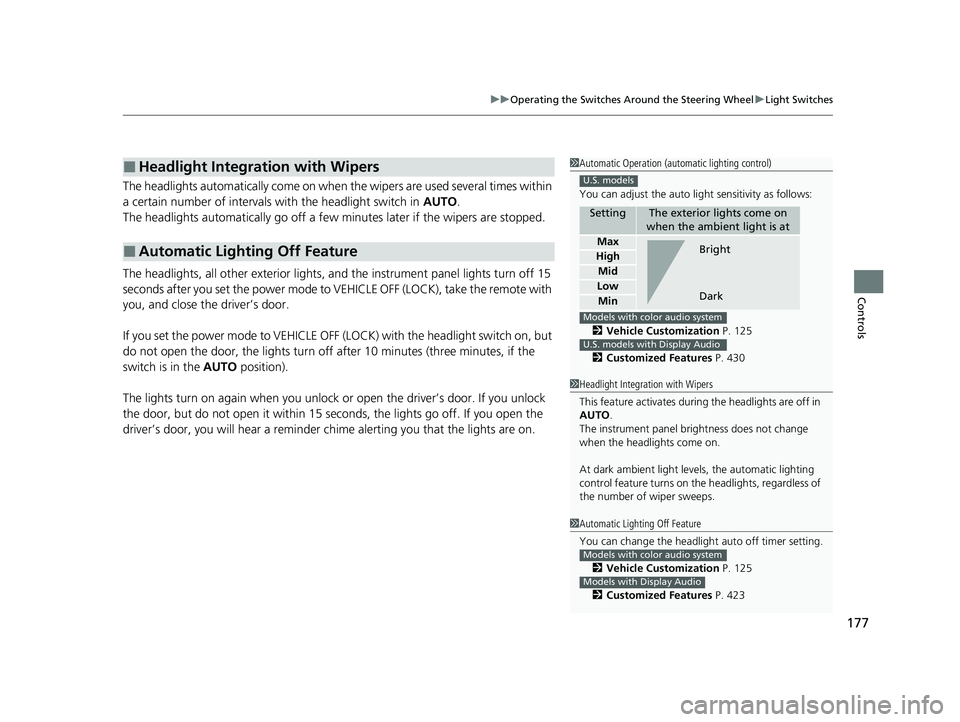
You can adjust the auto li ght sensitivity as follows:
2 Vehicle Customization P. 125
2 Customized Features P. 430
SettingThe exterior lights come on
when the ambient light is at
Max
High
Mid
Low
Min
U.S. models
Bright
Dark
Models with color audio system
U.S. models with Display Audio
1 Headlight Integration with Wipers
This feature activates during the headlights are off in
AUTO .
The instrument panel br ightness does not change
when the headlights come on.
At dark ambient light leve ls, the automatic lighting
control feature turns on the headlights, regardless of
the number of wiper sweeps.
1 Automatic Lighting Off Feature
You can change the headlight auto off timer setting.
2 Vehicle Customization P. 125
2 Customized Features P. 423
Models with color audio system
Models with Display Audio
21 PILOT-31TG76500.book 177 ページ 2020年3月18日 水曜日 午後4時38分
Page 184 of 739
182
uuOperating the Switches Around the Steering Wheel uDaytime Running Lights
Controls
Daytime Running Lights
The parking/daytime running lights come on when the following conditions have
been met:
• The power mode is in ON.
• The headlight switch is AUTO or OFF .
• The parking brake is released.
• The power mode is in ON.
• The headlight switch is AUTO.
• The parking brake is released.
The lights remain on even if you set the parking brake. Setting the power mode to
VEHICLE OFF (LOCK) will turn off the daytime running lights.
The daytime running lights are off once the headlight switch is turned on, or when
the head light switch is in AUTO and it is getting darker outside.
U.S. models
Canadian models
21 PILOT-31TG76500.book 182 ページ 2020年3月18日 水曜日 午後4時38分
Page 186 of 739
uuOperating the Switches Around the Steering Wheel uWipers and Washers
184
Controls
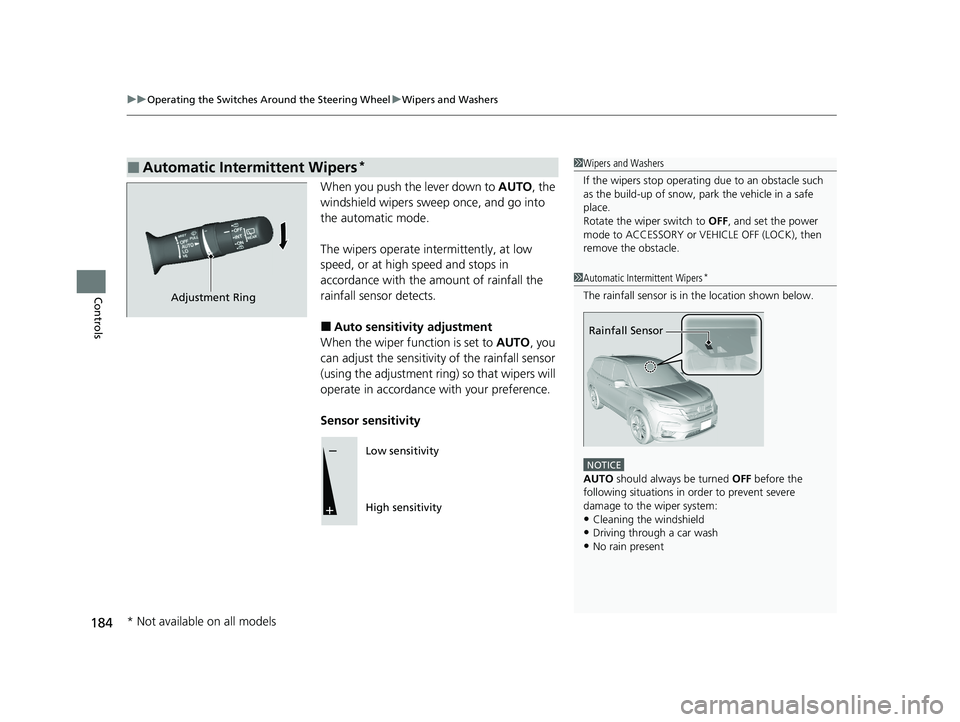
When you push the lever down to AUTO, the
windshield wipers sweep once, and go into
the automatic mode.
The wipers operate intermittently, at low
speed, or at high speed and stops in
accordance with the am ount of rainfall the
rainfall sensor detects.
■Auto sensitivity adjustment
When the wiper function is set to AUTO, you
can adjust the sensitivity of the rainfall sensor
(using the adjustment ring) so that wipers will
operate in accordance with your preference.
Sensor sensitivity
■Automatic Intermittent Wipers*1 Wipers and Washers
If the wipers st op operating due to an obstacle such
as the build-up of snow, pa rk the vehicle in a safe
place.
Rotate the wiper switch to OFF, and set the power
mode to ACCESSORY or VEHICLE OFF (LOCK), then
remove the obstacle.
1 Automatic Intermittent Wipers*
The rainfall sensor is in the location shown below.
NOTICE
AUTO should always be turned OFF before the
following situations in order to prevent severe
damage to the wiper system:
•Cleaning the windshield•Driving through a car wash
•No rain present
Rainfall Sensor
Adjustment Ring
Low sensitivity
High sensitivity
* Not available on all models
21 PILOT-31TG76500.book 184 ページ 2020年3月18日 水曜日 午後4時38分
Page 191 of 739
189
uuOperating the Switches Around the Steering Wheel uDriving Position Memory System*
Continued
Controls
Driving Position Memory System*
You can store two driver’s seat (except for power lumbar) and door mirror positions
with the driving position memory system.
When you unlock and open the driver’s door with a remote transmitter, or smart
entry system, door mirrors adjust to one of the two preset positions and the seat
adjusts to retracted positions of one of the two preset positions automatically.
The seat will move to the stored position when you set the power mode to
ACCESSORY.
When you enter the vehicle, the driver in formation interface briefly shows you which
remote transmitter you used to unlock the vehicle.
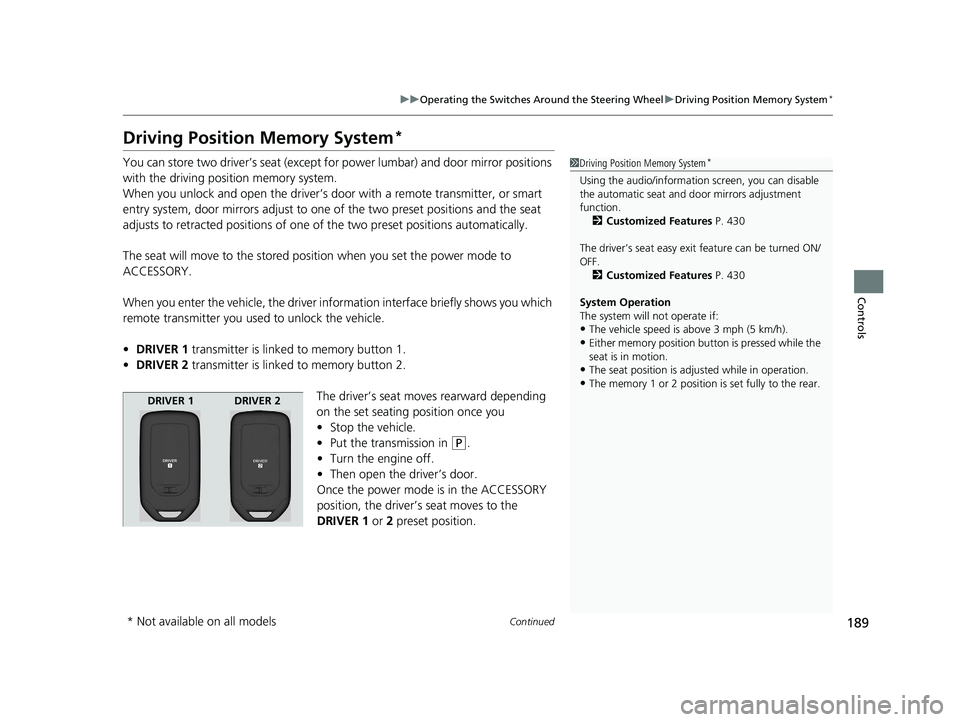
• DRIVER 1 transmitter is linked to memory button 1.
• DRIVER 2 transmitter is linked to memory button 2.
The driver’s seat moves rearward depending
on the set seating position once you
•Stop the vehicle.
• Put the transmission in
(P.
• Turn the engine off.
• Then open the driver’s door.
Once the power mode is in the ACCESSORY
position, the driver’s seat moves to the
DRIVER 1 or 2 preset position.
1 Driving Position Memory System*
Using the audio/informati on screen, you can disable
the automatic seat and d oor mirrors adjustment
function. 2 Customized Features P. 430
The driver’s seat easy exit feature can be turned ON/
OFF. 2 Customized Features P. 430
System Operation
The system will not operate if:
•The vehicle speed is above 3 mph (5 km/h).
•Either memory position button is pressed while the
seat is in motion.
•The seat position is adju sted while in operation.
•The memory 1 or 2 position is set fully to the rear.
DRIVER 1 DRIVER 2
* Not available on all models
21 PILOT-31TG76500.book 189 ページ 2020年3月18日 水曜日 午後4時38分
Page 193 of 739
191
uuOperating the Switches Around the Steering Wheel uAdjusting the Steering Wheel
Controls
Adjusting the Steering Wheel
The steering wheel height and distance from your body can be adjusted so that you
can comfortably grip the steering wheel in an appropriate driving posture.
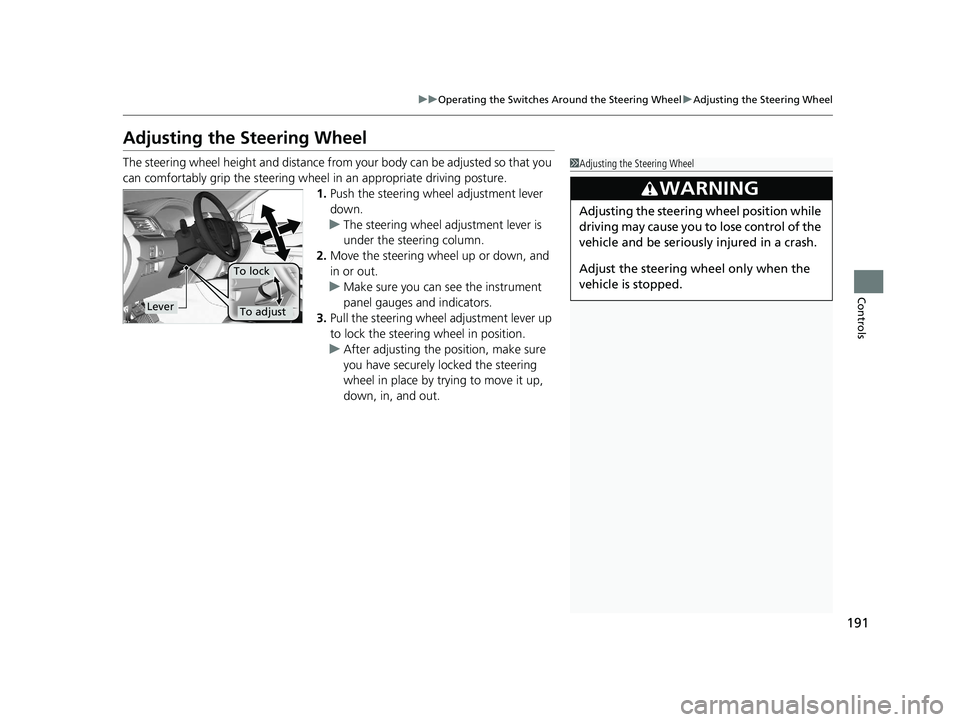
1. Push the steering wheel adjustment lever
down.
u The steering wheel adjustment lever is
under the steering column.
2. Move the steering wheel up or down, and
in or out.
u Make sure you can see the instrument
panel gauges and indicators.
3. Pull the steering wheel adjustment lever up
to lock the steering wheel in position.
u After adjusting the position, make sure
you have securely locked the steering
wheel in place by trying to move it up,
down, in, and out.1Adjusting the Steering Wheel
3WARNING
Adjusting the steering wheel position while
driving may cause you to lose control of the
vehicle and be seriously injured in a crash.
Adjust the steering wheel only when the
vehicle is stopped.
Lever
To lock
To adjust
21 PILOT-31TG76500.book 191 ページ 2020年3月18日 水曜日 午後4時38分
Page 198 of 739
uuAdjusting the Seats uFront Seats
196
Controls
■Adjusting the front manual seats*1Adjusting the front manual seats*
Once a seat is adjusted co rrectly, rock it back and
forth to make sure it is locked in position.
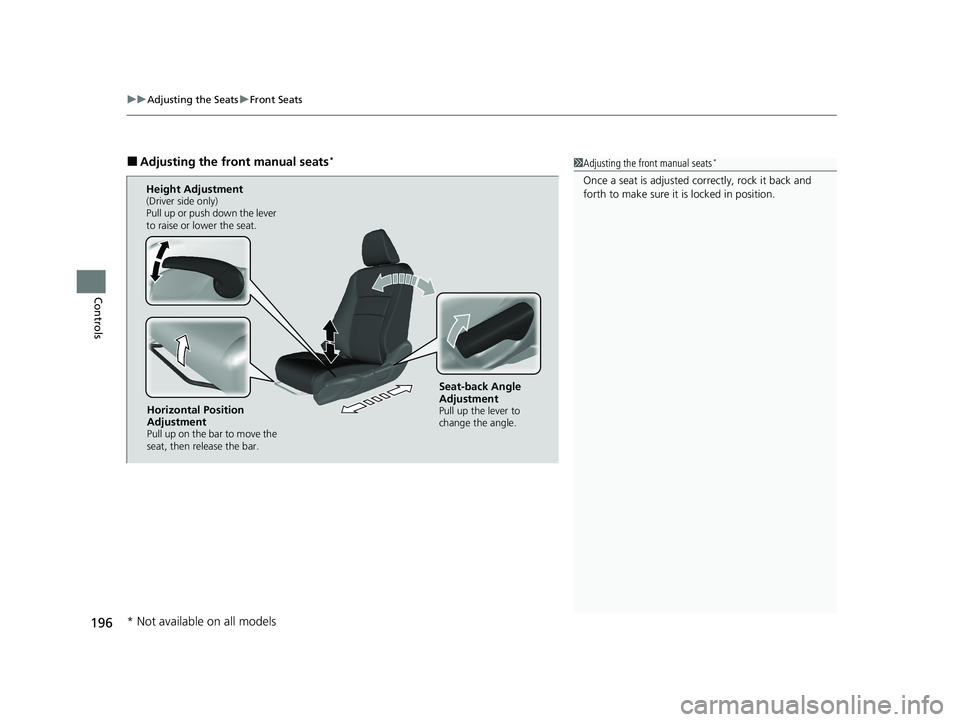
Horizontal Position
Adjustment
Pull up on the bar to move the
seat, then release the bar.
Height Adjustment(Driver side only)
Pull up or push down the lever
to raise or lower the seat.
Seat-back Angle
Adjustment
Pull up the lever to
change the angle.
* Not available on all models
21 PILOT-31TG76500.book 196 ページ 2020年3月18日 水曜日 午後4時38分
Page 200 of 739
198
uuAdjusting the Seats uSecond Row Seats
Controls
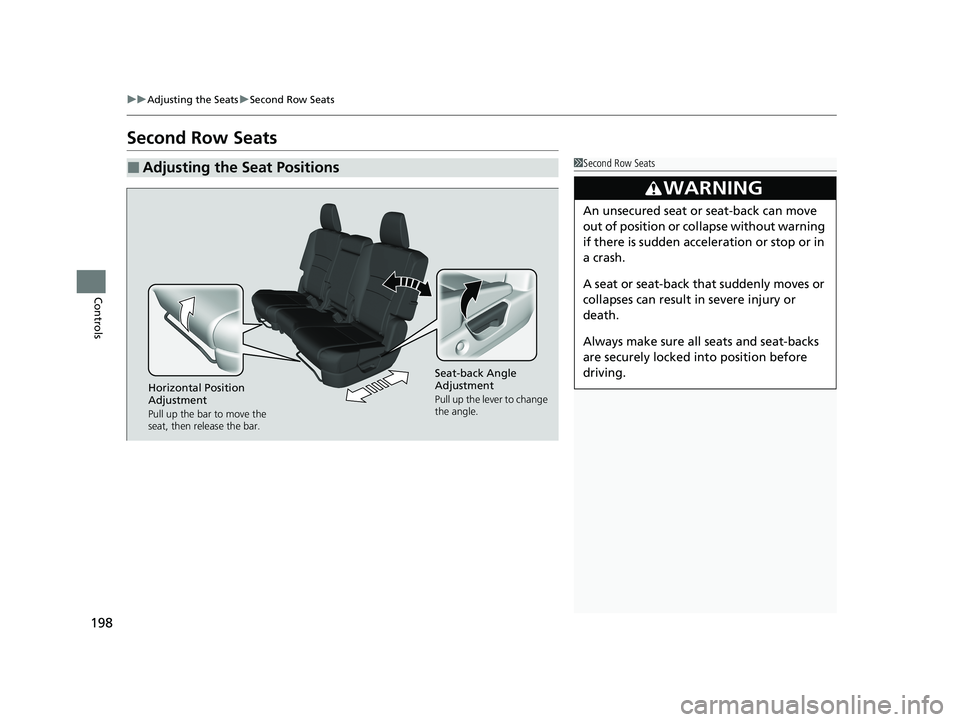
Second Row Seats
■Adjusting the Seat Positions1Second Row Seats
3WARNING
An unsecured seat or seat-back can move
out of position or collapse without warning
if there is sudden acce leration or stop or in
a crash.
A seat or seat-back that suddenly moves or
collapses can result in severe injury or
death.
Always make sure all seats and seat-backs
are securely locked in to position before
driving.
Seat-back Angle
Adjustment
Pull up the lever to change
the angle.Horizontal Position
Adjustment
Pull up the bar to move the
seat, then release the bar.
21 PILOT-31TG76500.book 198 ページ 2020年3月18日 水曜日 午後4時38分
Page 201 of 739
199
uuAdjusting the Seats uThird Row Seats
Controls
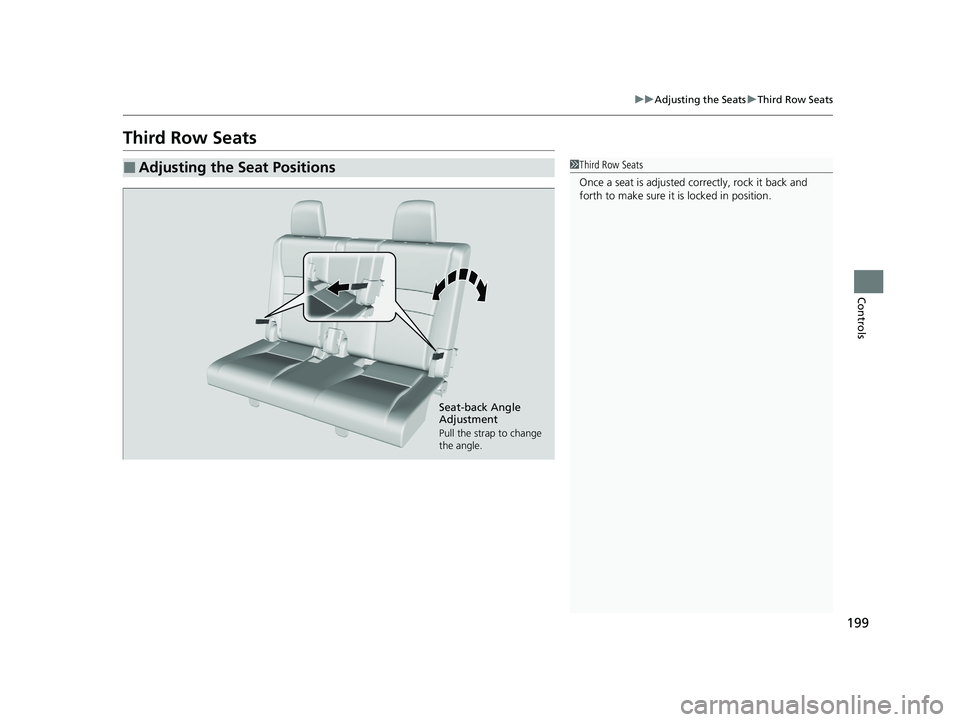
Third Row Seats
■Adjusting the Seat Positions1Third Row Seats
Once a seat is adjusted co rrectly, rock it back and
forth to make sure it is locked in position.
Seat-back Angle
Adjustment
Pull the strap to change
the angle.
21 PILOT-31TG76500.book 199 ページ 2020年3月18日 水曜日 午後4時38分