brake light HONDA PILOT 2023 Owner's Guide
[x] Cancel search | Manufacturer: HONDA, Model Year: 2023, Model line: PILOT, Model: HONDA PILOT 2023Pages: 814, PDF Size: 29.02 MB
Page 660 of 814

Driving
Anti-lock Brake System (ABS)
Helps prevent the wheels from locking up, and helps you retain steering control by
pumping the brakes rapidly, much f")
659
uuBraking uAnti-lock Brake System (ABS)
Driving
Anti-lock Brake System (ABS)
Helps prevent the wheels from locking up, and helps you retain steering control by
pumping the brakes rapidly, much faster than you can.
The electronic brake distribu tion (EBD) system, which is part of the ABS, also
balances the front-to-rear braking distribution according to vehicle loading.
You should never pump the brake pedal. Let the ABS work for you by always
keeping firm, steady pressure on the brake pe dal. This is sometimes referred to as
ŌĆ£stomp and steer.ŌĆØ
Ō¢ĀABS operation
The brake pedal may pulsate slightly when the ABS is working. Depress the brake
pedal and keep holding the pedal firmly do wn. On dry pavement, you will need to
press on the brake pedal very hard before th e ABS activates. However, you may feel
the ABS activate immediately if you are trying to stop on snow or ice.
ABS may activate when you depres s the brake pedal when driving on:
ŌĆó Wet or snow covered roads.
ŌĆó Roads paved with stone.
ŌĆó Roads with uneven surf aces, such as potholes, cracks, manholes, etc.
When the vehicle speed goes under 6 mph (10 km/h), the ABS stops.
Ō¢ĀABS1Anti-lock Brake System (ABS)
NOTICE
The ABS may not function correctly if you use a tire of
the incorrect size or type.
If the ABS indicator comes on while driving, there
may be a problem with the system.
While normal braking will not be affected, there is a
possibility that the ABS wi ll not be operating. Have
your vehicle checked by a dealer immediately.
The ABS is not designed for the purpose of reducing
the time or distance it takes for a vehicle to stop: It is
designed to limit brake lo ckup which can lead to
skidding and loss of steering control.
In the following cases, yo ur vehicle may need more
distance to stop than a vehicle without the ABS:
ŌĆóYou are driving on rough or uneven road surfaces,
such as gravel or snow.
ŌĆóThe tires are equipped with snow chains.
The following may be observed with the ABS system:
ŌĆóMotor sounds coming from the engine
compartment when the brakes are applied, or when
system checks are being performed after the engine
has been started and while the vehicle accelerates.
ŌĆóBrake pedal and/or the vehicle body vibration when
ABS activates.
These vibrations and sounds are normal to ABS
systems and are no cause for concern.
23 PILOT-31T906000_03.book 659 ŃāÜŃā╝ŃéĖ ’╝Æ’╝É’╝Æ’╝ÆÕ╣┤’╝æ’╝ɵ£ł’╝ō’╝æµŚźŃĆƵ£łµø£µŚźŃĆĆÕŹłÕēŹ’╝æ’╝ɵÖé’╝Æ’╝¢Õłå
Page 661 of 814

660
uuBraking uBrake Assist System
Driving
Brake Assist System
Designed to assist the driver by generating greater braking force when you depress
the brake pedal hard during emergency braking.
Ō¢ĀBrake assist system operation
Press the brake pedal firmly for more powerful braking.
When brake assist operates, the pedal ma y wiggle slightly and an operating noise
may be heard. This is normal. Keep holding the brake pedal firmly down.
23 PILOT-31T906000_03.book 660 ŃāÜŃā╝ŃéĖ ’╝Æ’╝É’╝Æ’╝ÆÕ╣┤’╝æ’╝ɵ£ł’╝ō’╝æµŚźŃĆƵ£łµø£µŚźŃĆĆÕŹłÕēŹ’╝æ’╝ɵÖé’╝Æ’╝¢Õłå
Page 692 of 814

691
Maintenance
This chapter discusses basic maintenance.
Before Performing MaintenanceInspection and Maintenance ............ 692
Safety When Performing Maintenance ..693
Parts and Fluids Used in Maintenance Service ........................................... 694
Maintenance Minder
TM..................... 695
Maintenance Under the Hood Maintenance Items Under the Hood .. 705
Opening the Hood ........................... 706
Engine Compartment Cover ............. 708
Recommended Engine Oil ................ 709
Oil Check ......................................... 710
Adding Engine Oil ............................ 711
Changing the Engine Oil and Oil Filter ....712
Engine Coolant ................................ 714
Transmission Fluid ............................ 716
Transfer Assembly Fluid
*.................. 716
Brake Fluid ....................................... 717
Refilling Window Wa sher Fluid......... 717
Replacing Light Bulbs ....................... 718
Checking and Maintaining Wiper
Blades .......................................... 723
Checking and Maintaining Tires
Checking Tires ................................. 728
Tire and Loading Information Label .. 729
Tire Labeling .................................... 729
DOT Tire Quality Grading (U.S. Vehicles) .. 731
Wear Indicators ............................... 733
Tire Service Life ................................ 733
Tire and Wheel Replacement ........... 734
Tire Rotation .................................... 735
Winter Tires ..................................... 736
Battery ............................................... 737
Remote Transmitter Care ................. 739
Climate Control System Maintenance .. 740Cleaning
Interior Care .................................... 742
Exterior Care.................................... 744
Accessories and Modifications ........ 747
* Not available on all models
23 PILOT-31T906000_03.book 691 ŃāÜŃā╝ŃéĖ ’╝Æ’╝É’╝Æ’╝ÆÕ╣┤’╝æ’╝ɵ£ł’╝ō’╝æµŚźŃĆƵ£łµø£µŚźŃĆĆÕŹłÕēŹ’╝æ’╝ɵÖé’╝Æ’╝¢Õłå
Page 693 of 814

692
Maintenance
Before Performing Maintenance
Inspection and Maintenance
For your safety, perform all listed inspections and maintenance to keep your vehicle
in good condition. If you become aware of an y abnormality (noise, smell, insufficient
brake fluid, oil residue on the ground, etc.), have your vehicle inspected by a dealer.
(Note, however, that service at a dealer is not mandatory to keep your warranties in
effect.)
Ō¢ĀRoutine inspections
Perform inspections before long distance tri ps, when washing the vehicle, or when
refueling.
2 Maintenance P. 32
Ō¢ĀPeriodic inspections
ŌĆó Check the brake fluid level monthly.
2 Checking the Brake Fluid P. 717
ŌĆóCheck the tire pressure monthly. Examin e the tread for wear and foreign objects.
2Checking and Maintaining Tires P. 728
ŌĆóCheck the operation of the exterior lights monthly.
2 Replacing Light Bulbs P. 718
ŌĆóCheck the condition of the wiper bl ades at least every six months.
2Checking and Maintaining Wiper Blades P. 723
Ō¢ĀTypes of Inspection and Maintenance
1Inspection and Maintenance
Maintenance, replacement, or repair of
emissions control devices and systems may be
done by any automotive repair establishment or
individuals using parts that are ŌĆ£certifiedŌĆØ to
EPA standards.
According to state and fede ral regulations, failure to
perform maintenance on the maintenance main
items marked with # will not void your emissions
warranties. However, all ma intenance services should
be performed in accordan ce with the intervals
indicated by the driver information interface.
2 Maintenance Service Items P. 700
If you want to perform complex maintenance tasks
that require more skills a nd tools, you can purchase a
subscription to the Service Express website at
www.techinfo.honda.com .
2 Authorized Manuals P. 800
If you want to perform ma intenance yourself, make
sure that you have the necessary tools and skills first.
After performing maintenanc e, update the records in
the separate maintenance booklet.
U.S. models
23 PILOT-31T906000_03.book 692 ŃāÜŃā╝ŃéĖ ’╝Æ’╝É’╝Æ’╝ÆÕ╣┤’╝æ’╝ɵ£ł’╝ō’╝æµŚźŃĆƵ£łµø£µŚźŃĆĆÕŹłÕēŹ’╝æ’╝ɵÖé’╝Æ’╝¢Õłå
Page 707 of 814
706
uuMaintenance Under the Hood uOpening the Hood
Maintenance
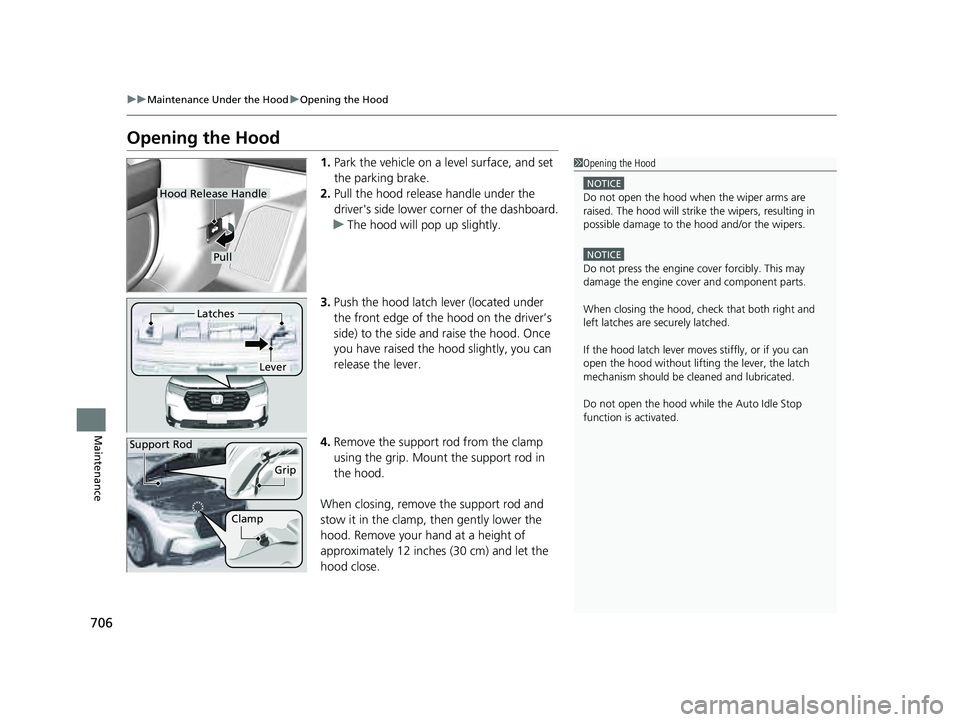
Opening the Hood
1. Park the vehicle on a level surface, and set
the parking brake.
2. Pull the hood release handle under the
driver's side lower corner of the dashboard.
u The hood will pop up slightly.
3. Push the hood latch lever (located under
the front edge of the hood on the driverŌĆÖs
side) to the side and raise the hood. Once
you have raised the hood slightly, you can
release the lever.
4. Remove the support rod from the clamp
using the grip. Mount the support rod in
the hood.
When closing, remove the support rod and
stow it in the clamp, then gently lower the
hood. Remove your hand at a height of
approximately 12 inches (30 cm) and let the
hood close.1 Opening the Hood
NOTICE
Do not open the hood when the wiper arms are
raised. The hood will strike the wipers, resulting in
possible damage to the hood and/or the wipers.
NOTICE
Do not press the engine cover forcibly. This may
damage the engine cover and component parts.
When closing the hood, check that both right and
left latches are securely latched.
If the hood latch lever moves stiffly, or if you can
open the hood without lifti ng the lever, the latch
mechanism should be cl eaned and lubricated.
Do not open the hood while the Auto Idle Stop
function is activated.
Hood Release Handle
Pull
Lever
Latches
Support Rod
Grip
Clamp
23 PILOT-31T906000_03.book 706 ŃāÜŃā╝ŃéĖ ’╝Æ’╝É’╝Æ’╝ÆÕ╣┤’╝æ’╝ɵ£ł’╝ō’╝æµŚźŃĆƵ£łµø£µŚźŃĆĆÕŹłÕēŹ’╝æ’╝ɵÖé’╝Æ’╝¢Õłå
Page 720 of 814

719
uuReplacing Light Bulbs uBrake Lights, Taillights, Rear Side Marker Lights, and Rear Turn Signal Light Bulbs
Continued
Maintenance
Brake Lights, Taillights, Rear Side Marker Lights, and
Rear Turn Signal Light Bulbs
When replacing, use the following bulbs.
1.Pry on the edge of the cover using a flat-tip
screwdriver to remove the cover.
u Wrap the flat-tip screwdriver with a cloth
to prevent scratches.
2. Remove the bolts.
Brake Ligh t: LED
Taillight: LED
Rear Side Marker Light: LED
Rear Turn Signal Light: 21 W (Amber)
1 Brake Lights, Taillights, Rear Side Marker Lights, and Rear Turn
Signal Light Bulbs
Brake lights, taillights, and rear side marker lights are
LED type. Have an authorized Honda dealer inspect
and replace the light assembly.
Cover
Bolt
23 PILOT-31T906000_03.book 719 ŃāÜŃā╝ŃéĖ ’╝Æ’╝É’╝Æ’╝ÆÕ╣┤’╝æ’╝ɵ£ł’╝ō’╝æµŚźŃĆƵ£łµø£µŚźŃĆĆÕŹłÕēŹ’╝æ’╝ɵÖé’╝Æ’╝¢Õłå
Page 721 of 814

720
uuReplacing Light Bulbs uBrake Lights, Taillights, Rear Side Marker Lights, and Rear Turn Signal Light Bulbs
Maintenance
3.Pull the light assembly out of the rear pillar.
4. Turn the socket counter-clockwise and
remove it.
5. Remove the old bulb and insert a new bulb.
6. Align the pins with the body grommets,
then push in unt il they fully seat.
Bulb
Socket
23 PILOT-31T906000_03.book 720 ŃāÜŃā╝ŃéĖ ’╝Æ’╝É’╝Æ’╝ÆÕ╣┤’╝æ’╝ɵ£ł’╝ō’╝æµŚźŃĆƵ£łµø£µŚźŃĆĆÕŹłÕēŹ’╝æ’╝ɵÖé’╝Æ’╝¢Õłå
Page 723 of 814

722
uuReplacing Light Bulbs uHigh-Mount Brake Light
Maintenance
High-Mount Brake Light
High-mount brake light is LED type. Have an authorized Honda dealer inspect and
replace the light assembly.
Puddle Lights*
Puddle lights are LED type. Have an authoriz ed Honda dealer inspect and replace the
light assembly.
* Not available on all models
23 PILOT-31T906000_03.book 722 ŃāÜŃā╝ŃéĖ ’╝Æ’╝É’╝Æ’╝ÆÕ╣┤’╝æ’╝ɵ£ł’╝ō’╝æµŚźŃĆƵ£łµø£µŚźŃĆĆÕŹłÕēŹ’╝æ’╝ɵÖé’╝Æ’╝¢Õłå
Page 747 of 814
 may fog temporarily
if you have driven in the rain, or after the vehicle has been run")
746
uuCleaning uExterior Care
Maintenance
The inside lenses of exterior lights (headli ghts, brake lights, etc.) may fog temporarily
if you have driven in the rain, or after the vehicle has been run through a car wash.
Dew condensation also may build up inside the lenses when there is a significant
enough difference between the ambient and inside lens temperatures (similar to
vehicle windows fogging up in rainy conditions). These conditions are natural
processes, not structural design problems in the exterior lights.
Lens design characteristics may result in mo isture developing on the light lens frame
surfaces. This also is not a malfunction.
However, if you see large amounts of wa ter accumulation, or large water drops
building up inside the lenses, have your vehicle inspected by a dealer.
Ō¢ĀFogged Exterior Light Lenses
23 PILOT-31T906000_03.book 746 ŃāÜŃā╝ŃéĖ ’╝Æ’╝É’╝Æ’╝ÆÕ╣┤’╝æ’╝ɵ£ł’╝ō’╝æµŚźŃĆƵ£łµø£µŚźŃĆĆÕŹłÕēŹ’╝æ’╝ɵÖé’╝Æ’╝¢Õłå
Page 752 of 814

751Continued
Handling the Unexpected
If a Tire Goes Flat
Changing a Flat Tire
If a tire goes flat while driving, grasp the steering wheel firmly and brake gradually
to reduce speed. Then, stop in a safe plac e. Replace the flat tire with a compact
spare tire
*/full-size spare tire*. Go to a dealer as soon as possible to have the full-
size tire repaired or replaced.
1. Park the vehicle on a firm, level, non-slippery surface and apply the parking brake.
2. Put the transmission into
(P.
3. Turn on the hazard warning lights an d set the power mode to VEHICLE OFF
(LOCK).
1 Changing a Flat Tire
Follow compact spare
* precautions:
Periodically check the tire pressure of the compact
spare. It should be set to the specified pressure.
Specified Pressure: 60 psi (420 kPa, 4.2 kgf/cm
2)
When driving with the compact spare tire, keep the
vehicle speed under 50 mph (80 km/h). Replace with
a full-size tire as soon as possible.
The compact spare tire and wheel in your vehicle are
specifically for this model. Do not use them with
another vehicle. Do not us e another type of compact
spare tire or wheel with your vehicle.
Do not mount tire chains on a compact spare tire.
If a chain-mounted front tire goes flat, remove one of
the full-size rear tires and replace it with the compact
spare tire. Remove the flat front tire and replace it
with the full-size tire that was removed from the rear.
Mount the tire chains on the front tire.
* Not available on all models
23 PILOT-31T906000_03.book 751 ŃāÜŃā╝ŃéĖ ’╝Æ’╝É’╝Æ’╝ÆÕ╣┤’╝æ’╝ɵ£ł’╝ō’╝æµŚźŃĆƵ£łµø£µŚźŃĆĆÕŹłÕēŹ’╝æ’╝ɵÖé’╝Æ’╝¢Õłå