audio HONDA PRELUDE 1992 Owner's Manual
[x] Cancel search | Manufacturer: HONDA, Model Year: 1992, Model line: PRELUDE, Model: HONDA PRELUDE 1992Pages: 225, PDF Size: 2.1 MB
Page 91 of 225
Audio System (Si, SR)
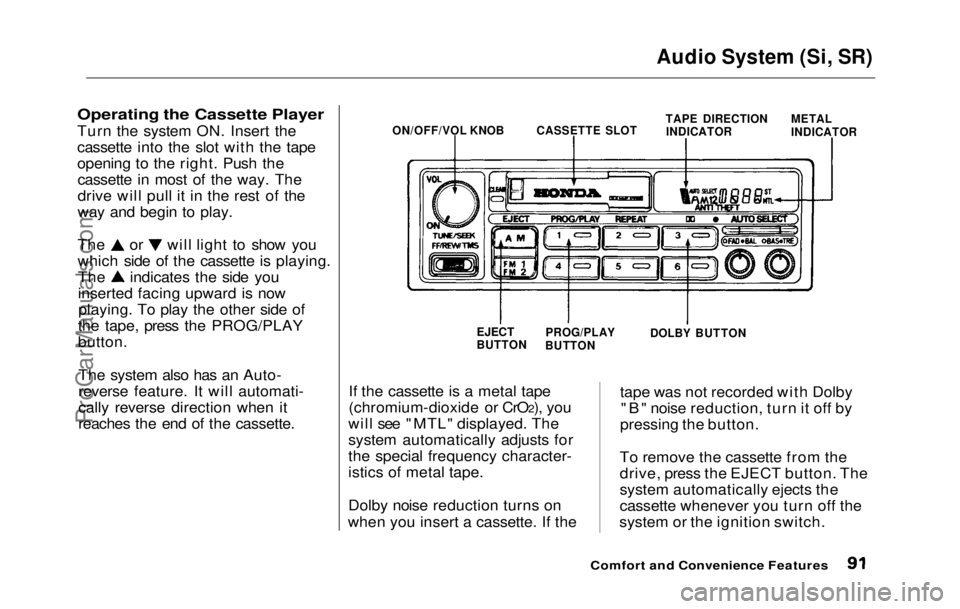
Operating the Cassette Player
Turn the
system ON. Insert the
cassette into the slot with the tape
opening to the right. Push the cassette in most of the way. The
drive will pull it in the rest of the
way and begin to play. The or will light to show you
which side of the cassette is playing.
The indicates the side you
inserted facing upward is now
playing. To play the other side of
the tape, press the PROG/PLAY
button.
The system also has an Auto-
reverse feature. It will automati-
cally reverse direction when it
reaches the end of the cassette. If the cassette is a metal tape
(chromium-dioxide or CrO2), you
will see "MTL" displayed. The
system automatically adjusts for
the special frequency character-
istics of metal tape.
Dolby noise reduction turns on
when you insert a cassette. If the tape was not recorded with Dolby
"B" noise reduction, turn it off by
pressing the button.
To remove the cassette from the
drive, press the EJECT button. The
system automatically ejects the
cassette whenever you turn off the
system or the ignition switch.
Comfort and Convenience Features
ON/OFF/VOL KNOB
CASSETTE SLOT
TAPE DIRECTION
INDICATOR METAL
INDICATOR
EJECT
BUTTON PROG/PLAY
BUTTON DOLBY BUTTONProCarManuals.comMain Menu Table of Contents s t
Page 92 of 225
Audio System (Si, SR)
Cassette Search Functions
Once a cassette is playing, you can
use the FF, REW, TMS, or REPEAT function to look for
desired songs or passages.
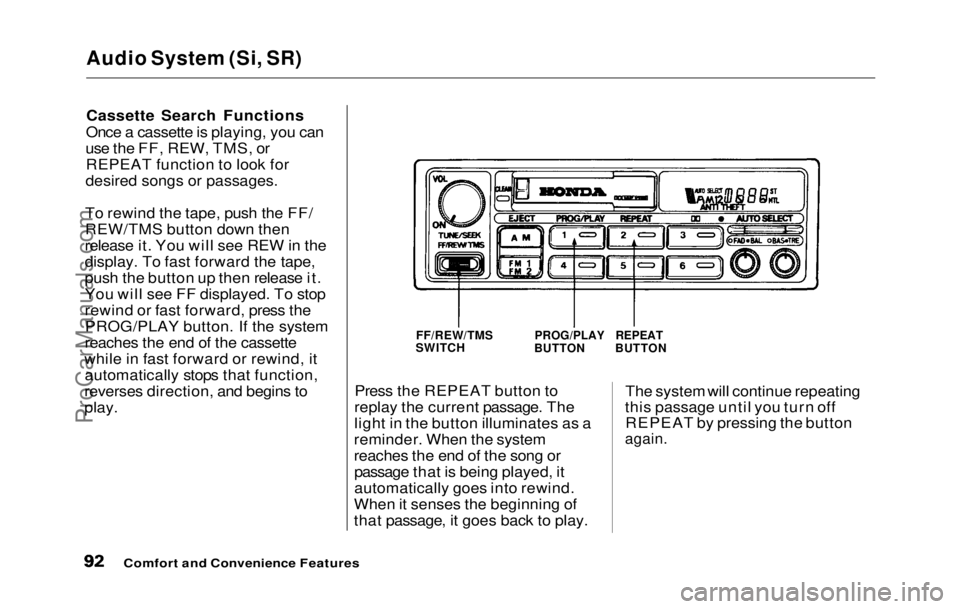
To rewind the tape, push the FF/
REW/TMS button down then
release it. You will see REW in the
display. To fast forward the tape,
push the button up then release it.
You will see FF displayed. To stop
rewind or fast forward, press the PROG/PLAY button. If the system
reaches the end of the cassette
while in fast forward or rewind, it automatically stops that function,
reverses direction, and begins to
play. Press the REPEAT button to
replay the current passage. The
light in the button illuminates as a
reminder. When the system
reaches the end of the song or passage that is being played, it
automatically goes into rewind.
When it senses the beginning of
that passage, it goes back to play. The system will continue repeating
this passage until you turn off REPEAT by pressing the button
again.
Comfort and Convenience Features
FF/REW/TMS
SWITCH
PROG/PLAY
BUTTON
REPEAT
BUTTONProCarManuals.comMain Menu Table of Contents s t
Page 93 of 225
Audio System (Si, SR)
The TMS function lets you skip to
the beginning of a song or other
passage. The tape skips forward or
backward, depending on which direction you push the FF/REW/
TMS switch.
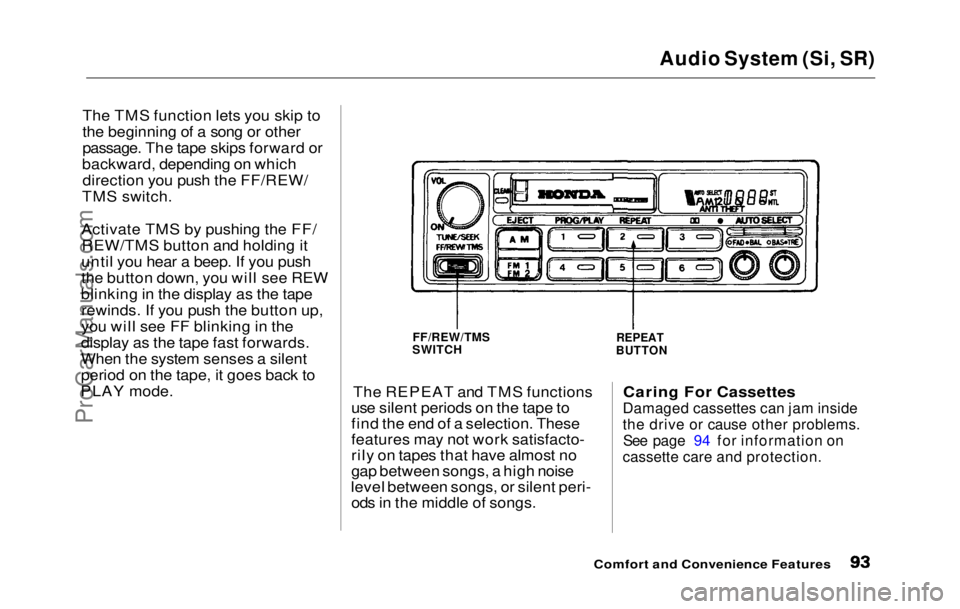
Activate TMS by pushing the FF/ REW/TMS button and holding it
until you hear a beep. If you push
the button down, you will see REW
blinking in the display as the tape rewinds. If you push the button up,
you will see FF blinking in the
display as the tape fast forwards.
When the system senses a silent
period on the tape, it goes back to
PLAY mode.
The REPEAT and TMS functions
use silent periods on the tape to
find the end of a selection. These
features may not work satisfacto-
rily on tapes that have almost no
gap between songs, a high noise
level between songs, or silent peri- ods in the middle of songs.
Caring For Cassettes
Damaged cassettes can jam inside
the drive or cause other problems.
See page 94 for information on
cassette care and protection.
Comfort and Convenience Features
FF/REW/TMS
SWITCH
REPEAT
BUTTONProCarManuals.comMain Menu Table of Contents s t
Page 95 of 225
Theft Protection
Theft Protection is standard on the Si and Si 4WS models in the U. S.,
and the SR and SR 4WS models in
Canada.
Your audio system is protected by a code number. The system immedi-
ately disables itself whenever the
radio/player unit is disconnected
from the battery. To make it work again, you must enter a five-digit
code with the station Preset
buttons.
Your dealer should have given you
two copies of your audio system's
code number with your car. Keep one of these copies at home, and
the other in your wallet or a con- cealed place in the car. If your car's battery is discon-
nected or goes dead, the audio
system will disable itself. The next
time you turn on the radio you will
see "Code" in the frequency display.
Use the Preset buttons to enter the
five-digit code. If entered correctly,
the radio will start to play.
You will then have to store your
favorite stations in the Preset
buttons. Your original settings
were lost when power was discon-
nected.
Comfort and Convenience FeaturesProCarManuals.comMain Menu Table of Contents s t
Page 104 of 225
Accessories
Your Honda dealer has many acces-
sories available to personalize your
car. Some of these are audio sys-
tems, alloy wheels, air conditioning, and color-coordinated carpet floor
mats. All Genuine Honda Acces-
sories have been approved by our
engineers for installation and use
on your car, and are covered by
warranty. For a complete guide to the Genuine Honda Accessories
available, see your dealer for a 1992
Accessories brochure.
Some non-Honda accessories you
can buy in the "aftermarket" are designed for universal applications.
Although they may fit your Honda,
they may not be within factory specifications. For example, after-
market wheels may not meet
Honda's specifications for width
and offset. They could cause sus-
pension problems which would not
be covered by your warranty. Im- properly-designed accessories can
adversely affect your car's han-
dling and stability.
Your car has several computer-
controlled systems, including the
SRS system, the engine's fuel
injection, and the Anti-lock brake
system. Strong electronic inter-
ference can affect their operation. Electronic communications equip-
ment, such as cellular telephones
and two-way radios are regulated
by the FCC and should not inter-
fere with your car's systems. Improper installation, or using
electrical equipment not intended
for mobile use may interfere with
your car's operation. If you want to
install a cellular telephone, other
mobile communications equipment
or even add-on stereo amplifiers,
please discuss it first with your
Honda dealer.
In many cases, improper instal-
lation is the real cause of problems
with aftermarket accessories. Have
these accessories installed by quali- fied technicians who are familiar
with your Honda. If possible, have
your Honda dealer inspect the final installation.
Before DrivingProCarManuals.comMain Menu Table of Contents s t
Page 152 of 225
Battery
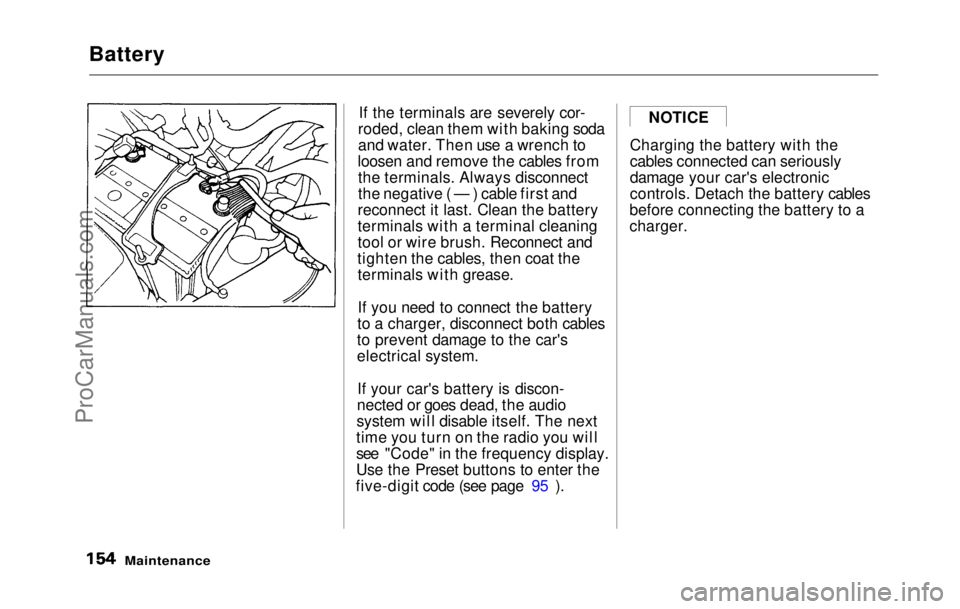
If the terminals are severely cor-
roded, clean them with baking soda
and water. Then use a wrench to
loosen and remove the cables from the terminals. Always disconnect
the negative ( — ) cable first and
reconnect it last. Clean the battery
terminals with a terminal cleaning
tool or wire brush. Reconnect and
tighten the cables, then coat the terminals with grease.
If you need to connect the battery
to a charger, disconnect both cables
to prevent damage to the car's
electrical system.
If your car's battery is discon-
nected or goes dead, the audio
system will disable itself. The next
time you turn on the radio you will
see "Code" in the frequency display.
Use the Preset buttons to enter the
five-digit code (see page 95 ). Charging the battery with the
cables connected can seriously
damage your car's electronic
controls. Detach the battery cables
before connecting the battery to a
charger.
Maintenance
NOTICEProCarManuals.comMain Menu Table of Contents s t
Page 217 of 225
Index
Accessories
Installation................................. 105
ACCESSORY
(Ignition Key Position).............. 48
Adding
Automatic Transmission
Fluid........................................ 144
Brake Fluid............................... 146 Clutch Fluid.............................. 147
Engine Oil...:.............................. 135
Manual Transmission Fluid... 145
Power Steering Fluid.............. 148
Radiator Coolant...................... 139
Windshield Washer fluid ........ 143
Additional Safety Information .... 16
Door Locks.................................. 16
Driving with Pets....................... 17
Seat-back Position..................... 16
Storing Cargo Safely................. 17
Additives, Engine Oil................... 136
Adjustments
Mirrors....................................... .
59
Seats............................................. 51
Steering Wheel..........................
43
Airbag (SRS).................................. 1
0
Air Conditioning............................. 68
Maintenance..............................
157
Usage............................................ 6 8
Ai
r Filter........................................
149
Air Outlet
s
(Vents)......................... 68
Air Pressure, Tires ......................
159
Alcohol an d
Drugs.......................... 24
Alcohol in Gasoline........................ 98
Antifreeze......................................
139
Anti-lock Brake s
(ABS)
Description................................
208
Indicator Light.................. .
34,
118
Operation................................... 117
Anti-theft Steerin
g
Column
Lock.............................................. 48
Appearance Care..........................
175
Ashtray............................................. 65
Audio System................................. .
75
Automatic Speed Control............. 44
Automatic Transmission............ 112
Capacity, Fluid........................
.
206
Checking Fluid Level.............. 144
Shifting
...................................... 113
Shift Leve r
Positions...............
112
Shift Lock Release................... 115
Battery
Charging System Light............. 33
Jump Starting............................ 191
Maintenance.............................. 152
Specifications............................ 207
Before Driving
................................ 97
Belts, Seat ......................................... 4
Body Repair
...................................
181
Brakes
Anti-lock Syste
m (ABS)..........
117
Break-in, Ne
w
Linings.............. 98
Fluid............................................
146
Light, Burned-out................... .
169
Parking......................................... 61
System Light.............................. .
33
Wear Indicators.....................
116
Brakes, AB S
Description...............................
.
208
Operation................................... 117
System Indicator...............
.
34,
118
Braking System...........................
.
116
Break-in, Ne
w
Car ......................... 98
CONTINUEDProCarManuals.comMain Menu s t