fuse HONDA PRELUDE 1992 Owners Manual
[x] Cancel search | Manufacturer: HONDA, Model Year: 1992, Model line: PRELUDE, Model: HONDA PRELUDE 1992Pages: 225, PDF Size: 2.1 MB
Page 115 of 225
The Braking System
Your Honda is equipped with disc brakes at all four wheels. The
braking system is power-assisted to
reduce the effort needed on the
brake pedal.
Put your foot on the brake pedal
only when you intend to brake.
Resting your foot on the pedal
keeps the brakes applied lightly,
causing them to build up heat. Heat
build-up can reduce how well your
brakes work. It also keeps your
brake lights on all the time, confusing drivers behind you.
Constant application of the brakes
when going down a long hill builds
up heat and reduces their effective-
ness. Use the engine to assist the
brakes by downshifting to a lower
gear and taking your foot off the
accelerator pedal. Check your brakes after driving
through deep water. Apply the
brakes moderately to see if they feel normal. If not, apply them
gently and frequently until they do. Since a longer distance is needed to
stop with wet brakes, be extra
cautious and alert in your driving.
Brake Wear Indicators
All four brakes have audible brake
wear indicators. When the brake pads need re-placing, you will hear a distinctive
metallic "screeching" sound when
you apply the brakes. If you do not
have the brake pads replaced, they
will begin screeching all the time.
Your brakes may sometimes squeal
or squeak when you apply them
lightly. Do not confuse this with the
brake wear indicators. They make a very audible "screeching".
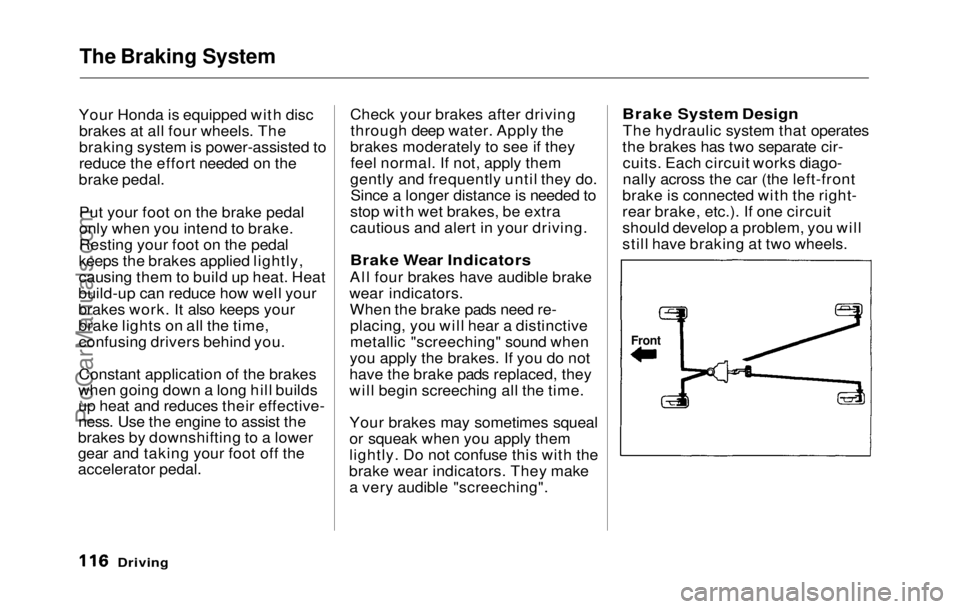
Brake System Design
The hydraulic system that operates
the brakes has two separate cir- cuits. Each circuit works diago-
nally across the car (the left-front
brake is connected with the right-
rear brake, etc.). If one circuit
should develop a problem, you will
still have braking at two wheels.
Driving
FrontProCarManuals.comMain Menu Table of Contents s t
Page 179 of 225
Taking Care of the Unexpected
This section covers the more- common problems that motorists
experience with their cars. It gives
you information about how to
safely evaluate the problem and
what to do to correct it. If the problem has stranded you on the
side of the road, you may be able to
get going again. If not, you will also
find instructions on getting your
car towed. Compact Spare Tire..................... 184
Changing a Flat Tire................... 185
If Your Engine Won't Start........ 190 Nothing Happens...................... 190
The Starter OperatesNormally................................ 191
Jump Starting................................ 191 If Your Engine Overheats.......... 193
Low Oil Pressure.......................... 195
Charging System Indication ...... 196
Check Engine Light..................... 197
Closing the Sunroof ..................... 198
Fuses............................................... 199 Checking and Replacing.........
200
Towing...........................................
202
Taking Car e
of the UnexpectedProCarManuals.comMain Menu s t
Page 186 of 225
If Your Engine Won't Start
Diagnosing why your engine won't
start falls into two areas, depending
on what you hear when you turn
the key to START (III): You hear nothing, or almost
nothing. The engine's starter
motor does not operate at all, or
operates very slowly.
You can hear the starter motor
operating normally, but the
engine does not start up and run. Nothing Happens or the
Starter Motor Operates Very
Slowly
When you turn the ignition switchto START (III), you do not hear the
normal noise of the engine trying to
start. You may hear
a clicking
sound or series of clicks, or nothing
at all.
Check these things:
Check the
transmission interlock.
If you have a 5-speed, the clutch
pedal must be pushed all the way
to the floor or the starter will not operate. With an automatic
transmission, it must be in Park
or Neutral.
Turn the ignition switch to ON
(II). Turn on the headlights and
check their brightness. If the
headlights are very dim or don't
light at all, the battery is dis-
charged.
See Jump Starting on
page 191
.
Turn the ignition switch to
START (III). If the headlights do
not dim, check the condition of
the fuses. If the fuses are OK,
there is probably something
wrong with the electrical circuit
for the ignition switch or starter
motor. You will need a qualified
technician to determine the
problem. (See Towing on page
202.)
If the headlights dim noticeably
or go out when you try to start
the engine, either the battery is
discharged or the connections
are corroded. Check the condi-
tion of the battery and terminal
connections (see page 153 ). You
can then try jump starting the
car from a booster battery (see
page 191).
Taking Care of the UnexpectedProCarManuals.comMain Menu Table of Contents s t
Page 187 of 225
If Your Engine Won't Start, Jump Starting
The Starter Operates
Normally
In this case, the starter motor
sounds normal when you turn the
ignition switch to START (III), but
the engine does not run. Are you using the proper starting
procedure? Refer to Starting
the Engine on page 109 . Do you have gas? Turn the
ignition switch to ON (II) for a
minute and watch the fuel gauge.
There may be an electrical
problem, such as no power to the
fuel pump. Check all the fuses
(see page 199 ).
If you find nothing wrong, you will
need a qualified technician to find
the problem. See Towing on page
202.
Jump Starting
If your car's battery has run down,
you may be able to start the engine
by using a booster battery. Although this seems like a simple
procedure, there are several precau-
tions you should take. Follow the
directions closely.
You cannot start a Honda with an
automatic transmision by pushingor pulling it. To jump start your car:
1. Open the hood and check the physical condition of the battery
(see page 152 ). In very cold
weather, check the condition of the electrolyte. If it seems slushy
or like ice, do not try jump
starting until it thaws.
If a battery sits in extreme cold, the
electrolyte inside can freeze.
Attempting to jump start with a frozen battery can cause it to
rupture or explode.
2. Turn off all the electrical acces- sories: heater, A/C, stereo system,
lights, etc. Put the transmission in Neutral
or Park and set the parking
brake.
Taking Care of the Unexpected
CONTINUED
A battery can explode if you
do not follow the correct
procedure, seriously injuring
anyone nearby.
Keep all sparks, open flames,
and smoking materials away
from the battery.
NOTICE
ProCarManuals.comMain Menu Table of Contents s t
Page 194 of 225
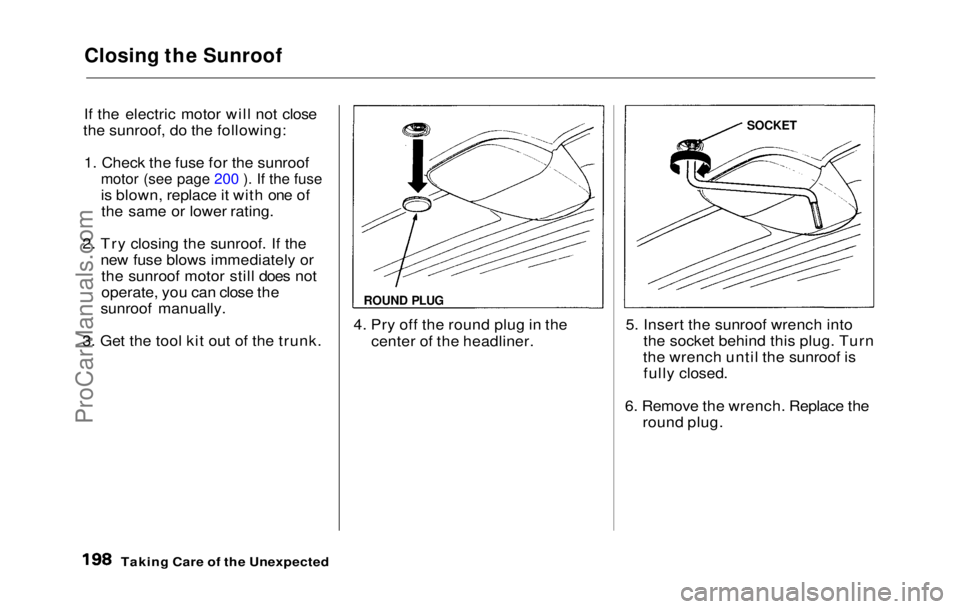
Closing the Sunroof
If the electric motor will not close
the sunroof, do the following:
1. Check the fuse for the sunroofmotor (see page 200 ). If the fuse
is blown, replace it with one ofthe same or lower rating.
2. Try
closing the sunroof. If the
new fuse blows immediately or the sunroof motor still does not
operate, you can close the
sunroof manually.
3. Get the tool kit out of the trunk. 4. Pry off the round plug in the
center of the headliner. 5. Insert the sunroof wrench into
the socket behind this plug. Turn
the wrench until the sunroof is fully closed.
6. Remove the wrench. Replace the round plug.
Taking Care of the Unexpected
ROUND PLUG
SOCKETProCarManuals.comMain Menu Table of Contents s t
Page 195 of 225
Fuses
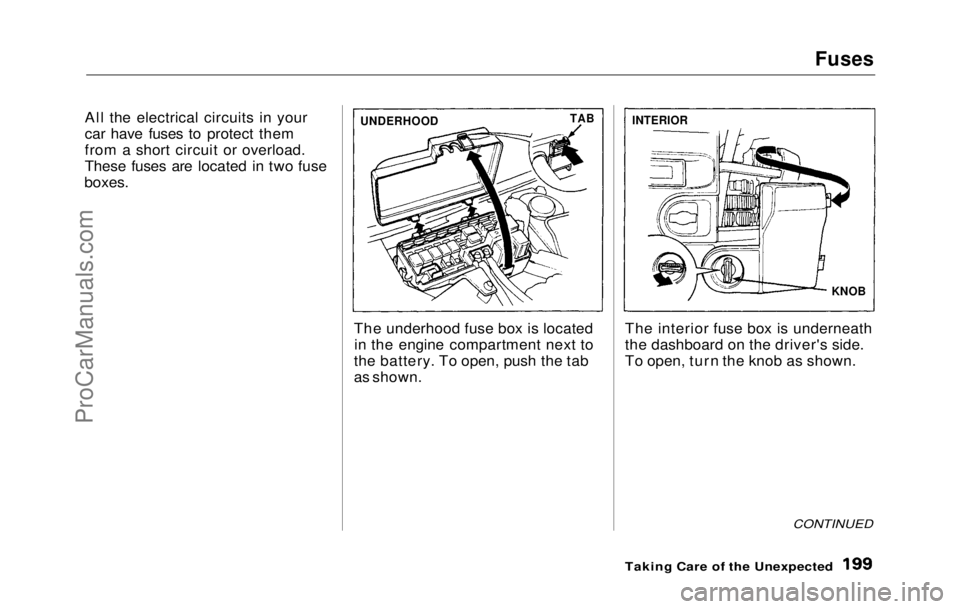
All the electrical circuits in your
car have fuses to protect them
from a short circuit or overload.
These fuses are located in two fuse
boxes.
The underhood fuse box is locatedin the engine compartment next to
the battery. To open, push the tab
as shown.
The interior fuse box is underneath
the dashboard on the driver's side.
To open, turn the knob as shown.
CONTINUED
Taking Care of the Unexpected
UNDERHOOD
TAB
KNOB
INTERIORProCarManuals.comMain Menu Table of Contents s t
Page 196 of 225
Fuses
Checking and Replacing
Fuses
If something electrical in your car
stops working, the first thing you
should check for is a blown fuse.
Determine from the chart on the
fuse box cover or inside the fuse
box which fuse or fuses control
that component. Check those fuses
first, but check all the fuses before deciding that is not the cause.
Replace any blown fuses and check
the component's operation.
1. Turn the ignition switch to LOCK (0). Make sure the head-
lights and all other accessories
are
off.
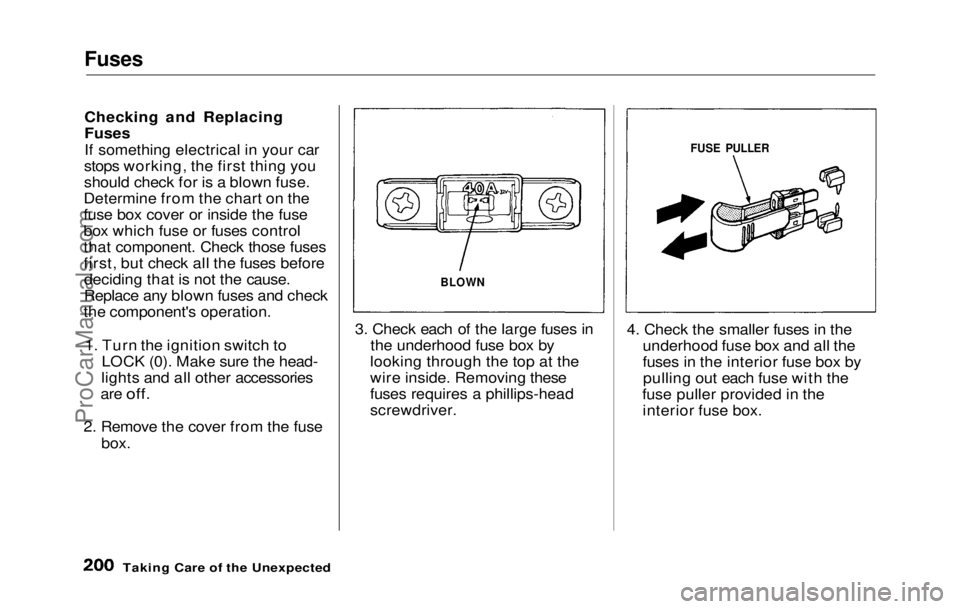
2. Remove the cover from the fuse box. 3. Check each of the large fuses in
the underhood fuse box by
looking through the top at the
wire inside. Removing these
fuses requires a phillips-head
screwdriver. 4. Check the smaller fuses in the
underhood fuse box and all the
fuses in the interior fuse box bypulling out each fuse with the
fuse puller provided in the interior fuse box.
Taking Care of the Unexpected
BLOWN
FUSE PULLERProCarManuals.comMain Menu Table of Contents s t
Page 197 of 225
Fuses
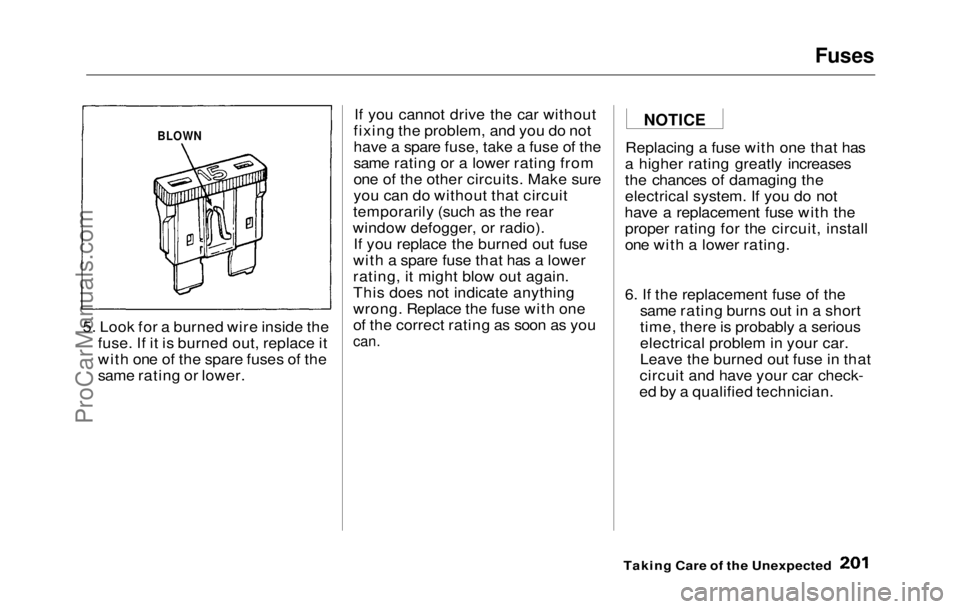
5. Look for a burned wire inside the fuse. If it is burned out, replace it
with one of the spare fuses of the
same rating or lower. If you cannot drive the car without
fixing the problem, and you do not
have a spare fuse, take a fuse of the
same rating or a lower rating from
one of the other circuits. Make sure
you can do without that circuit
temporarily (such as the rear
window defogger, or radio). If you replace the burned out fuse
with a spare fuse that has a lower
rating, it might blow out again.
This does not indicate anything
wrong. Replace the fuse with one
of the correct rating as soon as you
can.
Replacing a fuse with one that has
a higher rating greatly increases
the chances of damaging the
electrical system. If you do not
have a replacement fuse with the proper rating for the circuit, install
one with a lower rating.
6. If the replacement fuse of the same rating burns out in a short
time, there is probably a serious
electrical problem in your car.
Leave the burned out fuse in that
circuit and have your car check-
ed by a qualified technician.
Taking Care of the Unexpected
BLOWN
NOTICEProCarManuals.comMain Menu Table of Contents s t
Page 218 of 225
Index
Brightness Control, Instruments................................. 41
Brights, Headlights........................ 40
Bulb Replacement Back-up Lights......................... 169
Brake Lights.............................
169
Front Parking
Lights ..............
165
Front Side
Marker Lights......
166
Headlights................................. 164
High-mount Brake
Light........
168
License Plate
Lights................
171
Rear Sid
e
Marker Lights........
170
Specifications............................ 207
Turn Signa
l
Lights ..................
167
Bulbs, Halogen.............................
.
164
Cables, Jum
p
Starting With........
191
Capacities Chart...........................
206
Carbo
n Monoxide Hazard ............ 25
Cargo, Loading.............................
106
Cassette Playe r
Care..............................................
. 94
Operation.............................. 81,
91
Catalytic Converter.................... .
213
CAUTION, Explanatio
n
of............ ii
Center Console Compartment..... 64
Certification Label....................... 204
Chains............................................. 163
Change Oil
How to........................................ 137
When to...................................... 129
Changing a Flat Tire................... 185
Changing Engine Coolant........... 140
Charging System Light........ 33, 196
Check Engine Light............. 34, 197
Checking
Automatic Transmission
Fluid........................................
144
Battery Condition.................... .
152
Brake Flui
d
...............................
146
Clutch Fluid.............................
.
147
Engine Belts.............................
.
158
Engine Oil.................................
.
135
Fuses........................................... 199
Manual Transmissio
n
Fluid...
145
Power Steerin
g
Fluid..............
148
Radiator Coolant.....................
.
139
Checklist, Befor
e
Driving...........
108
Child Safety....................................
.
18
Cigarette Lighter........................... 65
Cleaner, Air...................................
149
Cleaning
Exterior......................................
176
Interior....................................... 179
Seat Belts...................................
179
Vinyl........................................... 179
CLEAN Light................................
.
94
Clock, Setting the.......................... 63
Clutch Fluid..................................
147
CO i n
the Exhaust........................
211
Cold Weather
,
Starting in...........
110
Compact Spare.............................
.
184
Consumer Information................
217
Controls, Instruments
and............ 29
Coolant
Adding........................................ 139
Checking.................................... 139
Proper Solution......................... 139
Temperature Gauge.................. 38
Corrosion Protection................... 180
Crankcase Emission Control
System........................................ 211
Cruise Control Operation ............. 44
Customer Relations Office......... 217ProCarManuals.comMain Menu s t
Page 219 of 225
Index
DANGER, Explanation of.............. ii
Dashboard........................................ 30
Daytime Running Lights.............. 40
Dead Battery, What to Do........... 191
Defects, Reporting Safety ............ 26
Defogger, Rear Window ............... 56
Defrosting the Windows............... 74
DEXRON ®
II Automatic
Transmission Fluid.................. 144
Dimensions.................................... 206
Dimming the Headlight
s .............. 40
Dipstick Automatic Transmission........
144
Engine Oil................................. .
135
Directional Signals........................
.
41
Disabled, Towing Your Car If ... 202
Disc Brake Wear Indicators.......
116
Disposal o f
Used Oil.....................
138
Doors
Locking an
d Unlocking ............ 48
Power Door Locks ..................... 48
DOT Tire Quality Grading......... 161
Downshifting,
5-speed Transmission.............. 111
Driving .......................................... .
107
Economy.................................... 104
In Bad Weather......................... 119
In Foreign Countries................. 99
Economy, Fuel.............................. 104
Emergencies on the Road........... 183 Battery, Jump Starting............ 191
Changing a Flat Tire............... 185
Charging System Light........... 196
Check Engine Light................. 197
Checking the Fuses.................
200
Low Oi l
Pressure Light........... 195
Manually Closing Sunroof...... 198
Overheated Engine.................. 193
Emergency Brake ......................... 61
Emergency Flashers...................... 56
Emission Controls......................... 211
Engine Check Light....................... 34, 197
Coolant Temperature Gauge... 38
Oil Pressure Light............. 33, 195
Oil, What Kind to Use .............
135
Overheating............................... 193
Specifications........................... 206
Ethano l
in Gasoline........................ 98
Evaporative Emission Controls......................................
211
Exhaust Fumes.............................. .
25
Expectant Mothers, Use of Seat Belts by.................................. 8
Exterior, Cleaning the.................
176
Fabric, Cleaning........................... 179
Fan, Interior.................................... 68
Fan, Radiator.................................. 27
Features, Comfort
and Convenience........................ 67
Filling the Gas Tank.................... 100
Filters
Air
............................................... 149
Fuel............................................. 150
Oil ............................................... 137
First Gear, Shifting...................... 111
5-Speed Transmissio n
Checkin
g Fluid Level..............
145
CONTINUED
ProCarManuals.comMain Menu s t