display HONDA PRELUDE 1992 Owners Manual
[x] Cancel search | Manufacturer: HONDA, Model Year: 1992, Model line: PRELUDE, Model: HONDA PRELUDE 1992Pages: 225, PDF Size: 2.1 MB
Page 29 of 225
Instruments and Controls
This section gives information
about the controls and displays that
contribute to the daily operation of
your Honda. All the essential
controls are within easy reach.
Control Locations......................... 30
Indicator Lights.............................. 31
Gauges............................................. 37
Speedometer
.............................
37
Tachometer................................. 37
Odometer
.................................... 37
Trip Meter................................... 37
Fuel Gauge..................................
38
Temperature Gauge
..................
38
Controls Near the
Steering
Wheel
....................................... 39
Headlights................................... 40
Daytime Running Lights.......... 40
Instrument Panel Brightness... 41
Turn Signals................................ 41
Windshield Wipers.....................
42
Windshield Washers.................
42
Steering Wheel Adjustment ....
. 43
Steering Wheel Controls............... 44
Cruise Control............................ 44
Horn ............................................ 47
Keys and Locks.............................. 47
Keys.............................................. 47
Ignition Switch........................... 47
Door Locks.................................. 48
Power Door Locks ..................... 48
Trunk.......................................... 50
Seat Adjustments........................... 51
Rear Seat Access........................ 52
Additional Driver' s
Seat
Adjustments...........................
53
Seat Heaters.................................... 54
Folding Rea r
Seat.......................... 55
Hazard Warning............................ 56
Rear Window Defogger ................ 56
Power Windows.............................. 57
Sunroof ...........................................
58
Mirrors ........................................... 59
Parking Brake................................ .
61
Glove Box........................................
.
62
Digital Clock..................................
.
63
Center Console Compartment .... 64
Vanity
Mirror
..............................
64
Cigarette Lighter
..........................
.
65
Ashtray........................................... 65
Interior Lights...............................
.
66
Instruments an
d
ControlsProCarManuals.comMain Menu s t
Page 38 of 225
Gauges
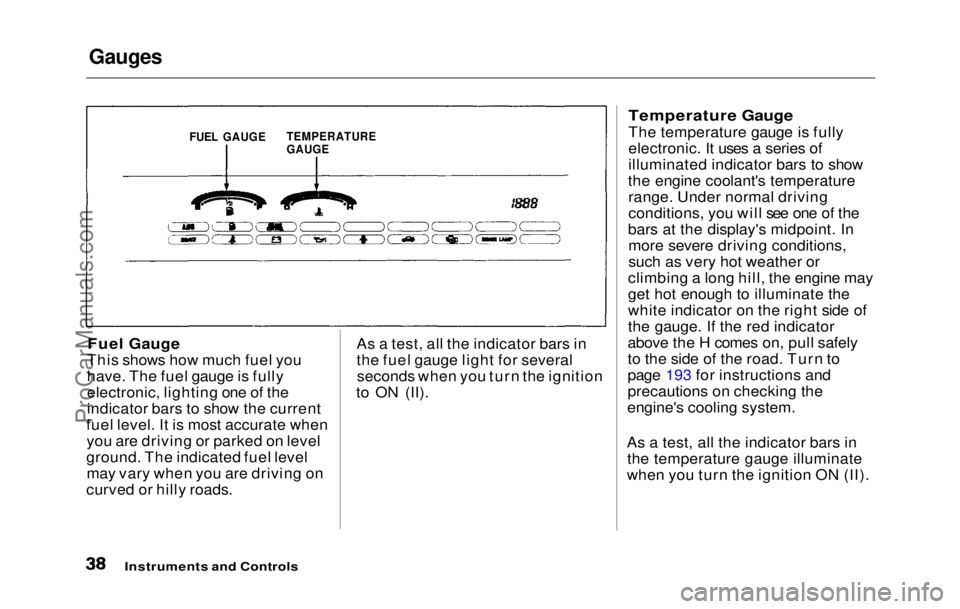
Fuel Gauge
This shows how much fuel you
have. The fuel gauge is fully
electronic, lighting one of the
indicator bars to show the current
fuel level. It is most accurate when you are driving or parked on level
ground. The indicated fuel level may vary when you are driving on
curved or hilly roads. As a test, all the indicator bars in
the fuel gauge light for several
seconds when you turn the ignition
to ON (II).
Temperature Gauge
The temperature gauge is fully
electronic. It uses a series of
illuminated indicator bars to show
the engine coolant's temperature range. Under normal driving
conditions, you will see one of the
bars at the display's midpoint. In more severe driving conditions,
such as very hot weather or
climbing a long hill, the engine may
get hot enough to illuminate the
white indicator on the right side of
the gauge. If the red indicator
above the H comes on, pull safely
to the side of the road. Turn to
page 193 for instructions and
precautions on checking the
engine's cooling system.
As a test, all the indicator bars in the temperature gauge illuminate
when you turn the ignition ON (II).
Instruments and Controls
FUEL GAUGE
TEMPERATURE
GAUGEProCarManuals.comMain Menu Table of Contents s t
Page 63 of 225
Digital Clock
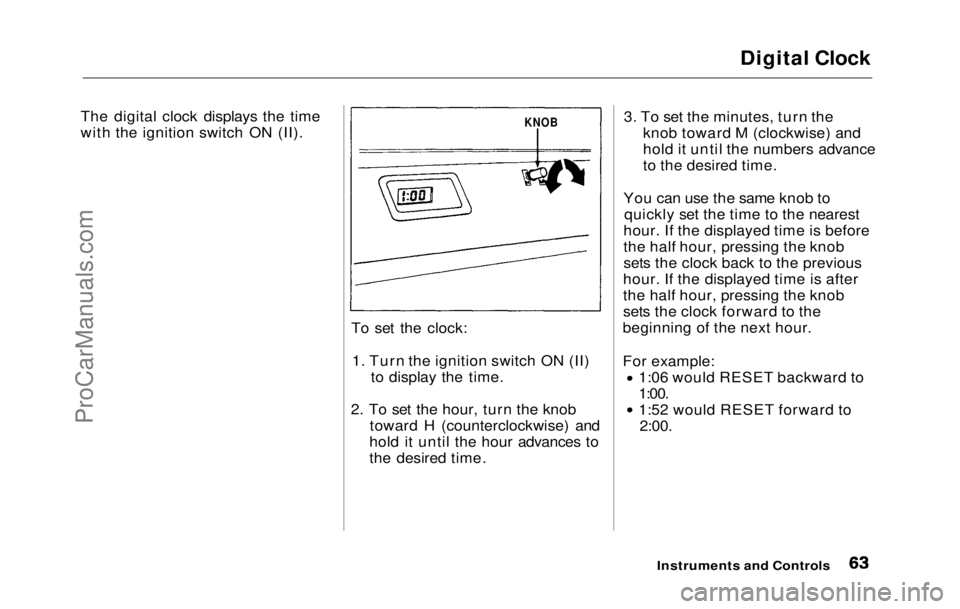
The digital clock displays the time
with the ignition switch ON (II).
To set the clock:1. Turn the ignition switch ON (II)
to display the time.
2. To
set the hour, turn the knob
toward H (counterclockwise) and
hold it until the hour advances to
the desired time.
3. To
set the minutes, turn the
knob toward M (clockwise) and
hold it until the numbers advance
to the desired time.
You ca
n
use the same knob to
quickly set the time to the nearest
hour. If the displayed time is before
the half hour, pressing the knob
sets the clock back to the previous
hour. If the displayed time is after
the half hour, pressing the knob
sets the clock forward to the
beginning of the next hour.
For example: 1:06 would RESET backward to
1:00. 1:52 would RESET forward to
2:00.
Instruments and
Controls
KNOBProCarManuals.comMain Menu Table of Contents s t
Page 77 of 225
Audio System (S)
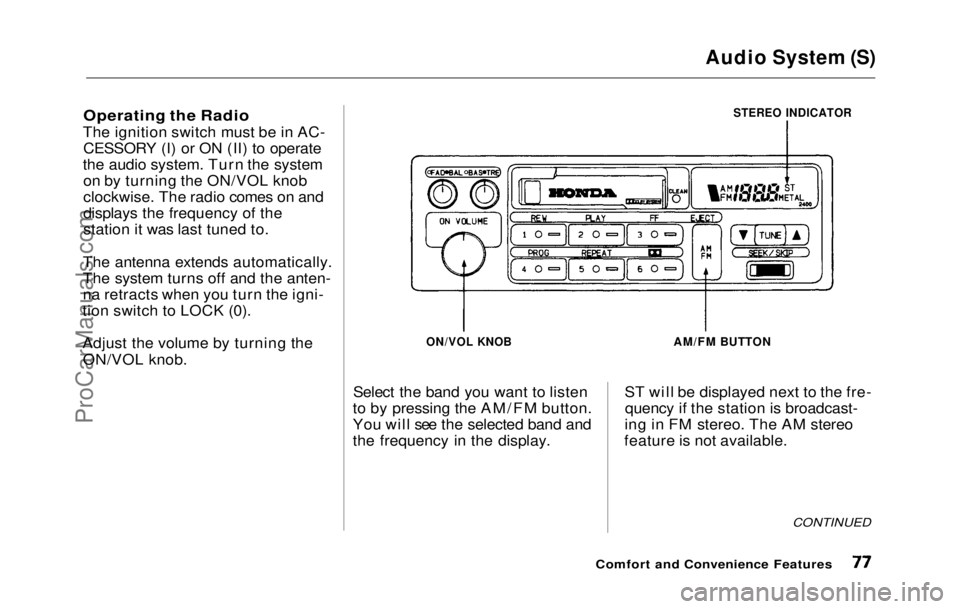
Operating the Radio
The ignition switch must be in AC- CESSORY (I) or ON (II) to operate
the audio system. Turn the system on by turning the ON/VOL knob
clockwise. The radio comes on and
displays the frequency of the
station it was last tuned to.
The antenna extends automatically.
The system turns off and the anten-
na retracts when you turn the igni-
tion switch to LOCK (0).
Adjust the volume by turning the
ON/VOL knob.
STEREO INDICATOR
ON/VOL KNOB
Select the band you want to listen
to by pressing the AM/FM button.
You will see the selected band and
the frequency in the display.
AM/FM BUTTON
ST will be displayed next to the fre- quency if the station is broadcast-
ing in FM stereo. The AM stereo
feature is not available.
CONTINUED
Comfort and Convenience FeaturesProCarManuals.comMain Menu Table of Contents s t
Page 78 of 225
Audio System (S)
You can use any of three methods
to find radio stations on the
selected band: TUNE, SEEK, or
the Preset buttons.
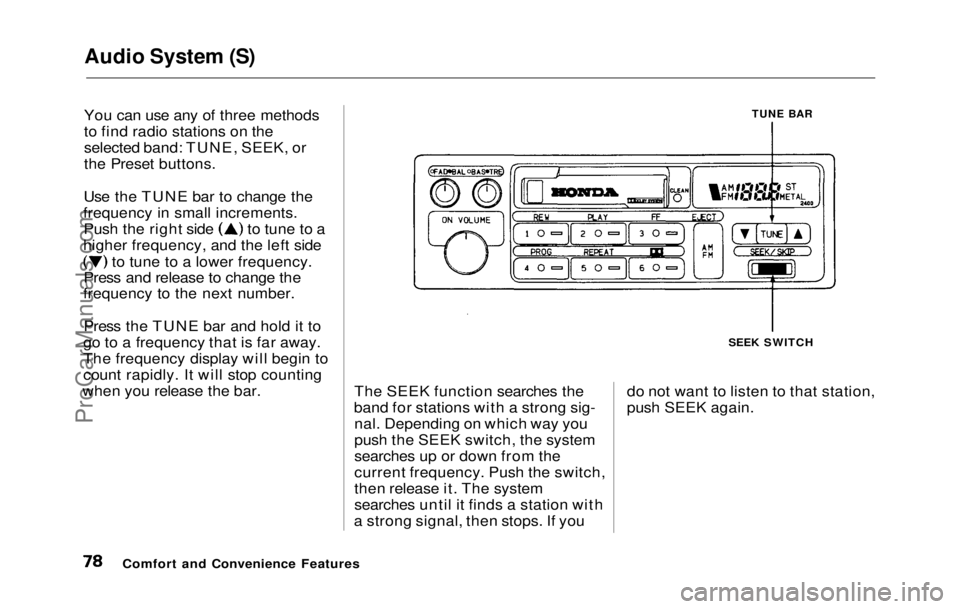
Use the TUNE bar to change the
frequency in small increments. Push the right side to tune to a
higher frequency, and the left side to tune to a lower frequency.
Press and release to change the
frequency to the next number.
Press the TUNE bar and hold it to
go to a frequency that is far away.
The frequency display will begin to
count rapidly. It will stop counting
when you release the bar.
TUNE BAR
The SEEK function searches the
band for stations with a strong sig- nal. Depending on which way you
push the SEEK switch, the system
searches up or down from the
current frequency. Push the switch,
then release it. The system
searches until it finds a station with
a strong signal, then stops. If you SEEK SWITCH
do not want to listen to that station,
push SEEK again.
Comfort and Convenience FeaturesProCarManuals.comMain Menu Table of Contents s t
Page 81 of 225
Audio System (S)
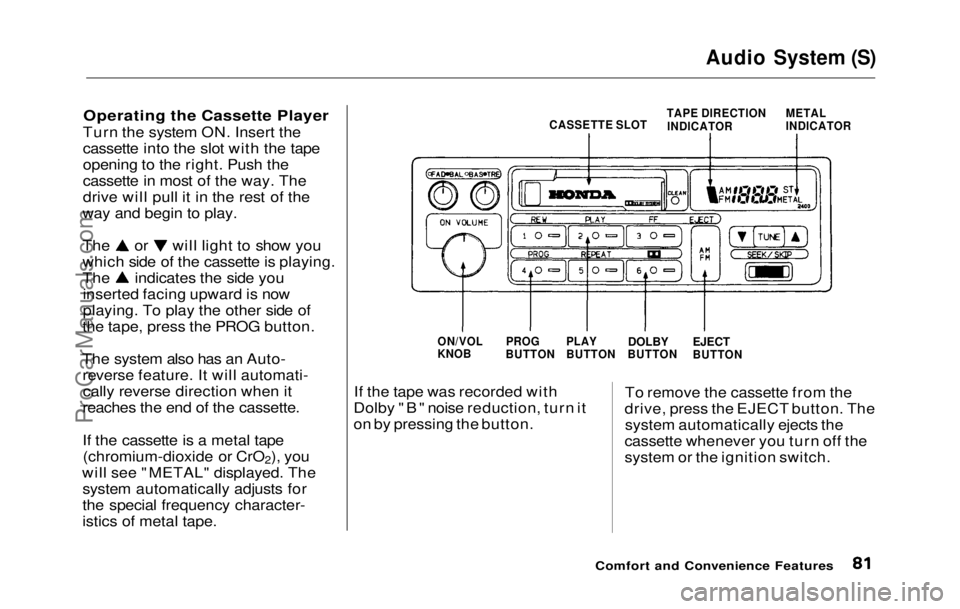
Operating the Cassette Player
Turn the system ON. Insert the
cassette into the slot with the tape
opening to the right. Push the
cassette in most of the way. The
drive will pull it in the rest of the
way and begin to play. The or will light to show you
which side of the cassette is playing.
The indicates the side you
inserted facing upward is now
playing. To play the other side of
the tape, press the PROG button.
The system also has an Auto- reverse feature. It will automati-cally reverse direction when it
reaches the end of the cassette.
If the cassette is a metal tape (chromium-dioxide or CrO 2), you
will see "METAL" displayed . The
system automaticall y
adjusts for
the special frequency character-
istics of metal tape. If the tape was recorded with
Dolby "B" noise reduction, turn it
on by pressing the button. To remove the cassette from the
drive, press the EJECT button. The system automatically ejects the
cassette whenever you turn off the
system or the ignition switch.
Comfort and Convenience Features
METAL
INDICATOR
TAPE DIRECTION
INDICATOR
CASSETTE SLOT
EJECT
BUTTON
DOLBY
BUTTON
PLAY
BUTTON
PROG
BUTTON
ON/VOL
KNOBProCarManuals.comMain Menu Table of Contents s t
Page 86 of 225
Audio System (Si, SR)
Operating the Radio
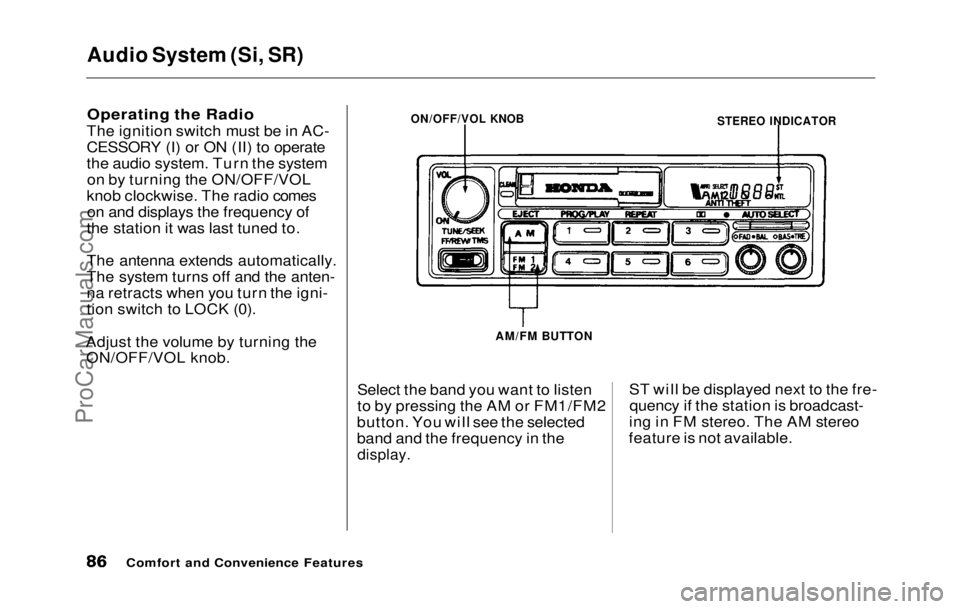
The ignition switch must be in AC-
CESSORY (I) or ON (II) to operate
the audio system. Turn the system on by turning the ON/OFF/VOL
knob clockwise. The radio comes on and displays the frequency of
the station it was last tuned to.
The antenna extends automatically.
The system turns off and the anten-
na retracts when you turn the igni-
tion switch to LOCK (0).
Adjust the volume by turning the ON/OFF/VOL knob.
Select the band you want to listen
to by pressing the AM or FM1/FM2
button. You will see the selected
band and the frequency in the
display.
ST will be displayed next to the fre-
quency if the station is broadcast-
ing in FM stereo. The AM stereo
feature is not available.
Comfort and Convenience Features
STEREO INDICATOR
ON/OFF/VOL KNOB
AM/FM BUTTONProCarManuals.comMain Menu Table of Contents s t
Page 89 of 225
Audio System (Si, SR)
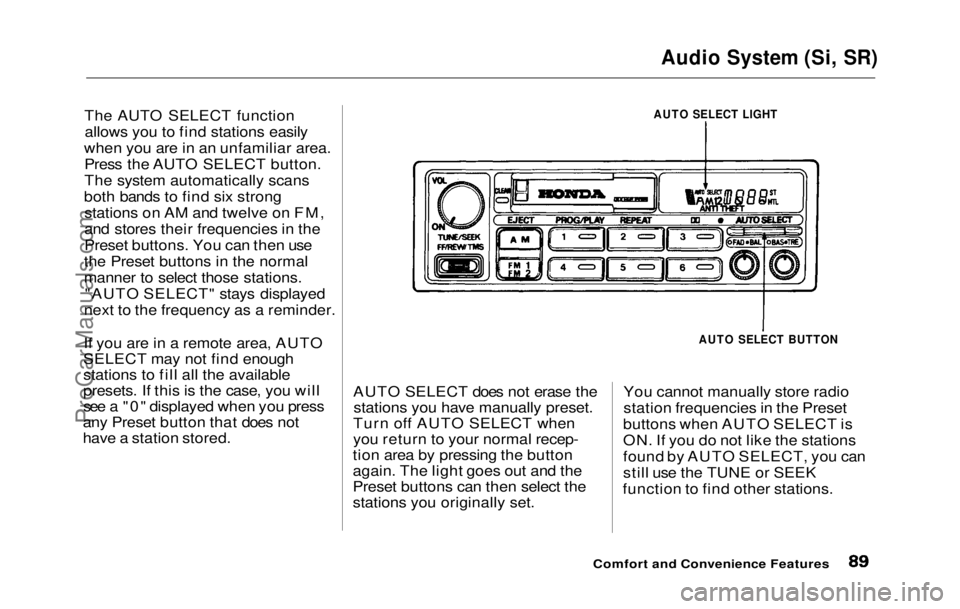
The AUTO SELECT function allows you to find stations easily
when you are in an unfamiliar area. Press the AUTO SELECT button.
The system automatically scans
both bands to find six strong stations on AM and twelve on FM,
and stores their frequencies in the
Preset buttons. You can then use
the Preset buttons in the normal
manner to select those stations. "AUTO SELECT" stays displayed
next to the frequency as a reminder.
If you are in a remote area, AUTO
SELECT may not find enough
stations to fill all the available
presets. If this is the case, you will
see a "0" displayed when you press
any Preset button that does not
have a station stored. AUTO SELECT does not erase the
stations you have manually preset.
Turn off AUTO SELECT when
you return to your normal recep-
tion area by pressing the button
again. The light goes out and the
Preset buttons can then select the
stations you originally set. You cannot manually store radio
station frequencies in the Preset
buttons when AUTO SELECT is
ON. If you do not like the stations
found by AUTO SELECT, you can
still use the TUNE or SEEK
function to find other stations.
Comfort and Convenience Features
AUTO SELECT LIGHT
AUTO SELECT BUTTONProCarManuals.comMain Menu Table of Contents s t
Page 91 of 225
Audio System (Si, SR)
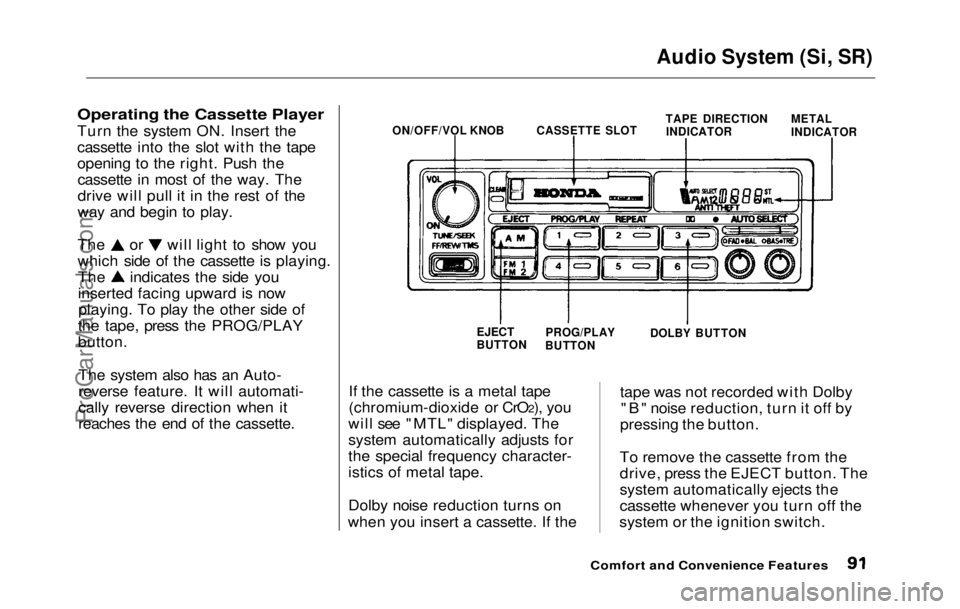
Operating the Cassette Player
Turn the
system ON. Insert the
cassette into the slot with the tape
opening to the right. Push the cassette in most of the way. The
drive will pull it in the rest of the
way and begin to play. The or will light to show you
which side of the cassette is playing.
The indicates the side you
inserted facing upward is now
playing. To play the other side of
the tape, press the PROG/PLAY
button.
The system also has an Auto-
reverse feature. It will automati-
cally reverse direction when it
reaches the end of the cassette. If the cassette is a metal tape
(chromium-dioxide or CrO2), you
will see "MTL" displayed. The
system automatically adjusts for
the special frequency character-
istics of metal tape.
Dolby noise reduction turns on
when you insert a cassette. If the tape was not recorded with Dolby
"B" noise reduction, turn it off by
pressing the button.
To remove the cassette from the
drive, press the EJECT button. The
system automatically ejects the
cassette whenever you turn off the
system or the ignition switch.
Comfort and Convenience Features
ON/OFF/VOL KNOB
CASSETTE SLOT
TAPE DIRECTION
INDICATOR METAL
INDICATOR
EJECT
BUTTON PROG/PLAY
BUTTON DOLBY BUTTONProCarManuals.comMain Menu Table of Contents s t
Page 92 of 225
Audio System (Si, SR)
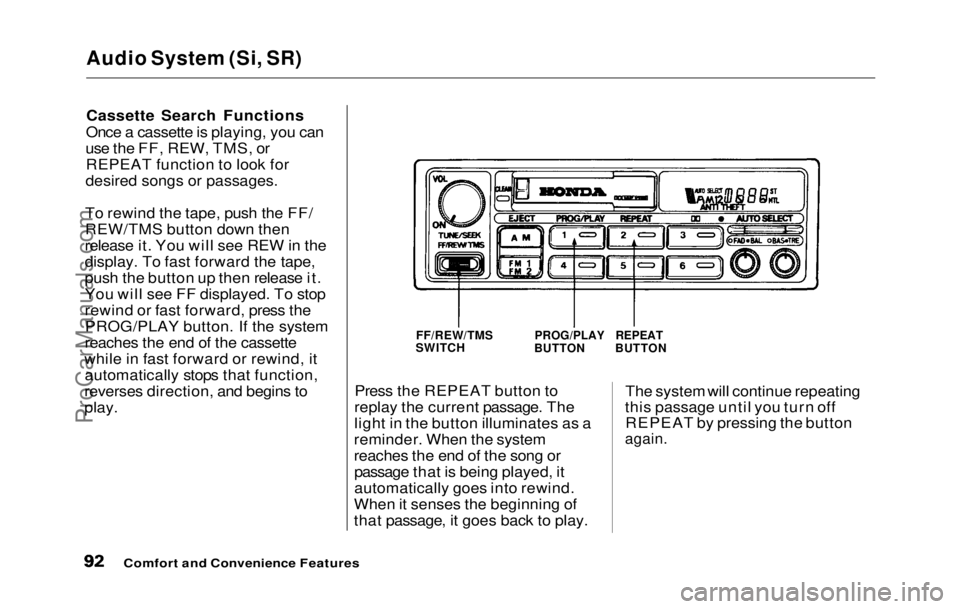
Cassette Search Functions
Once a cassette is playing, you can
use the FF, REW, TMS, or REPEAT function to look for
desired songs or passages.
To rewind the tape, push the FF/
REW/TMS button down then
release it. You will see REW in the
display. To fast forward the tape,
push the button up then release it.
You will see FF displayed. To stop
rewind or fast forward, press the PROG/PLAY button. If the system
reaches the end of the cassette
while in fast forward or rewind, it automatically stops that function,
reverses direction, and begins to
play. Press the REPEAT button to
replay the current passage. The
light in the button illuminates as a
reminder. When the system
reaches the end of the song or passage that is being played, it
automatically goes into rewind.
When it senses the beginning of
that passage, it goes back to play. The system will continue repeating
this passage until you turn off REPEAT by pressing the button
again.
Comfort and Convenience Features
FF/REW/TMS
SWITCH
PROG/PLAY
BUTTON
REPEAT
BUTTONProCarManuals.comMain Menu Table of Contents s t