windshield wipers HONDA PRELUDE 1992 Owners Manual
[x] Cancel search | Manufacturer: HONDA, Model Year: 1992, Model line: PRELUDE, Model: HONDA PRELUDE 1992Pages: 225, PDF Size: 2.1 MB
Page 29 of 225
Instruments and Controls
This section gives information
about the controls and displays that
contribute to the daily operation of
your Honda. All the essential
controls are within easy reach.
Control Locations......................... 30
Indicator Lights.............................. 31
Gauges............................................. 37
Speedometer
.............................
37
Tachometer................................. 37
Odometer
.................................... 37
Trip Meter................................... 37
Fuel Gauge..................................
38
Temperature Gauge
..................
38
Controls Near the
Steering
Wheel
....................................... 39
Headlights................................... 40
Daytime Running Lights.......... 40
Instrument Panel Brightness... 41
Turn Signals................................ 41
Windshield Wipers.....................
42
Windshield Washers.................
42
Steering Wheel Adjustment ....
. 43
Steering Wheel Controls............... 44
Cruise Control............................ 44
Horn ............................................ 47
Keys and Locks.............................. 47
Keys.............................................. 47
Ignition Switch........................... 47
Door Locks.................................. 48
Power Door Locks ..................... 48
Trunk.......................................... 50
Seat Adjustments........................... 51
Rear Seat Access........................ 52
Additional Driver' s
Seat
Adjustments...........................
53
Seat Heaters.................................... 54
Folding Rea r
Seat.......................... 55
Hazard Warning............................ 56
Rear Window Defogger ................ 56
Power Windows.............................. 57
Sunroof ...........................................
58
Mirrors ........................................... 59
Parking Brake................................ .
61
Glove Box........................................
.
62
Digital Clock..................................
.
63
Center Console Compartment .... 64
Vanity
Mirror
..............................
64
Cigarette Lighter
..........................
.
65
Ashtray........................................... 65
Interior Lights...............................
.
66
Instruments an
d
ControlsProCarManuals.comMain Menu s t
Page 39 of 225
Controls Near the Steering Wheel
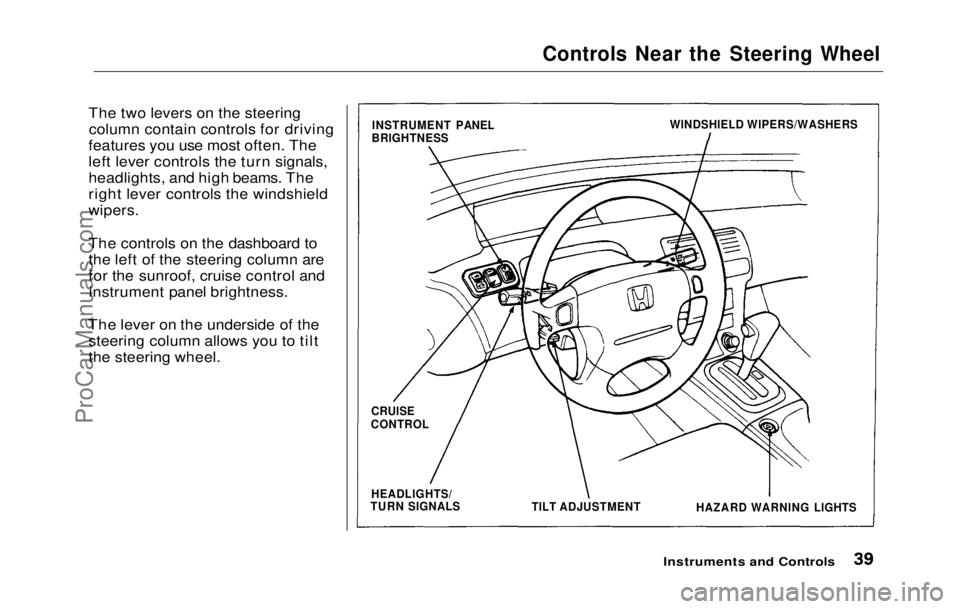
The two levers on the steering column contain controls for driving
features you use most often. The
left lever controls the turn signals,
headlights, and high beams. The
right lever controls the windshield
wipers.
The controls on the dashboard to
the left of the steering column are
for the sunroof, cruise control and instrument panel brightness.
The lever on the underside of the steering column allows you to tilt
the steering wheel.
Instruments and Controls
INSTRUMENT PANEL
BRIGHTNESS WINDSHIELD WIPERS/WASHERS
CRUISE
CONTROL
HEADLIGHTS/
TURN SIGNALS
TILT ADJUSTMENT
HAZARD WARNING LIGHTSProCarManuals.comMain Menu Table of Contents s t
Page 42 of 225
Controls Near the Steering Wheel
Windshield Wipers
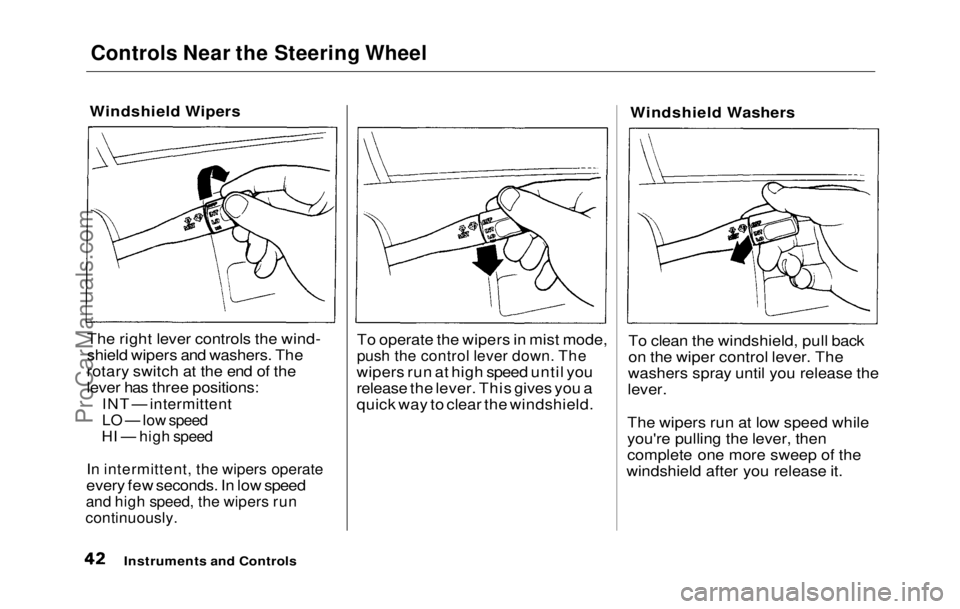
The right lever controls the wind-
shield wipers and washers. The
rotary switch at the end of the
lever has three positions:
INT — intermittent
LO — low speed
HI — high speed
In intermittent, the wipers operate
every few seconds. In low speed
and high speed, the wipers run
continuously.
To operate the wipers in mist mode,
push the control lever down. The
wipers run at high speed until you
release the lever. This gives you a
quick way to clear the windshield. Windshield Washers
To clean the windshield, pull back
on the wiper control lever. The
washers spray until you release the
lever.
The wipers run at low speed while
you're pulling the lever, then
complete one more sweep of the
windshield after you release it.
Instruments and ControlsProCarManuals.comMain Menu Table of Contents s t
Page 119 of 225

Driving in Bad Weather
Driving Technique — Always
drive slower than you would in dry
weather. It takes your car longer to react, even in conditions that may
seem just barely damp. Apply
smooth, even pressure to all the
controls. Abrupt steering wheel
movements or sudden, hard appli-
cation of the brakes can cause loss
of control in wet weather. Be extra
cautious for the first few miles of
driving while you adjust to the change in driving conditions. This
is especially true in snow. A person
can forget some snow-driving tech- niques during the summer months.
Practice is needed to relearn those
skills.
Exercise extra caution when
driving in rain after a long dry spell.
After months of dry weather, the
first rains bring oil to the surface of
the roadway, making it slippery. Visibility — Being able to see
clearly in all directions and being
visible to other drivers are impor-
tant in all weather conditions. This is more difficult in bad weather. To
be seen more clearly during day-
light hours, turn on your headlights.
Inspect your windshield wipers and
washers frequently. Keep the wind- shield washer reservoir full of the
proper fluid. Replace the wind-
shield wiper blades if they start to
streak the windshield or leave parts
unwiped. Use the defrosters and air conditioner to keep the windows
from fogging up on the inside (see
page 73).
Traction — Check your tires
frequently for wear and proper pressure. Both are important in
preventing "hydroplaning" (loss of
traction on a wet surface). In the
winter, mount snow tires on all four
wheels for the best handling.
Watch road conditions carefully, they can change from moment to
moment. Wet leaves can be as slip-
pery as ice. "Clear" roads can have
patches of ice. Driving conditions
can be very hazardous when the
outside temperature is near freez-
ing. The road surface can become
covered with areas of water pud-
dles mixed with areas of ice, so
your traction can change without
warning.
Be careful when downshifting. If
traction is low, you can lock up the
drive wheels for a moment and
cause a skid.
DrivingProCarManuals.comMain Menu Table of Contents s t
Page 125 of 225

Maintenance
Regularly maintaining your Honda
is the best way to protect your investment. You will be rewarded
with safer, more economical,
trouble-free driving. This section
lists items that need to be checked
regularly and explains how to check them. It also details some
simple maintenance tasks you can
do yourself. The maintenance
schedules for normal and severe
driving conditions show you when
these things need to be done.
If you are interested in how to per-
form more complex maintenance
on your Honda, you can purchase
the Service Manual. See page 221 for information on how to
obtain a copy, or see your Honda
dealer.
Maintenance Schedule................ 128
Maintenance Record................ 131
Periodic Checks............................ 133
Fluid Locations............................. 134
Engine Oil...................................... 135
Checking Engine Oil................ 135
Adding........................................ 135
Recommended Oil.................... 136
Additives.................................... 136 Oil and Filter Changes ............ 137
Cooling System............................. 139 Checking the Coolant Level... 139
Adding Radiator Coolant........ 139
Replacing Coolant.................... 140
Windshield Washers.................... 143
Transmission Oil.......................... 144
Automatic Transmission........ 144
5-speed Transmission.............. 145
Brake and Clutch Fluid............... 146
Brake System............................ 146
Anti-lock Brake System ......... 147 Clutch System........................... 147
Power Steering............................. 148
Air Filter....................................... 149
Fuel Filter..................................... 150
Spark Plugs.................................. .
150
Replacement.............................. 150
Specification.............................. 152
Battery............................................ 152
Windshield Wipers....................... 155
Air Conditioner............................. 157 Engine Belts.................................. 158
Tires................................................ 158 Inflation...................................... 158
Inspection................................... 159
Maintenance.............................. 160
Tire Rotation............................ 160
Replacing Tires ........................ 161
Wheels and Tires...................... 161
DOT Tire Quality Grading..... 161 Treadwear............................. 161
Traction................................. 162
Temperature......................... 162
Winter Driving.......................... 163 Snow Tires............................ 163
Tire Chains............................ 163
Lights.............................................. 164
Replacing Bulbs........................ 164
Storing Your Car.......................... 173
MaintenanceProCarManuals.comMain Menu s t
Page 153 of 225
Windshield Wipers
Check the condition of the wind-
shield wiper blades at least every
six months. Look for signs of crack- ing in the rubber, or areas that are
getting hard. Replace the blades if
you find these signs, or they leavestreaks and unwiped areas when
used.
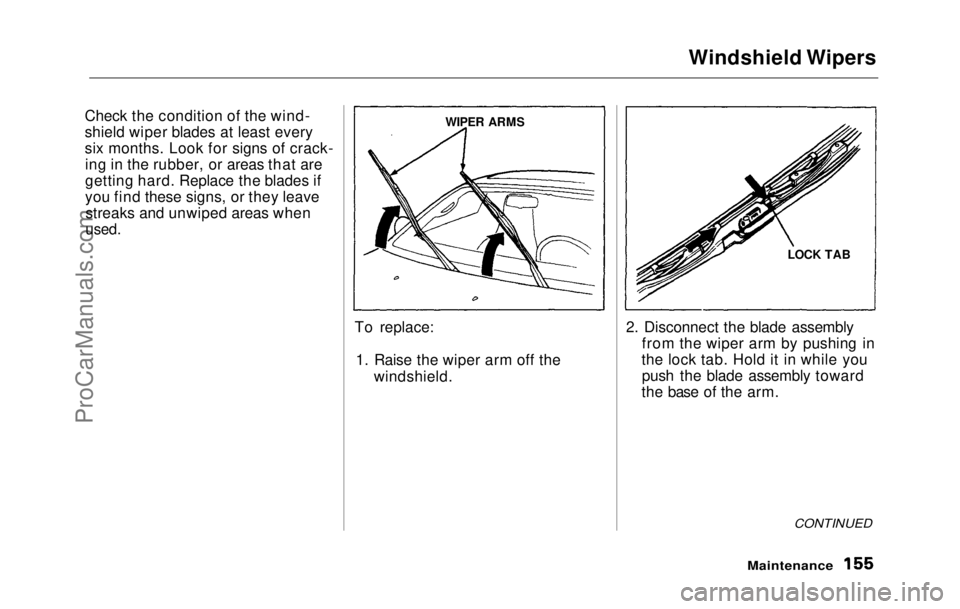
To replace:1. Raise the wiper arm off the windshield. 2. Disconnect the blade assembly
from the wiper arm by pushing in
the lock tab. Hold it in while you push the blade assembly toward
the base of the arm.
CONTINUED
Maintenance
WIPER ARMS
LOCK TABProCarManuals.comMain Menu Table of Contents s t
Page 154 of 225
Windshield Wipers
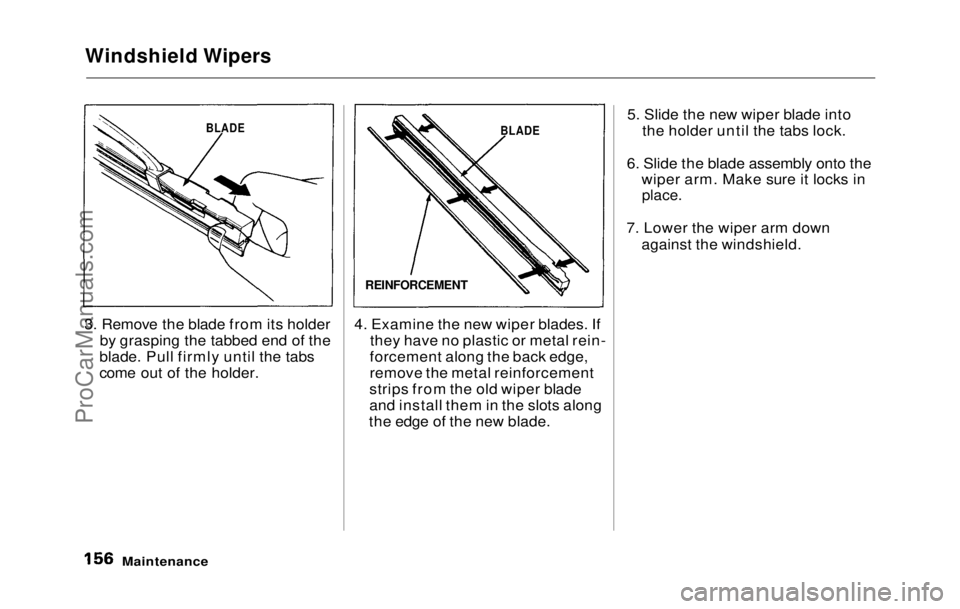
3. Remove the blade from its holder by grasping the tabbed end of the
blade. Pull firmly until the tabs
come out of the holder. 4. Examine the new wiper blades. If
they have no plastic or metal rein-
forcement along the back edge,
remove the metal reinforcement
strips from the old wiper blade
and install them in the slots along
the edge of the new blade. 5. Slide the new wiper blade into
the holder until the tabs lock.
6. Slide the blade assembly onto the wiper arm. Make sure it locks in
place.
7. Lower the wiper arm down against the windshield.
Maintenance
BLADE
REINFORCEMENT
BLADEProCarManuals.comMain Menu Table of Contents s t
Page 224 of 225
Index
Inflation...................................... 158
Inspection................................... 159
Replacing................................... 161
Rotating..................................... 160
Snow........................................... 163
Specifications............................
207
Tools, Tire
Changing ..................
185
Torn Seat
Belts................................. 9
Towing A Trailer....................................
121
Emergency Wrecher............... . 202
Transmission
Checking Flui
d Level,
Automatic..............................
144
Checking Flui d
Level,
5-speed....................................
145
Fluid Selection......................... .
144
Identification Number...........
.
204
Shifting th
e
Automatic ...........
112
Shifting th
e
5-speed.................
111
Treadwear..................................... 161
Trip Meter....................................... 37
Trunk
............................................... 50
Opening the................................ 50
Open Monito r
Light...................
35
Turn Signals.................................... 41
Underside, Cleaning...................
.
176
Unexpected, Takin
g
Care
of the...........................................
183
Uniform Tir e
Quality Grading.. 161
Unleaded Gasoline......................... 98
Upholstery Cleaning....................
179
Used Oil ,
How to Dispose of.......
138
Vanity Mirror.
................................ 64
Vehicle Capacit y
Load................
106
Vehicle Dimensions..................... 206
Vehicle Identification Number.. 204
Vehicle Storage...........................
.
173
Ventilation....................................... 7
1
VIN................................................
.
204
Vinyl Cleaning.............................
.
179
Viscosity, Oil................................
.
136
Warning Beepers
Key in Ignition...........................
. 47
Seat Belts..................................... 33
WARNING, Explanation of........... ii
Warning Labels, Location of........ 27
Warranty Coverages....................
216
Washer, Windshiel d
Checkin
g the Fluid Level.......
155
Operation..................................... 4
2
Washing.........................................
.
176
Waxing an
d
Polishing..................
177
Wheels
Adjusting th
e Steering.............. 43
Alignment and Balance........... 161 Compact Spare.......................... 184
Wrench.......................................
185
Windows Cleaning.....................................
180
Operating the
Power................. 57
Rear, Defogger........................... 56
Windshield
Cleaning....................................... 42
Defroster...................................... 74
Wipers, Windshield Changing Blades.......................
155
Operation..................................... 4 2
Wor
n Tires.....................................
159
Wrecker, Emergenc
y
Towing...
202
ProCarManuals.comMain Menu s t